
Popular categories
Looking for a yarn?


Comments / Questions (58)
![]() Minna Koskiranta wrote:
Minna Koskiranta wrote:
Hei, Olen tehnyt neuleesta n. 30 cm ruutupiirroksen 1 mukaisesti. Nyt pitäisi vaihtaa 2 ruutupiirrokseen. 1 kuvassa on mallikerrassa 13 silmukkaa ja 2 kuvassa mallikerrassa 15 silmukkaa. En nyt mitenkään saa onnistumaan näitä. Kuvaa on joskus korjattu niin lukee, mutta mikä siinä vielä on ettei onnistu? Ystävällisin terveisin Minna Koskiranta
07.07.2023 - 09:48DROPS Design answered:
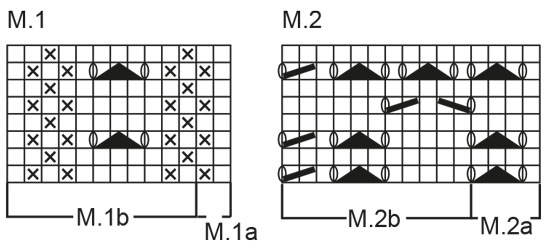
Ohjeeseen on tehty toinen korjaus: Neulo seur. krs näin: 5 s helmineuletta (= etureunus), M.1A, neulo 231 (253-275) s piirroksen M.1B mukaisesti, 5 s helmineuletta (= etureunus). Jatka tällä jaolla kunnes työ on 29-30-32 cm ja neulo sitten seur. krs näin: 5 s helmineuletta (= etureunus), M.2A, neulo 229 (251-273) s piirroksen M.2B mukaisesti, 5 s helmineuletta (= etureunus).
21.08.2023 - 16:50
![]() Pietschner Kordula wrote:
Pietschner Kordula wrote:
Sie haben das M2 Diagramm online korrigiert am 4.3.2022! Leider sehe ich keine Veränderung zu dem alten Diagramm. Können Sie mir bitte mitteilen was geändert wurde?
07.03.2022 - 19:24DROPS Design answered:
Liebe Frau Pietschner, aktualisieren die Seite/leeren Sie Cache/Cookies, so können Sie am besten das neue Diagram M.2 sehen. Viel Spaß beim stricken!
08.03.2022 - 11:00
![]() Pietschner Kordula wrote:
Pietschner Kordula wrote:
Hallo, ich habe diese schöne Jacke jetzt angefangen und bei dem Muster M 2 hapert es gewaltig! Das Muster sieht überhaupt nicht aus, wie auf dem Foto! Besonders die 5. Reihe passt überhaupt!
03.03.2022 - 12:14DROPS Design answered:
Liebe Pietschne, Diagram M.2 wurde korrigiert, danke für den Hinweis. Viel Spaß beim stricken!
04.03.2022 - 15:22
![]() Patricia wrote:
Patricia wrote:
Können Sie mir bitte mitteilen, ob das Muster M2 korrigiert worden ist? Ich habe in älteren Kommentaren gelesen, dass das angekündigt war. Aber bei den Online-Korrekturen ist das Muster nicht aufgeführt. Danke und viele Grüße Patricia
30.10.2021 - 08:17Patricia answered:
Gefunden! Mit den ersten neun Maschen von M2b enden, dann wird das Muster symmetrisch. Ich teste das jetzt und hoffe, es ist korrekt. Viele Grüße!
30.10.2021 - 08:55
![]() Daniela wrote:
Daniela wrote:
Guten Tag. Irgend etwas stimmt nicht mit dem Muster M2 b. Es hat viel zu viele Löcher und das Resultat sieht überhaupt nicht aus wie auf dem Bild. In den Kommentaren sehe ich, dass viele das gleiche Problem haben. Gibt es ein neues Strichmuster? Vielen Dank für Ihre Antwort.
05.08.2021 - 08:26
![]() Orna Smith wrote:
Orna Smith wrote:
Sorry, in my former question. I said "slash" was Purl, I should have said "X" was Purl. Sorry. Lots of your other patterns say to switch on reverse, but this one doesn't. In looking at projects on Ravelry, I can see people have done it both ways! Hope you will clarify.
13.07.2021 - 20:35DROPS Design answered:
Dear Orna, pplease note that this is an older pattern of ours, and patterns were written somewhat differently back then. However, the diagrams always show every row as they seen from the right side. So if you see a stitch that looks like a knit stitch from the RS, but yoou are doing it from the WS, you should purl it. I hope that helps. Happy Stitching!
13.07.2021 - 21:05
![]() Orna Smith wrote:
Orna Smith wrote:
Your stitch directions the square is Knit and "slash" is Purl. It says nothing about reversing to Purl and Knit on wrong side. Nevertheless, I can see in the photos, at least on pattern 3, that is the case, there are 5 stitch columns of stockinette stitch. SO, Is that the case throughout? M1, on the other hand, looks like columns of seed stitch in picture, But following strict instructions would give you stockinette columns. Please clarify.
13.07.2021 - 18:21DROPS Design answered:
Dear Orna, the diagrams always show every row as they seen from the right side. Do if you see a stitch that looks like a knit stitch from the RS, but yoou are doing it from the WS, you should purl it. I hope that helps. Happy Stitching!
13.07.2021 - 21:04
![]() Sonja wrote:
Sonja wrote:
Guten Abend, ist das Muster mittlerweile richtig dargestellt oder muss ich beim stricken der Jacke etwas beachten? Auf den ersten Blick scheint es nicht so als wären die Muster symmetrisch. Liebe Grüße von Sonja
28.06.2021 - 22:27DROPS Design answered:
Liebe Sonja, Anleitung drucken Sie am besten wieder wenn Sie sie schon vor den Korrekturdaten gedruckt hatten, sonnst stimmen so Diagramme und Muster wird symetrisch sein. Viel Spaß beim stricken!
29.06.2021 - 08:58
![]() Susan Price wrote:
Susan Price wrote:
I have noticed that several people have the same problem as I, which is that the pattern grids for 2a and 2b do not generate the same pattern as the photos on Ravelry. You have provided the same answer to all of these questions, but it is still not corrected. I have knit 16 rows of the pattern as noted above and I would like to send you a picture of the resulting garment. It does not match the photos (which are quite lovely). Please provide your email and I will send it to you with my proposal.
20.06.2021 - 07:36DROPS Design answered:
Dear Mrs Price, pattern M.2 is worked as follows: start with M.2A (= 5 sts), then repeat M.2B (20-22-24 times over the next 220-242-264sts) and finish with the first 9 sts in M.2B (= 229-251-273 sts worked with M.2B and the pattern is symetrical). Hope this will help. Please send the picture to your store, they will be able to provide you any further personnal assistance, even per mail or telephone. Happy knitting!
21.06.2021 - 07:44
![]() Manuela Schwarzer wrote:
Manuela Schwarzer wrote:
Liebes Drops Team, Vielen Dank für die schnelle Antwort. Ich werde es gleich mal versuchen :-)
20.04.2021 - 07:31
|
|||||||||||||||||||
Beach Love |
|||||||||||||||||||
|
|
|||||||||||||||||||
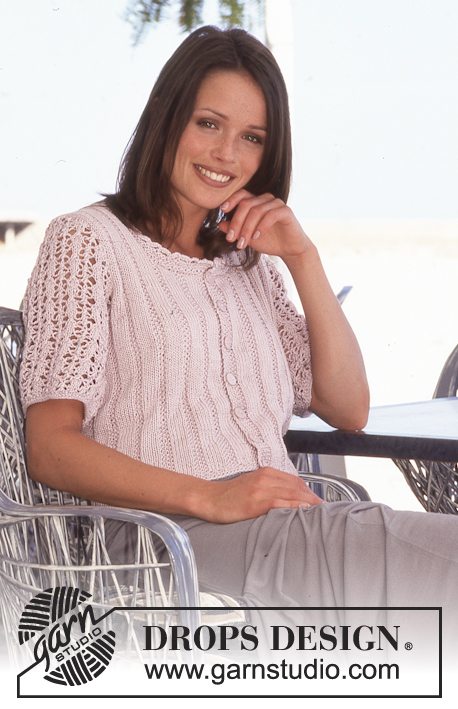
DROPS Cardigan in Muskat.
DROPS 60-16 |
|||||||||||||||||||
|
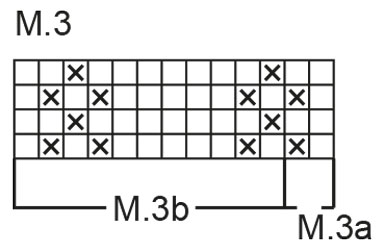
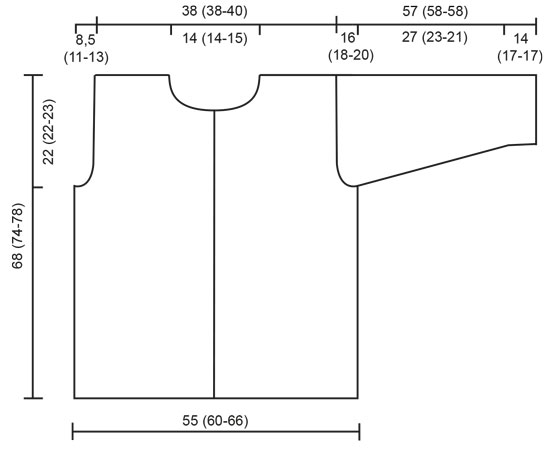
Gauge: 21 sts x 28 rows in stockinette st = 10 x 10 cm [4" x 4"]. Garter st, when knitting flat: Knit all sts, all rows. Pattern: See chart (1 chart = 1 repeat). The pattern is seen from the right side. Buttonholes: Make buttonholes on the right front as follows: bind off the 3rd and 4th sts and cast on 2 new sts over the bound-off sts on the next row when the work measures: 29 (30-32) cm [11⅛" (11.75" - 12⅝")] 34 (34.5-37) cm [13⅜" (13⅝" - 14.5")] 39 (39.5-42) cm [15.25" (15.5" - 16.5")] 44 (44-47) cm [17.25" (17.25" - 18.5")] 49 (49-52) cm [19.25" (19.25" - 20.5")] 54 (53.5-57) cm [21.25" (21" - 22.5")] -- (58-62) cm [-- (22⅞" - 24⅜")] Seed stitch (on an even number of sts): Row 1: * K 1, P 1* Row 2: * P 1, K 1* Seed stitch (on an odd number of sts): All rows: K 1, *P 1, K 1* Seed stitch (worked in the round): Row 1: * knit 1, purl 1 * Row 2: * knit the purl sts from the previous row and purl the knit sts from the previous row * Body: Cast on 243 (265-287) sts (this includes 5 sts at each side for the button band). Knit 2 rows garter st, then 3 rows seed st. On the next row establish the pattern as follows: 5 sts seed st (button band), Pattern 1A, 231 (253-275) sts in Pattern 1B, 5 sts seed st (button band). Continue in pattern as established until the work measures 29 (30-32) cm [11⅜" (11.75" - 12⅝")], then establish the pattern on the next row as follows: 5 sts seed st (button band), Pattern 2A, 229 (251-273) sts in Pattern 2B, 5 sts seed st (button band). Continue in pattern as established -- make buttonholes on the right front (see instructions above) until the work measures 43 (47-49) cm [16⅞" (17.25" - 19.25")] - adjust for complete pattern. On the next row establish the pattern as follows: 5 sts seed st (button band), Pattern 3A, 231 (253-275) sts in Pattern 3B, 5 sts seed st (button band). Continue in pattern as established to finished dimensions. At the same time, when the work measures 46 (52-55) cm [18⅛" (20.5" - 21⅝")] knit the next row as follows: 59 (65-70) sts for the front, bind off 8 sts for armhole, 109 (119-131) sts for the back, bind off 8 sts for armhole, 59 (65-70) sts for the front. Knit the rest of each part separately. Front: = 59 (65-70) sts. Bind off for armholes every other row: 3 sts 3 (4-4) times, 2 sts 2 (3-5) times, dec 1 st 2 times = 44 (45-46) sts. On the row after the last buttonhole - when the work measures 54 (58-62) cm [21.25" (22⅞" - 24⅜")] - bind off for the neck every other row: 10 (11-11) sts 1 time, 3 sts 1 time, 2 sts 2 times, 1 st 2 times. Bind off when the work measures 68 (74-78) cm [26.75" (29⅛" - 30.75")]. Back: = 109 (119-131) sts. Bind off for armholes as on the front = 79 (79-83) sts. When the work measures 66 (72-76) cm [26" (28.25" - 29⅞")] bind off the center 25 (25-27) sts for the neck. Bind off 2 sts at each neck edge on the next row. Bind off when the work measures 68 (74-78) cm [26.75" (29⅛" - 30.75")]. Sleeves: Cast on 59 (59-59) sts and knit 2 rows garter st, then 3 rows seed st. On the next row establish the pattern as follows: K 1 (edge st knit in garter st throughout), Pattern 2A, 53 (53-53) sts in Pattern 2B, K 1 (edge st knit in garter st throughout). Continue in pattern as established until the work measures 14 (17-17) cm [5.5" (6.75" - 6.75")] - adjust for complete pattern. On the next row establish the pattern as follows: K 1 (edge st knit in garter st throughout), Pattern 3A, 55 sts in Pattern 3B, K 1 (edge st knit in garter st throughout). Continue in pattern as established and at the same time inc 1 st at each side (inside the edge st) 15 (15-16) times: Size S: alternately every 4th and 5th row Size M/L: alternately every 3rd and 4th row Size XL: every 3rd row = 89 (89-91) sts. Knit the increased sts into the Pattern as you go along. When the work measures 41 (40-38) cm [16⅛" (15.75" - 14⅞")] bind off for sleeve caps at each side every other row: 3 sts 2 (1-1) times, 2 sts 2 times, 1 st 15 (19-22) times, 2 sts 2 (3-2) times, 3 sts 2 (1-1) times, bind off. The work measures approx. 57 (58-58) cm [22.5" (22⅞" - 22⅞")]. Assembly: Sew shoulder seams. Pick up approx. 115-125 sts around the neck and knit 3 rows seed st, then 2 rows garter st, bind off. Sew sleeve seams. Crochet border: Crochet borders around the body, along the button bands, around the neck and around the sleeves as follows: 1st row: 1 single crochet (sc), * ch 4, skip over approx. 1.5 cm [⅝"], 1 sc *, repeat * - * 2nd row: 4 sc around every ch st loop, 1 sc in the sc from the previous row. Sew on the sleeves and the buttons. |
|||||||||||||||||||
Diagram explanations |
|||||||||||||||||||
|
|||||||||||||||||||
 |
|||||||||||||||||||
 |
|||||||||||||||||||
 |
|||||||||||||||||||
Have you finished this pattern?Tag your pictures with #dropspattern or submit them to the #dropsfan gallery. Do you need help with this pattern?You'll find 26 tutorial videos, a Comments/Questions area and more by visiting the pattern on garnstudio.com. © 1982-2026 DROPS Design A/S. We reserve all rights. This document, including all its sub-sections, has copyrights. Read more about what you can do with our patterns at the bottom of each pattern on our site. |
|||||||||||||||||||


With over 40 years in knitting and crochet design, DROPS Design offers one of the most extensive collections of free patterns on the internet - translated to 17 languages. As of today we count 324 catalogs and 12290 patterns - 12280 of which are translated into English (US/in).
We work hard to bring you the best knitting and crochet have to offer, inspiration and advice as well as great quality yarns at incredible prices! Would you like to use our patterns for other than personal use? You can read what you are allowed to do in the Copyright text at the bottom of all our patterns. Happy crafting!
Post a comment to pattern DROPS 60-16
We would love to hear what you have to say about this pattern!
If you want to leave a question, please make sure you select the correct category in the form below, to speed up the answering process. Required fields are marked *.