
Popular categories
Looking for a yarn?


Comments / Questions (58)
![]() Romi wrote:
Romi wrote:
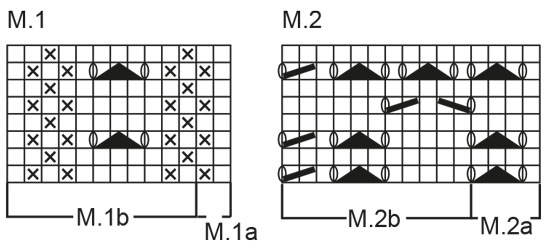
I am having trouble with the M2 diagram. I am knitting size M/L and 2B consists of 11 sts but 251 divided by 11 is 22,81 so my stitch count doesn't even out. Fix the problem, please.
23.04.2026 - 03:04DROPS Design answered:
Hi Romi, Working M.2B across 251 stitches means that you work 22 repeats of M.2B, then work the first 9 stitches in the diagram before working the band-stitches. Regards, Drops Team.
23.04.2026 - 06:01
![]() Agneta wrote:
Agneta wrote:
Jag stickar i storlek xl i Muskat. Jag beställde 1000 gr. Rätt stickfasthet. Till ärmarna har det gått åt något mindre än fem nystan. Nu på bålen räckte det 6e nystanet endast till fem cm. Med den utgången så räcker garnet ju endast till ca 25 ca på bålen. Vad gör jag för fel?
22.03.2026 - 09:27
![]() Eva wrote:
Eva wrote:
Die Anleitung war 1 Herausforderung für mich obwohl ich nur nach Anleitung stricke. Ergebnis ist sehr schön geworden
15.02.2026 - 18:43
![]() Susan wrote:
Susan wrote:
I ordered 800g for the small size, and I've already used 200 for only 8" on the body. I don't think I'll have nearly enough to finish. Does anyone who has made this sweater have advice about the amount? (I'm using the cotton/linen blend.)
15.06.2025 - 14:11DROPS Design answered:
Dear Susan, 800gr is for DROPS Muskat, 50g = 100m. If you use another yarn you will need to calculate the amount of yarn necessary, since the yardage is different. You will need approx. 3 more balls of DROPS Bomul-lin, since you need approx. 950gr of the yarn. Happy knitting!
16.06.2025 - 00:38
![]() Ruth wrote:
Ruth wrote:
What size are the buttons? I can't find the Drop buttons listed, but maybe I could find a substitute if I knew the size. I would like to buy them before starting the pattern.
11.04.2025 - 23:08DROPS Design answered:
Hi Ruth! It is better to finish the garment first and then find buttons that fit best. Happy knitting!
12.04.2025 - 18:09
![]() Claudia Barth wrote:
Claudia Barth wrote:
Hallo liebes Drops Team, ich stoße bei dieser Anleitung an meine Grenzen (habe schon viel nach euren Anleitungen gestrickt). Nach den 3 Reihen Perlmuster am Anfang soll man M1aüber 13 Maschen stricken, danach gehts weiter mit dem Rapport M1b über 11 Maschen , das verschiebt sich doch und der Rapport ist mit 11 Maschen auch nicht symmetrisch. Würde mich über Antwort freuen LG C. Barth
14.08.2024 - 09:09
![]() Michelle Nivison wrote:
Michelle Nivison wrote:
Hi yes, number of stitches match but pattern /stripes in pattern do not line up on shoulders
09.08.2024 - 21:45
![]() Michelle Nivison wrote:
Michelle Nivison wrote:
Hi can you help, is it correct that the shoulder seam pattern does to match/ line up. If not correct, where could I have gone wrong
08.08.2024 - 22:04DROPS Design answered:
Dear Mrs Nivison, pattern should fit on shoulders, make sure you cast off the same number of stitches for both armholes on front and back piece. Happy knitting!
09.08.2024 - 07:34
![]() Maria wrote:
Maria wrote:
Buenos dias. En el cuerpo del patrón al inicio de la labor nos dice trabajar 1 pliegue y después 3 filas de arroz. ¿A qué se refiere con trabajar un pliegue?, ¿A una fila de pliegues cada 10 puntos como he visto en algunos de sus vídeos?. Muchas Gracias y perdón por las molestias
02.07.2024 - 13:07DROPS Design answered:
Hola Maria, puedes encontrar la explicación de pliegue en la parte superior del patrón. Pliegue/ Punto musgo: 1 pliegue = 2 filas de derecho. Por lo tanto, si tienes que trabajar 1 pliegue trabajas 2 filas de derecho.
07.07.2024 - 22:31
![]() Brigitte wrote:
Brigitte wrote:
Also ich stricke seit 50 Jahren und jetzt seit ca. 8 Jahren Modelle von drops design, aber diese Anleitung ist nicht zum stricken geeignet. Die Muster passen nicht zusammen, die Maschenangaben sind falsch oder einfach nur falsch erklärt und in den Kommentaren findet.man nur Antworten die nichts erklären. Dieses Modell kann ich absolut nicht weiterempfehlen . Sorry aber das nächste Mal vielleicht während dem Stricken die Anleitung schreiben.
20.06.2024 - 16:15
|
|||||||||||||||||||
Beach Love |
|||||||||||||||||||
|
|
|||||||||||||||||||
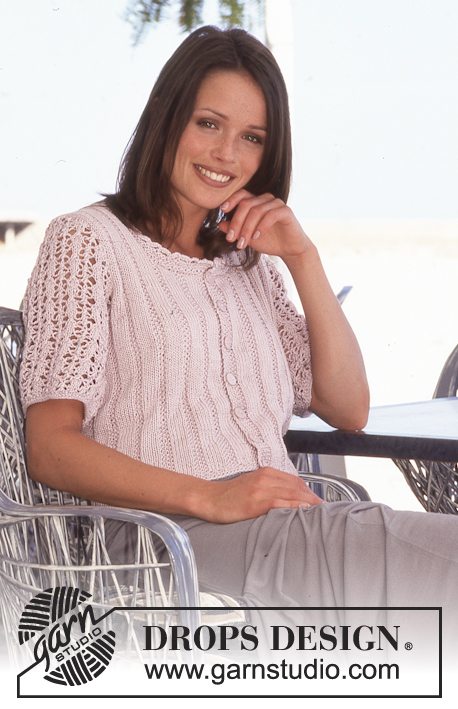
DROPS Cardigan in Muskat.
DROPS 60-16 |
|||||||||||||||||||
|
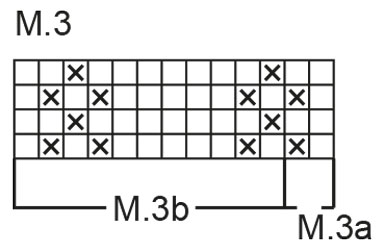
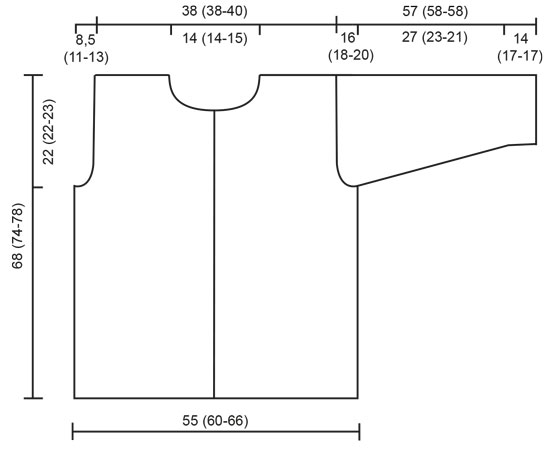
Gauge: 21 sts x 28 rows in stockinette st = 10 x 10 cm [4" x 4"]. Garter st, when knitting flat: Knit all sts, all rows. Pattern: See chart (1 chart = 1 repeat). The pattern is seen from the right side. Buttonholes: Make buttonholes on the right front as follows: bind off the 3rd and 4th sts and cast on 2 new sts over the bound-off sts on the next row when the work measures: 29 (30-32) cm [11⅛" (11.75" - 12⅝")] 34 (34.5-37) cm [13⅜" (13⅝" - 14.5")] 39 (39.5-42) cm [15.25" (15.5" - 16.5")] 44 (44-47) cm [17.25" (17.25" - 18.5")] 49 (49-52) cm [19.25" (19.25" - 20.5")] 54 (53.5-57) cm [21.25" (21" - 22.5")] -- (58-62) cm [-- (22⅞" - 24⅜")] Seed stitch (on an even number of sts): Row 1: * K 1, P 1* Row 2: * P 1, K 1* Seed stitch (on an odd number of sts): All rows: K 1, *P 1, K 1* Seed stitch (worked in the round): Row 1: * knit 1, purl 1 * Row 2: * knit the purl sts from the previous row and purl the knit sts from the previous row * Body: Cast on 243 (265-287) sts (this includes 5 sts at each side for the button band). Knit 2 rows garter st, then 3 rows seed st. On the next row establish the pattern as follows: 5 sts seed st (button band), Pattern 1A, 231 (253-275) sts in Pattern 1B, 5 sts seed st (button band). Continue in pattern as established until the work measures 29 (30-32) cm [11⅜" (11.75" - 12⅝")], then establish the pattern on the next row as follows: 5 sts seed st (button band), Pattern 2A, 229 (251-273) sts in Pattern 2B, 5 sts seed st (button band). Continue in pattern as established -- make buttonholes on the right front (see instructions above) until the work measures 43 (47-49) cm [16⅞" (17.25" - 19.25")] - adjust for complete pattern. On the next row establish the pattern as follows: 5 sts seed st (button band), Pattern 3A, 231 (253-275) sts in Pattern 3B, 5 sts seed st (button band). Continue in pattern as established to finished dimensions. At the same time, when the work measures 46 (52-55) cm [18⅛" (20.5" - 21⅝")] knit the next row as follows: 59 (65-70) sts for the front, bind off 8 sts for armhole, 109 (119-131) sts for the back, bind off 8 sts for armhole, 59 (65-70) sts for the front. Knit the rest of each part separately. Front: = 59 (65-70) sts. Bind off for armholes every other row: 3 sts 3 (4-4) times, 2 sts 2 (3-5) times, dec 1 st 2 times = 44 (45-46) sts. On the row after the last buttonhole - when the work measures 54 (58-62) cm [21.25" (22⅞" - 24⅜")] - bind off for the neck every other row: 10 (11-11) sts 1 time, 3 sts 1 time, 2 sts 2 times, 1 st 2 times. Bind off when the work measures 68 (74-78) cm [26.75" (29⅛" - 30.75")]. Back: = 109 (119-131) sts. Bind off for armholes as on the front = 79 (79-83) sts. When the work measures 66 (72-76) cm [26" (28.25" - 29⅞")] bind off the center 25 (25-27) sts for the neck. Bind off 2 sts at each neck edge on the next row. Bind off when the work measures 68 (74-78) cm [26.75" (29⅛" - 30.75")]. Sleeves: Cast on 59 (59-59) sts and knit 2 rows garter st, then 3 rows seed st. On the next row establish the pattern as follows: K 1 (edge st knit in garter st throughout), Pattern 2A, 53 (53-53) sts in Pattern 2B, K 1 (edge st knit in garter st throughout). Continue in pattern as established until the work measures 14 (17-17) cm [5.5" (6.75" - 6.75")] - adjust for complete pattern. On the next row establish the pattern as follows: K 1 (edge st knit in garter st throughout), Pattern 3A, 55 sts in Pattern 3B, K 1 (edge st knit in garter st throughout). Continue in pattern as established and at the same time inc 1 st at each side (inside the edge st) 15 (15-16) times: Size S: alternately every 4th and 5th row Size M/L: alternately every 3rd and 4th row Size XL: every 3rd row = 89 (89-91) sts. Knit the increased sts into the Pattern as you go along. When the work measures 41 (40-38) cm [16⅛" (15.75" - 14⅞")] bind off for sleeve caps at each side every other row: 3 sts 2 (1-1) times, 2 sts 2 times, 1 st 15 (19-22) times, 2 sts 2 (3-2) times, 3 sts 2 (1-1) times, bind off. The work measures approx. 57 (58-58) cm [22.5" (22⅞" - 22⅞")]. Assembly: Sew shoulder seams. Pick up approx. 115-125 sts around the neck and knit 3 rows seed st, then 2 rows garter st, bind off. Sew sleeve seams. Crochet border: Crochet borders around the body, along the button bands, around the neck and around the sleeves as follows: 1st row: 1 single crochet (sc), * ch 4, skip over approx. 1.5 cm [⅝"], 1 sc *, repeat * - * 2nd row: 4 sc around every ch st loop, 1 sc in the sc from the previous row. Sew on the sleeves and the buttons. |
|||||||||||||||||||
Diagram explanations |
|||||||||||||||||||
|
|||||||||||||||||||
 |
|||||||||||||||||||
 |
|||||||||||||||||||
 |
|||||||||||||||||||
Have you finished this pattern?Tag your pictures with #dropspattern or submit them to the #dropsfan gallery. Do you need help with this pattern?You'll find 26 tutorial videos, a Comments/Questions area and more by visiting the pattern on garnstudio.com. © 1982-2026 DROPS Design A/S. We reserve all rights. This document, including all its sub-sections, has copyrights. Read more about what you can do with our patterns at the bottom of each pattern on our site. |
|||||||||||||||||||


With over 40 years in knitting and crochet design, DROPS Design offers one of the most extensive collections of free patterns on the internet - translated to 17 languages. As of today we count 324 catalogs and 12290 patterns - 12280 of which are translated into English (US/in).
We work hard to bring you the best knitting and crochet have to offer, inspiration and advice as well as great quality yarns at incredible prices! Would you like to use our patterns for other than personal use? You can read what you are allowed to do in the Copyright text at the bottom of all our patterns. Happy crafting!
Post a comment to pattern DROPS 60-16
We would love to hear what you have to say about this pattern!
If you want to leave a question, please make sure you select the correct category in the form below, to speed up the answering process. Required fields are marked *.