
Popular categories
Looking for a yarn?


Comments / Questions (97)
![]() Ribault Martine wrote:
Ribault Martine wrote:
Bonjour, désolé 🙏 de vous inonder de questions pour la réalisation de ce modèle. J\'ai une dernière question concernant les augmentations. Est ce qu\'il faut utiliser la technique de la vidéo \"Comment augmenter avec le fil du rang précédent\"? Merci pour l\'ensemble des réponses que vous voudrez bien apporter aux questions que je vous ai posées depuis le 18 juin et restées sans réponses pour l\'instant. Cdlt Ribault
20.06.2020 - 18:31DROPS Design answered:
Bonjour Mme Ribault, vous pouvez également augmenter de cette façon, tout à fait, essayez si elle vous convient mieux ainsi. Rappelez-vous que pour toute assistance personnalisée (et plus rapide), vous pouvez directement vous adresser à votre magasin, même par mail ou téléphone. Bon tricot!
22.06.2020 - 08:20
![]() Ribault Martine wrote:
Ribault Martine wrote:
Bonjour, Je rencontre des difficultés pour les augmentations après la bordure des 3 rang au point de riz. Tout de suite après continuer avec le point fantaisie & de suite faire les 1ère augmentations : 1 m de chaque côté de chaque marqueur, 4 fois tous les 5 cm (208 m Taille M). A partir de quelle m JERSEY je fais la 1ère, 2ème 3ème & 4ème augmentation d'après le détail de vos dernières explications du diagramme Taille M ? Merci pour votre réponse. Cdlt Ribault
20.06.2020 - 18:23DROPS Design answered:
Bonjour Mme Ribault, placez un marqueur de chaque côté = 1 au début du tour + 1 après la moitié des mailles, et tricotez vos augmentations ainsi: 1 augmentation, marqueur, maille du début du tour/moitié du tour, 1 augmentation. Tricotez ensuite vos augmentations de sorte que le motif soit toujours une alternance de 5 m jersey/3 m point de riz. - gardez la maille sur le côté en jersey. Bon tricot!
22.06.2020 - 08:19
![]() Ribault Martine wrote:
Ribault Martine wrote:
Bonjour, au vu des difficultés rencontrées pour faire les augmentations et tout en continuant le point fantaisie, est-ce qu'il serait possible de m'envoyer par mail l'ensemble du diagramme Taille M avec augmentations de chaque côté, de chaque marqueur ? Ce serait plus facile de visualiser l'emplacement des augmentations tous les 5 cm. Je rappelle que je n'ai jamais tricoté en rond et donc pour les augmentations ça quoince ! Merci pour votre réponse. Cdlt Ribault
20.06.2020 - 18:18DROPS Design answered:
Bonjour Mme Ribault, nous n'avons pas d'autre diagramme que celui que vous avez à votre disposition. Mesurez 5 cm sur votre ouvrage pour compter le nombre de tours/rangs correspondant et prenez ce nombre en base pour vos augmentations. Tricotez les augmentations de sorte que le motif soit en continu sur le devant/le dos - sur les côtés, le motif ne pourra plus tomber juste, c'est normal. Bon tricot!
22.06.2020 - 08:17
![]() Ribault Martine wrote:
Ribault Martine wrote:
Bonjour, Je rencontre des difficultés pour les augmentations après la bordure des 3 rang au point de riz. Tout de suite après continuer avec le point fantaisie & de suite faire les 1ère augmentations : 1 m de chaque côté de chaque marqueur, 4 fois tous les 5 cm (208 m Taille M). A partir de quelle m JERSEY je fais la 1ère, 2ème 3ème & 4ème augmentation d'après le détail de vos dernières explications du diagramme Taille M ? Merci pour votre réponse. Cdlt Ribault
20.06.2020 - 18:05DROPS Design answered:
Bonjour Mme Ribault, vous pouvez augmenter de chaque côté d'une maille sur les côtés par ex: 1 augm, 1 m, 1 augm. Tricotez les nouvelles mailles côté devant et dos de sorte que le motif continue sur le devant/le dos, mais ils ne se suivront naturellement plus sur les côtés. Bon tricot!
22.06.2020 - 08:14
![]() Ribault Martine wrote:
Ribault Martine wrote:
Bonjour, j'ai reproduit dans son ensemble le diagramme sur une feuille quadrillée pour la taille M, d'après vos dernières explications. J'ai constaté qu'il y avait x11 motif complet et 1 motif sur les 7 1ères m du 1er rang. Est-ce exact ? Donc 12 motif du point fantaisie pour le devant (95 m) en tout. Et x12 motif complet pour le dos (=97 m). Je vous remercie de bien vouloir me confirmer si j'ai compris vos explications. Cdlt Ribault
20.06.2020 - 01:37DROPS Design answered:
Bonjour Mme Ribault, tout à fait, vous avez obtenu la description de la réponse du 18.06. Bon tricot!
22.06.2020 - 07:35
![]() Ribault Martine wrote:
Ribault Martine wrote:
Bonjour, dans vos dernières explications vous dite que le diagramme se tricote sur 8 m. Rang 1 : 3 m end, 1 m env, 1 m end, 1 m env, 2 m end et ainsi de suite pour le rang 2. Pour la taille M, pouvez vous me donner le détail s\'il vous plaît ? Je ne sais pas par quoi commencer, 1 m end /1m env. Merci pour votre réponse. Cdlt. Ribault Martine
18.06.2020 - 00:46DROPS Design answered:
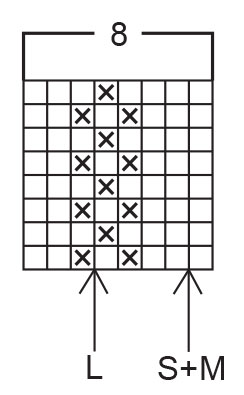
Bonjour Mme Ribault, en M, vous commencez par la 2ème m du diagramme soit: 2 m end, 1 m env, 1 m end, 1 m env, 2 m end, puis vous répétez le motif complet jusqu'à la fin du tour (= 3 m end, 1 m env, 1 m end, 1 m env, 2 m end) x 11 pour le devant (= 95 m) puis répétez de (à) 12 fois au total et terminez par la 1ère m de M.1 = 97 m pour le dos. Continuez ainsi, en tricotant les mailles jersey à l'endroit (= en rond) avec 3 m au point de riz entre les 5 m jersey. Bon tricot!
18.06.2020 - 09:57
![]() Ribault Martine wrote:
Ribault Martine wrote:
Bonjour, Je vous remercie pour vos dernières réponses de ce jour. Je vais suivre votre conseil en faisant un échantillon sur aiguille circulaire en tricotant en rond. Cordialement. Ribault Martine
17.06.2020 - 09:12
![]() Ribault Martine wrote:
Ribault Martine wrote:
Bonjour, en découvrant les 23 vidéos correspondant au modèle, j'ai découvert une vidéo du point JERSEY tricoté en rond et pas le point mousse tricoté en rond. Alors, que dans les explications est indiqué que l'on doit utilisé le point mousse en rond. C'est très perturbant pour moi ! Qu'est ce qu'il faut vraiment tricoté entre chaque motif du point fantaisie, du JERSEY tricoté en rond ou du point mousse tricoté en rond ? Merci pour votre réponse. Cdlt. Ribault Martine
16.06.2020 - 20:21DROPS Design answered:
Suite . Vous trouverez le lien du point mousse dans la réponse ci-dessous - le diagramme se tricote ainsi (sur 8 m) en rond: rang1: 3 m end, 1 m env, 1 m end, 1 m env, 2 m end - rang 2: 4 m end, 1 m env, 3 m end (si vous devez faire ce rang sur l'envers par la suite vous tricoterez 4 m env, 1 m end, 4 m env). Répétez ces 2 rangs en rond/rangs. En répétant le motif, vous aurez des rayures verticales formées de 5 m jersey et de 3 m point de riz. Entraînez vous sur un échantillon avant de commencer, ce sera ainsi plus simple de bien comprendre le point. Bon tricot!
17.06.2020 - 07:57
![]() Ribault Martine wrote:
Ribault Martine wrote:
Bonjour, les cases blanches sont des m JERSEY. Pourquoi à la lecture des explications il n'est nullement fait référence à ce point, mais seulement le point mousse tricoté en rond & point de riz? Du coup, je ne sais pas si je dois me fier aux explications du descriptif ou les votre. Pourriez vous s'il vous plaît être plus clair? Je n'ai jamais tricoté en rond avec l'aiguille circulaire. Qu'est ce que je dois comprendre et qu\'elles sont les bonnes explications? Ribault
16.06.2020 - 19:55DROPS Design answered:
Bonjour Mme Ribault, les explications sont les mêmes :) Le diagramme montre toutes les mailles, vues sur l'endroit. Vu sur l'endroit, le jersey ne montre que des mailles endroit (= les petits v) et les mailles envers du point de riz que les mailles envers. Le point de riz se tricotera tel que dans le diagramme, au 1er rang: 1 m env, 1 m end, 1 m env. Et au 2ème rang: les m env à l'end et les m end à l'env. Pour tricoter du point mousse en rond, vous alternez 1 tour end, 1 tour env - cf vidéo. à suivre
17.06.2020 - 07:53
![]() Ribault Martine wrote:
Ribault Martine wrote:
Bonjour, votre réponse concernant le nombre de maille entre chaque motif du point fantaisie, vous indiquez qu'il faut faire des mailles en jersey. Hors, les explications n'indique pas que l'on doit utiliser ce point, mais seulement le point de riz et le point mousse tricoté en rond. Alors, votre réponse me perturbe quelque peu. Quel est le point à utiliser entre chaque motif du point fantaisie ? Le point mousse tricoté en rond ? Merci pour votre réponse. Cdlt. Ribault Martine
16.06.2020 - 11:56DROPS Design answered:
Bonjour Mme Ribault, vous tricotez en rond, donc les mailles endroit = cases blanches sont des mailles jersey; les mailles avec une croix correspondent à 1 maille à tricoter à l'envers (sur l'endroit, en rond). En tricotant en rond, les 8 m du diagramme se tricotent: 3 m end (= jersey), 3 m point de riz (= 1 m env, 1 m end, 1 m env), 2 m end (= jersey). Quand vous tricoterez en allers et retours après les emmanchures, vous tricoterez les m jersey à l'envers sur l'envers et les mailles point de riz comme avant. Bon tricot!
16.06.2020 - 13:49
|
|||||||
Summer Charm |
|||||||
|
|
|||||||
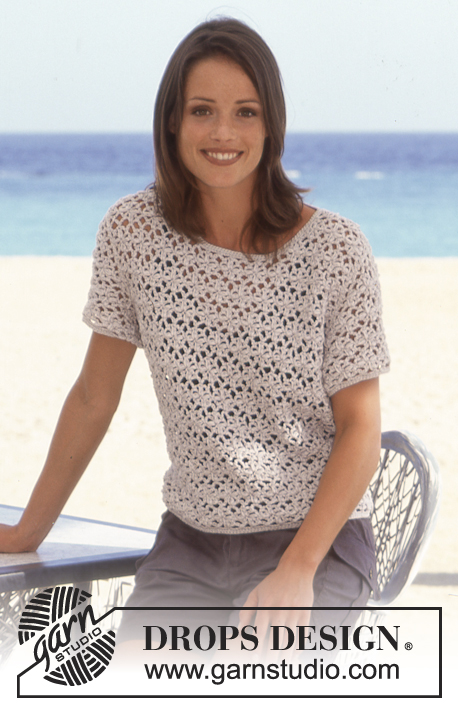
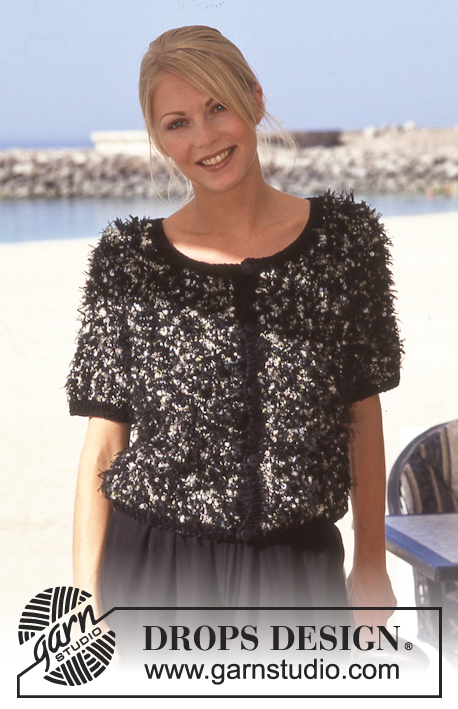
DROPS Sleeveless Top in Muskat.
DROPS 60-13 |
|||||||
|
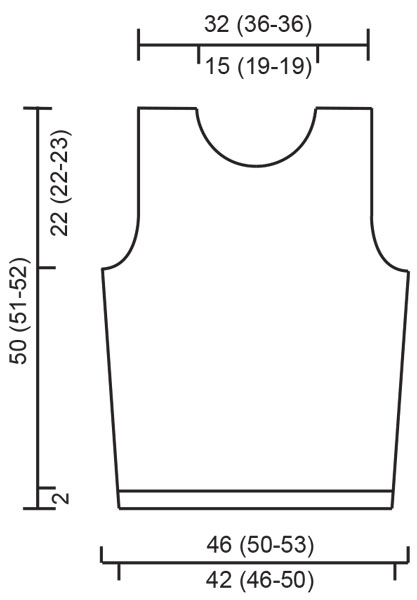
Gauge: 21 sts x 28 rows in stockinette st = 10 x 10 cm [4" x 4"]. Garter st, when knitting flat: Knit all sts, all rows. Seed stitch (on an even number of sts): Row 1: * K 1, P 1 * Row 2: * P 1, K 1 * Seed stitch (on an odd number of sts): All rows: K 1, *P 1, K 1* Seed stitch (worked in the round): Round 1: * knit 1, purl 1 * Round 2: * knit the purl sts from the previous round and purl the knit sts from the previous round * Pattern: See chart (1 chart = 1 repeat). The pattern is seen from the right side. Arrows indicate the starting points on the chart for different sizes. Make decreases as follows on the right side: Before the 3 edge sts: K 2 tog. After the 3 edge sts: sl 1, K 1, psso Make decreases as follows on the wrong side: Before the 3 edge sts: P 2 tog into back of st. After 3 edge sts: P 2 tog. BODY Cast on 176 (192-208) sts; join and place a marker at the join. K1 round, P1 round, then work 3 rounds in seed st. Attach a marker at each side, front = 87 (95-103) sts, back = 89 (97-105) sts. Establish Pattern - start at the appropriate arrow on the chart. After the seed st border, on next round inc 1 st at each side of the markers, repeat every 5 cm [2"] a total of 4 times = 192 (208-224) sts. Front = 95 (103-111) sts, back = 97 (105-113) sts. Work the increased sts into the pattern as you go along. When the work measures 27 (28-28) cm [10⅝" (11" - 11")] work 3 rounds with seed st over 6 (6-7) sts at each side of each marker (work rem sts as before), on next round bind off 3 (3-4) sts for armholes at each side of each marker, and then work back and forth on the needles - front = 89 (97-103) sts, back = 91 (99-105) sts. Front: = 89 (97-103) sts. Dec 1 st for armholes inside 3 edge sts (work the edge sts in seed st throughout) at each side every row 5 (5-8) times, then every other row 4 times, then every 4th row 2 times = 67 (75-75) sts. When the work measures 37 cm [14.5"] work 3 rows with seed st over the center 15 (23-23) sts (work rem sts as before), on next row bind off the center 9 (17-17) sts for the neck, and work each shoulder separately. Continue and dec 1 st at neck edge - dec inside 3 edge sts (work these sts in seed st throughout) on every row 6 times, then on every other row 2 times, then every 4th row 2 times. Bind off when the work measures 50 (51-52) cm [19.75" (20" - 20.5")]. Back: = 91 (99-105) sts. Bind off for armholes inside 3 edge sts as for the front = 69 (77-77) sts. When the work measures 47 (48-49) cm [18.5" (18⅞" - 19.25")] work 3 rows with seed st over the center 33 (41-41) sts (work rem sts as before), on next row bind off the center 27 (35-35) sts for the neck and work each shoulder separately. Continue and dec 1 st at each neck edge inside 3 edge sts (these sts are worked in seed st) every row 2 times. Bind off when the work measures 50 (51-52) cm [19.75" (20" - 20.5")]. Assembly: Sew shoulder seams. Crochet a border around the neck from the right side as follows: 1st round : 1 single crochet (sc), * ch 4 over 2 knit sts, 1 slip st in the 3rd knit st *, repeat * - *. 2nd round : * 4 sc in the ch space, 1 slip st in the slip st from the previous round *, repeat * - *. |
|||||||
Diagram explanations |
|||||||
|
|||||||
 |
|||||||
 |
|||||||
Have you finished this pattern?Tag your pictures with #dropspattern or submit them to the #dropsfan gallery. Do you need help with this pattern?You'll find 22 tutorial videos, a Comments/Questions area and more by visiting the pattern on garnstudio.com. © 1982-2026 DROPS Design A/S. We reserve all rights. This document, including all its sub-sections, has copyrights. Read more about what you can do with our patterns at the bottom of each pattern on our site. |
|||||||


With over 40 years in knitting and crochet design, DROPS Design offers one of the most extensive collections of free patterns on the internet - translated to 17 languages. As of today we count 325 catalogs and 12298 patterns - 12288 of which are translated into English (US/in).
We work hard to bring you the best knitting and crochet have to offer, inspiration and advice as well as great quality yarns at incredible prices! Would you like to use our patterns for other than personal use? You can read what you are allowed to do in the Copyright text at the bottom of all our patterns. Happy crafting!
Post a comment to pattern DROPS 60-13
We would love to hear what you have to say about this pattern!
If you want to leave a question, please make sure you select the correct category in the form below, to speed up the answering process. Required fields are marked *.