
Popular categories
Looking for a yarn?


Comments / Questions (17)
![]() Lacassin wrote:
Lacassin wrote:
Bonjour je ne comprend pas l'histoire des augmentation pour le col en v. Je fais 2 augmentation puis 3 puis 10 et ainsi de suite jusqu'à la fin de mon col v? 10 me semble assez important. Merci d'avance
09.10.2021 - 20:56DROPS Design answered:
Bonjour Mme Lacassin, vous augmentez pour l'encolure V 1 seule maille à chaque fois (= de chaque côté, autrement dit 2 mailles par rang): 2 fois tous les 6 rangs = augmentez 1 m sur chaque devant, tricotez 5 rangs, augmentez 1 m sur chaque devant. Puis 10 x tous les 4 rangs: *augmentez 1 m de chaque côté, tricotez 3 rangs*, répétez de *-* 9 fois puis augmentez 1 m de chaque côté; et enfin augmentez aux 3 rangs sur l'endroit suivant (= tricotez 1 rang sur l'envers, augmentez au rang suivant sur l'endroit) répétez 3 fois de (à). Bon tricot!
11.10.2021 - 07:32
![]() Paola Pastore wrote:
Paola Pastore wrote:
Buongiorno fate dei modelli bellissimi . Purtroppo io lavoro coi 2 ferri e quindi non mi trovo mai con le speigazioni. Peccato. Come potete aiutarmi? Grazie
19.02.2020 - 12:00DROPS Design answered:
Buongiorno Paola. A questa pagina trova indicazioni utili per adattare un modello ai ferri dritti. In linea generale, modelli aperti (p.es cardigan), anche se lavorati con i ferri circolari, possono essere adattati facilmente ad una lavorazione in piano e in parti separate. Per ogni ulteriore aiuto, può contattare il suo rivenditore Drops di fiducia. Buon lavoro!
19.02.2020 - 16:17
![]() Asmaa wrote:
Asmaa wrote:
Hi i hope you all very well 😘 🌼 the pattern says :: ((( increase for V-NECK in each side towards mid front – read explanation above, as follows: Increase every 6th row 2 times in total, every 4th row 10-13-13-13-14-15 times in total and every other row 3-0-1-1-1-0 times in total (= 15-15-16-16-17-17 stitches in total increased in each side towards mid front))) i didn't make v neck sweaters before so i don't understand this part
09.06.2019 - 04:44DROPS Design answered:
Dear Asmaa, you work the increases for neck (inside the garter stitch edge on each side - see section V-NECK at the beg. of the pattern): start to increase for V-neck on 6th row from beginning (= 3rd row from RS = at the same time you will increase the 3rd time for raglan), and repeat these increases 1 more time every 6th row then every 4th row 10-13-13-13-14-15 times in total and every other row 3-0-1-1-1-0 times in total (= a total of 15-15-16-16-17-17 stitches will have to be increased on each front piece). Happy knitting!
11.06.2019 - 10:50
![]() Aljona wrote:
Aljona wrote:
Jätte fin !!!! Önskar sånt
01.02.2019 - 23:27
![]() Christine wrote:
Christine wrote:
Très bel effet de manches !
13.01.2019 - 22:19
![]() Anett wrote:
Anett wrote:
Schönes Modell!
05.01.2019 - 09:46
![]() Beck wrote:
Beck wrote:
Super gilet pour les soirée d’été et belles manches
12.12.2018 - 12:45
|
|
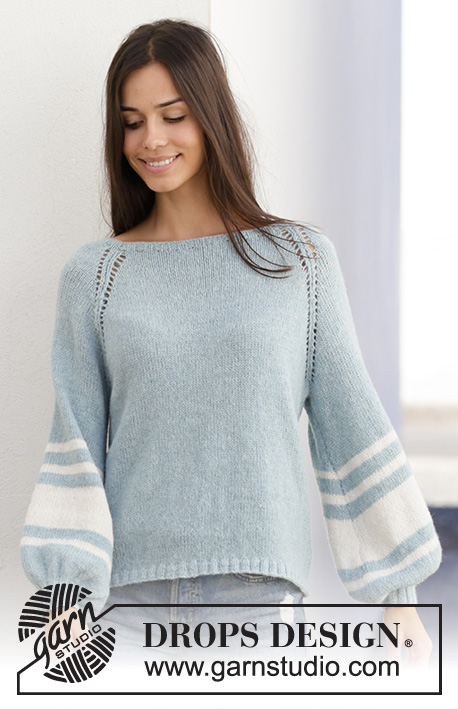
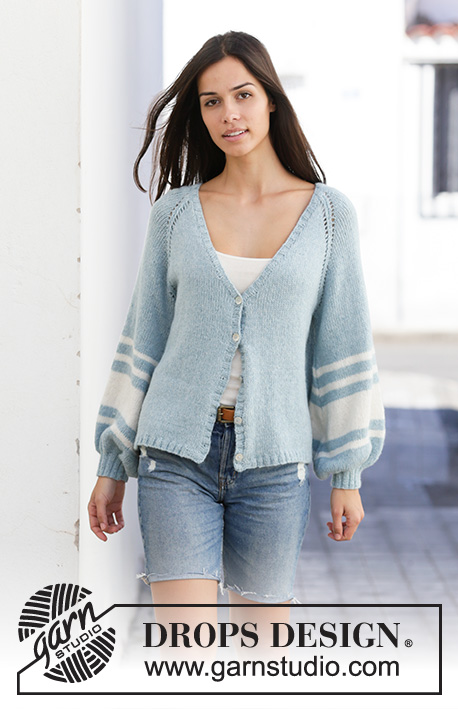
Hamptons Holiday Jacket#hamptonsholidayjacket |
|
 |
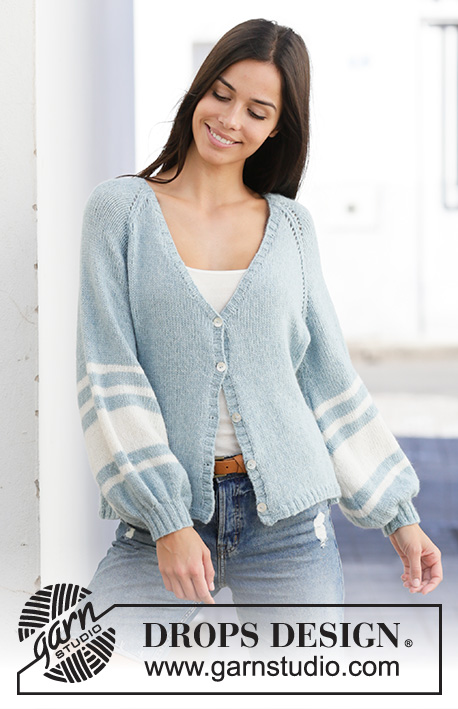 |
Knitted jacket with balloon sleeves in DROPS Sky. Piece is knitted top down with raglan, V-neck and stripes. Size: S - XXXL
DROPS 199-10 |
|
|
---------------------------------------------------------- EXPLANATION FOR THE PATTERN: ---------------------------------------------------------- GARTER STITCH (back and forth): Knit all rows. 1 ridge vertically = knit 2 rows. RAGLAN: All increases are done from the right side. Increase for raglan in every transition between sleeves and body as follows: Work until 1 stitch remains before marker thread, make 1 yarn over, knit 2 (marker thread is in the middle of these 2 stitches), make 1 yarn over = 2 stitches increased. On next row (wrong side) purl the yarn over to make a hole. Then work the new stitches in stockinette stitch. Increase 8 stitches in total on every increase row. V-NECK: All increases are done from the right side. Make 1 yarn over inside 1 edge stitch in garter stitch (= 1 stitch increased) in each side. On next row (wrong side) purl yarn over twisted to avoid holes. Then work the new stitches in stockinette stitch. Increase 2 stitches in total on every increase row. INCREASE/DECREASE TIP (evenly): To calculate how to increase/decrease evenly, use the total number of stitches on row (e.g. 198 stitches) and divide stitches by number of increases/decreases to be done (e.g. 38) = 5.2. In this example increase by making 1 yarn over after approx. every 5th stitch. On next row work yarn overs twisted to avoid holes. If decreasing work every 4th and 5th stitch together. INCREASE TIP (applies to sleeves): Work until 1 stitch remains before marker thread, 1 yarn over, knit 2 (marker thread is in the middle of these stitches), 1 yarn over. On next round knit yarn overs twisted to avoid holes. Then work the new stitches in stockinette stitch. STRIPES (applies to sleeves): 1½ cm = ½" with white. 2 cm = ¾" with light mint. 1½ cm = ½" with white. 2 cm = ¾" with light mint. 7 cm = 2¾" with white. 2 cm = ¾" with light mint. 1½ cm = ½" with white. Then work with light mint until finished measurements. BUTTONHOLES: Decrease for buttonholes on right band (when garment is worn). Decrease from right side (decrease buttonholes in purl sections) as follows: 1 buttonhole = purl 2 together, make 1 yarn over. On next row knit yarn over to make holes. Decrease first buttonhole 2-2-3-4-3-4 cm = ¾"-¾"-1⅛"-1½"-1⅛"-1½" from bottom edge of jacket. Then decrease the next 4-4-4-4-5-5 buttonholes, approx. 7-7-7-7-6-6 cm = 2¾"-2¾"-2¾"-2¾"-2⅜"-2⅜" between each. ---------------------------------------------------------- START THE PIECE HERE: ---------------------------------------------------------- JACKET - SHORT OVERVIEW OF THE PIECE: Work yoke and body back and forth on circular needle from mid front, work top down. Work sleeves in the round on double pointed needles/a short circular needle, top down. Then work a band/neck edge along the entire edge mid front. YOKE: Cast on 64-64-70-70-76-76 stitches (including 1 edge stitch in each side towards mid front) on circular needle size 4 mm = US 6 with light mint. Purl 1 row from wrong side. Insert 4 marker threads in piece as follows (without working the stitches): Insert first marker thread after the first 3-3-3-3-3-3 stitches (= front piece), insert 2nd marker thread after the next 12-12-14-14-16-16 stitches (= sleeve), insert 3rd marker thread after the next 34-34-36-36-38-38 stitches (= back piece), and insert 4th marker thread after the next 12-12-14-14-16-16 stitches (= sleeve), 3-3-3-3-3-3 stitches remain on row after last marker (= front piece). Then work in stockinette stitch with 1 edge stitch in GARTER STITCH - read explanation above, in each side towards mid front – AT THE SAME TIME on first row from right side increase for RAGLAN in every transition between body and sleeves – read explanation above. Continue increase for raglan every other row (i.e. on every row from right side) until increase has been done 28-31-32-36-38-42 times in total on each side of the 4 marker threads. AT THE SAME TIME on 6th row (i.e. on 3rd row from right side) increase for V-NECK in each side towards mid front – read explanation above, as follows: Increase every 6th row 2 times in total, every 4th row 10-13-13-13-14-15 times in total and every other row 3-0-1-1-1-0 times in total (= 15-15-16-16-17-17 stitches in total increased in each side towards mid front). REMEMBER THE KNITTING GAUGE! After last increase for raglan continue without increases until piece measures 20-22-23-26-27-31 cm = 8"-8¾"-9"-10¼"-10⅝"-12¼", but continue with increase for V-neck as before. Work next row as follows from right side: Work until first marker thread, work 0-0-1-2-4-6 stitches after marker thread (= front piece), slip the next 68-74-76-82-84-88 stitches on 1 stitch holder for sleeve, cast on 8-10-12-12-12-16 new stitches on needle (= in the side under sleeve), work 90-96-102-112-122-134 stitches (= back piece), slip the next 68-74-76-82-84-88 stitches on 1 stitch holder for sleeve, cast on 8-10-12-12-12-16 new stitches on needle (= in the side under sleeve), work until marker thread (= 0-0-1-2-4-6 stitches) and work the remaining stitches on needle (= front piece). Then finish body and sleeves separately. NOW MEASURE THE PIECE FROM HERE! BODY: Continue with stockinette stitch, 1 edge stitch in garter stitch in each side (work first row from wrong side) and increase for V-neck as before. When increase for V-neck is done, there are 198-214-230-250-270-302 stitches on needle. Piece measures approx. 4-4-4-2-2-1 cm = 1½"-1½"-1½"-¾"-¾"-⅜" from division (V-neck measures approx. 24-26-27-28-29-30 cm = 9½"-10¼"-10⅝"-11"-11⅜"-11¾" from shoulder). Continue with stockinette stitch and 1 edge stitch in garter stitch in each side. When piece measures 29-29-30-28-29-27 cm = 11⅜"-11⅜"-11¾"-11"-11⅜"-10⅝" from division, knit 1 row from right side while increasing 38-42-46-50-54-62 stitches evenly - read INCREASE/DECREASE TIP = 236-256-276-300-324-364 stitches. Switch to circular needle size 3 mm = US 2,5. Work next row as follows from wrong side: 1 edge stitch in garter stitch, * purl 2, knit 2 *, repeat from *-* until 3 stitches remain on needle, purl 2 and finish with 1 edge stitch in garter stitch. Continue rib like this for 2 cm = ¾". Bind off with knit over knit and purl over purl (to avoid a tight bind-off edge use circular needle size 4 mm = US 6). Jacket measures approx. 54-56-58-60-62-64 cm = 21¼"-22"-22¾"-23⅝"-24⅜"-25¼" from shoulder. SLEEVE: Slip the 68-74-76-82-84-88 stitches from stitch holder in one side of piece on a short circular needle/double pointed needles size 4 mm = US 6 and pick in addition up 1 stitch in each of the 8-10-12-12-12-16 stitches cast on in the side under sleeve = 76-84-88-94-96-104 stitches. Insert 1 marker thread in the middle of the 8-10-12-12-12-16 stitches under sleeve and move the marker thread upwards when working, it is used for increasing later. Begin round at the marker thread and work stockinette stitch in the round. When piece measures 7 cm = 2¾" from division, increase 2 stitches mid under sleeve - read INCREASE TIP. Increase like this every 2½-3-2½-3-2½-3 cm = 1"-1⅛"-1"-1⅛"-1"-1⅛" 12-10-11-10-11-9 times in total = 100-104-110-114-118-122 stitches. AT THE SAME TIME when piece measures 19-18-17-15-15-13 cm = 7½"-7"-6¾"-6"-6"-5⅛", work STRIPES - read explanation above. Continue until piece measures 42-41-40-38-38-35 cm = 16½"-16⅛"-15¾"-15"-15"-13¾" from division - or desired length (shorter measurements in the larger sizes because of longer yoke). Work 1 round while decreasing 4-0-6-2-6-2 stitches evenly - read INCREASE/DECREASE TIP = 96-104-104-112-112-120 stitches. Work 1 round while knitting the stitches together 2 by 2 = 48-52-52-56-56-60 stitches. Switch to double pointed needles size 3 mm = US 2,5 and work rib in the round = knit 2/purl 2 for 5 cm = 2". Bind off with knit over knit and purl over purl (to avoid a tight bind-off edge use double pointed needles size 4 mm = US 6). Work the other sleeve the same way. BAND + NECK EDGE: Insert 1 marker mid back of neck on back piece, marker should be used to calculate half the stitches on band/neck edge. Begin at the bottom on right front piece from right side and pick up approx. 161-169-177-185-189-193 stitches (divisible with 4 + 1) along the entire front edge up to marker in the neck, on circular needle size 3 mm = US 2,5 with light mint – leave the marker. Continue by picking up approx. 161-169-177-185-189-193 stitches (divisible with 4 + 1) along the entire front edge down to edge on left front = 322-338-354-370-378-386 stitches. NOTE: If more or fewer stitches stitches than this are picked up adjust number of stitches on first row – adjust to make it the same on each side of marker in the neck. It is important that the rib is not to loose with too many stitches but it should not be too tight either with tight front edges. Work next row as follows from wrong side: 2 stitches in garter stitch, * purl 2, knit 2 *, repeat from *-* until 4 stitches remain, purl 2 and finish with 2 stitches in garter stitch. Continue rib like this. When rib measures 1 cm = ⅜", decrease for BUTTONHOLES - see explanation above. Continue like this until rib measures 2 cm = ¾". Bind off with knit over knit and purl over purl (to avoid a tight bind-off edge use circular needle size 4 mm = US 6). ASSEMBLY: Sew buttons on to left front piece. |
|
 |
|
Have you finished this pattern?Tag your pictures with #dropspattern #hamptonsholidayjacket or submit them to the #dropsfan gallery. Do you need help with this pattern?You'll find 26 tutorial videos, a Comments/Questions area and more by visiting the pattern on garnstudio.com. © 1982-2026 DROPS Design A/S. We reserve all rights. This document, including all its sub-sections, has copyrights. Read more about what you can do with our patterns at the bottom of each pattern on our site. |
|


With over 40 years in knitting and crochet design, DROPS Design offers one of the most extensive collections of free patterns on the internet - translated to 17 languages. As of today we count 324 catalogs and 12290 patterns - 12280 of which are translated into English (US/in).
We work hard to bring you the best knitting and crochet have to offer, inspiration and advice as well as great quality yarns at incredible prices! Would you like to use our patterns for other than personal use? You can read what you are allowed to do in the Copyright text at the bottom of all our patterns. Happy crafting!
Post a comment to pattern DROPS 199-10
We would love to hear what you have to say about this pattern!
If you want to leave a question, please make sure you select the correct category in the form below, to speed up the answering process. Required fields are marked *.