
Popular categories
Looking for a yarn?


Comments / Questions (57)
![]() Ulla Gudbergsen wrote:
Ulla Gudbergsen wrote:
Jeg vil gerne strikke denne med lange ærmer, kan jeg evt få hjælp til dette?
08.04.2019 - 18:17DROPS Design answered:
Hei Ulla. Ønsker du lengre ermer, kan du helt fint strikke dem lenger. Når alle fellinger er ferdige fortsetter du til ønsket mål. Om du syntes du trenger å felle ytterligere, felles på samme måte som tidligere til du har oppnådd ønsket vidde. God fornøyelse
09.04.2019 - 11:29
![]() Kirsten Giselsson wrote:
Kirsten Giselsson wrote:
Hvordan undgår man, at den nederste kant ruller, når der med opskriften ikke strikkes rib?
03.04.2019 - 09:53DROPS Design answered:
Hej Kirsten, nogle kvaliteter ruller mere end andre. Man kan altid dampe kanterne let inden brug.
05.04.2019 - 14:13
![]() Pascale wrote:
Pascale wrote:
Bonjour, Je commence juste le motif A 1, au première rang. J'ai une question au sujet des toutes premières mailles du motif : que faut-il faire , un jeté, une maille endroit, un jeté ? Ou deux jetés l'un immédiatement après l'autre sur l'aiguille droite ? Merci de votre réponse.
14.03.2019 - 13:31DROPS Design answered:
Bonjour Pascale, au 1er rang de A.1, commencez par 1 jeté, 1 m end, 1 jeté, 2 m end etc.. et terminez par 1 jeté, 1 m end, 1 jeté (on a également 1 m end entre les 2 jetés du milieu de A.1). Bon tricot!
14.03.2019 - 13:43
![]() Marjatta Järvikivi wrote:
Marjatta Järvikivi wrote:
Ikävä kyllä lähes kaikki neuleet ovat ylhäältä alas päin neulottu. Työ käy raskaaksi ja kädet väsyvät. Jos vähänkin haittaa olkapäissä tai ranteissa ikävä neuloa
31.01.2019 - 16:22
![]() Boutrouche wrote:
Boutrouche wrote:
Je trouve ce modèle très joli, j'espère que vous publierez les explications ;-)
27.01.2019 - 14:15
![]() Roussy wrote:
Roussy wrote:
Magnifique raffiné
21.01.2019 - 22:11
![]() Monika wrote:
Monika wrote:
Ein sehr schönes Modell. besonders das Muster der Ärmel gefällt mir.
15.01.2019 - 10:26
|
|||||||||||||||||||||||||
Blue Nostalgia Cardigan#bluenostalgiacardigan |
|||||||||||||||||||||||||
 |
 |
||||||||||||||||||||||||
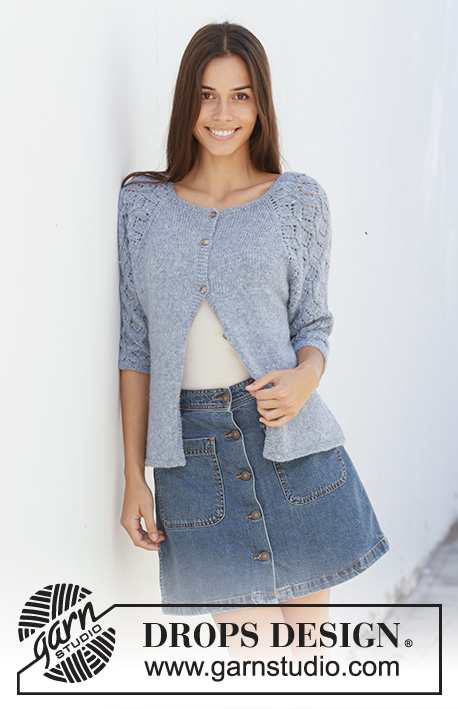
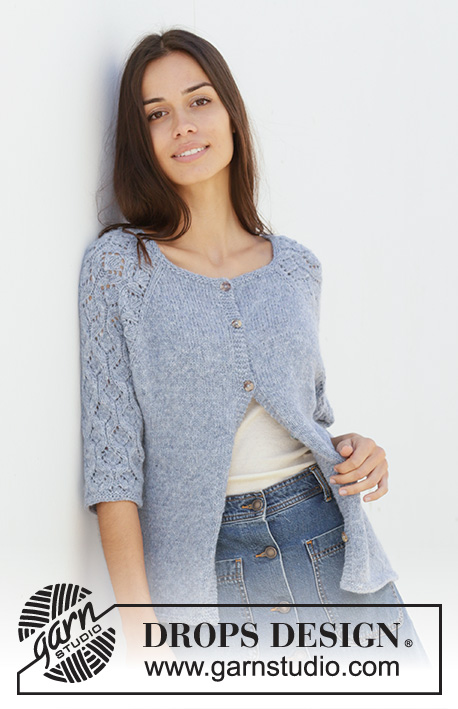
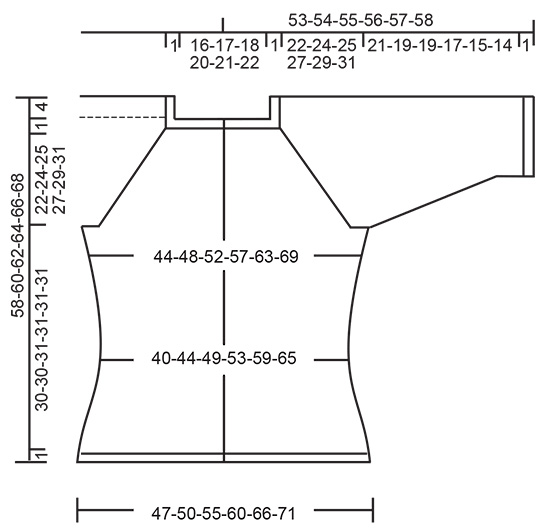
Knitted jacket with raglan in DROPS Sky. The piece is worked top down with lace pattern on sleeves. Sizes S – XXXL.
DROPS 199-4 |
|||||||||||||||||||||||||
|
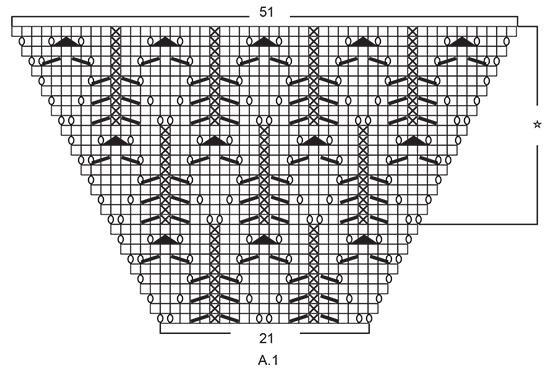
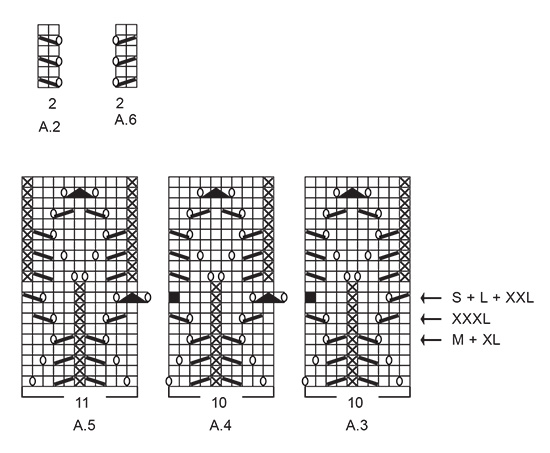
------------------------------------------------------- EXPLANATIONS FOR THE PIECE: ------------------------------------------------------- RIDGE/GARTER STITCH (worked back and forth): Knit all rows. 1 ridge in height = Knit 2 rows. INCREASE TIP-1 (evenly spaced): To work out how to increase evenly, count the total number of stitches on the needle (e.g. 110 stitches), minus bands (e.g. 10 stitches) and divide the remaining stitches by the number of increases to be made (e.g. 10) = 10. In this example, increase by making 1 yarn over after each 10th stitch. On the next row (wrong side) purl the yarn overs twisted to avoid holes. Do not increase on the bands. PATTERN: See diagrams A.1 to A.6. Find your size in the diagrams (applies to A.3 to A.5). The diagrams show all the rows in the pattern seen from the right side. BUTTONHOLES: Work buttonholes on right band (when garment is worn). Work from the right side when there are 3 stitches left on the row as follows: Make 1 yarn over, knit the next 2 stitches together and knit the last stitch. On the next row knit the yarn over to leave a hole. The first buttonhole is worked when the piece measures approx. 1½-2 cm = ½" from the cast-on edge. Then work the other 5-5-5-6-6-6 buttonholes with approx. 9-9-9-8½-8½-8½ cm = 3½"-3½"-3½"-3¼"-3¼"-3¼" between each one. DECREASE TIP (for sides of body and sleeves): All decreases worked from the right side! Work until there are 3 stitches left before the marker thread, knit 2 together, knit 2 (marker thread sits between these 2 stitches), slip 1 stitch as if to knit, knit 1 and pass the slipped stitch over the knitted stitch. INCREASE TIP-2 (for sides of body): All increases are worked from the right side! Work until there are 2 stitches left before the marker thread, 1 yarn over, knit 4 (marker thread sits in middle of these stitches), 1 yarn over. On the next row (wrong side) purl the yarn overs twisted to avoid holes. Then work the new stitches in stockinette stitch. RIDGE/GARTER STITCH (worked in the round): 1 ridge in height = 2 rounds; i.e. knit 1 round and purl 1 round ------------------------------------------------------- START THE PIECE HERE: ------------------------------------------------------- JACKET - SHORT OVERVIEW OF THE PIECE: Yoke and body are worked back and forth with circular needle from mid front, top down. The sleeves are worked in the round with short circular needle/double pointed needles, top down. YOKE: Cast on 110-116-120-126-130-136 stitches (including 5 band stitches on each side towards mid front) with circular needle size 3.5 mm = US 4 and Sky. Work 2 RIDGES – read description above. Knit 1 row from the right side where you increase 10-8-8-10-10-8 stitches evenly spaced – read INCREASE TIP-1 = 120-124-128-136-140-144 stitches. Change to circular needle size 4mm = US 6. Purl 1 row from the wrong side with 5 band stitches in garter stitch on each side. The next row is worked as follows from the right side: 5 band stitches in garter stitch, stockinette stitch over the next 15-16-17-19-20-21 stitches (= front piece), 1 yarn over, 2 stitches stockinette stitch, A.1 over 21 stitches (= sleeve), 2 stitches stockinette stitch, 1 yarn over, 30-32-34-38-40-42 stitches stockinette stitch (= back piece), 1 yarn over, 2 stitches stockinette stitch, A.1 over 21 stitches (= sleeve), 2 stitches stockinette stitch, 1 yarn over, stockinette stitch over the next 15-16-17-19-20-21 stitches and finish with 5 band stitches in garter stitch (= front piece). There are now 128-132-136-144-148-152 stitches on the needle. Continue this pattern onwards. In other words, increase on the sleeves on each side as shown in A.1. On the next row (wrong side) purl the yarn overs on the sleeves (= holes) and the increased stitches are worked into the pattern as shown in A.1. On front and back pieces, you increase with a yarn over before/after the 2 stitches in stockinette stitch (there will be 2 stitches in stockinette stitch between each raglan increase). On the next row (wrong side) purl these yarn overs twisted (= no holes) and the increased stitches are then worked in stockinette stitch. Increase like this every 2nd row (i.e. each row from right side). You increase a total of 8 stitches on each increase row (= 4 yarn overs + 4 yarn overs increased in A.1). REMEMBER THE KNITTING GAUGE and remember BUTTONHOLES on right band – read description above. When A.1 has been worked 1 time in height there are 240-244-248-256-260-264 stitches on the needle. Continue this pattern, i.e. the pattern repeats as shown in A.1. Each time you have worked 20 rows in height there is room for 1 more repeat with lace pattern in width on each sleeve. When you have increased a total of 24-27-29-32-34-38 times on each side of A.1 there are 312-340-360-392-412-448 stitches on the needle and the piece measures approx. 18-20-22-24-25-28 cm = 7"-8"-8¾"-9½"-9¾"-11" from the cast on edge mid front. Continue with band stitches in garter stitch, stockinette stitch and pattern as before, but without increasing. In other words over the 69-75-79-85-89-97 stitches in A.1 work as follows: Work A.2 (= 2 stitches), 2-0-2-0-2-1 stitches stockinette stitch, start on row marked with arrow in your size and work A.3 (= 10 stitches), A.4 over the next 40-50-50-60-60-70 stitches (= 4-5-5-6-6-7 repeats of 10 stitches), A.5 (= 11 stitches), 2-0-2-0-2-1 stitches stockinette stitch and A.6 (= 2 stitches). Continue working until the piece measures 23-25-26-28-30-32 cm = 9"-9¾"-10¼"-11"-11¾"-12½" from the cast-on edge mid front. The next row is worked as follows from the wrong side: Work 5 band stitches in garter stitch, 41-45-49-54-59-65 stitches stockinette stitch (= front piece), place the next 69-75-77-83-83-89 stitches on 1 thread for sleeve, cast on10-10-12-12-14-14 new stitches on the needle (= in side under sleeve), 82-90-98-108-118-130 stitches in stockinette stitch (= back piece), place the next 69-75-77-83-83-89 stitches on 1 thread for sleeve, cast on 10-10-12-12-14-14 new stitches on needle (= in side under sleeve), 41-45-49-54-59-65 stitches stockinette stitch and 5 band stitches in garter stitch (= front piece). Body and sleeves are continued separately. THE PIECE IS NOW MEASURED FROM HERE! BODY: = 194-210-230-250-274-298 stitches. Insert 1 marker thread in each side, in the middle of the 10-10-12-12-14-14 stitches cast on under each sleeve. Allow them to follow your work onwards; they will be used later when decreasing/increasing. Work stockinette stitch, with 5 band stitches in garter stitch on each side of the piece. When the piece measures 2 cm = ¾" from the division, decrease 1 stitch on each side of both marker threads - read DECREASE TIP = 4 stitches decreased. Decrease like this every 3 cm = 1⅛" a total of 4 times = 178-194-214-234-258-282 stitches. Continue until the piece measures 14 cm = 5½" from the division. Now increase 1 stitch on each side of both marker threads – read INCREASE TIP-2 = 4 stitches increased. Increase like this every 2 cm = ¾" a total of 7 times = 206-222-242-262-286-310 stitches. Continue until the piece measures 30-30-31-31-31-31 cm = 11¾"-11¾"-12¼"-12¼"-12¼"-12¼" from the division. Change to circular needle size 3.5 mm = US 4. Work 2 ridges back and forth over all stitches. Loosely bind off with knit, but to avoid the bind-off edge being tight you can bind off with size 4 mm = US 6 needle. The jacket measures approx. 58-60-62-64-66-68 cm = 22¾"-23⅝"-24⅜"-26¼"-26"-26¾" from the shoulder down. SLEEVE: Place the 69-75-77-83-83-89 stitches from the thread on one side of the piece on short circular needle/double pointed needles size 4 mm = US 6 and knit up 1 stitch in each of the 10-10-12-12-14-14 stitches cast on under sleeve = 79-85-89-95-97-103 stitches. Insert 1 marker thread in the middle of the 10-10-12-12-14-14 stitches under the sleeve and allow the marker thread to follow your work onwards; it will be used later when decreasing. Start the round by the marker thread. Start on the correct round in the diagrams so that the pattern continues on from the yoke and work as follows: Work 4-2-4-2-3-1 stitches stockinette stitch, A.3 (= 10 stitches), A.4 over the next 50-60-60-70-70-80 stitches (= 5-6-6-7-7-8 repeats of 10 stitches), A.5 (= 11 stitches) and 4-2-4-2-3-1 stitches stockinette stitch. Continue this pattern. When the piece measures 2 cm = ¾" from the division, decrease 2 stitches mid under sleeve – remember DECREASE TIP. Decrease like this every 3rd-3rd-3rd-2nd-2nd-2nd round a total of 14-15-15-16-15-16 times = 51-55-59-63-67-71 stitches. The stitches which do not fit into the pattern as you decrease are worked in stockinette stitch, but make sure when decreasing in the pattern you also make 1 yarn over. Continue until the piece measures 21-19-19-17-15-14 cm = 8¼"-7½"-7½"-6¾"-6"-5½" from the division (shorter measurements in larger sizes due to longer yoke). Change to double pointed needles size 3.5 mm = US 4. Work 2 RIDGES in the round – read description above. Loosely bind off with knit, but to avoid the bind-off edge being tight you can bind off with size 4 mm = US 6 needles. The sleeve measures approx. 22-20-20-18-16-15 cm = 8¾"-8"-8"-7"-6¼"-6" from the division. Work the other sleeve in the same way. ASSEMBLY: Sew buttons onto left band. |
|||||||||||||||||||||||||
Diagram explanations |
|||||||||||||||||||||||||
|
|||||||||||||||||||||||||
 |
|||||||||||||||||||||||||
 |
|||||||||||||||||||||||||
 |
|||||||||||||||||||||||||
Have you finished this pattern?Tag your pictures with #dropspattern #bluenostalgiacardigan or submit them to the #dropsfan gallery. Do you need help with this pattern?You'll find 27 tutorial videos, a Comments/Questions area and more by visiting the pattern on garnstudio.com. © 1982-2026 DROPS Design A/S. We reserve all rights. This document, including all its sub-sections, has copyrights. Read more about what you can do with our patterns at the bottom of each pattern on our site. |
|||||||||||||||||||||||||


With over 40 years in knitting and crochet design, DROPS Design offers one of the most extensive collections of free patterns on the internet - translated to 17 languages. As of today we count 324 catalogs and 12290 patterns - 12280 of which are translated into English (US/in).
We work hard to bring you the best knitting and crochet have to offer, inspiration and advice as well as great quality yarns at incredible prices! Would you like to use our patterns for other than personal use? You can read what you are allowed to do in the Copyright text at the bottom of all our patterns. Happy crafting!
Post a comment to pattern DROPS 199-4
We would love to hear what you have to say about this pattern!
If you want to leave a question, please make sure you select the correct category in the form below, to speed up the answering process. Required fields are marked *.