
Popular categories
Looking for a yarn?


Comments / Questions (16)
![]() DE PRINS wrote:
DE PRINS wrote:
Quelques erreurs dans ce modèle : - Dos et devant : Il faut écrire Placer de nouveaux marqueurs pour les côtés soit 56-61-65m (au lieu de 51-61-65m) - Manche droite : Monter 62-62-64m et tricoter 9rgs (et non 9m) A 6 cm de hauteur totale, augmenter 1m (et non diminuer 1m)
03.06.2017 - 10:01DROPS Design answered:
Bonjour Mme DePrins et merci pour votre retour, les corrections ont été faites. Bon tricot!
06.06.2017 - 09:36
![]() Lillan Bradley wrote:
Lillan Bradley wrote:
I've been in contact w/NordicMart and they referred me to you regarding the increases and decreases for the front piece(s) it states: with 65sts on the needle: increase for the collar until 22 sts remain 65-22=43sts left; also decrease 1st every 6th row 4x and on every 4th row 13x=26sts. Then 2sts bind-off-24sts. Bind-off for armholes 15sts total=24-15=9sts REMAIN! The pattern states that there will be 23 sts FOR THE SHOULDER LEFT??? (and 19 for the collar) .
06.05.2017 - 00:45DROPS Design answered:
Dear Mrs Bradley, you are inc for collar: 1 st every 6th row 12 times + every 8th row 2 times = 14 sts inc for collar (+ 8 sts front band = 22 sts for collar). Then you will dec 17 sts for neck (= 1 st every 6th row 4 times, then every 4th row 13 times). Then bind off 17 sts for armhole (=2 sts + 3 sts 2 times, 2 sts 3 times, 1 st 3 times). Then dec 1 st 3 times = 3 sts dec (= 19 sts for collar remain). There were 65 sts + 14 - 17 -17 - 3 = 42 sts - 23 sts for shoulder = 19 sts remain (= sts for collar). Happy knitting!
08.05.2017 - 10:05
![]() Betsie wrote:
Betsie wrote:
Ook snap ik het meerderen minderen voor de kraag niet. Bij welke steek moet ik precies meerderen/minderen. Wat wordt er bedoeld met middenvoor. Is dat tussen de vierde en vijfde steek van de gerstekorrelbies, of aan het begin van de naald of aan het begin van de tricotsteek. Ik zie met belangstelling uw reactie tegemoet.
26.02.2012 - 14:05DROPS Design answered:
U breit alles ineen, zie foto. U heeft al een bies middenvoor in gerstekorrel, u meerdert tussen de bies en het voorpand. Middenvoor is waar het vest sluit, waar later knopen komen.
12.03.2012 - 10:59
![]() Betsie wrote:
Betsie wrote:
Wat wordt er bedoeld met: Brei 1 r aan weerszijden van de markeerringen, en meerder buiten deze st r (aan weerszijden) 3 keer 1 st. Ik begrijp dus niet wat er wordt bedoeld met "buiten". Ook op de vele instructievideo's kom ik het niet tegen. Graag verneem ik van u. Bij voorbaat mijn dank.
24.02.2012 - 20:12DROPS Design answered:
U breit tot 1 st voor de markeerring, dan meerdert u 1 st, dan breit u 2 st r (1 r, markeerring, 1 r) en dan meerdert u weer.
12.03.2012 - 10:56
![]() DROPS Design wrote:
DROPS Design wrote:
Hej Jette Du skal tage ud indenfor 1 m (den yderste m = kantm) og lidt senere skal du ifølge opskriften tage ind indenfor 8 forkantmasker + de nye m som er taget ud. God fornøjelse! mvh Garnstudio
24.08.2007 - 08:33
![]() Jette wrote:
Jette wrote:
Jeg har problemer i forbindelse med at jeg skal tage ud til kraven. I opskriften står der, at jeg skal tage ud på indersigen af 1 kantmaske. (der har ikke tidligere stået noget i opskriften om kantmasker) Mit spørgsmål er: skal jeg strikke de første 8 m perlestrik og så tage ud derefter, eller skal jeg strikke en maske (af de 8 m) og så tage ud efter den. Jeg håber i kan hjælpe mig. På forhånd tak. Med venlig hilsen Jette
23.08.2007 - 22:31
|
|
DROPS 60-7 |
|
|
|
|
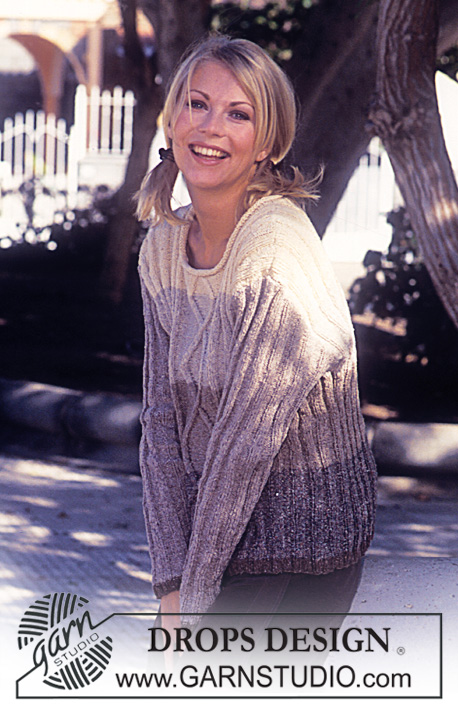
DROPS Cardigan in Bomull-Lin with shawl collar
DROPS 60-7 |
|
|
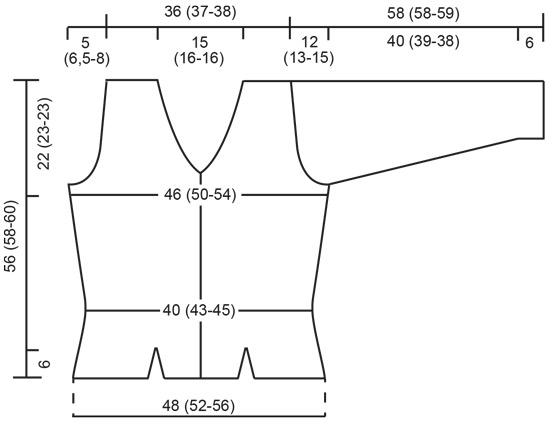
Gauge: 21 sts x 28 rows in stockinette stitch = 10 x 10 cm [4" x 4"]. Buttonholes: When the work measures: 8 cm, 14.5 (15.5-16) cm, 21.5 (22.5-24) cm and 28 (30-32) cm [3⅛", 5.75" (5⅞" - 6.25"), 8.5" (8⅞" - 9.5"), and 11" (11.75" - 12⅝")], make buttonholes on the right front as follows: bind off the 4th and 5th sts and cast on 2 new sts over the bound-off sts on the next row. Make the top buttonhole in the neckband in line with the others. Seed stitch (on an even number of sts): Row 1: * K 1, P 1 * Row 2: * P 1, K 1 * Seed stitch (on an odd number of sts): All rows: K 1, *P 1, K 1* Seed stitch (worked in the round): Row 1: * knit 1, purl 1 * Row 2: * knit the purl sts from the previous row and purl the knit sts from the previous row * Back: Cast on 50 (52-54) sts and knit 9 rows seed st. Change to stockinette stitch, keeping the outer 6 sts at each side in seed st throughout. When the work measures 7 cm [2.75"] put the work aside. Left Side piece: Cast on 54 (62-68) sts and knit 9 rows seed st. Change to stockinette stitch, keeping the outer 6 sts at each side in seed st throughout. When the work measures 7 cm [2.75"] put the work aside. Right Side piece: Cast on and knit as for the left side piece. Left Front piece: Cast on 29 (30-31) sts and knit 9 rows seed st. Change to stockinette stitch, keeping the outer 6 sts at the left side and the outer 8 sts at the center front (for the button band) in seed st throughout. When the work measures 7 cm [2.75"] put the work aside. Right Front: Cast on and knit as for the left front, but reverse pattern (6 sts seed st at the right side, 8 sts seed st at the center front). Body: Put all five parts on the same needles as follows: right front, right side piece, back, left side piece, left front - there will be 2 splits in the back and 2 in the front = 216 (236-252) sts on the needles. Place markers at each join. Knit the next 6 rows as follows: Keep 6 sts on each side of each marker and the 8 sts at each center front (button bands) in seed st; knit the remaining sts in stockinette stitch. Then knit stockinette stitch over all sts, but continue to work the 8 button band sts on each side in seed st throughout. Make buttonholes on the right front - see instructions above. When the work measures 10 cm [4"] dec 1 st at each side of each marker 4 (5-6) times (see instructions below): Sizes S+M: every 4th row Size L: alternately every 3rd and 4th row Make decreases as follows on the right side: Before the marker: K 2 tog. After the marker: slip 1, K 1, pass the slipped st over (psso). Make decreases as follows on the wrong side: Before the marker: P 2 tog into the back of the st. After the marker: P 2 tog. = 184 (196-204) sts on the needles. When the work measures 17 (18-19) cm [6.75" (7" - 7.5")] inc 1 st each side of each marker (make increases 1 st in from marker) 3 (4-5) times every 5th (4th-3rd) row = 208 (228-244) sts. Remove the markers when you are finished with the increases. Attach new markers, one at each side: fronts = 56 (61-65) sts each, back = 96 (106-114) sts. When the work measures 27 (29-31) cm [10⅝" (11⅜" - 12.25")] increase for the collar at the center front edge 1 st in from the edge - measure the collar from here. Inc 1 st each side every 6th row 12 times, then every 8th row 2 times = 22 sts each collar. Knit the increased sts into seed st as you go along. At the same time, when the work measures 29 (31-33) cm [11" (12.25" - 13")], decrease for the neck and continue to increase for the collar as instructed above. Make the decreases in the last stitch of stockinette st next to the seed stitch border. Dec 1 st every 6th row 4 times, then every 4th row 12 (13-13) times. Make decreases as follows on the right side: Before the seed st border: K 2 tog. After the seed st border: slip 1, K 1, pass the slipped st over (psso). Make decreases as follows on the wrong side: Before the seed st border: P 2 tog into the back of the st. After the seed st border: P 2 tog. When the work measures 34 (35-37) cm [13⅜" (13.75" - 14.5")], bind off 2 sts on each side of each marker for armholes and knit the rest of each part separately. Front: Bind off for armholes every other row: 3 sts 1 (2-2) times, 2 sts 1 (2-3) times, 1 st 3 (2-3) times. When the collar measures 25 cm [9⅞"], dec 1 st at each center front (make decrease 1 st in from the edge), then every 3 cm [1.25"] 2 times = 19 sts collar. When the work measures 56 (58-60) cm [22" (22⅞" - 23⅝")] bind off 22 (22-23) sts for the shoulder. Now only the collar sts remain on the needles. Continue in seed st, but every other row knit a short row on the collar follows: Knit 1 row only over the outer 12 sts at the center front, turn the work and knit back to edge. Knit the next row over all sts. When the collar measures 7.5 (7.5-8) cm [3" (3" - 3⅛")] put all sts on a stitch holder. Back: = 92 (102-110) sts. Bind off for armholes as on the front = 76 (78-80) sts. When the work measures 54 (56-58) cm [21.25" (22" - 22⅞")] bind off the center 28 (30-30) sts for the neck. Bind off 2 sts at each neck edge on the next row. Bind off when the work measures 56 (58-60) cm [22" (22⅞" - 23⅝")]. Right sleeve: Knit the sleeves back and forth on the needles for the first 16 (18-18) cm [6.25" (7" - 7")]. Cast on 62 (62-64) sts and knit 9 rows seed st. Change to stockinette stitch, but keep the outer 8 sts at each side in seed st and place a marker as follows: 40 (40-41) sts for the upper sleeve, attach a marker (underarm), 22 (22-23) sts for the lower sleeve. When the work measures 6 cm [2⅜"], inc 1 st at each side of the marker 16 (18-17) times: Size S: alternately every 6th and 7th row Sizes M+L: alternately every 5th and 6th row. When the work measures 16 (18-18) cm [6.25" (7" - 7")], bind off the outer 8 sts on the lower sleeve. Put all sts on double pointed needles and join. Knit all sts in stockinette stitch. Continue to increase at the underarm marker until there are 86 (90-90) sts on the needles. When the work measures 46 (45-44) cm [18⅛" (17.75" - 17.25")], bind off 2 sts each side of underarm marker and knit the rest of the work back and forth on the needles. Bind off for sleeve caps at each side every other row: 3 sts 2 times, 2 sts 2 (3-2) times, 1 st 7 (7-12) times, 2 sts 3 times, 3 sts 3 (3-2) times, bind off. The work measures approximately 58 (58-59) cm [22⅞" (22⅞" - 23.25")]. Left sleeve: Knit like the right, but reverse shaping. Assembly: Sew shoulder seams. Weave the collar together at the center back. Sew the collar to the neck opening on the back with the seam toward the wrong side. Lay the lower sleeve button band under the upper sleeve button band and sew. Sew on the sleeves and the buttons. The buttons on the sleeves should be sewed through both bands. |
|
 |
|
Have you finished this pattern?Tag your pictures with #dropspattern or submit them to the #dropsfan gallery. Do you need help with this pattern?You'll find 20 tutorial videos, a Comments/Questions area and more by visiting the pattern on garnstudio.com. © 1982-2026 DROPS Design A/S. We reserve all rights. This document, including all its sub-sections, has copyrights. Read more about what you can do with our patterns at the bottom of each pattern on our site. |


With over 40 years in knitting and crochet design, DROPS Design offers one of the most extensive collections of free patterns on the internet - translated to 17 languages. As of today we count 324 catalogs and 12290 patterns - 12280 of which are translated into English (US/in).
We work hard to bring you the best knitting and crochet have to offer, inspiration and advice as well as great quality yarns at incredible prices! Would you like to use our patterns for other than personal use? You can read what you are allowed to do in the Copyright text at the bottom of all our patterns. Happy crafting!
Post a comment to pattern DROPS 60-7
We would love to hear what you have to say about this pattern!
If you want to leave a question, please make sure you select the correct category in the form below, to speed up the answering process. Required fields are marked *.