
Popular categories
Looking for a yarn?


Comments / Questions (35)
![]() Sherry wrote:
Sherry wrote:
Can I use a yarn bee dazzling yarn for this project? it's 3.5 oz,100g,249yard,228 meter, 98% Acrylic. and how much would I need for this project? And do you have a tutorial for this too?
19.06.2021 - 17:06DROPS Design answered:
Dear Sherry, please understand that these patterns are made available to support DROPS yarns, therefore we cannot advise you about yarns made by a different brand. Happy Stitching!
20.06.2021 - 01:25
![]() Christelle wrote:
Christelle wrote:
Bonjour, c'est mon premier gros ouvrage et je ne sais comment m'y prendre lorsqu'il faut tricoter chaque partie séparément . Dois-je commencer par le dos? Et faut-il laisser les mailles des deux côtés en attente, c'est-à-dire les ôter des aiguilles circulaires.? Ce modèle est magnifique mais je suis un peu perdue. Merci pour votre aide !
20.12.2020 - 22:53DROPS Design answered:
Bonjour Christelle, la veste est tricotee de bas en haut, en allers et retours sur l’aiguille circulaire à partir du milieu devant (dos et devants a la fois), jusqu'aux emmanchures. Tricoter ensuite les devants et le dos séparément, en allers et retours sur aiguille circulaire. Laisser les mailles des deux côtés en attente signifie de les oter des aiguilles et les mettre sur un fil ou une autre aiguille (dite auxilialire). Les manches se tricotent en allers et retours sur aiguille circulaire. Suivez les explications, tout va etre bien :) Bon tricot!
20.12.2020 - 23:06
![]() Karin wrote:
Karin wrote:
Het maken van de sjaalkraag begrijp ik niet. Bij het rechter voorpand staat dat er na afkanten nog 18 steken over blijven en bij het maken van de sjaalkraag staat: brei 2 naalden over de eerste 12-12-12-14-14-14 steken, 2 naalden over alle steken *. Waar moet ik beginnen en/of welke steken moet ik overslaan? Zou fijn zijn als jullie dit kunnen uitleggen, dan wil ik het vest graag maken :-).
17.12.2020 - 23:35
![]() Johan G Mason wrote:
Johan G Mason wrote:
Looks like the one for me
13.10.2020 - 18:56
![]() Eva wrote:
Eva wrote:
Hej Skulle behöva er hjälp. Har börjat sticka denna kofta. Masktätheten stämmer . Började med xl, repade upp och gör nu enligt stl m. Trots detta mäter koftan 170 cm i nederkant. Vad är fel? Och vad ska jag göra så det blir rätt? Tycker den är så fin och rolig att sticka.
15.07.2020 - 08:25DROPS Design answered:
Hej Eva, Husk at du har 18 masker som overlapper hinanden på forstykket, derfor måler arbejdet mere end målet som står i måleskitsen. God fornøjelse!
30.07.2020 - 14:23
![]() Nanci Donacki-Thompson wrote:
Nanci Donacki-Thompson wrote:
I am having a problem with the buttonholes on this project. The instruction tell you how to do the buttonhole and at what length ti place them. But it does not say how many stitches in from thy he right edge to make the buttonhole.
30.12.2019 - 16:39DROPS Design answered:
Dear Nancy, to do a buttonhole you should knit together the third and fourth stitch from edge and make 1 yarn over. On next row knit yarn over, so there will be a hole in its place. I hope this help. Happy Knitting!
31.12.2019 - 15:38
![]() Dorette wrote:
Dorette wrote:
Hallo liebes Team, die Strickanleitung ist wirklich prima, jedoch habe ich ein Verständnisproblem mit dem Schalkragen. Mir ist nicht klar was damit gemeint ist, den Kragen an der kurzen Seite mittig nach innen zu nähen. Ich habe keine Vorstellung, wie der Kragen danach aussehen soll. Ich freue mich auf Ihre Antwort. Vielen Dank. Grüße aus Haimhausen von Dorette.
04.10.2019 - 21:21
![]() Dorette wrote:
Dorette wrote:
Hallo liebes Team, die Strickanleitung ist wirklich prima, jedoch habe ich ein Verständnisproblem mit dem Schalkragen. Mir ist nicht klar was damit gemeint ist, den Kragen an der kurzen Seite mittig nach innen zu nähen. Ich habe keine Vorstellung, wie der Kragen danach aussehen soll. Ich freue mich auf Ihre Antwort. Vielen Dank. Grüße aus Haimhausen von Dorette.
04.10.2019 - 21:00DROPS Design answered:
Liebe Dorette, dieses Video sollte Ihnen helfen, im Video wird der Kragen ohne verkürzten Reihen gestrickt, sonnst wird er gleich zusammengenäht (die abgekettene Maschen von beiden Kragen zusammennähen, dann in den Halsausschnitt am Rückenteil zusammennähen. Viel Spaß beim stricken!
07.10.2019 - 08:40
![]() Anne wrote:
Anne wrote:
Bonjour, ce modele est magnifique mais je ne comprends pas les explications quand vous dites de diminuer à 28cm de hauteurs 9 mailles dans les sections mailles envers de A2/A3/A4. pouvez vous m'aider merci d'avance .
03.04.2019 - 11:15DROPS Design answered:
Bonjour Anne, à 28 cm, vous devez diminuer 1 m envers (= 2 m ens à l'envers) dans chacune des sections en mailles envers de A.2/A.3/A.4 = vous diminuerez ainsi 9 mailles au total - continuez ensuite le point fantaisie comme avant, avec 2 m envers au lieu de 3 dans A.2/A.3/A.4. Bon tricot!
03.04.2019 - 13:50
![]() Lisbeth Frimer wrote:
Lisbeth Frimer wrote:
Hej. Jeg vil gerne ændre knapperne til flade runde. Hvilken diameter skal de så have?
21.03.2019 - 17:18DROPS Design answered:
Hei Lisbeth. Du kan forsøke knapper med diameter på 25-30mm, det kommer litt an på hvor løst du strikker knapphullene. God fornøyelse
26.03.2019 - 14:37
|
||||||||||||||||
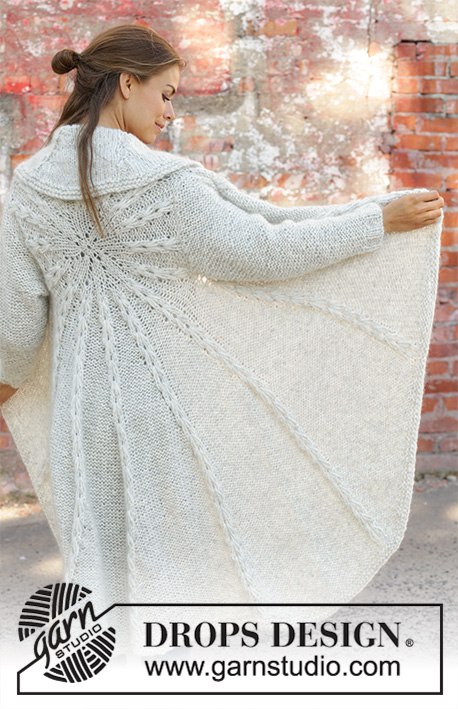
Trondheim#trondheimjacket |
||||||||||||||||
 |
 |
|||||||||||||||
Knitted jacket with shawl collar in DROPS Snow. Piece is knitted in lace pattern and seed stitch. Size: S - XXXL
DROPS 194-12 |
||||||||||||||||
|
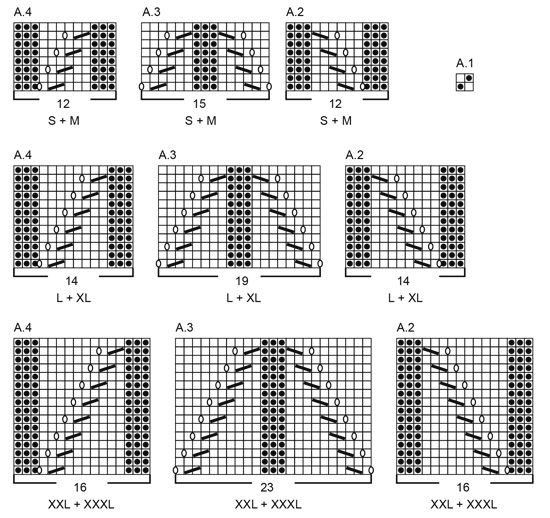
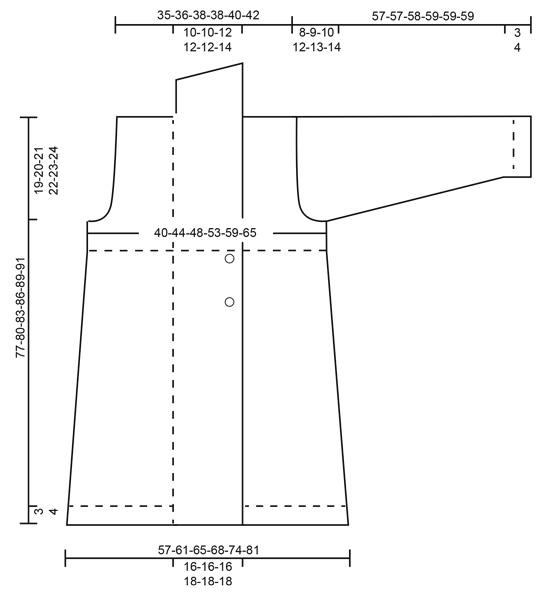
---------------------------------------------------------- EXPLANATION FOR THE PATTERN: ---------------------------------------------------------- GARTER STITCH (back and forth): 1 ridge = knit 2 rows. PATTERN: See diagrams A.1 to A.4. Choose diagram for your size. Diagrams show all rows in pattern seen from the right side. DECREASE TIP (applies to sides of body): After 1st and 3rd marker thread: Slip 1 stitch knitwise, knit 1, pass slipped stitch over stitch worked Before 2nd and 4th marker thread: Work until 2 stitches remain before marker thread, knit 2 together. MEASURING TIP: To get the right proportions on jacket length measurements are done when piece is flat. Because of the weight of the yarn and seed stitch on yoke the piece will be approx. 5 cm / 2" longer than measurements in chart. INCREASE TIP (applies to sleeves): All increases are done from right side. Increase in each side inside 1 edge stitch in garter stitch and 1 knit by making 1 yarn over. On next row purl yarn over twisted to avoid hole. BUTTONHOLES: Decrease for buttonholes on right band. 1 BUTTONHOLE = knit third and fourth stitch from edge together and make 1 yarn over. On next row knit yarn over = hole. Decrease for buttonholes when piece measures: S: 44 and 53 cm M: 46 and 55 cm L: 48 and 57 cm XL: 50 and 59 cm XXL: 52 and 61 cm XXXL: 54 and 63 cm NOTE: Approx. 1 cm / ⅜" remains after last buttonhole before working seed stitch over all stitches. ---------------------------------------------------------- START THE PIECE HERE: ---------------------------------------------------------- JACKET - SHORT OVERVIEW OF THE PIECE: Work back and forth on circular needle from mid front, bottom up to armholes. Then work front pieces and back piece back and forth on circular needle separately. Work sleeves back and forth on circular needle. BODY: Cast on 151-159-165-177-189-203 stitches (including 18-18-18-20-20-20 band stitches in each side of piece) on circular needle size 7 mm / US 10.75 with Snow. Work first row as follows from right side: Work A.1 (= 2 stitches) over the first 18-18-18-20-20-20 stitches (= band), work 115-123-129-137-149-163 stitches in GARTER STITCH – read explanation above, and finish with A.1 (= 2 stitches) over the last 18-18-18-20-20-20 stitches (= band). Continue this pattern like this until piece measures 3-3-3-4-4-4 cm / 1⅛"-1⅛"-1⅛"-1½"-1½"-1½". REMEMBER THE GAUGE! Switch to circular needle size 8 mm / US 11 and insert 4 marker threads (= for decrease in the side) at the same time work as follows – from right side: A.1 (= 2 stitches) over the first 18-18-18-20-20-20 stitches as before, A.2 (= 12-12-14-14-16-16 stitches), insert 1st marker thread, work in stockinette stitch over the next 26-30-27-31-31-38 stitches, insert 2nd marker thread, A.4 (= 12-12-14-14-16-16 stitches), A.3 (= 15-15-19-19-23-23 stitches), A.2 (= 12-12-14-14-16-16 stitches), insert 3rd marker thread, work stockinette stitch over the next 26-30-27-31-31-38 stitches, insert 4th marker thread, A.4 (= 12-12-14-14-16-16 stitches) finish with A.1 (= 2 stitches) over the last 18-18-18-20-20-20 stitches as before. Continue this pattern. Decrease in the sides, in pattern and for buttonholes as follows: SIDES: When piece measures 8 cm / 3⅛", decrease 1 stitch at each marker thread (= 4 stitches decreased) - read DECREASE TIP and MEASURING TIP! Decrease like this every 7-7½-8-10-10½-11 cm 7-7-7-6-6-6 times in total (= 28-28-28-24-24-24 stitches decreased) - AT THE SAME TIME when piece measures 44-46-48-50-52-54 cm / 17¼"-18"-19"-19¾"-20½"-21¼" begin decrease for BUTTONHOLES – read explanation above. IN PATTERN: When piece measures approx. 28-29-30-31-32-33 cm / 11"-11⅜"-11¾"-12¼"-12½"-13" decrease 1 stitch in every purl section in A.2/A.3/A.4, decrease by purling 2 stitches together in every purl section (= 9 stitches decreased). When all decreases are done there are 114-122-128-144-156-170 stitches on row. Work until piece measures 54-56-58-60-62-64 cm / 21¼"-22"-22¾"-23⅝"-24⅜"-25¼", adjust according to row worked from right side. Purl 1 row from wrong side, continue with A.1 (= 2 stitches) over all stitches until finished measurements. When piece measures 58-60-62-64-66-68 cm / 22¾"-23⅝"-24⅜"-25¼"-26"-26¾", work next row as follows: Work the first 32-34-35-40-43-46 stitches, bind off the next 6 stitches for armhole, work the next 38-42-46-52-58-66 stitches, bind off the next 6 stitches for armhole, work the last 32-34-35-40-43-46 stitches. Finish each part separately. BACK PIECE: = 38-42-46-52-58-66 stitches. Continue A.1 as before and bind off for armhole at the beginning of every row in each side as follows: 2 stitches 0-0-1-2-3-4 times and 1 stitch 0-1-0-1-1-2 times = 38-40-42-42-44-46 stitches. When piece measures 75-78-81-84-87-89 cm, bind off the middle 8-8-10-10-10-12 stitches for neck and finish each shoulder separately = 15-16-16-16-17-17 stitches. Bind off 1 stitch on next row from neck = 14-15-15-15-16-16 stitches. Continue until piece measures 77-80-83-86-89-91 cm and bind off. Work the other shoulder the same way. RIGHT FRONT PIECE: = 32-34-35-40-43-46 stitches. Continue A.1 as before and bind off for armhole as on back piece = 32-33-33-35-36-36 stitches. Continue to work until piece measures 77-80-83-86-89-91 cm. Bind off the first 14-15-15-15-16-16 stitches for shoulder on next row from wrong side = 18-18-18-20-20-20 stitches for shawl collar. SHAWL COLLAR: Work ridges, beginning from mid front: * Work 2 rows over the first 12-12-12-14-14-14 stitches, 2 rows over all stitches *, work from *-* until piece measures approx. 7-7-8-8-8-9 cm/2¾"-2¾"-3"-3"-3"-3½" on the shortest (measured closest to the shoulder). Bind off. LEFT FRONT PIECE: Work as right front piece but reversed. Bind off for shoulder from right side. SLEEVE: Cast on 26-28-30-30-34-34 stitches (including 1 edge stitch in each side) on circular needle size 7 mm / US 10.75 with Snow. Work 2 ridges. Switch to circular needle size 8 mm / US 11 and work in stockinette stitch with 1 edge stitch in garter stitch in each side. When piece measures 8 cm / 3⅛", increase 1 stitch in each side - read INCREASE TIP. Increase like this approx. every 7½-6-6-5-5-4 cm 6-7-7-8-8-9 times in total = 38-42-44-46-50-52 stitches. When piece measures 49-48-48-47-46-45 cm (NOTE: Shorter measurements in the larger sizes because of longer sleeve cap and wider shoulders), bind off for sleeve cap at beginning of every row in each side as follows: bind off 3 stitches 1 time, 2 stitches 1-2-2-2-2-2 times and 1 stitch 2-2-3-3-3-3 times. Then bind off 2 stitches at beginning of every row in each side until piece measures approx. 56-56-57-58-58-58 cm/22"-22"-22½"-22¾"-22¾"-22¾", then bind off 3 stitches 1 time in each side. Bind off the remaining stitches, piece measures approx. 57-57-58-59-59-59 cm/22½"-22½"-22¾"-23¼"-23¼"-23¼". Work the other sleeve the same way. ASSEMBLY: Sew the shoulder seams. Sew shawl collar together mid back and make sure that seam is in towards wrong side when collar is folded down. Sew shawl collar to neck line in the back of neck. Sew in sleeves inside 1 edge stitch. Sew underarm seams in one inside 1 edge stitch. Sew buttons on to left front piece. |
||||||||||||||||
Diagram explanations |
||||||||||||||||
|
||||||||||||||||
 |
||||||||||||||||
 |
||||||||||||||||
Have you finished this pattern?Tag your pictures with #dropspattern #trondheimjacket or submit them to the #dropsfan gallery. Do you need help with this pattern?You'll find 29 tutorial videos, a Comments/Questions area and more by visiting the pattern on garnstudio.com. © 1982-2026 DROPS Design A/S. We reserve all rights. This document, including all its sub-sections, has copyrights. Read more about what you can do with our patterns at the bottom of each pattern on our site. |
||||||||||||||||


With over 40 years in knitting and crochet design, DROPS Design offers one of the most extensive collections of free patterns on the internet - translated to 17 languages. As of today we count 324 catalogs and 12291 patterns - 12281 of which are translated into English (US/in).
We work hard to bring you the best knitting and crochet have to offer, inspiration and advice as well as great quality yarns at incredible prices! Would you like to use our patterns for other than personal use? You can read what you are allowed to do in the Copyright text at the bottom of all our patterns. Happy crafting!
Post a comment to pattern DROPS 194-12
We would love to hear what you have to say about this pattern!
If you want to leave a question, please make sure you select the correct category in the form below, to speed up the answering process. Required fields are marked *.