
Popular categories
Looking for a yarn?


Comments / Questions (35)
![]() Popp wrote:
Popp wrote:
Hallo, ich würde gerne diese Jacke stricken. Aber die Anleitung stimmt mit dem Bild der Jacke nicht überein. Nach dem Bild hat diese Jacke keine Blende,keine Knöpfe und ist vorne abgerundeten. Die Anleitung sagt was anderes.
08.10.2025 - 11:06DROPS Design answered:
Hallo, das Foto wirkt tatsächlich etwas verwirrend. Die Jacke hat keine Rundung, das ist nur eine Art optische Täuschung, weil die untere Ecke der Jacke im Moment der Fotoaufnahme nach oben "geflogen" ist und dadurch gerundet wirkt. Die Blende gibt es, das ist der Perlmusterbereich an den Vorderteilen. Sie ist mit 18 Maschen recht breit, wirkt auf dem Foto aber nochmal breiter. Die beiden Knöpfe sind tatsächlich nicht zu erkennen, da die Dame auf dem Foto offenbar genau ihre Hände darüber hält - jedenfalls ist das die Position der Knöpfe in der Maßskizze. Trotzdem viel Spaß beim Stricken oder beim Stöbern nach einem anderen Modell!
23.10.2025 - 00:54
![]() Simone Sutter wrote:
Simone Sutter wrote:
Und die Fragen der anderssprachigen Kommentatoren, bzw. Ihre Antworten dazu sind wichtig und sollten in der jeweilig eigenen Sprache übersetzt werden. Bitte ändern Sie das.
29.09.2025 - 21:21
![]() Simone Sutter wrote:
Simone Sutter wrote:
Hallo, eine schöne Jacke, aber die Anleitung für die Abnahmen stimmen nicht mit den Abnahmen in den Bildern des Musters überein.
29.09.2025 - 21:20
![]() Anette wrote:
Anette wrote:
Hej\\r\\nPå Billede nr 2 og 3 buer /er der et ovale/rundt stykke midt på forstykket.\\r\\nUdtagningerne mangler i opskriften.\\r\\n\\r\\nEr der en anden Drops opskrift, som har disse udtagninger med til det runde forstykke \\r\\nVH
07.01.2025 - 14:58
![]() Anette Kaag wrote:
Anette Kaag wrote:
Hvilket nr har opskriften, som svarer til billederne?- med det runde/buede forstykke Tak
03.01.2025 - 21:16DROPS Design answered:
Hei Anette. Hvilken runde/buede oppskrift? Om du klikker på de ulike bildene vil du komme til oppskriften, og der du vil se oppskriftsnr. mvh DROPS Design
07.01.2025 - 14:15
![]() Sophie wrote:
Sophie wrote:
Bonjour, Sur les photos, les devants ont l'air d'avoir une augmentation de maille continue en A1 dès le départ. Or ce n'est écrit nulle part. On reste toujours sur 20 mailles en A1 sur les devants. A quel moment le A1 est'il augmenté? Merci et bravo
14.02.2024 - 08:20DROPS Design answered:
Bonjour Sophie, on n'augmente pas le nombre de mailles point de riz, sur la photo, le bord du devant gauche est légèrement relevé sans doute à cause du vent le jour de la photo, mais les devants vont être droits, comme dans le schéma. Bon tricot!
14.02.2024 - 16:17
![]() Netti wrote:
Netti wrote:
Gibt es für das Muster (insb. A.3) ebenfalls eine Maschenprobe?
27.08.2023 - 14:59DROPS Design answered:
Liebe Netti, für dieses Modell haben wir nur die Maschenprobe glatt rechts gestrickt, sollte sie stimmen, dann sollte Ihre Arbeit die gewünschte Maßnahmen wie in der Skizze messen. Viel Spaß beim stricken!
28.08.2023 - 14:19
![]() Jessica wrote:
Jessica wrote:
Hej! Är nederkanten på framstyckena rundad? Det ser ut så på bilden men kan inte utläsa det i mönstret. Tänker sticka denna om nederkanten är rak men inte om den är rundad.
02.10.2022 - 03:43DROPS Design answered:
Hej Jessica, nej de är raka, se även måttskissen :)
03.10.2022 - 15:13
![]() Yvonne wrote:
Yvonne wrote:
Lieve mensen, kunt u mij vertellen waar ik moet beginnen met de sjaal kraag. Ik begrijp niet waar de 12 steken vandaan komen. Ik hoor graag van u.
12.01.2022 - 20:25DROPS Design answered:
Dag Yvonne,
Je breit 2 naalden over de eerste steken op de naald, dus gewoon over de steken die je al op de naald hebt staan. Je breit dus 12 steken dan stop je met breien, keer je het werk en brei je weer terug. Dan brei je een naald over alle steken. Zo wissel je af met alleen de eerste 12 steken breien en de hele naald breien, tot de aangegeven afmeting.
13.01.2022 - 19:02
![]() Sherry Z wrote:
Sherry Z wrote:
Do you have a tutorial for this pattern? Because I would learn the pattern much easier and faster than reading it from a print out
04.07.2021 - 16:45DROPS Design answered:
Dear Sherry, if you mean a tutorial, that takes you throught this one piece, no we do not. However, there are 30 different relevant videos, showing you how to do different parts of the patterns, they are linked below the pattern. Happy Stitching.
05.07.2021 - 02:23
|
||||||||||||||||
Trondheim#trondheimjacket |
||||||||||||||||
 |
 |
|||||||||||||||
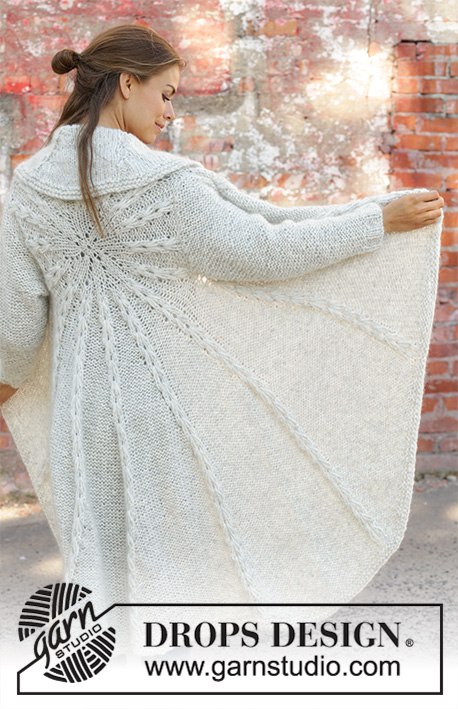
Knitted jacket with shawl collar in DROPS Snow. Piece is knitted in lace pattern and seed stitch. Size: S - XXXL
DROPS 194-12 |
||||||||||||||||
|
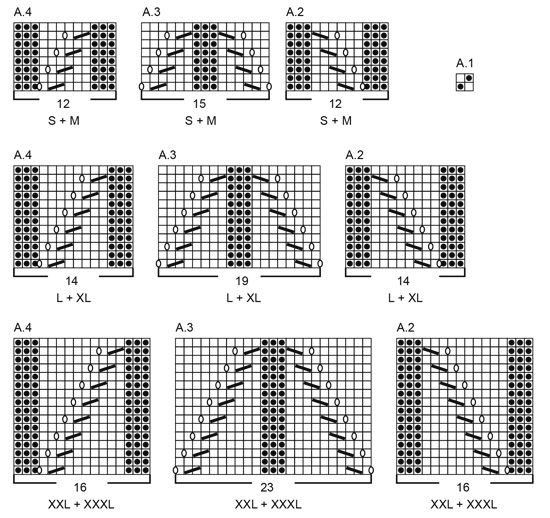
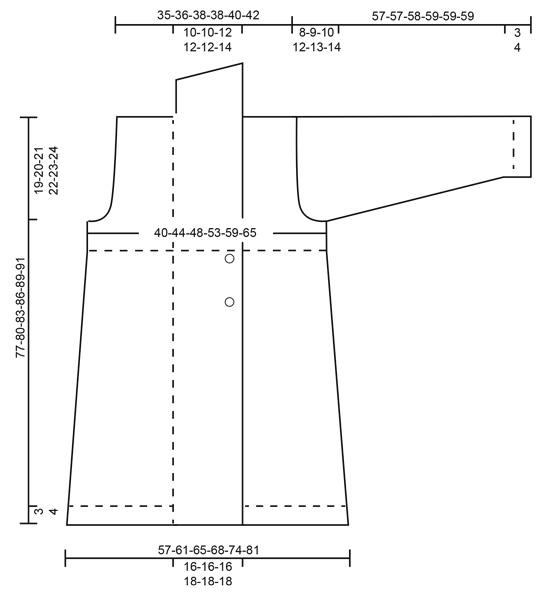
---------------------------------------------------------- EXPLANATION FOR THE PATTERN: ---------------------------------------------------------- GARTER STITCH (back and forth): 1 ridge = knit 2 rows. PATTERN: See diagrams A.1 to A.4. Choose diagram for your size. Diagrams show all rows in pattern seen from the right side. DECREASE TIP (applies to sides of body): After 1st and 3rd marker thread: Slip 1 stitch knitwise, knit 1, pass slipped stitch over stitch worked Before 2nd and 4th marker thread: Work until 2 stitches remain before marker thread, knit 2 together. MEASURING TIP: To get the right proportions on jacket length measurements are done when piece is flat. Because of the weight of the yarn and seed stitch on yoke the piece will be approx. 5 cm / 2" longer than measurements in chart. INCREASE TIP (applies to sleeves): All increases are done from right side. Increase in each side inside 1 edge stitch in garter stitch and 1 knit by making 1 yarn over. On next row purl yarn over twisted to avoid hole. BUTTONHOLES: Decrease for buttonholes on right band. 1 BUTTONHOLE = knit third and fourth stitch from edge together and make 1 yarn over. On next row knit yarn over = hole. Decrease for buttonholes when piece measures: S: 44 and 53 cm M: 46 and 55 cm L: 48 and 57 cm XL: 50 and 59 cm XXL: 52 and 61 cm XXXL: 54 and 63 cm NOTE: Approx. 1 cm / ⅜" remains after last buttonhole before working seed stitch over all stitches. ---------------------------------------------------------- START THE PIECE HERE: ---------------------------------------------------------- JACKET - SHORT OVERVIEW OF THE PIECE: Work back and forth on circular needle from mid front, bottom up to armholes. Then work front pieces and back piece back and forth on circular needle separately. Work sleeves back and forth on circular needle. BODY: Cast on 151-159-165-177-189-203 stitches (including 18-18-18-20-20-20 band stitches in each side of piece) on circular needle size 7 mm / US 10.75 with Snow. Work first row as follows from right side: Work A.1 (= 2 stitches) over the first 18-18-18-20-20-20 stitches (= band), work 115-123-129-137-149-163 stitches in GARTER STITCH – read explanation above, and finish with A.1 (= 2 stitches) over the last 18-18-18-20-20-20 stitches (= band). Continue this pattern like this until piece measures 3-3-3-4-4-4 cm / 1⅛"-1⅛"-1⅛"-1½"-1½"-1½". REMEMBER THE GAUGE! Switch to circular needle size 8 mm / US 11 and insert 4 marker threads (= for decrease in the side) at the same time work as follows – from right side: A.1 (= 2 stitches) over the first 18-18-18-20-20-20 stitches as before, A.2 (= 12-12-14-14-16-16 stitches), insert 1st marker thread, work in stockinette stitch over the next 26-30-27-31-31-38 stitches, insert 2nd marker thread, A.4 (= 12-12-14-14-16-16 stitches), A.3 (= 15-15-19-19-23-23 stitches), A.2 (= 12-12-14-14-16-16 stitches), insert 3rd marker thread, work stockinette stitch over the next 26-30-27-31-31-38 stitches, insert 4th marker thread, A.4 (= 12-12-14-14-16-16 stitches) finish with A.1 (= 2 stitches) over the last 18-18-18-20-20-20 stitches as before. Continue this pattern. Decrease in the sides, in pattern and for buttonholes as follows: SIDES: When piece measures 8 cm / 3⅛", decrease 1 stitch at each marker thread (= 4 stitches decreased) - read DECREASE TIP and MEASURING TIP! Decrease like this every 7-7½-8-10-10½-11 cm 7-7-7-6-6-6 times in total (= 28-28-28-24-24-24 stitches decreased) - AT THE SAME TIME when piece measures 44-46-48-50-52-54 cm / 17¼"-18"-19"-19¾"-20½"-21¼" begin decrease for BUTTONHOLES – read explanation above. IN PATTERN: When piece measures approx. 28-29-30-31-32-33 cm / 11"-11⅜"-11¾"-12¼"-12½"-13" decrease 1 stitch in every purl section in A.2/A.3/A.4, decrease by purling 2 stitches together in every purl section (= 9 stitches decreased). When all decreases are done there are 114-122-128-144-156-170 stitches on row. Work until piece measures 54-56-58-60-62-64 cm / 21¼"-22"-22¾"-23⅝"-24⅜"-25¼", adjust according to row worked from right side. Purl 1 row from wrong side, continue with A.1 (= 2 stitches) over all stitches until finished measurements. When piece measures 58-60-62-64-66-68 cm / 22¾"-23⅝"-24⅜"-25¼"-26"-26¾", work next row as follows: Work the first 32-34-35-40-43-46 stitches, bind off the next 6 stitches for armhole, work the next 38-42-46-52-58-66 stitches, bind off the next 6 stitches for armhole, work the last 32-34-35-40-43-46 stitches. Finish each part separately. BACK PIECE: = 38-42-46-52-58-66 stitches. Continue A.1 as before and bind off for armhole at the beginning of every row in each side as follows: 2 stitches 0-0-1-2-3-4 times and 1 stitch 0-1-0-1-1-2 times = 38-40-42-42-44-46 stitches. When piece measures 75-78-81-84-87-89 cm, bind off the middle 8-8-10-10-10-12 stitches for neck and finish each shoulder separately = 15-16-16-16-17-17 stitches. Bind off 1 stitch on next row from neck = 14-15-15-15-16-16 stitches. Continue until piece measures 77-80-83-86-89-91 cm and bind off. Work the other shoulder the same way. RIGHT FRONT PIECE: = 32-34-35-40-43-46 stitches. Continue A.1 as before and bind off for armhole as on back piece = 32-33-33-35-36-36 stitches. Continue to work until piece measures 77-80-83-86-89-91 cm. Bind off the first 14-15-15-15-16-16 stitches for shoulder on next row from wrong side = 18-18-18-20-20-20 stitches for shawl collar. SHAWL COLLAR: Work ridges, beginning from mid front: * Work 2 rows over the first 12-12-12-14-14-14 stitches, 2 rows over all stitches *, work from *-* until piece measures approx. 7-7-8-8-8-9 cm/2¾"-2¾"-3"-3"-3"-3½" on the shortest (measured closest to the shoulder). Bind off. LEFT FRONT PIECE: Work as right front piece but reversed. Bind off for shoulder from right side. SLEEVE: Cast on 26-28-30-30-34-34 stitches (including 1 edge stitch in each side) on circular needle size 7 mm / US 10.75 with Snow. Work 2 ridges. Switch to circular needle size 8 mm / US 11 and work in stockinette stitch with 1 edge stitch in garter stitch in each side. When piece measures 8 cm / 3⅛", increase 1 stitch in each side - read INCREASE TIP. Increase like this approx. every 7½-6-6-5-5-4 cm 6-7-7-8-8-9 times in total = 38-42-44-46-50-52 stitches. When piece measures 49-48-48-47-46-45 cm (NOTE: Shorter measurements in the larger sizes because of longer sleeve cap and wider shoulders), bind off for sleeve cap at beginning of every row in each side as follows: bind off 3 stitches 1 time, 2 stitches 1-2-2-2-2-2 times and 1 stitch 2-2-3-3-3-3 times. Then bind off 2 stitches at beginning of every row in each side until piece measures approx. 56-56-57-58-58-58 cm/22"-22"-22½"-22¾"-22¾"-22¾", then bind off 3 stitches 1 time in each side. Bind off the remaining stitches, piece measures approx. 57-57-58-59-59-59 cm/22½"-22½"-22¾"-23¼"-23¼"-23¼". Work the other sleeve the same way. ASSEMBLY: Sew the shoulder seams. Sew shawl collar together mid back and make sure that seam is in towards wrong side when collar is folded down. Sew shawl collar to neck line in the back of neck. Sew in sleeves inside 1 edge stitch. Sew underarm seams in one inside 1 edge stitch. Sew buttons on to left front piece. |
||||||||||||||||
Diagram explanations |
||||||||||||||||
|
||||||||||||||||
 |
||||||||||||||||
 |
||||||||||||||||
Have you finished this pattern?Tag your pictures with #dropspattern #trondheimjacket or submit them to the #dropsfan gallery. Do you need help with this pattern?You'll find 29 tutorial videos, a Comments/Questions area and more by visiting the pattern on garnstudio.com. © 1982-2026 DROPS Design A/S. We reserve all rights. This document, including all its sub-sections, has copyrights. Read more about what you can do with our patterns at the bottom of each pattern on our site. |
||||||||||||||||


With over 40 years in knitting and crochet design, DROPS Design offers one of the most extensive collections of free patterns on the internet - translated to 17 languages. As of today we count 324 catalogs and 12291 patterns - 12281 of which are translated into English (US/in).
We work hard to bring you the best knitting and crochet have to offer, inspiration and advice as well as great quality yarns at incredible prices! Would you like to use our patterns for other than personal use? You can read what you are allowed to do in the Copyright text at the bottom of all our patterns. Happy crafting!
Post a comment to pattern DROPS 194-12
We would love to hear what you have to say about this pattern!
If you want to leave a question, please make sure you select the correct category in the form below, to speed up the answering process. Required fields are marked *.