
Popular categories
Looking for a yarn?


Comments / Questions (15)
![]() Isa wrote:
Isa wrote:
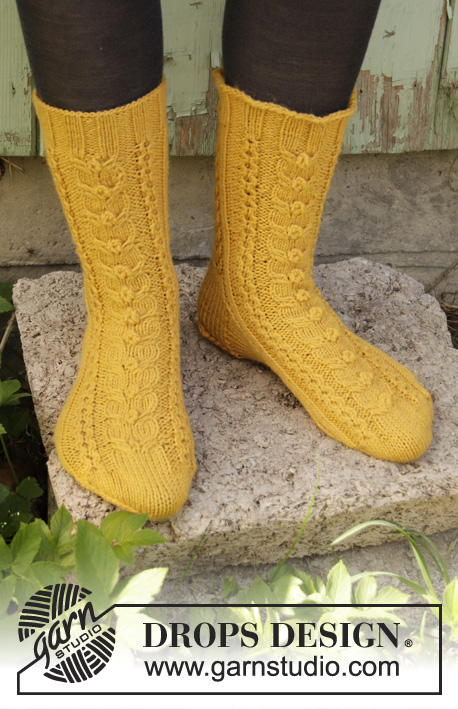
Die Anleitung ergibt nicht die Socke auf dem Foto. Seitlich hat das abgebildete Modell einen Zopf, der im Diagramm durch den Teil mit der Noppe ersetzt wurde. Wird halt weniger hübsch so.
22.01.2025 - 15:09
![]() Maja wrote:
Maja wrote:
Ble litt forvirrende, det mangler diagram til flette mønstret som er synlig bakerst på leggen på bilde 2, det ser ut som den var ment å komme mellom A1 og A3 istedenfor A2, som gjentas 3 ganger, på bildet ser man den bare 1 gang (kanskje på baksiden også) mønsteret som er synlig i arbeidet fra diagrammer er bare boble mønsteret fra A2 og de små sirklene fra A3, A4 og A5+A1 sammen.. er ganske sikker at det står feil på diagrammet
04.08.2024 - 13:00
![]() Ron wrote:
Ron wrote:
Zucht, vind het verwarrend... Zoals ik het interpreteer, vanaf: "Brei de volgende naald als volgt: Brei 0-2-2 recht, 1-1-2 averecht, 9 recht, brei A.3C (= 12 steken), A.2C (= 9 steken) ...........". Maar je moet A.3C/A.2C/A.4C volledig afmaken, 8 nld, want anders klopt het patroon niet meer. Dan 2 minderingen en A.6A, A.6A afmaken 8 nld. Dan A.6A herhalen, 8 nld. Dus brei je A.6A twee keer voordat je aan de hiel begint.
29.03.2024 - 09:55
![]() Ron wrote:
Ron wrote:
Bij de 1st keer A.6A in het patroon, de naald waarin 2 steken geminderd wordt, staat “ga verder op de juiste naald in telpatroon”. Wat wordt hier mee bedoeld? En dan daarna “herhaal A.6A, overige steken in tricosteek”. Maar zou “herhaal A.6A” niet “ga verder met A.6A” moeten zijn? Dus 1 nld met 2 minderingen en de overige 7 nld met de overige steken in tricosteek. En dus 1 x A.6A voor de hiel? Of is het anders?
24.03.2024 - 18:19DROPS Design answered:
Dag Ron,
Met de juiste naald in het telpatroon wordt bedoeld dat je gewoon verder met het telpatroon gaat waar je was gebleven, zodat het telpatroon mooi doorloopt. A.6 brei je inderdaad maar 1 keer in de breedte, dus dat er 'herhaal' staat is een beetje verwarrend.
27.03.2024 - 13:50
![]() Helena wrote:
Helena wrote:
Hei, Ohjeesta nayttaa puuttuvan palmikkokuvio pohkeen puolelta. Ohjeesa toistetaan A2 (A,B,C) kolmesti, muodostaen kolme "nypyllista" palmikkoa, mutta kuvissa on selkeasti "nypyton" palmikko pohkeen puolella ja vain yksi nypyllinen palmikko edessa/jalkapoydan puolella. Kuvien perusteella ohjeen ensimmainen A.2 olisi 8n (tai 6n) silmukan silea palmikko, ei 9n silmukan nypyllinen palmikko, kuten ohjepirroksissa? Vai ovatko kuvat jostain muusta ohjeesta?
14.11.2022 - 11:48DROPS Design answered:
Hei, ohje tarkistetaan parhaillaan ja tarvittaessa siihen tehdään korjaus.
16.01.2023 - 17:57
![]() Jannina wrote:
Jannina wrote:
Hej! Jag stickar storlek 35-37, och får inte varvet efter bubblan att gå ihop. Enligt diagrammet ska det stickas 8 räta maskor i diagram A2, men med den maska som blir kvar efter bubblan på varvet innan finns det 9 maskor som ska rymmas inom A2. Är det fel eller har jag missupfattat något? Undrar även om bilden av sockorna stämmer - med detta mönster blir det tre bubblor, men på bilden ser det ut som bara en bubbla mitt på foten. Tack på förhand!
22.01.2022 - 13:26DROPS Design answered:
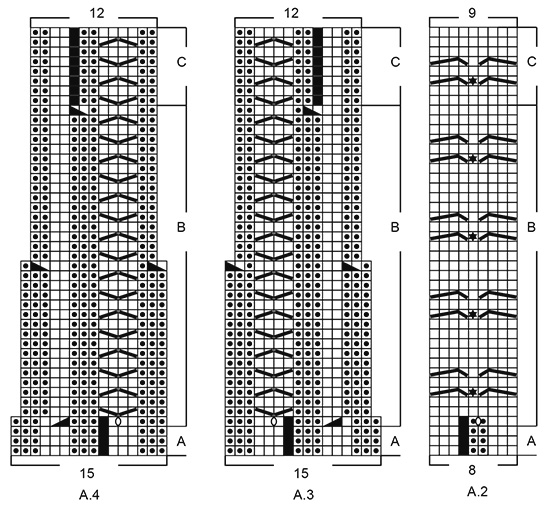
Hei Jannina. Når du strikker A.2A diagrammet er det 8 masker, diagrammet viser 9 masker men en helt sort rute viser at det ikke er noen maske. Når du strikker 1. omgang av A.2B øker du med 1 maske = 9 masker. Slik at når du skal strikke flettene og boblen er det over 9 masker. Når det gjelder diagrammet med 3 bobler er det oversendt design avd. slik at de kan ta en dobbeltsjekk. mvh DROPS Design
25.01.2022 - 11:32
![]() Sólveig wrote:
Sólveig wrote:
"setjið 1 lykkju á kaðlaprjón aftan við stykkið, prjónið 3 lykkjur slétt, prjónið 1 lykkju slétt af kaðlaprjóni" , á þetta ekki að vera fyrir framan stykkið?
08.06.2021 - 11:21DROPS Design answered:
Takk fyrir Sólveig, það er búið að laga þetta.
09.06.2021 - 10:02
![]() Louise wrote:
Louise wrote:
Jeg lurer på om det mangler et diagram i oppskriften? Jeg har lagt opp 60 masker i størrelse 35-37, men mønsteret fra A.1A - A.5A er kun 44 masker. Hva med resten?
24.05.2021 - 08:23DROPS Design answered:
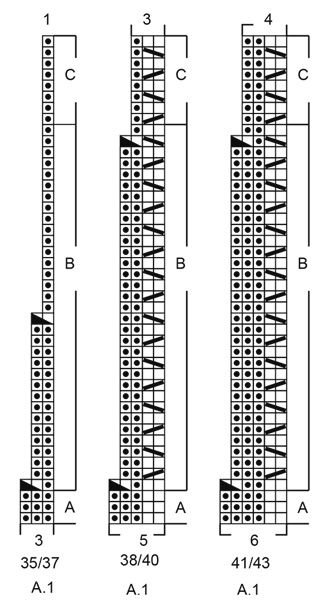
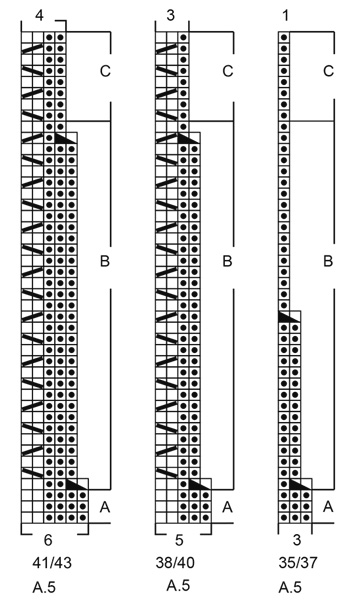
Hej Louise. Du stickar vissa av diagrammen flera gånger. Första pinne i storlek 35-37 stickar du såhär: 3 (=A.1A)+ 8 (=A.2A) + 15 (=A.3A) +8 (=A.2A)+15 (=A.4A)+ 8 (=A.2A) +3 (=A.5A) = 60m. Mvh DROPS Design
24.05.2021 - 09:00
![]() Anna wrote:
Anna wrote:
Hei, lurer på om det mangler et diagram? Når jeg følger mønsteret får jeg ikke flyttingen man ser bakerst på bilde 2
12.04.2021 - 11:36DROPS Design answered:
Hei Anna. Det er 6 diagrammer til sokken (A.1, A.2, A.3, A.4, A.5 og A.6). Disse diagrammene er også delt inn i A, B og C (bortsett fra A.6 som bare har A og B). (Usikker på hva du mener med flyttingen bakerst på bilde 2, ser vrangmasker og flette). mvh DROPS design
12.04.2021 - 15:24
![]() Britany wrote:
Britany wrote:
Bonjour. Je tente de faire se modèle j’ai alors monté 66mailles pour la plus grande version. Ensuite j’ai suivie le diagramme A1A,A2A,A3A, A2A, A4A, A2A,A5A. J’ai fait sur 4cm mais maintenant je doit faire A1B,A2B,A3B,A2B...?? Car cela donnera 3NOPE non??
16.01.2020 - 19:18DROPS Design answered:
Bonjour Brittany, tout à fait, comme vous tricotez 3 fois A.2A en largeur, vous aurez 3 nopes. Bon tricot!
17.01.2020 - 08:27
|
||||||||||||||||||||||||||||||||||
Happy Day#happydaysocks |
||||||||||||||||||||||||||||||||||
 |
 |
|||||||||||||||||||||||||||||||||
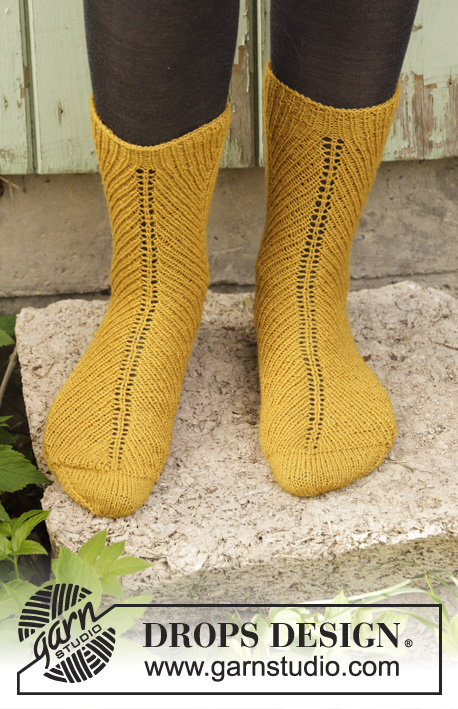
Knitted socks with cables in DROPS Lima.
DROPS 193-4 |
||||||||||||||||||||||||||||||||||
|
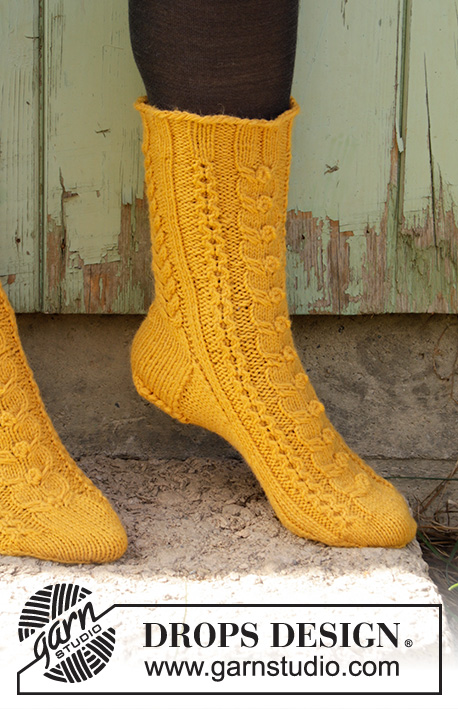
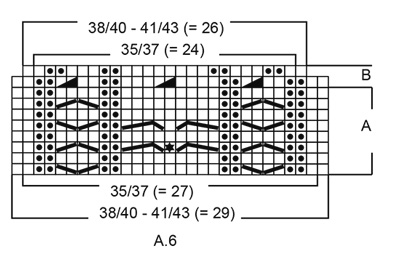
---------------------------------------------------------- EXPLANATION FOR THE PATTERN: ---------------------------------------------------------- PATTERN: See diagrams A.1 to A.6. Choose diagram for your size. KNITTING TIP (applies to heel): To get a stronger heel the entire heel and heel decrease can be worked in 2 strands as follows: Use strand inside and outside of ball and work 1 stitch alternately with one and the other strand. This way you get a thicker heel without working with double strand. HEEL DECREASE: ROW 1 (= right side): Knit until 7-7-8 stitches remain, slip next stitch as if to knit, knit 1, pass slipped stitch over stitch knitted, turn piece. ROW 2 (= wrong side): Purl until 7-7-8 stitches remain, slip next stitch as if to purl, purl 1, pass slipped stitch over stitch purled, turn piece. ROW 3 (= right side): Knit until 6-6-7 stitches remain, slip next stitch as if to knit, knit 1, pass slipped stitch over stitch knitted, turn piece. ROW 4 (= wrong side): Purl until 6-6-7 stitches remain, slip next stitch as if to purl, purl 1, pass slipped stitch over stitch purled, turn piece. Continue decrease like this with 1 stitch less before each decrease until there are 12-14-14 stitches on needle. DECREASE TIP-2: Work until 2 stitches remain before marker, knit 2 together, marker, slip 1 stitch knitwise, knit 1, pass slipped stitch over stitch worked (= 2 stitches decreased). ---------------------------------------------------------- START THE PIECE HERE: ---------------------------------------------------------- SOCKS - SHORT OVERVIEW OF THE PIECE: Worked in the round on double pointed needles, from the top and down to toes. SOCK: Cast on 60-64-66 stitches on double pointed needles size 2.5 mm / US 1.5 with Lima. Knit 1 round. Work next round as follows: Work A.1A (= 3-5-6 stitches), A.2A (= 8 stitches), A.3A (= 15 stitches), A.2A (= 8 stitches), A.4A (= 15 stitches), A.2A (= 8 stitches) and finish with A.5A (= 3-5-6 stitches). Repeat A.1A and A.5A vertically until piece measures 4 cm / 1½". Switch to double pointed needles size 3.5 mm / US 4 and work A.1B over A.1A, A.2B over A.2A, A.3B over A.3A, A.4B over A.4A and A.5B over A.5A. Continue this pattern. REMEMBER THE GAUGE! When A.1B to A.5B have been worked, there are 53-57-59 stitches on round. Then work as follows: Work A.1C over A.1B, A.2C over A.2B, A.3C over A.3B, A.4C over A.4B and A.5C over A.5B. Work A.1C to A.5C 2-2-3 times in total vertically. Piece measures approx. 20-20-23 cm / 7⅞"-7⅞"-9". Work next round as follows: Knit 0-2-2, purl 1-1-2, knit 9, work A.3C (= 12 stitches), A.2C (= 9 stitches) and A.4C (= 12 stitches) as before, knit 9, purl 1-1-2 and knit 0-2-2-. Work next round as follows: Knit 5-7-8, knit 2 together (= 1 stitch decreased), knit 6-5-5, work A.6A (= 27-29-29 stitches) – continue on correct round in diagram, knit 6-5-5, knit 2 together (= 1 stitch decreased) and knit 5-7-8 = 51-55-57 stitches. Then repeat A.6A (= 27-29-29 stitches), work the remaining stitches in stockinette stitch. Now keep the first 12-13-14 stitches on needle for heel, slip the next 27-29-29 stitches on 1 stitch holder (= mid on top of foot) and keep the last 12-13-14 stitches on needle for heel. Read KNITTING TIP and work in stockinette stitch back and forth over the 24-26-28 heel stitches for 5-5½-6 cm / 2"-2¼"-2½". Insert 1 marker in middle of row, MEASURE PIECE FROM HERE. Now work HEEL DECREASE - see explanation above. When heel decrease is done, pick up 11-12-13 stitches on each side of heel and slip the 27-29-29 stitches from stitch holder back on needle = 61-67-69 stitches. Insert 1 marker on each side of the 27-29-29 stitches on top of foot. Work in stockinette stitch and A.6A as before and decrease on each side of the 27-29-29 stitches on top of foot as follows: Knit the last 2 stitches BEFORE first marker on top of foot together and knit the first 2 stitches AFTER last marker on top of foot twisted together. Decrease like this every other round 7-8-7 times in total = 47-51-55 stitches. Work until piece measures 17-19-21 cm / 6¾"-7½"-8¼" from marker on heel – adjust to not finish on 3rd to 5th round in A.6A. Now work A.6B over A.6A, continue the remaining stitches in stockinette stitch. When A.6B has been worked vertically, there are 44-48-52 stitches on needles. Continue working in stockinette stitch over all stitches. Continue until piece measures approx. 18-20-22 cm / 7"-8"-8¾" from marker on heel (approx. 4-4-5 cm / 1½"-1½"-2" remain until finished measurements, try the sock on and work to desired length). Insert 1 marker in each side of sock so that there are 22-24-26 stitches both on top of foot and under foot. Continue working and decrease for toes on each side of these two markers - read DECREASE TIP-2. Decrease like this on every other round a total of 4-4-5 times and then on every round a total of 5-6-6 times = 8 stitches remain on needles in all sizes. Cut the yarn and pull it through the remaining stitches, tighten together and fasten. Knit another sock the same way. |
||||||||||||||||||||||||||||||||||
Diagram explanations |
||||||||||||||||||||||||||||||||||
|
||||||||||||||||||||||||||||||||||
 |
||||||||||||||||||||||||||||||||||
 |
||||||||||||||||||||||||||||||||||
 |
||||||||||||||||||||||||||||||||||
 |
||||||||||||||||||||||||||||||||||
Have you finished this pattern?Tag your pictures with #dropspattern #happydaysocks or submit them to the #dropsfan gallery. Do you need help with this pattern?You'll find 25 tutorial videos, a Comments/Questions area and more by visiting the pattern on garnstudio.com. © 1982-2026 DROPS Design A/S. We reserve all rights. This document, including all its sub-sections, has copyrights. Read more about what you can do with our patterns at the bottom of each pattern on our site. |
||||||||||||||||||||||||||||||||||


With over 40 years in knitting and crochet design, DROPS Design offers one of the most extensive collections of free patterns on the internet - translated to 17 languages. As of today we count 325 catalogs and 12298 patterns - 12288 of which are translated into English (US/in).
We work hard to bring you the best knitting and crochet have to offer, inspiration and advice as well as great quality yarns at incredible prices! Would you like to use our patterns for other than personal use? You can read what you are allowed to do in the Copyright text at the bottom of all our patterns. Happy crafting!
Post a comment to pattern DROPS 193-4
We would love to hear what you have to say about this pattern!
If you want to leave a question, please make sure you select the correct category in the form below, to speed up the answering process. Required fields are marked *.