
Popular categories
Looking for a yarn?


Comments / Questions (84)
![]() Christiane Th. wrote:
Christiane Th. wrote:
Als Anfängerin wüsste ich gerne, welches ist die rechte Blende? Wenn ich die Knopflöcher einstricken soll, habe ich keinen Anhaltspunkt. Mit Beginn der Maschenaufnahme; hängt der Anschlagfaden auf der rechten Seite, ich stricke also die 1. Reihe als Rückreihe. Ist der Maschenanschlag aufgehäkelt, so ist es genau andersherum. Woran kann ich mich orientieren? Lieben Dank für eure tollen und kostenfreien Anleitungen, eure Unterstützung und nicht zuletzt die tolle und preiswerten Garne.
04.10.2018 - 09:01DROPS Design answered:
Liebe Christiane, wenn man eine Jacke von oben nach unten strickt, beginnt man die Hinreihen mit dem linken Vorderteil bis zum rechten Vorderteil - die rechte Blende wird dann am Ende der Hinreihe sein (= am Anfang der Rückreihe). Die Knoplöcher stricken Sie am Ende der Hinreihe. Viel Spaß beim stricken!
04.10.2018 - 10:31
![]() Julia wrote:
Julia wrote:
Hallo, ich würde die Jacke gerne mit einem dickeren Garn stricken sodass ich nur einen Faden benötige. Worauf muss ich achten, welche Stärke benötige ich. In ihrem Shop finde ich nur ein Garn aus der Gruppe D. Ich hätte aber gerne ein glattes Garn. Vielen Dank!
28.09.2018 - 14:36DROPS Design answered:
Liebe Julia, 3 Fäden Garngruppe A können Sie entweder durch 1 Faden Garngruppe D oder 2 Fäden Garngruppe B ersetzen - mehr über Garnalternativen lesen Sie hier. Viel Spaß beim stricken!
01.10.2018 - 07:37
![]() Jenny wrote:
Jenny wrote:
Hallo, ich verstehe die Abnahme einfach nicht. Soll ich in einer Hin- oder Rückseite abnehmen. Und wenn ich in einer Reihe 2x vor der markierten Masvhe beginne abzunehmen, erfolgt die Abnahme doch einmal auf einer vorderseite und einmal im Rückenteil. Das kann doch nicht richtig sein? Ich bitte um Hilfe.
09.08.2018 - 18:16DROPS Design answered:
Liebe Jenny, bei dem Rumpfteil haben Sie 2 Markierer (= Seiten, zwischen Rückenteil und jedem Vorderteil), wie unter ABNAHMETIPP abnehmen: bei einer Hinreihe stricken Sie bis noch 1 Masche vor der markierten Masche übrig ist: 2 M als rechts zs abheben (= die Masche vor der Markierer + die Markierte Masche), die nächste Masche entsprechend A.1 stricken, und die 2 abgehobenen Maschen überziehen = 2 M wurden abgenommen, 1 M bleibt (dier Markierung hier einzetzen), bei der 2. Markierten Masche wiederholen = es wurden 4 Maschen insgesamt abgenommen (= 1 auf jedem Vorderteil und 2 auf dem Rückenteil) Viel Spaß beim stricken!
10.08.2018 - 08:01
![]() Jenny wrote:
Jenny wrote:
Hallo, ich verstehe die Abnahme einfach nicht. Soll ich in einer Hin- oder Rückseite abnehmen. Und wenn icn in einer Reihe 2x vor der markierten Masvhe beginne abzunehmen, erfolgt die Abnahme doch einmal auf einer vorderseite und einmal im Rückenteil. Das kann doch nicht richtig sein? Ich bitte um Hilfe.
09.08.2018 - 18:15
![]() Caudron wrote:
Caudron wrote:
Bonjour, je souhaiterais réaliser ce modèle mais avec des longues manches, pourriez vous m indiquer combien de pelotes en plus pour la taille xl il me faut s il vous plait?
09.07.2018 - 09:49DROPS Design answered:
Bonjour Mme Caudron, nous ne sommes malheureusement pas en mesure de pouvoir ajuster chacun de nos modèles à chaque demande individuelle, vous pouvez vous inspirer d'un modèle similaire de la même tension, n'hésitez pas à demander de l'aide à votre magasin, on vous y aidera volontiers, même par mail, téléphone ou via les réseaux sociaux. Bon tricot!
09.07.2018 - 12:50
![]() Sylvie wrote:
Sylvie wrote:
J'aimerais bien faire ce modèle mais je me demande quelle grosseur de laine est-ce ?
19.06.2018 - 11:26DROPS Design answered:
Bonjour Sylvie, vous trouverez toutes les informations nécessaires sur les fils utilisés dans ce modèle magasin DROPS. Bon tricot!
19.06.2018 - 12:57
![]() Linnéa Seignér wrote:
Linnéa Seignér wrote:
Vart kan jag se vart måtten på de färdiga plaggen är? Jag vet inte vilken storlek jag ska sticka. Bystmått 100-105 brukar jag sticka, vilken storlek ska jag ha då?
17.06.2018 - 17:36
![]() Chantal Duflot wrote:
Chantal Duflot wrote:
Bonjour, je suis en train de réaliser ce modèle en taille S. Est-ce que les diminutions des manches se font bien tous les 13 cm ? Elles sont beaucoup plus rapprochées dans les autres tailles. Merci
14.06.2018 - 11:42DROPS Design answered:
Bonjour Mme Duflot, tout à fait, on diminue également moins en taille S: seulement 3 fois. Bon tricot!
14.06.2018 - 16:35
![]() Annette Fäldt wrote:
Annette Fäldt wrote:
Kan jag använda 191-8 till denna modell? Hur mycket garn behöver jag då?
08.06.2018 - 21:42
![]() Vaury wrote:
Vaury wrote:
Bonjour j'aimerai tricoter ce modele en blanc . Pouvez vous me donner les références des fils . Vous remerciant Salutations
11.05.2018 - 15:08DROPS Design answered:
Bonjour Mme Vaury, vous trouverez les références nécessaires des couleurs souhaitées sous chacun des nuanciers concernés. Votre magasin DROPS saura vous aider si besoin, même par mail ou téléphone. Bon tricot!
11.05.2018 - 16:06
|
|||||||
Le Conquet#leconquetcardigan |
|||||||
 |
 |
||||||
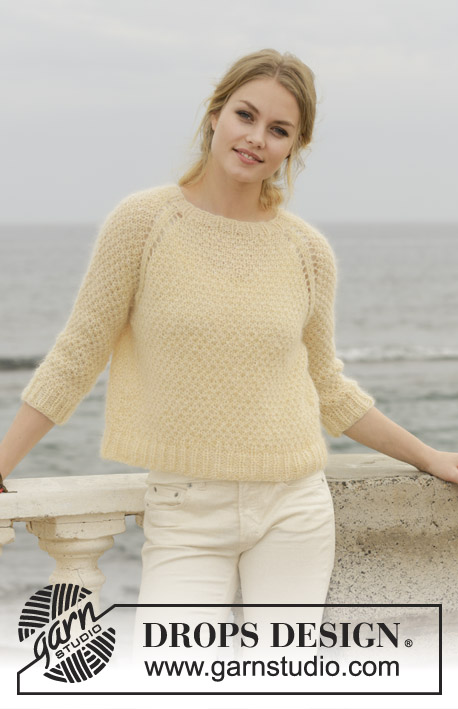
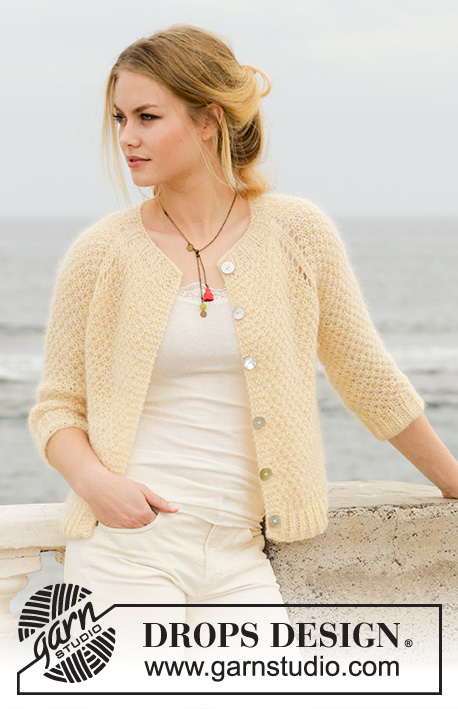
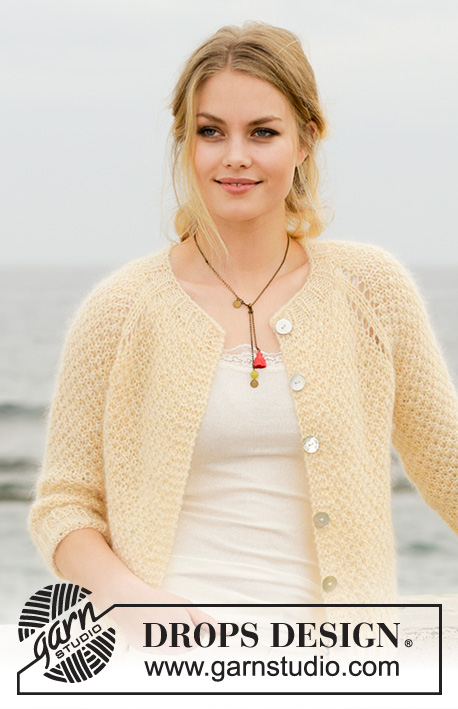
Jacket with raglan, seed stitch and ¾ sleeves, knitted top down. Size: S - XXXL Piece is knitted in 1 strand DROPS Alpaca or DROPS Flora and 2 strands DROPS Kid-Silk.
DROPS 191-8 |
|||||||
|
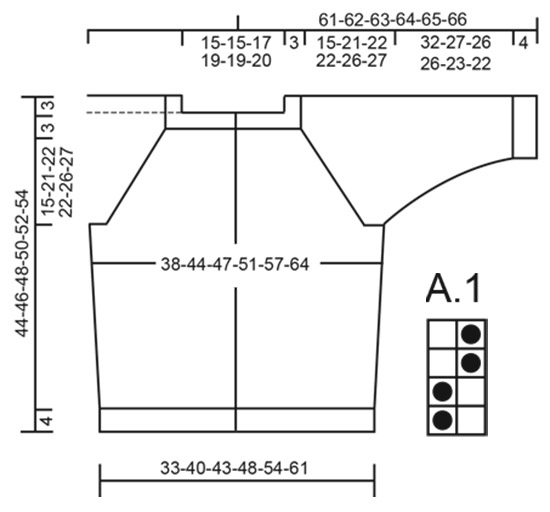
INFORMATION FOR PATTERN: GARTER STITCH (back and forth): 1 ridge = knit 2 rows. INCREASE TIP: To calculate how to increase evenly, use the total number of stitches on row (e.g. 63 stitches), minus bands (e.g. 8 stitches) and divide the remaining 55 stitches by number of increases to be done (e.g. 12) = 4.6. In this example increase after alternately approx. every 4th and 5th stitch. Increase 1 stitch by making 1 yarn over, on next row work yarn over twisted to avoid holes. PATTERN: See diagram A.1 (seed stitch). Diagrams show all rows in pattern seen from the right side. RAGLAN: All increases are done from the right side. Increase on every other row (i.e. every row from right side) as follows: Begin 1 stitch before marker thread, make 1 yarn over, work 2 stitches in stockinette stitch (marker thread is in the middle of these two stitches), make 1 yarn over (= 2 stitches increased). Increase on each side of the 4 marker threads. On next row (wrong side) purl yarn overs to make holes, then work the increased stitch in pattern. The 2 stitches along each raglan line are worked in stockinette stitch until yoke is done. DECREASE TIP (applies to sides on body and mid under sleeves): Work until 1 stitch remains before stitch with marker thread, slip 2 stitches as if to knit together, work next stitch as shown in A.1 and pass the 2 slipped stitches over. This way A.1 will continue nicely over decrease on next row/round. BUTTONHOLES: Decrease for buttonholes on right band (when garment is worn). Decrease from right side when 3 stitches remain on row as follows: Make 1 yarn over, knit the next 2 stitches together, knit last stitch. On next row knit yarn over to make holes. Decrease first buttonhole when neck edge measures approx. 1½-2 cm/½"-¾". Then decrease the next 5-5-5-6-6-6 buttonholes approx. 7½-8-8-7-7½-8 cm /2⅞"-3"-3"-2¾"-2⅞"-3" apart. ---------------------------------------------------------- JACKET: Work back and forth on circular needle from mid front, work top down. Sleeves are worked in the round on a short circular needle top down, switch to double pointed needles when needed. NECK EDGE: Cast on 63-63-69-75-78-81 stitches (including 4 band stitches in each side towards mid front) on circular needle size 6 mm / US 10 with 1 strand Alpaca or Flora + 2 strands Kid-Silk (= 3 strands). Purl 1 row (= wrong side). Work next row as follows from right side: 4 band stitches in GARTER STITCH - see explanation above - * knit 1, purl 2 *, repeat from *-* until 5 stitches remain, knit 1 and finish with 4 band stitches in garter stitch. Continue rib like this for 3 cm / 1" – remember BUTTONHOLES on right band – see explanation above. After rib purl 1 row from wrong side while increasing 12-12-14-14-11-10 stitches evenly - read INCREASE TIP = 75-75-83-89-89-91 stitches. Now insert 4 marker threads in the piece as follows (without working the stitches): Insert first marker thread after the first 16-16-18-20-20-20 stitches (= front piece), insert 2nd marker thread after the next 9 stitches (= sleeve), insert 3rd marker thread after the next 25-25-29-31-31-33 stitches (= back piece), and insert 4th marker thread after the next 9 stitches (= sleeve). There are 16-16-18-20-20-20 stitches after last marker thread on front piece. Then work yoke as explained below. YOKE: Switch to circular needle size 7 mm / US 10.75 and work first row from right side as follows: 4 band stitches in garter stitch, work A.1 over the next 11-11-13-15-15-15 stitches (begin and end with knit 1), make 1 yarn over, work 2 stitches in stockinette stitch (marker thread is in the middle of these two stitches), make 1 yarn over, work A.1 over the next 7 stitches (begin and end with knit 1), make 1 yarn over, work 2 stitches in stockinette stitch, make 1 yarn over, work A.1 over the next 23-23-27-29-29-31 stitches (begin and end with knit 1), make 1 yarn over, work 2 stitches in stockinette stitch, make 1 yarn over, work A.1 over the next 7 stitches (begin and end with knit 1), make 1 yarn over, work 2 stitches in stockinette stitch, make 1 yarn over, work A.1 over the next 11-11-13-15-15-15 stitches (begin and end with knit 1) and finish with 4 band stitches in garter stitch (= 8 stitches increased). Continue A.1 back and forth with 4 band stitches in garter stitch in each side towards mid front and 2 stitches in stockinette stitch along each raglan line. AT THE SAME TIME continue increase in RAGLAN on each side of the 4 marker threads – see explanation above, until 11-15-16-16-19-20 increases have been done in total along each raglan line (including increase on first row after neck edge). REMEMBER THE GAUGE! After last increase there are 163-195-211-217-241-251 stitches on needle. Continue pattern with 2 stitches in stockinette stitch along each raglan line until piece measures 18-24-25-25-29-30 cm / 7"-9⅜"-9 ¾"-9 ¾"-11⅜"-11 ¾" from cast-on edge mid front. Work next row as follows from wrong side: Work the first 26-30-32-34-38-40 stitches as before, slip the next 33-41-45-45-49-49 stitches on 1 stitch holder for sleeve, cast on 5-5-5-7-7-11 new stitches on needle (= in the side under sleeve), work the next 45-53-57-59-67-73 stitches as before, slip the next 33-41-45-45-49-49 stitches on a stitch holder for sleeve, cast on 5-5-5-7-7-11 new stitches on needle and work the last 26-30-32-34-38-40 stitches as before. Then finish body and sleeves separately. NOW MEASURE THE PIECE FROM HERE! BODY: = 107-123-131-141-157-175 stitches. Insert 1 marker thread in the middle of the 5-5-5-7-7-11 stitches cast on under sleeve in each side and move the marker threads upwards when working. Continue A.1 back and forth with 4 band stitches in garter stitch in each side. When piece measures 4 cm / 1½" from division, decrease 2 stitches in each side - read DECREASE TIP (= 4 stitches decreased). Decrease like this every 6-4-4-8-8-8 cm / 2⅜"-1 ½"-1 ½"-3⅛"-3⅛"-3⅛" a total of 3-3-3-2-2-2 times in each side = 95-111-119-133-149-167 stitches. When piece measures 19-15-16-18-16-17 cm / 7⅜"-5⅞"-6 ¼"-7"-6 ¼"-6⅝" from division, knit 1 row from right side while increasing 13-12-13-17-19-19 stitches evenly = 108-123-132-150-168-186 stitches. Switch to circular needle size 6 mm / US 10. Work next row as follows from wrong side: 4 band stitches in garter stitch, * purl 1, knit 2 *, repeat from *-* until 5 stitches remain, purl 1 and 4 band stitches in garter stitch. Continue rib like this for 4 cm / 1½". Switch back to circular needle size 7 mm / US 10.75 and bind off with knit over knit and purl over purl - make sure to avoid a tight bind-off edge. Jacket measures approx. 44-46-48-50-52-54 cm / 17¼"-18"-19"-19¾"-20½"-21¼" from shoulder and down. SLEEVE: Slip the 33-41-45-45-49-49 stitches from stitch holder in one side of piece on a short circular needle size 7 mm / US 10.75 and pick in addition up 1 stitch in each of the 5-5-5-7-7-11 stitches cast on under sleeve = 38-46-50-52-56-60 stitches. Insert 1 marker thread in the middle stitch of the 5-5-5-7-7-11 stitches under sleeve. Continue A.1 in the round. When piece measures 3 cm / 1" from division, decrease 2 stitches mid under sleeve - read DECREASE TIP. Decrease like this every 13-3½-3-3-2-1½ cm/5"-1¼"-1"-1"-¾"-½" 3-7-8-8-10-11 times in total = 32-32-34-36-36-38 stitches. Continue until sleeve measures 32-27-26-26-23-22 cm / 12 ½"-10⅝"-10 ¼"-10 ¼"-9"-8⅝" from division (shorter measurements in the larger sizes because of wider neck and longer yoke). Knit 1 round while increasing 4-4-5-3-3-4 stitches evenly = 36-36-39-39-39-42 stitches. Switch to double pointed needles size 6 mm / US 10. Work rib in the round = knit 1/purl 2 for 4 cm / 1½". Bind off with knit over knit and purl over purl but to avid at tight bind-off edge make 1 yarn over after every 6th stitch at the same time bind off (bind off yarn overs as stitches). Sleeve measures approx. 36-31-30-30-27-26 cm / 14⅛"-12⅛"-11 ¾"-11 ¾"-10⅝"-10 ¼" from division. Work the other sleeve the same way. ASSEMBLY: Sew the buttons on to the left band. |
|||||||
Diagram explanations |
|||||||
|
|||||||
 |
|||||||
Have you finished this pattern?Tag your pictures with #dropspattern #leconquetcardigan or submit them to the #dropsfan gallery. Do you need help with this pattern?You'll find 26 tutorial videos, a Comments/Questions area and more by visiting the pattern on garnstudio.com. © 1982-2026 DROPS Design A/S. We reserve all rights. This document, including all its sub-sections, has copyrights. Read more about what you can do with our patterns at the bottom of each pattern on our site. |
|||||||


With over 40 years in knitting and crochet design, DROPS Design offers one of the most extensive collections of free patterns on the internet - translated to 17 languages. As of today we count 324 catalogs and 12290 patterns - 12280 of which are translated into English (US/in).
We work hard to bring you the best knitting and crochet have to offer, inspiration and advice as well as great quality yarns at incredible prices! Would you like to use our patterns for other than personal use? You can read what you are allowed to do in the Copyright text at the bottom of all our patterns. Happy crafting!
Post a comment to pattern DROPS 191-8
We would love to hear what you have to say about this pattern!
If you want to leave a question, please make sure you select the correct category in the form below, to speed up the answering process. Required fields are marked *.