
Popular categories
Looking for a yarn?


Comments / Questions (121)
![]() Sylvie wrote:
Sylvie wrote:
Bonjour, pourriez vous me dire si je fais le modèle 12/18 mois le modèle nous montre un diagramme A2C je le mets quand je vois aucune place pour celui ci merci
28.03.2026 - 10:28DROPS Design answered:
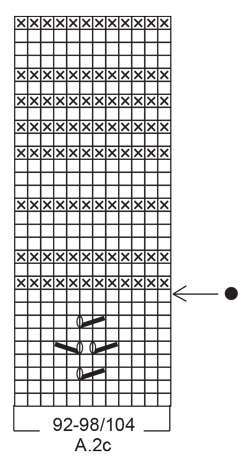
Bonjour Sylvie, en taille 12/18 mois (= 80/86) vous ne tricotez pas A.2C, le motif A.2C ne concerne que les grandes tailles (2 ans et 3/4 ans). Bon tricot!
07.04.2026 - 08:51
![]() Aina wrote:
Aina wrote:
Bord nr 2 , heter A2 i mønster beskrivelse og den er ikke med . Skal ikke være med liten a
16.03.2026 - 09:35DROPS Design answered:
Hei Aina. Se vårt svar til deg under. mvh DROPS Design
16.03.2026 - 13:13
![]() Aina wrote:
Aina wrote:
Finner ikke A 2
16.03.2026 - 08:44DROPS Design answered:
Hei Aina. A.2 = A.2a, A.2b og A.2c. Når du skal strikke etter A.2 må du først strikke A.2a, så A.2b og A.2c, slik at mønstret vi stemme. mvh DROPS Design
16.03.2026 - 09:14
![]() Vibeke Lind wrote:
Vibeke Lind wrote:
Hjælp! Jeg kan ikke komme videre efter de 12 masker indtaget. Jeg ved ikke, hvad en rapport er? Så jeg forstår ikke, hvordan jeg kommer videre. Venlig hilsen Vibeke
27.02.2026 - 18:21DROPS Design answered:
Hej Vibeke. En rapport är en upprepning av diagrammet. T.ex. i minsta storleken så har man 168 maskor och stickar A.1 / A.2 (=12 maskor) 14 gånger på en omgang; 12 maskor x 14 gånger = 168 maskor. När du har tagit ind 12 maskor har du 156 maskor och stickar då A.2 kun 13 gånger på omgangen. 12 maskor x 13 gånger = 156 maskor. Läs gärna mer om hur du läser ett stickdiagram i denna lektion. Mvh DROPS Design
04.03.2026 - 13:44
![]() Vibeke Lind wrote:
Vibeke Lind wrote:
Jeg forstår ikke hvad en rapport er? Hvor mange masker/ mønster det indebærer efter de 12 masker er taget ind. Venlig hilsen Vibeke
26.02.2026 - 20:01DROPS Design answered:
Hej Vibeke. Se svar ovan, hoppas det är till hjälp. Mvh DROPS Design
04.03.2026 - 13:45
![]() Gabi Schmidt wrote:
Gabi Schmidt wrote:
Guten Tag, Ich möchte dieses Kleid für das Alter 2 Jahre nur kraus rechts, aber dafür mit 6 oder 7 verschiedenen Farben in schmalen (2 R, 4 R, 6 R und 8 R) Streifen stricken. Ist es besser den Faden nach jedem Farbwechsel abzuschneiden und zu vernähen oder kann man auch die Fäden am Rand mitführen? Danke für eine Antwort und viele Grüße Gabi Schmidt
06.02.2026 - 11:09DROPS Design answered:
Liebe Gabi, beim Stricken in Runden (gilt für das Rumpfteil) ist es ja unproblematisch, die Fäden nach oben mitzuführen. Beim Stricken in Reihen (Passe) Sie können den Faden auch am Rand mitführen, indem Sie ihn am Anfang der Reihe mit dem Strickfaden verkreuzen. Vielleicht probieren Sie das vorher mal an einem Probestück aus. Viel Spaß beim Stricken, das wird sicherlich ein sehr süßes Kleidchen!
06.02.2026 - 12:39
![]() Lena wrote:
Lena wrote:
Ich habe eine maschenprobe gestrickt die hat gestimmt- ich stricke größe 92 und das kleidchen hat einen so großen umfang dass es ein kleid für mich als erwachsene mit größe 42 sein könnte.
26.01.2026 - 22:55DROPS Design answered:
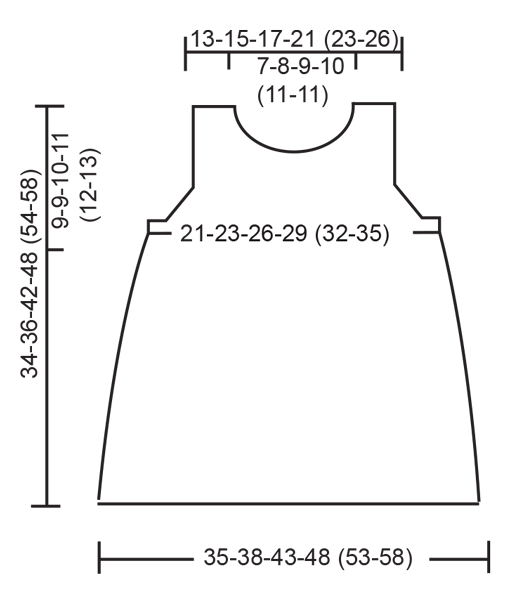
Liebe Lena, Sie sehen ja die Maße des Kleidchens unten in der Maßskizze. Es ist unten relativ weit, wird nach oben am Oberkörper aber natürlich enger. Messen Sie am besten ein Kleidungsstück aus, das dem Kind obenrum gut passt, und vergleichen Sie das Brustweitenmaß. Daran können Sie sich orientieren. Bei korrekter Maschenprobe passt das Kleidchen dann, auch wenn es unten weit ist. Viel Spaß beim Stricken!
29.01.2026 - 11:59
![]() Anneli Jacobsen wrote:
Anneli Jacobsen wrote:
Det må være noe jeg gjør feil, for jeg har mange flere masker etter 2 fellinger enn jeg startet med. 20 masker for mye. Selve tegnene på diagrammene er vanskelig å tyde. Det er en running tegnet før eller etter en skrå, der har jeg lagt inn et maskehull, men nå skjønner jeg ingenting når jeg har 200 masker på andre felling og startet med 180.
08.12.2025 - 22:23DROPS Design answered:
Hei Anneli. Vi skal hjelpe deg så godt vi kan, men fint om du kan opplys om hvilken str. du strikker slik at vi kan dobbeltsjekke tallene. Kastene i selve diagrammene er hullmønster, mens fellingene strikkes etter diagram ikonene som er tegnet utenfor de ulike diagrammene (stjerne og sort prikk). mvh DROPS Design
15.12.2025 - 08:02
![]() Simone Schmitt wrote:
Simone Schmitt wrote:
Vielen Dank für die Hilfe. Ich habe das Muster als Maschenprobe gestrickt und vergessen, dass A1 in Runden gestrickt wird. Jetzt macht alles Sinn!
24.07.2025 - 18:35
![]() Simone Schmitt wrote:
Simone Schmitt wrote:
Ich stricke das Kleid in Größe 80/86. In einem früheren Kommentar haben sie erklärt, dass diese Größe mit den Musterraporten A. 2a und A. 2b gestrickt wird. In der Anleitung heißt es dass alle Kleider mit A1 beginnen. Was ist richtig? Vielen Dank für Ihre Hilfe
20.07.2025 - 00:38DROPS Design answered:
Liebe Frau Schmitt, ja genau, zuerst strickt man A.1 in allend Grössen, dann strickt man A.2, und A.2 wird so gestrickt: zuerst strickt man A.2a, dann A.2b und endlich A.2c. Viel Spaß beim Stricken!
24.07.2025 - 15:53
|
|||||||||||||||||||||||||
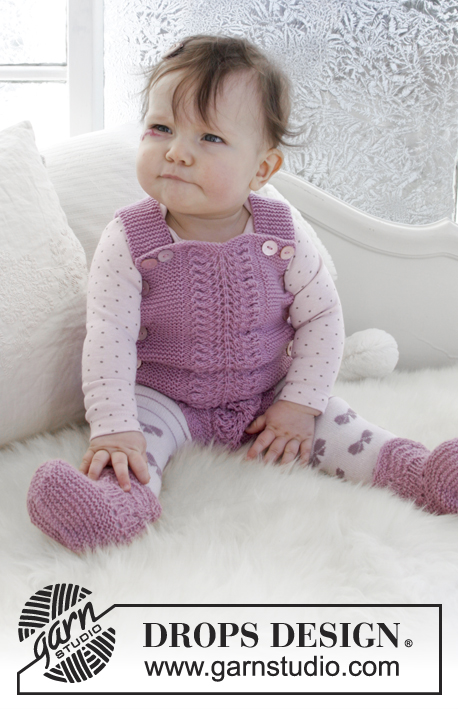
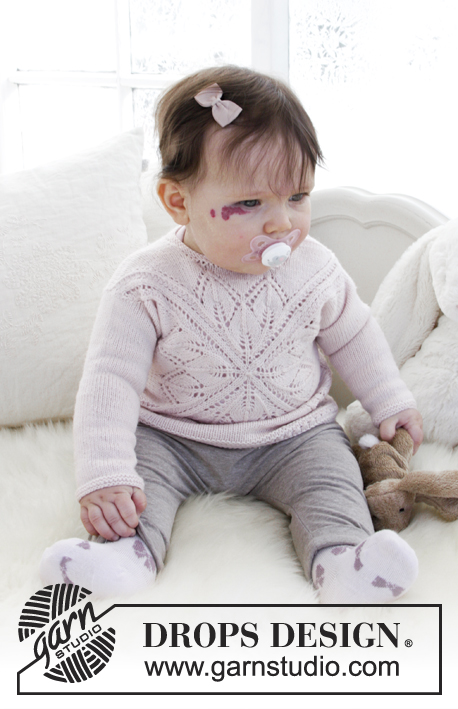
Serafina#serafinadress |
|||||||||||||||||||||||||
 |
 |
||||||||||||||||||||||||
Knitted dress with lace pattern and garter stitch for baby. Size 0 - 4 years Piece is knitted in DROPS Alpaca.
DROPS Baby 31-17 |
|||||||||||||||||||||||||
|
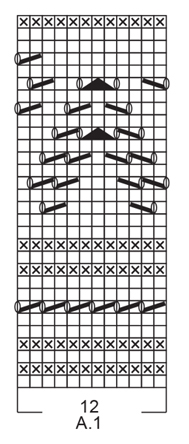
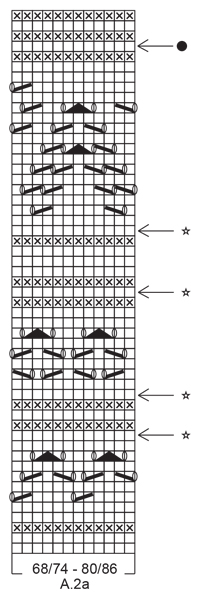
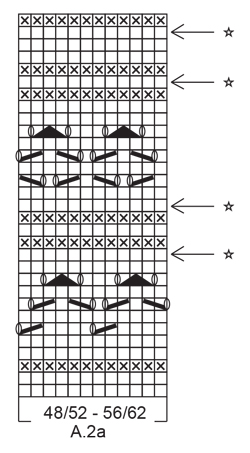
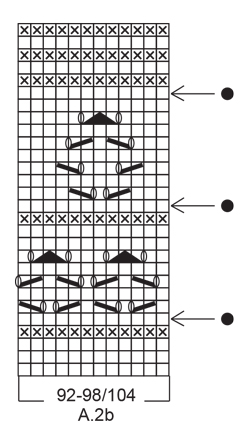
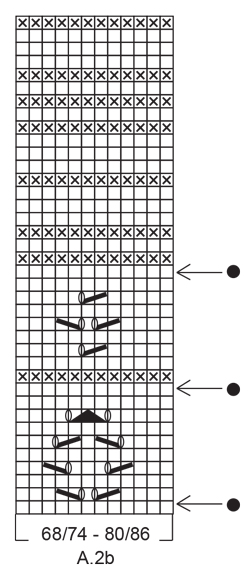
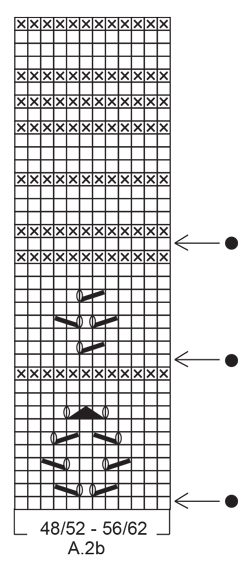
INFORMATION FOR PATTERN: GARTER STITCH (worked in the round): 1 ridge = 2 rounds. Knit 1 round and purl 1 round. GARTER STITCH (back and forth): 1 ridge = knit 2 rows. PATTERN: See diagrams A.1 and A.2 (first A.2a, then A.2b and A.2c). Choose diagram for your size. Diagrams show all rows in pattern seen from the right side. DECREASE TIP-1 (applies evenly spaced decrease): To calculate how to decrease evenly, use the total number of stitches on row (e.g. 168 stitches) and divide stitches by number of decreases to be done (e.g. 6) = 28. In this example work approx. every 27th and 28th stitch together. DECREASE TIP-2 (applies to armholes): Decrease inside 3 edge stitches in garter stitch. All decreases are done from the right side. Decrease before 3 edge stitches as follows: Knit 2 together. Decrease after 3 edge stitches as follows: Slip 1 stitch knitwise, knit 1, pass slipped stitch over stitch worked. ---------------------------------------------------------- DRESS: Worked in the round on circular needle up to armhole, then work front and back piece back and forth separately. Neck edge is worked back and forth on needle. BODY: Cast on 168-180-204-228 (252-276) stitches on circular needle size 3 mm / US 2.5 with Alpaca. Insert 1 marker at beginning of round and 1 marker after 84-90-102-114 (126-138) stitches, markers indicates side of garment. Then work A.1 (= 12 stitches) over all stitches (= 14-15-17-19 (21-23) times in width). REMEMBER THE GAUGE! When A.1 has been worked 1 time vertically, piece measures approx. 8 cm / 3⅛". Then work A.2 (= 12 stitches) over all stitches (= 14-15-17-19 (21-23) times in width). On rounds marked with arrow decrease stitches evenly - read DECREASE TIP-1. For every time 12 stitches are decreased in total, work 1 repetition less of A.2 in width. When all decreases are done, there are 108-120-132-156 (156-180) stitches on needle (= 54-60-66-78 (78-90) stitches on each side of marker). READ ALL OF THE FOLLOWING SECTION BEFORE CONTINUING! WORK PATTERN WHILE AT THE SAME TIME DECREASING FOR ARMHOLE THE SIDE AS FOLLOWS: PATTERN: Continue with pattern. When A.2 has been worked vertically, continue in GARTER STITCH - see explanation above. Piece measures approx. 27-27-33-33 (39-39) cm/10½"-10½"-13"-13" (15¼"-15¼"). ARMHOLE: When piece measures 24-26-31-36 (41-44) cm, continue as follows: Work 9 stitches in garter stitch, work pattern/garter stitch as before, but decrease 4-4-4-8 (2-6) stitches evenly until 9 stitches remain before next marker, work 18 stitches in garter stitch, work pattern/garter stitch as before, but decrease 4-4-4-8 (2-6) stitches evenly until 9 stitches remain on round, finish with 9 stitches in garter stitch = 100-112-124-140 (152-168) stitches in total (= 50-56-62-70 (76-84) stitches on each side of markers). Continue like this until piece measures 25-27-32-37 (42-45) cm/9¾"-10½"-12½"-14½" (16½"-17¾"). Now bind off stitches for armhole as follows: bind off the first 6 stitches, work 3 stitches in garter stitch, work pattern until 9 stitches remain before next marker, work 3 stitches in garter stitch, bind off the next 12 stitches, work 3 stitches in garter stitch, work pattern as before until 9 stitches remain, work 3 stitches in garter stitch and bind off the last 6 stitches. Now finish front and back piece separately. BACK PIECE: Now work back and forth. = 38-44-50-58 (64-72) stitches. Continue with pattern and 3 stitches in garter stitch in each side of piece. Then decrease 1 stitch for armhole inside 3 stitches in garter stitch in each side of piece - read DECREASE TIP-2! Decrease like this on every other row 3-4-5-4 (4-5) times in total = 32-36-40-50 (56-62) stitches. When piece measures 32-34-40-46 (52-56) cm/12½"-13½"-15¾"-18" (20½"-22"), bind off the middle 16-18-22-24 (26-26) stitches for neck = 8-9-9-13 (15-18) stitches on each shoulder. Now finish each shoulder separately. LEFT SHOULDER: Continue in stockinette stitch with 3 stitches in garter stitch out towards armhole as before until piece measures 34-36-42-48 (54-58) cm/13½"-14¼"-16½"-19" (21¼"-22¾") in total. Bind off by purling from wrong side. This shoulder is sewn together with left shoulder on front piece later. RIGHT SHOULDER: Continue in stockinette stitch with 3 stitches in garter stitch out towards armhole as before until piece measures 34-36-42-48 (54-58) cm/13½"-14¼"-16½"-19" (21¼"-22¾") in total. Bind off by knitting from wrong side. On this shoulder sew on buttons later. FRONT PIECE: Work as on back piece until piece measures 30-32-37-42 (48-51) cm/11¾"-12½"-14½"-16½" (19"-20"). Now bind off the middle 10-12-16-16 (18-18) stitches for neck = 11-12-12-17 (19-22) stitches on each shoulder. Now finish each shoulder separately. RIGHT SHOULDER: bind off 1 stitch on every row from neck 3-3-3-4 (4-4) times in total = 8-9-9-13 (15-18) stitches. When piece measures 32-34-40-46 (52-56) cm/12½"-13½"-15¾"-18" (20½"-22"), work in stockinette stitch with 3 stitches in garter stitch out towards armhole. When piece measures 34-36-42-48 (54-58) cm/13½"-14¼"-16½"-19" (21¼"-22¾") decrease for 2 buttonholes from right side as follows: Knit 1-1-1-2 (3-3), knit 2 together, make 1 yarn over (= 1 buttonhole), knit 2-2-2-4 (5-8), knit 2 together, make 1 yarn over (= 1 buttonhole), finish with 1-2-2-3 (3-3) stitches in garter stitch. Bind off by knitting on next row from wrong side. LEFT SHOULDER: Bind off 1 stitch on every row from neck 3-3-3-4 (4-4) times in total = 8-9-9-13 (15-18) stitches. Continue in stockinette stitch with 3 stitches in garter stitch out towards armhole as before until piece measures 34-36-42-48 (54-58) cm/13⅜"-14¼"-16½"-19" (21¼"-22¾") in total. Bind off by purling from wrong side. This shoulder is sewn together with left shoulder on back piece later. ASSEMBLY: Sew buttons on to right shoulder on back piece. Sew left shoulder together with grafting/kitchener stitches. NECK EDGE: Worked back and forth. Begin at right shoulder on back piece and pick up 46-70 stitches around the neck from right side. Knit 3 rows, bind off by knitting, make sure to avoid a tight bind-off edge, bind off with 1 larger needle size if needed. |
|||||||||||||||||||||||||
Diagram explanations |
|||||||||||||||||||||||||
|
|||||||||||||||||||||||||
 |
|||||||||||||||||||||||||
 |
|||||||||||||||||||||||||
 |
|||||||||||||||||||||||||
 |
|||||||||||||||||||||||||
 |
|||||||||||||||||||||||||
 |
|||||||||||||||||||||||||
 |
|||||||||||||||||||||||||
 |
|||||||||||||||||||||||||
 |
|||||||||||||||||||||||||
Have you finished this pattern?Tag your pictures with #dropspattern #serafinadress or submit them to the #dropsfan gallery. Do you need help with this pattern?You'll find 27 tutorial videos, a Comments/Questions area and more by visiting the pattern on garnstudio.com. © 1982-2026 DROPS Design A/S. We reserve all rights. This document, including all its sub-sections, has copyrights. Read more about what you can do with our patterns at the bottom of each pattern on our site. |
|||||||||||||||||||||||||


With over 40 years in knitting and crochet design, DROPS Design offers one of the most extensive collections of free patterns on the internet - translated to 17 languages. As of today we count 324 catalogs and 12291 patterns - 12281 of which are translated into English (US/in).
We work hard to bring you the best knitting and crochet have to offer, inspiration and advice as well as great quality yarns at incredible prices! Would you like to use our patterns for other than personal use? You can read what you are allowed to do in the Copyright text at the bottom of all our patterns. Happy crafting!
Post a comment to pattern DROPS Baby 31-17
We would love to hear what you have to say about this pattern!
If you want to leave a question, please make sure you select the correct category in the form below, to speed up the answering process. Required fields are marked *.