
Popular categories
Looking for a yarn?


Comments / Questions (21)
![]() Teri wrote:
Teri wrote:
Hi! Thanks for answering my first question :) Would you know of a tutorial for fastening the strap? I'm not quite sure how to do it once I've twisted the cord...
18.08.2021 - 21:20DROPS Design answered:
Dear Teri, attach one end of the first strap through the corner of square 2 (see A.3) and attach the other end of the same strap through the corner on square 4, same side when bag is facing you. Then attach 2nd cord on the other side, on the tip of squares 2 and 4. Hope this will help.
19.08.2021 - 08:09
![]() Teri wrote:
Teri wrote:
Hi! Just wanted to clarify the strap. Do we use 8 strands per side, 4m each? For a total of 16 strands? And how can we fasten the straps to the bag?
18.08.2021 - 12:38DROPS Design answered:
Hi Teri, you need 8 strands each 4 meters for each strap, ie a total of 16 strands (each strap consist of 8 strands). Happy crocheting!
18.08.2021 - 14:29
![]() Sharon wrote:
Sharon wrote:
May I ask what the dimensions of each finished granny square should be before assembling them? Thanks!
06.07.2021 - 22:31DROPS Design answered:
Dear Sharon, the size of the square depends greatly on your gauge. It is not given as it is not that terribly important, like it would be with a garment, nothing happens if your bag ends up a couple of cm larger oe smaller. Happy stitching!
07.07.2021 - 03:23
![]() Magali wrote:
Magali wrote:
Bonjour je voulais savoir si 1 bride entre 2 brides signifie 2 brides écoulées ensemble ? Merci !
09.06.2020 - 18:59DROPS Design answered:
Bonjour Magali, pour crocheter 1 bride entre 2 brides, piquer votre crochet entre les 2 brides du rang précédent (et pas dans la maille, pas dans les 2 brins comme normalement) et crochetez ainsi votre bride. Bon crochet!
09.06.2020 - 19:08
![]() Carol Stephens wrote:
Carol Stephens wrote:
I s this bag lined?
04.09.2019 - 15:51DROPS Design answered:
Dear Mrs Stephens, if you mean that there is a lining with fabric inside the bag, our pattern doesn't include something like this but you may do such one. Happy crocheting!
04.09.2019 - 16:12
![]() Nancyhäkelt wrote:
Nancyhäkelt wrote:
Rechtzeitig bei der Hitze fertig gestellt, ab ins Bad. Vielen Dank die Anleitung ist gut verständlich beschrieben, hat Spaß gemacht 😁
12.06.2019 - 14:22
![]() Hilde wrote:
Hilde wrote:
Hei. Det er altfor lite av det blå garnet når man også skal bruke det i monteringen. Så det var nevnt her tidligere også. Hekler med normal fasthet
01.06.2019 - 12:24
![]() Simone wrote:
Simone wrote:
Wieviel Wolle braucht man für eine Decke aus diesen Grannies, in der gleichen Farbgebung?
25.04.2019 - 07:22DROPS Design answered:
Liebe Simone, da diese Tasche mit verschiedenen Farben gehäkelt wurde, haben wir diese Angabe nicht, und leider können wir nicht jede Anleitung nach jeder Anfrage anpassen. Sie können die verschiedenen Garnmenge zusammenrechnen, wahrscheinlich brauchen Sie etwas weniger mit nur 1 Farbe. Viel Spaß beim häkeln!
25.04.2019 - 09:16
![]() Nicole Pfeiffer wrote:
Nicole Pfeiffer wrote:
Leider reichen bei mir die angegebenen 50g der blauen Wolle nicht aus. Ich habe die vorgeschlagene Drops Paris in genau der Farbkombination bestellt, und es ist leider nicht ausreichend, um die letzten 2 Quadrate anzuhäkeln.
05.02.2019 - 12:44
![]() Jenny Gunnarzon wrote:
Jenny Gunnarzon wrote:
Hej, finns det en instruktions video någonstanns på hur man virkar rutorna till drops 187-35. Jag klarar inte att läsa diagrammet... tack på förhand Jenny
13.07.2018 - 14:29
|
||||||||||||||||||||||||||||||||||||||||
Carry Me Home#carrymehomebag |
||||||||||||||||||||||||||||||||||||||||
 |
 |
|||||||||||||||||||||||||||||||||||||||
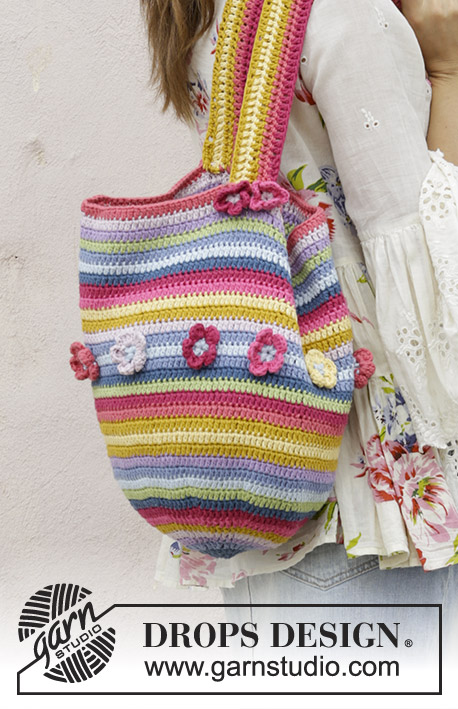
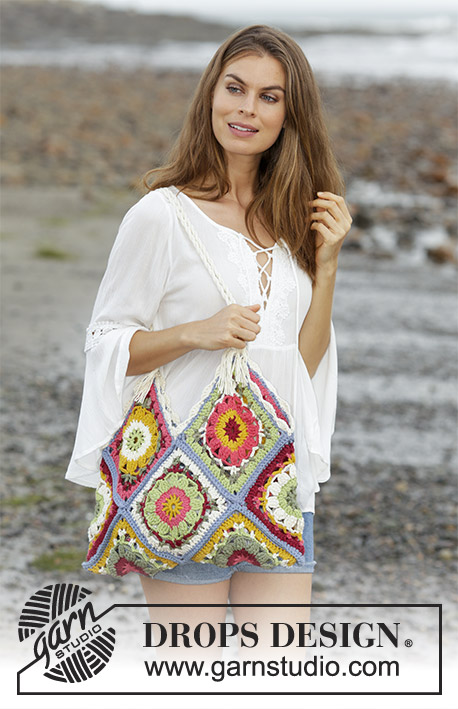
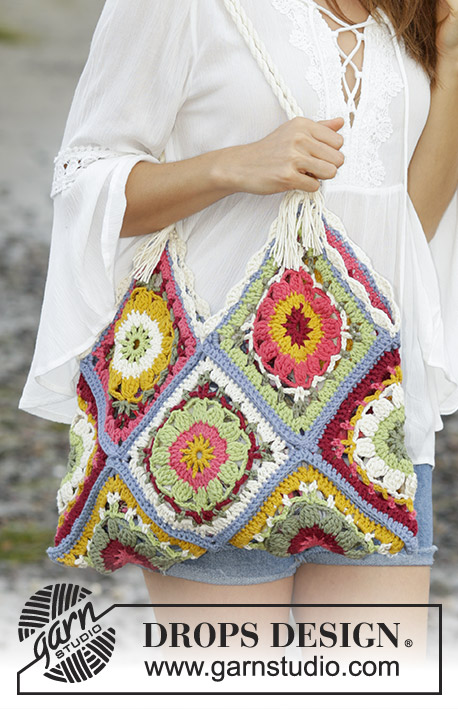
Crocheted bag with squares in various colors. The piece is worked in DROPS Paris.
DROPS 187-35 |
||||||||||||||||||||||||||||||||||||||||
|
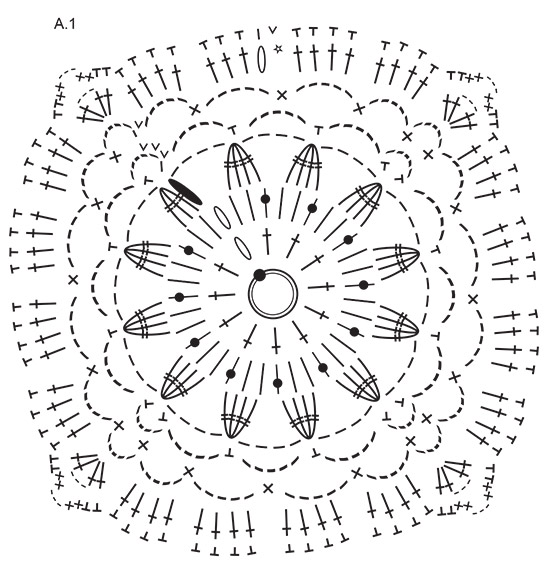
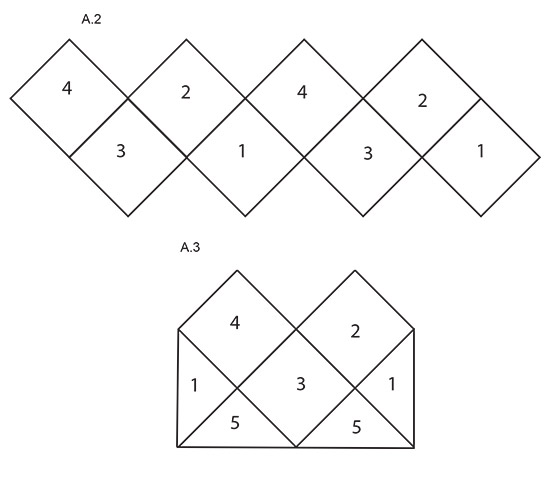
INFORMATION FOR THE PATTERN: PATTERN: Crochet according to diagram A.1. A.2 and A.3 show how the squares are worked together. COLOR COMBINATIONS: SQUARE 1: CHAIN-STITCH RING + ROUND 1: moss green ROUND 2: Pistachio ROUND 3: Off white ROUND 4: Mustard ROUND 5: Raspberry ROUND 6: Rusty red ROUND 7: Gray blue SQUARE 2: CHAIN-STITCH RING + ROUND 1: Rusty red ROUND 2: Mustard ROUND 3: Raspberry ROUND 4. : Off white ROUND 5: moss green ROUND 6: Pistachio ROUND 7: Gray blue SQUARE 3: CHAIN-STITCH RING + ROUND 1: Mustard ROUND 2: Raspberry ROUND 3: Pistachio ROUND 4: Rusty red ROUND 5: moss green ROUND 6: Off white ROUND 7: Gray blue SQUARE 4: CHAIN-STITCH RING + ROUND 1: Pistachio ROUND 2: Off white ROUND 3: Mustard ROUND 4: moss green ROUND 5: Rusty red ROUND 6: Raspberry ROUND 7: Gray blue SQUARE 5: CHAIN-STITCH RING + ROUND 1: Raspberry ROUND 2: Rusty red ROUND 3: moss green ROUND 4: Pistachio ROUND 5: Off white ROUND 6: Mustard ROUND 7: Gray blue COLOR CHANGE: To get a neat transition when changing colors, work the last slip stitch of the round with the new color as follows: Insert the hook in the last chain stitch from the beginning of the round, pick up the new strand, make a yarn over with the new strand and pull it through the stitch on the hook. ---------------------------------------------------------- BAG: The bag is made up of 10 squares with different color combinations. Work 2 squares of each COLOR COMBINATION – see description above. Work according to A.1 and start as follows: Work 7 chain stitches with hook size 4.5 mm/US 7 and Paris and form them into a ring with 1 slip stitch in the first chain stitch. Continue according to diagram A.1, changing color on each round – read COLOR CHANGE. NOTE! Round 6 does not start in the corner of the square, but in the middle of one of the sides of the square. ASSEMBLY: The bag is worked together with gray blue and hook size 4.5 mm/US 7. Lay out 8 of the squares (squares in color combinations 1 to 4) as shown in A.2. Start on the right side and lay squares 1 and 2 wrong side to wrong side. Start in the chain-space in the corner and work 2 single crochets around both chain-spaces. Continue with 1 single crochet in each single crochet on both squares, finish with 2 single crochets around both chain-spaces in the corner. Lay square 3 with wrong side towards square 2, work 2 single crochets around both chain-spaces in the corner, continue with 1 single crochet in each single crochet from both squares and finish with 2 single crochets around both chain-spaces in the corner. Continue like this until the 8 squares have been worked together. Then work square 4 at the end of A.2 together with square 1 at the beginning of A.2, so that the bag is joined in both sides, finish with a slip stitch in the first single crochet worked on squares 1 and 2. Cut and fasten the strand. Now work the last two squares to the bottom of the bag as shown in A.3. Start at the bottom right corner, lay square 5 with wrong side to square 1, work 2 single crochets around both chain-spaces, work 1 single crochet in each single crochet from both squares, finish with 2 single crochets around both chain-spaces in the corner. Lay the next side of square 5 with wrong side towards square 3, work 2 single crochets around both chain-spaces, work 1 single crochet in each single crochet from both squares, finish with 2 single crochets around both chain-spaces in the corner. Continue until the last 2 squares have been worked to the bottom of the bag and finish with 1 slip stitch in the first single crochet. Cut and fasten the strand. CROCHET EDGE: Crochet an edge around the opening on the bag. Work with off white and hook size 4.5 mm/US 7 as follows: Work 1 single crochet in the join between the 2 middle squares on the bag (squares 2 and 4 in A.3), *skip 2 single crochets from square 4, work 5 double crochets in the next single crochet, skip 2 single crochets, work 1 single crochet in the next single crochet *, repeat from *-* 3 more times, work 1 single crochet + 3 chain stitches + 1 single crochet around the chain-space, * work 1 single crochet in the next single crochet, skip 2 single crochets, work 5 double crochets in the next single crochet, skip 2 single crochets *, repeat from *-* 3 more times and finish with 1 single crochet in the join between the next 2 squares. Continue like this around the whole opening on the bag, finish with 1 slip stitch in the first single crochet. TWISTED CORD: Cut 8 strands off-white of 4 metres in length. Twist them together until they begin to resist, fold the cord double and it will continue to twist. Tie a knot in each end. Fasten the cord through the chain-space from the crochet edge on the top of one of the squares and the other end in the top of another square on the same side of the bag. Leave approx. 8 cm / 3⅛" as a fringe after the knots. Repeat on the other side of the bag. |
||||||||||||||||||||||||||||||||||||||||
Diagram explanations |
||||||||||||||||||||||||||||||||||||||||
|
||||||||||||||||||||||||||||||||||||||||
 |
||||||||||||||||||||||||||||||||||||||||
 |
||||||||||||||||||||||||||||||||||||||||
Have you finished this pattern?Tag your pictures with #dropspattern #carrymehomebag or submit them to the #dropsfan gallery. Do you need help with this pattern?You'll find 13 tutorial videos, a Comments/Questions area and more by visiting the pattern on garnstudio.com. © 1982-2026 DROPS Design A/S. We reserve all rights. This document, including all its sub-sections, has copyrights. Read more about what you can do with our patterns at the bottom of each pattern on our site. |
||||||||||||||||||||||||||||||||||||||||

With over 40 years in knitting and crochet design, DROPS Design offers one of the most extensive collections of free patterns on the internet - translated to 17 languages. As of today we count 324 catalogs and 12199 patterns - 12189 of which are translated into English (US/in).
We work hard to bring you the best knitting and crochet have to offer, inspiration and advice as well as great quality yarns at incredible prices! Would you like to use our patterns for other than personal use? You can read what you are allowed to do in the Copyright text at the bottom of all our patterns. Happy crafting!
Post a comment to pattern DROPS 187-35
We would love to hear what you have to say about this pattern!
If you want to leave a question, please make sure you select the correct category in the form below, to speed up the answering process. Required fields are marked *.