
Popular categories
Looking for a yarn?


|
|||||||||||||||||||||||||
Juanita |
|||||||||||||||||||||||||
 |
 |
||||||||||||||||||||||||
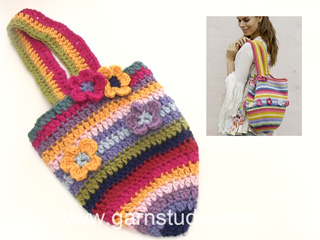
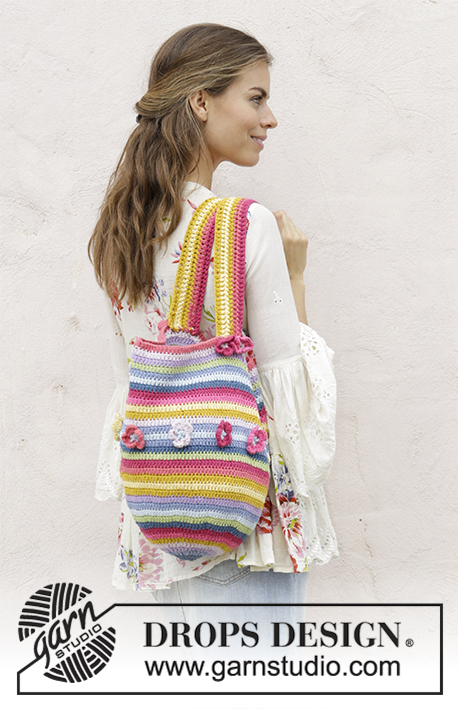
Bag with stripes and flowers, crocheted bottom up. Piece is crocheted in DROPS Paris.
DROPS 187-3 |
|||||||||||||||||||||||||
|
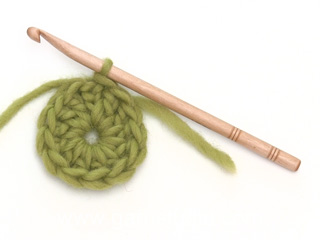
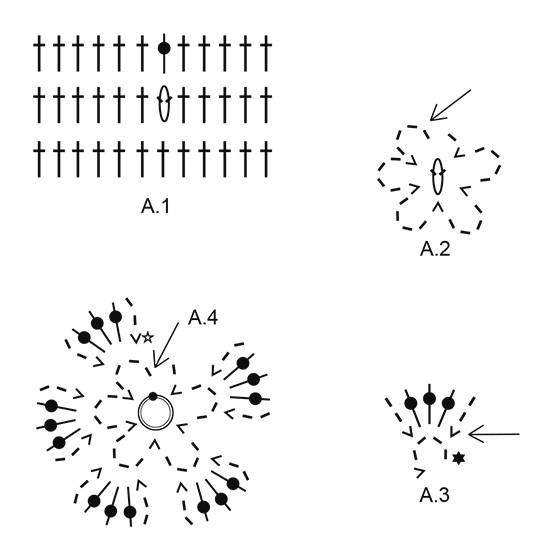
INFORMATION FOR PATTERN: CROCHET INFO: Replace first double crochet on round with 3 chain stitches, finish round with 1 slip stitch in third chain stitch. When changing color work last slip stitch on round as follows: Insert hook in 3rd chain stitch at beginning of round, switch to next color and pull yarn through loop on hook. PATTERN: See diagrams A.1 to A.4. 2 DOUBLE CROCHETS TOGETHER IN 1 STITCH: Work a double crochet in next stitch but wait with last yarn over and pull through (= 2 loops on hook). Work another double crochet in same stitch but on last pull through pull yarn through all 3 loops on hook (= 2 double crochets worked together in 1 stitch). STRIPES BAG: Chain stitch circle at beginning of bag + ROUNDS 1-2: petrol ROUND 3: gray blue ROUND 4: light purple ROUND 5: powder pink ROUND 6: mustard ROUND 7: shocking pink ROUND 8: heather ROUND 9: petrol ROUND 10: pistachio ROUND 11: light ice blue ROUND 12: gray blue ROUND 13: light purple ROUND 14: mustard ROUND 15: vanilla ROUND 16: mustard ROUND 17: raspberry ROUND 18: heather ROUND 19: pistachio ROUND 20: petrol ROUND 21: gray blue ROUND 22: light ice blue ROUND 23: gray blue ROUND 24: powder pink ROUND 25: mustard ROUND 26: vanilla ROUND 27: shocking pink ROUND 28: heather ROUND 29: petrol ROUND 30: light ice blue ROUND 31: gray blue ROUND 32: pistachio ROUND 33: light purple ROUND 34: powder pink ROUND 35: raspberry STRIPES STRAP: Chain stitch row at beginning of strap + ROW 1: mustard ROW 2: vanilla ROW 3: mustard ROW 4: raspberry ROW 5: heather ---------------------------------------------------------- BAG: Worked in the round from middle of bottom and upwards. Work strap back and forth and worked together with bag when finished. Work 5 chain stitches on hook size 3.5 mm/E/4 and petrol and form a ring with 1 slip stitch in first chain stitch made. Then work STRIPES BAG - see explanation above, and double crochets as follows: ROUND 1: Work 11 double crochets in ring – READ CROCHET INFO! ROUND 2: Work 2 double crochet in every double crochet = 22 double crochets. ROUND 3: Work * 1 double crochet in first double crochet, 2 double crochets in next double crochet *, repeat from *-* the entire round = 33 double crochets. ROUND 4: Work * 1 double crochet in each of the first 2 double crochets, 2 double crochets in next double crochet *, repeat from *-* the entire round = 44 double crochets. REMEMBER THE CROCHET GAUGE! ROUNDS 5-11: Continue with increases and pattern as before, i.e. on every round work 1 double crochet more between increases = 121 double crochets. Now work with 1 double crochet in every double crochet. On 22nd round work 2nd round in A.1 + A.2 (flower) as follows: Work 1 double crochet in first double crochet, ** work 1 double crochet in each of the next 5 double crochets, work 2 DOUBLE CROCHETS TOGETHER IN 1 STITCH – see explanation above, and around these double crochet work A.2 (= flower) as follows (see arrow in A.2, flower begins here): Around last double crochet worked in A.1 work as follows: * Work 4 chain stitches, 1 slip stitch *, repeat from *-* 3 times in total, then work around next to last double crochet worked in A.1 as follows: * Work 4 chain stitches, 1 slip stitch *, repeat from *-* 2 times in total, work 1 chain stitch, then work A.1 as follows: Work 1 double crochet in each of the next 6 double crochets **. Repeat from **-** the entire round = 10 flowers. (Work around chain spaces in flower with different colors (= A.3) later on). On 23rd round work 3rd round in A.1 as follows: Work 1 double crochet in first double crochet. ** Work 1 double crochet in each of the next 5 double crochets, work 1 double crochet around chain stitch worked after flower, work 1 double crochet in each of the next 6 double crochets **, repeat from **-** the entire round. Rounds 24-33: Continue with 1 double crochet in every double crochet. When 33rd stripe has been worked, put piece aside and work the strap. STRAP: Work 152 chain stitches with mustard on hook size 3.5 mm/E/4. Work as follows: ROW 1: 1 double crochet in 4th chain stitch from hook (= 2 double crochets), 1 double crochet in each of the next 4 chain stitches, * skip 1 chain stitch, work 1 double crochet in each of the next 5 chain stitches *, repeat from *-* 24 times in total = 126 double crochets. NOTE: Every row begins with 3 chain stitches that replace first double crochet on row. ROW 2: Switch to vanilla and work 1 double crochet in every double crochet. ROW 3: Switch to mustard and work 1 double crochet in every double crochet. ROW 4: Switch to raspberry and work 1 double crochet in every double crochet. ROW 5: Switch to heather and work 1 double crochet in every double crochet. Fasten off. Now work round 34 - remember stripes, while at the same time working strap together with bag as follows: Work 1 double crochet in each of the first 28 double crochets, place one end on strap along the inside of bag and work strap together with bag by working 1 double crochet in next double crochet and through first row on strap, work each of the next 4 double crochets together with next row on strap (strap will contract a little), continue with 1 double crochet in each of the next 55 double crochets on bag, place the other end on strap along the inside of bag and work strap together with bag by working 1 double crochet in next double crochet and through first row on strap, work each of the next 4 double crochets together with next row on strap (strap will contract a little), work 1 double crochet in each of the last 28 double crochets. Then work last row on bag. Fasten off. FLOWER: Around every chain space worked in A.2 (= 4 chain stitches) work A.3 in different colors - see explanation below. When A.3 has been worked around all the 5 chain spaces in 1 flower, cut the yarn, tie the ends together and fasten off. Work 1st and 6th flower in color 35 vanilla. Work 2nd and 7th flower in color 06 shocking pink. Work 3rd and 8th flower in color 07 heather. Work 4th and 9th flower in color 58 powder pink. Work 5th and 10th flower in color 38 raspberry. Now work 4 loose flowers as follows: Work pattern according to diagram A.4 in 1st flower: Chain stitch circle at beginning of piece + round 1: powder pink. Round 2: heather 2nd flower: Chain stitch circle at beginning of piece + round 1: powder pink. Round 2: shocking pink 3rd flower: Chain stitch circle at beginning of piece + round 1: powder pink. Round 2: raspberry 4th flower: Chain stitch circle at beginning of piece + round 1: powder pink. Round 2: vanilla Sew 1st and 2nd flower onto bag with powder pink. Sew through round 34 (= round in powder pink) and strap. Sew 3rd and 4th flower the same way on strap in the other side of bag. |
|||||||||||||||||||||||||
Diagram explanations |
|||||||||||||||||||||||||
|
|||||||||||||||||||||||||
|
|||||||||||||||||||||||||
|
Have you made this or any other of our designs? Tag your pictures in social media with #dropsdesign so we can see them! Do you need help with this pattern?You'll find tutorial videos, a Comments/Questions area and more by visiting the pattern on garnstudio.com. © 1982-2024 DROPS Design A/S. We reserve all rights. This document, including all its sub-sections, has copyrights. Read more about what you can do with our patterns at the bottom of each pattern on our site. |
|||||||||||||||||||||||||


With over 40 years in knitting and crochet design, DROPS Design offers one of the most extensive collections of free patterns on the internet - translated to 17 languages. As of today we count 304 catalogs and 11422 patterns - 11417 of which are translated into English (US/in).
We work hard to bring you the best knitting and crochet have to offer, inspiration and advice as well as great quality yarns at incredible prices! Would you like to use our patterns for other than personal use? You can read what you are allowed to do in the Copyright text at the bottom of all our patterns. Happy crafting!
Comments / Questions (8)
You are wonderfull .
13.11.2020 - 18:52Voi sapete solo copiare dal lavoro di veri designer. Complimenti per aver copiato l’ennesimo modello. questo e’ un modello di Lucy di attic 24. https://attic24.typepad.com/weblog/crochet-bag.html
11.07.2020 - 01:34Wenn ich nur in einer Farbe diese Tasche möchte....wie viel Knäuel benötige ich dann von der Paris?
26.07.2019 - 16:01DROPS Design answered:
Liebe Beatrix, für dieses Modell können wir Ihnen leider keine genaue Garnmenge für ein einfarbiges Modell nennen. Am besten schauen Sie sich vergleichbare Taschen an und können dann in etwa abschätzen, wie viel Garn dafür benötigt wird, z.B. werden für die zweifarbige Tasche 173-1 mit gleichem Umfang und gleicher Höhe 400 g Paris benötigt. In etwa mit dieser Garnmenge sollten Sie rechnen. Viel Spaß beim Häkeln!
29.07.2019 - 16:30This type of planter is very grademiners popular with avid gardeners because they provide a healthy environment for an annual’s root system and discourage root rot. They are meant to be used with a liner of some type, typically a fibrous liner made of compressed fibers called coir.
23.12.2018 - 18:34Modellen på bilden vart har hon fått tag på blusen? Tacksam för svar🌞
13.06.2018 - 11:24DROPS Design answered:
Hej Jenny, det kan vi tyvärr inte svara på :)
13.06.2018 - 15:06Hallo, ich suche die Anleitung von der Tasche mit Tulpenmotiv. In der Vorschau war sie zu sehen.Können sie mit bitte weiterhelfen? Gruss Tina
02.05.2018 - 13:59DROPS Design answered:
Liebe Frau Kaufmann, dieses Modell wurde noch nicht hochgeladen, es kommt aber sicher in den nächsten Wochen. Bleiben Sie daran!
02.05.2018 - 15:17Kate wrote:
Terrible description, why mess things up like that? Crazy 2 DOUBLE CROCHETS TOGETHER IN 1 STITCH and flowers in knitted fabric. Why not just sew them on?
26.02.2018 - 21:36Hei! Flott veske, men... Skjønner ikke beskrivelsen/hvordan jeg fester/hekler stroppen fast i vesken? Kan dere lage en video?
17.02.2018 - 18:20DROPS Design answered:
Hej Agnes, den hækles sammen med 34.omgang ved at hækle både stroppen og 34.omgang samtidigt. Vi skriver dit ønske om video på vores ønskeliste. God fornøjelse!
21.02.2018 - 14:52