
Popular categories
Looking for a yarn?


Comments / Questions (42)
![]() Birgitta Mörnefält wrote:
Birgitta Mörnefält wrote:
Jag vill sticka den här koftan nerifrån och upp. Hur gör jag?
03.11.2023 - 13:05DROPS Design answered:
Hei Birgitta. Les oppskriften godt, husk f.eks gjør økninger istedenfor minskninger, les diagrammene oppned osv. mvh DROPS Design
06.11.2023 - 14:05
![]() Gravina wrote:
Gravina wrote:
C'est bon j'ai trouvé, tout va bien 👌👌
28.01.2023 - 22:57
![]() Gravina wrote:
Gravina wrote:
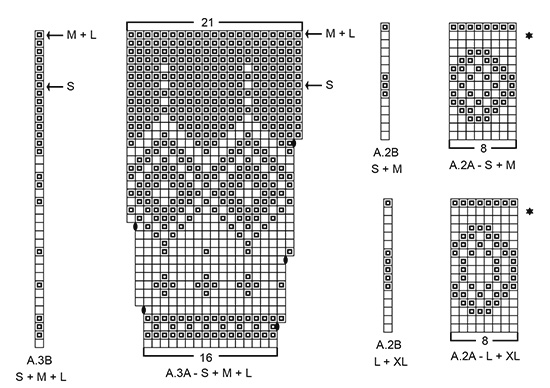
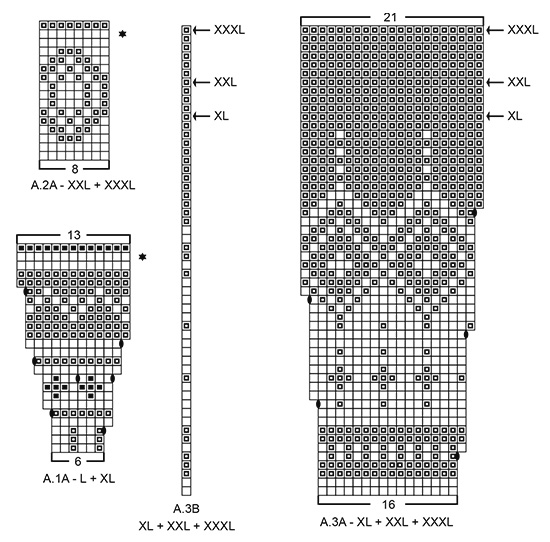
Bonjour Il y a un problème sur le graphique A.3A Si l'on fait un les jetés des lignes 11 15 et peut être aussi 25 cela ne cadre plus avec le graphisme du pull !!
28.01.2023 - 16:42DROPS Design answered:
Bonjour Mme Gravina, lorsque vous faites 1 jeté dans le diagramme, cela augmente le nombre de mailles du motif à tricoter, au rang suivant, tricotez la nouvelle maille comme indiqué dans le diagramme, le motif va s'élargir et s'aligner tout comme dans le diagramme. (même si vous n'avez par ex que 3 m de la couleur du fond à la fin du rang 11 (et 4 m au début du diagramme), continuez bien ainsi, tel que le diagramme est représenté). Bon tricot!
30.01.2023 - 08:55
![]() Renate Nijk wrote:
Renate Nijk wrote:
The sleeve for M must be 29 cm+ 10. If I do that it is a short sleeve until :between elbow and wrist. Is this correct? Renate
14.09.2022 - 22:17DROPS Design answered:
Dear Mrs Nijk, that's correct, check measurements on a similar garment you have and like the size, don't forget to measure from neck too (including yoke)- and adjust to your own size if needed. Happy knitting!
15.09.2022 - 09:53
![]() Ana wrote:
Ana wrote:
Los aumentos marcados en el gráfico A.3A, los 3 últimos, no se pueden realizar en los sitios donde se marcan por que desvirtúan el dibujo..., yo estoy realizando una talla XXXL y tuve que cambiar de sitio y deshacer un buen trozo.
18.01.2022 - 13:05
![]() Kirsten Mogensen wrote:
Kirsten Mogensen wrote:
Ifølge opskriften 180-4, skal der strikkes udtagningspinde efter diagrammet, hvor der er markeret med stjerne. Jeg kan se det drejer sig om ret mange masker, men kan ikke gennemskue hvor mange og hvordan. Håber du kan hjælpe mig. Venlig hilsen Kirsten
01.06.2021 - 10:11DROPS Design answered:
Hej Kirsten, Det er lidt forskelligt, det kommer an på hvilken størrelse du strikker. I A.1 tages der 11-22-33-36-21-22 masker ud jævnt fordelt (vælg det antal som står i din størrelse). Næste gang tager du ud i A.2, her skriver vi også hvor mange masker du skal tage ud.
02.06.2021 - 12:10
![]() Astrid Flage Larsen wrote:
Astrid Flage Larsen wrote:
Har dere ikke Drops Flora farge grønn nr 15?
19.03.2021 - 18:28DROPS Design answered:
Hei Astrid. Jo, DROPS Flora farge 15 grønn er fremdeles i vårt sortiment. mvh DROPS design
22.03.2021 - 12:11
![]() Marlene wrote:
Marlene wrote:
Bonjour j aimerais savoir si il est possible d agrandir la largeur de la manche Nous a.vous des mailles sur notre aiguille et on en rajoute pour le dessous du bras Carmela serre au début et c est très fatiguant Si on rajoute des mailles est ce que cela l’agrandirait et ne déformerait pas la manche ?
01.03.2021 - 15:57DROPS Design answered:
Bonjour Marlene, si vous ajoutez des mailles, vous allez modifier la largeur/circonférence de la manche qui ne passera plus avec les explications du modèle. Vous pouvez ajuster sur la base d'un modèle présentant les mêmes manches que celles que vous souhaitez (cherchez bien un modèle de même tension). Pour toute assistance complémentaire, n'hésitez pas à contacter votre magasin, même par mail ou téléphone. Bon tricot!
01.03.2021 - 16:12
![]() Lubica wrote:
Lubica wrote:
I am working on pattern A.3A, in row 11 I add a loop at the beginning and then each time after 18 loops. This means that then the diamonds are moved and their points are not centered above the crosses below them-this happens if I follow the pattern of 1 green loop, 4 white, 1 green... How to proceed? Should I follow pattern 1-4-1 or should I create a green loop always according to the bottom tip of the cross in order to keep it centered? In the second case, there would be 5 loops instead of 4
27.02.2021 - 13:42DROPS Design answered:
Dear Lubica, work diagram as shown - the diamonds have to be worked like that, you will increase 1 stitch at the end of each repeat some rows later, so that the diamond will match perfectly. Happy knitting!
01.03.2021 - 10:38
![]() Ľubica wrote:
Ľubica wrote:
V 11 rade vzoru A.3A pridávame očko na začiatku a vždy po 18 očkách. To znamená, že potom sa nám kosoštvorce posúvajú a nie sú vycentrované ich hroty nad krížikmi pod nimi, ak dodržíme vzor 1 zelené očko, 4 biele, 1 zelené,... Ako teda pokračovať, dodržať vzor 1-4-1 alebo aby to nebolo posunuté, dať zelené očko vždy podľa spodného hrotu krížika? Vtedy by tam, kde bol nákyd, neboli 4 ale 5 očiek. Nejako to nevychádza. Prosím o radu. Ďakujem.
20.02.2021 - 23:23DROPS Design answered:
Dobrý den, Lubico, myslím, že máte chybě zorientované schéma: vzorek čteme zprava doleva (a zdola nahoru). V 11. řadě nahazujeme 1 oko vždy na konci sekvence, tj. vždy za 17. okem vzoru. Pak by mělo být vše v pořádku a kosočtverce by měly ležet nad sebou. Hodně zdaru! Hana
28.02.2021 - 00:30
|
|||||||||||||||||||
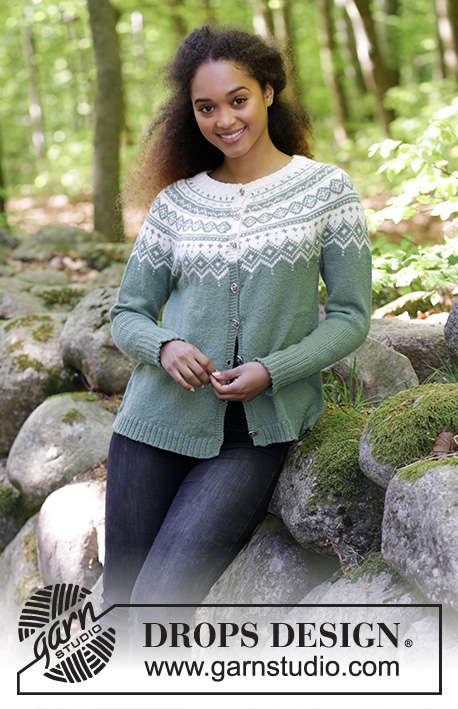
Perles du Nord Jacket#perlesdunordjacket |
|||||||||||||||||||
 |
 |
||||||||||||||||||
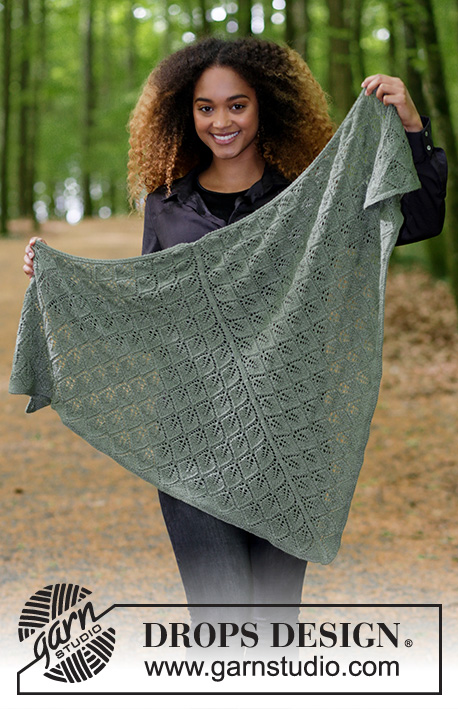
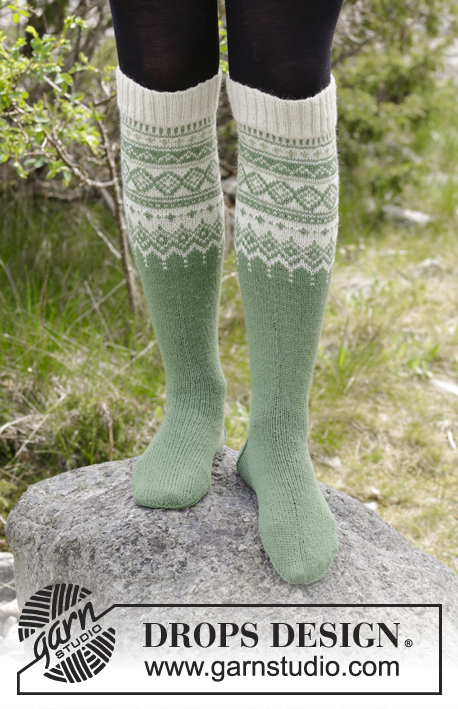
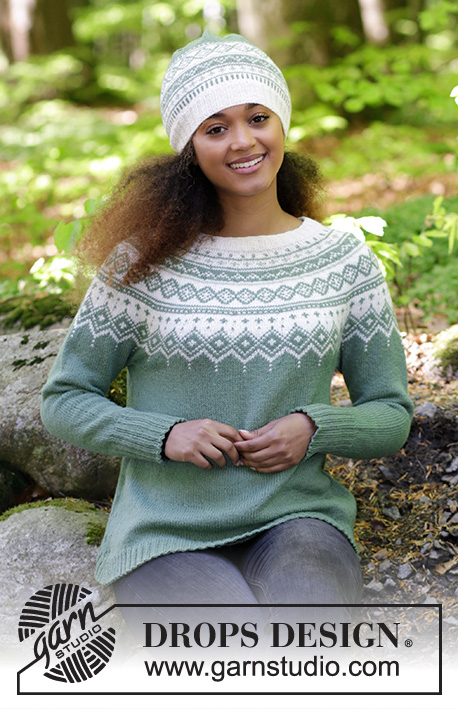
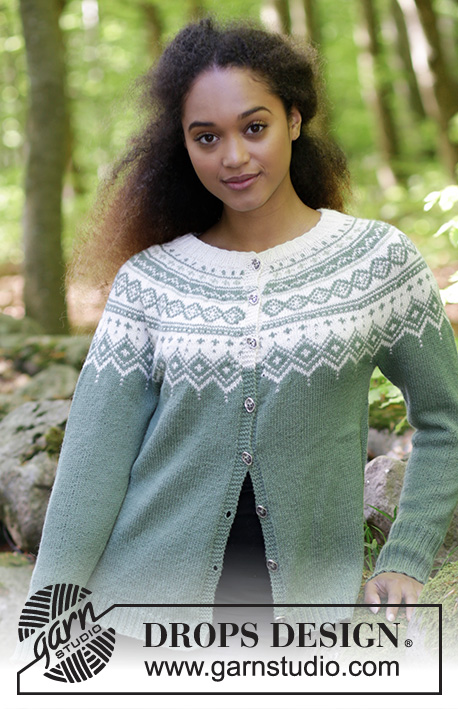
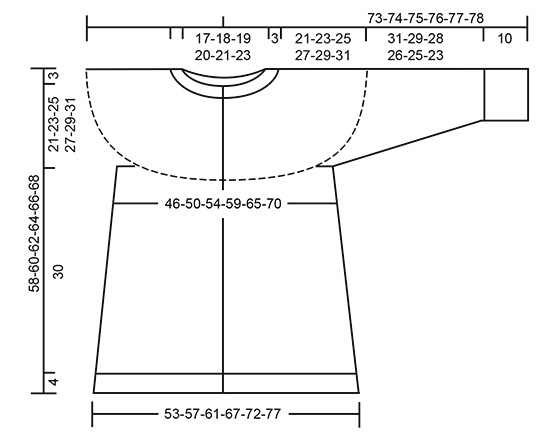
Knitted jacket with round yoke, multi-colored Norwegian pattern and A-shape, worked top down. Sizes S - XXXL. The piece is worked in DROPS Flora.
DROPS 180-4 |
|||||||||||||||||||
|
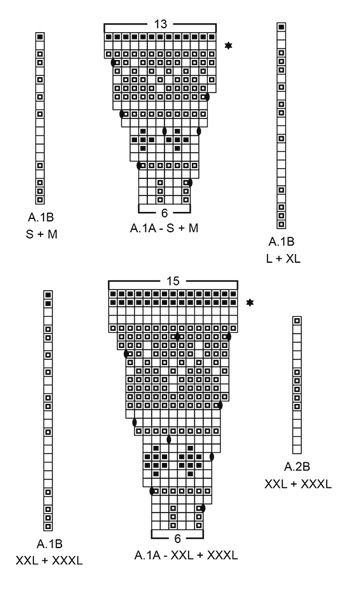
INFORMATION FOR THE PATTERN: RIDGE/GARTER STITCH (worked back and forth): 1 ridge = Knit 2 rows. DECREASE/INCREASE TIP: To work out how to decrease/increase evenly, count the total number of stitches on the needle (e.g. 132 stitches) minus the bands (e.g. 10 stitches) and divide by the number of decreases/increases to be made (e.g. 19) = 6.4. In this example, decrease by knitting alternately every 5th and 6th stitch and every 6th and 7th stitch together. Do not decrease over the bands. If you are increasing, do this after alternately every 6th and 7th stitch (increase 1 stitch by making 1 yarn over, on the next round, knit the yarn overs twisted and into the pattern so that there are no holes). ELEVATION: Insert 1 marker mid back. Start from the right side with off white and knit until you have worked 10-10-11-12-12-13 stitches past the marker, turn, tighten the strand and purl 20-20-22-24-24-26 stitches. Turn, tighten the strand and knit 30-30-33-36-36-39 stitches, turn, tighten the strand and purl 40-40-44-48-48-52 stitches. Turn, tighten the strand and knit 50-50-55-60-60-65 stitches, turn, tighten the strand and purl 60-60-66-72-72-78 stitches. Turn, tighten the strand and knit 70-70-77-84-84-91 stitches, turn, tighten the strand and purl to end of row (the band is knitted). PATTERN: See diagrams A.1 to A.3. Choose diagram for your size. The diagrams show all the rows in the pattern seen from the right side. The whole pattern is worked in stockinette stitch. KNITTING TIP-1 (for the bands): When working the pattern edge with two colors on the yoke, work the background color in the pattern also over the 5 band stitches in each side. KNITTING TIP-2: To prevent the knitting gauge from becoming tighter when working pattern, it is important that the strands do not tighten at the back of the piece. You can increase the size of your needle when working pattern if you find you are working too tightly. INCREASE TIP (for the sides on body): All increases are from the right side! Start 2 stitches before the marker thread, make 1 yarn over, knit 4 (marker thread sits in the middle of these 4 stitches), make 1 yarn over (= 2 stitches increased). On the next row (wrong side) purl the yarn overs twisted to prevent holes. DECREASE TIP (for mid under sleeve): Work until there are 4 stitches left before the marker thread, knit 2 together, knit 4 (the marker thread sits in the middle of these 4 stitches), slip 1 stitch as if to knit, knit 1, pass the slipped stitch over the knitted stitch (= 2 stitches decreased). BUTTONHOLES: Decrease for buttonholes on the right band (when garment is worn): Knit from the right side until there are 3 stitches left at the end of the row, make 1 yarn over, knit the next 2 stitches together and knit the final stitch. On the next row knit the yarn over to make a hole. The first buttonhole is worked when the band at the neck measures approx. 1½-2 cm / ½"-¾". Then work the next 7 buttonholes with approx. 7½-8-8-8½-8½-9 cm / 2⅞"-3"-3"-3¼"-3¼"-3½" between each. ---------------------------------------------------------- JACKET: The piece is worked back and forth with circular needle from mid front and is worked top down. The sleeves are worked in the round with short circular needle, top down, change to double pointed needles when you have decreased enough stitches. NECKLINE: Cast on 132-136-140-144-152-160 stitches (including 5 band stitches in each side towards mid front) with circular needle size 2.5 mm / US 1.5 and off white. Purl 1 row (= wrong side). The next row is worked as follows from the right side: Work 5 band stitches in GARTER STITCH – see description above, * knit 2, purl 2 *, repeat from *-* until there are 7 stitches left on the needle, knit 2 and finish with 5 band stitches in garter stitch. Continue the rib in this way – remember BUTTONHOLES on right band – see description above. When the rib measures 3 cm / 1" knit 1 row from the right side where you decrease 19-17-15-13-15-17 stitches evenly on row – read DECREASE/INCREASE TIP = 113-119-125-131-137-143 stitches. Continue by working the yoke as described below. YOKE: Change to circular needle size 3 mm / US 2.5. Purl 1 row from wrong side with 5 band stitches in each side. For a better fit, you can now work an ELEVATION at the back of the neck – see description above. When you have completed the elevation, work the next row as follows from the right side: 5 band stitches in garter stitch, work A.1A until there are 6 stitches left on the needle (= 17-18-19-20-21-22 repeats of 6 stitches), work A.1B (= 1 stitch) and finish with 5 band stitches in garter stitch. Continue the pattern in this way and increase as shown in the diagram. Read KNITTING TIP-1 and KNITTING TIP-2. REMEMBER THE GAUGE! On the row marked with a star in A.1 (i.e. the last row from the right side in A.1) there are 232-245-258-271-326-341 stitches on the needle, increase at the same time 11-22-33-36-21-22 stitches evenly on row – read DECREASE/INCREASE TIP = 243-267-291-307-347-363 stitches. When A.1 has been completed, work the next row from the right side as follows: 5 band stitches in garter stitch, work A.2A until there are 6 stitches left on the needle (= 29-32-35-37-42-44 repeats of 8 stitches), work A.2B (= 1 stitch) and finish with 5 band stitches in garter stitch. Continue the pattern in this way, but on the row marked with a star in A.2 (i.e. the last row from the right side in A.2) increase 8-16-24-24-16-16 stitches evenly on row = 251-283-315-331-363-379 stitches. When A.2 has been completed, work the next row as follows from the right side: 5 band stitches in garter stitch, work A.3A until there are 6 stitches left on the row (= 15-17-19-20-22-23 repeats of 16 stitches), work A.3B (= 1 stitch) and finish with 5 band stitches in garter stitch. Continue the pattern in this way and increase as shown in the diagram. When the last row in A.3 remains (marked with an arrow in each size) there are 326-368-410-431-473-494 stitches on the needle, increase at the same time 11-11-1-11-0-5 stitches evenly on the last row from the wrong side = 337-379-411-442-473-499 stitches. The piece now measures approx. 24-26-28-30-32-34 cm / 9½"-10¼"-11"-11¾"-12½"-13½" from the cast-on edge measured mid front. NOTE: If the piece is shorter than this, continue working stockinette stitch with green and 5 band stitches in garter stitch in each side to required length. The next row is worked as follows from the right side with green: Knit 55-60-64-70-76-81 stitches (= front piece), place the next 64-75-83-86-90-93 stitches on a thread for the sleeve, cast on 10-10-12-12-14-16 new stitches on the needle (= in the side under the sleeve), knit 99-109-117-130-141-151 stitches (= back piece), place the next 64-75-83-86-90-93 stitches on a thread for the sleeve, cast on 10-10-12-12-14-16 new stitches on the needle (= in the side under the sleeve) and knit the remaining 55-60-64-70-76-81 stitches (= front piece). The body and sleeves are now finished separately. THE PIECE IS MEASURED FROM HERE! BODY: = 229-249-269-294-321-345 stitches. Insert 1 marker thread 60-65-70-76-83-89 stitches in from each side = 109-119-129-142-155-167 stitches between marker threads on the back piece. Continue with green and work stockinette stitch back and forth with 5 band stitches in each side towards mid front. When the piece measures 2 cm / ¾" from the division increase 1 stitch on each side of both marker threads – read INCREASE TIP (= 4 stitches increased). Increase in this way every 10th row (approx. every 3 cm / 1") to finished length (if the knitting gauge is correct in height, there should be approx. 9 increase rows in each side). When the piece measures 30 cm / 11¾" from the division in all sizes, there are 265-285-305-330-357-381 stitches on the needle. Purl 1 row from wrong side where you increase 83-87-95-106-115-123 stitches evenly on row – read DECREASE/INCREASE TIP = 348-372-400-436-472-504 stitches. Change to circular needle size 2.5 mm / US 1.5 and work the next row from the right side as follows: Work 5 band stitches in garter stitch, * knit 2, purl 2 *, repeat from *-* until there are 7 stitches left on the needle, knit 2 and finish with 5 band stitches in garter stitch. Continue rib in this way for 4 cm / 1½". Then bind off with garter stitch over garter stitch, knit over knit and purl over purl, but to prevent the bind-off edge being tight, you can make 1 yarn over after every 4th stitch AT THE SAME TIME as you bind off (the yarn overs are bind off as normal stitches). The jacket measures approx. 58-60-62-64-66-68 cm / 22¾"-23⅝"-24⅜"-25¼"-26"-26¾" from the shoulder down. SLEEVE: Place the 64-75-83-86-90-93 stitches from the thread on the one side of the piece on a short circular needle size 3 mm / US 2.5 and in addition, knit up 1 stitch in each of the 10-10-12-12-14-16 stitches cast on under the sleeve = 74-85-95-98-104-109 stitches on the needle. Insert 1 marker thread in the middle of the 10-10-12-12-14-16 stitches under the sleeve. Start the round here and work stockinette stitch in the round with green. When the sleeve measures 2 cm / ¾" from the division decrease 2 stitches mid under the sleeve – read DECREASE TIP. Decrease in this way a total of 11-15-19-19-21-22 times in S: Every 9th round, in M: Every 6th round, in L and XL: Every 4th round, in XXL: Alternately every 3rd and 4th round and in XXXL: Every 3rd round = 52-55-57-60-62-65 stitches. When the sleeve measures 31-29-28-26-25-23 cm / 12¼"-11½"-11"-10¼"-9¾"-9" from the division (shorter measurements in the larger sizes due to longer yoke), knit 1 round where you increase 16-17-19-20-18-19 stitches evenly = 68-72-76-80-80-84 stitches. Change to double pointed needles size 2.5 mm / US 1.5 and work rib in the round (= knit 2 / purl 2). When the rib measures 10 cm / 4" (or the desired length) bind off with knit over knit and purl over purl, but to prevent the bind-off edge being tight you can make 1 yarn over after every 4th stitch AT THE SAME TIME as you bind off (the yarn overs are bind off as normal stitches). The sleeve measures approx. 41-39-38-36-35-33 cm / 16"-15¼"-15"-14¼"-13¾"-13" from the division. Work a second sleeve in the same way. ASSEMBLY: Sew the buttons onto the left band. |
|||||||||||||||||||
Diagram explanations |
|||||||||||||||||||
|
|||||||||||||||||||
 |
|||||||||||||||||||
 |
|||||||||||||||||||
 |
|||||||||||||||||||
 |
|||||||||||||||||||
Have you finished this pattern?Tag your pictures with #dropspattern #perlesdunordjacket or submit them to the #dropsfan gallery. Do you need help with this pattern?You'll find 33 tutorial videos, a Comments/Questions area and more by visiting the pattern on garnstudio.com. © 1982-2026 DROPS Design A/S. We reserve all rights. This document, including all its sub-sections, has copyrights. Read more about what you can do with our patterns at the bottom of each pattern on our site. |
|||||||||||||||||||


With over 40 years in knitting and crochet design, DROPS Design offers one of the most extensive collections of free patterns on the internet - translated to 17 languages. As of today we count 325 catalogs and 12298 patterns - 12288 of which are translated into English (US/in).
We work hard to bring you the best knitting and crochet have to offer, inspiration and advice as well as great quality yarns at incredible prices! Would you like to use our patterns for other than personal use? You can read what you are allowed to do in the Copyright text at the bottom of all our patterns. Happy crafting!
Post a comment to pattern DROPS 180-4
We would love to hear what you have to say about this pattern!
If you want to leave a question, please make sure you select the correct category in the form below, to speed up the answering process. Required fields are marked *.