
Popular categories
Looking for a yarn?


Comments / Questions (11)
![]() Marina wrote:
Marina wrote:
Diminuzioni maniche: fare le diminuzioni ogni 2 giri si intende diminuire al 3 giro o al secondo?
25.03.2026 - 21:02DROPS Design answered:
Buonasera Marina, le diminuzioni sono a giri alterni. Buon lavoro!
25.03.2026 - 21:53
![]() Marina wrote:
Marina wrote:
Non riesco a capire la spiegazione. È lavorato topdown dall alto in basso o no? Da dove si inizia dal collo? Dal cappuccio? Grazie Marina
16.03.2026 - 17:54DROPS Design answered:
Buonasera Marina, le indicazioni sono nelle spiegazioni. E' lavorato dall'alto in basso e si inizia dal cappuccio. Buon lavoro!
16.03.2026 - 21:51
![]() Lilianne wrote:
Lilianne wrote:
Am not sure what to do at the increases where I have only 6 sts?
13.11.2023 - 02:51DROPS Design answered:
Dear Lilianne, could you specify which part you are working?
26.11.2023 - 23:37
![]() Fatma KISRANE wrote:
Fatma KISRANE wrote:
Bonjour j ai une laine en acrylique qui peut se tricoter en 6 qu elle serait le nombre de mailles a faire pour tricoter la veste .sinon est ce que je peut la tricoter en XXXL avec l aiguille numero 6 je fais une taille L-XL MERCI
16.09.2023 - 06:54DROPS Design answered:
Bonjour Mme Kirsrane, ce modèle se tricote sur la base d'un échantillon de 10 mailles x 14 rangs jersey = 10 x10 cm; c'est grâce à cet échantillon que vous obtiendrez les mesures du schéma correspondant à la taille choisie. Retrouvez plus d'infos sur l'échantillon ici - retrouvez également d'autres infos importantes relatives à l'utilisation d'une alternative ici. Bon tricot!
18.09.2023 - 08:06
![]() Monica Johansson wrote:
Monica Johansson wrote:
När man stickar raglan står det att man skall öka 2 m före och och 2 m efter markören = 4 m emellan hur gör man på nästa varvs ökning fortfarande samma som på första med 4 m emellan Har kört fast tacksam för hjälp
18.10.2021 - 12:15DROPS Design answered:
Hei Monica. Start alltid 2 masker før merketråden, lag 1 kast om pinnen, strikk 4 masker (merketråden sitter midt i disse 4 maskene), lag 1 kast om pinnen (= 2 masker økt). Neste gang det skal økes starter du 2 masker før merketråden og det økes som tidligere. Merketrådene er hele tiden mellom de 2 sammen maskene. mvh DROPS Design
18.10.2021 - 13:35
![]() CaptBumblebee wrote:
CaptBumblebee wrote:
How is the hood closed? Is the cast on edge folded and sewn together?
24.10.2018 - 04:07DROPS Design answered:
Dear Mrs CaptBumblebee, that's correct, just fold cast on edge double and sew sts together to close the hood. Happy knitting!
24.10.2018 - 08:24
![]() Ellisen wrote:
Ellisen wrote:
Love it! Warm for winter. Hope to see the pattern soon.
05.07.2017 - 19:16
![]() Gabriela wrote:
Gabriela wrote:
Super edel und sportiv! Ein Keypiece ds hat bestimmt nicht jeder
01.07.2017 - 05:50
![]() Sonja Buhr wrote:
Sonja Buhr wrote:
Dit zal mijn 2de najaarsjas worden van Andes. Vorig jaar al heel blij met een jas van deze wol.
05.06.2017 - 21:59
![]() Sharon Freshour wrote:
Sharon Freshour wrote:
I love this sweater. I'm hoping its crochet. I'd love to see more crochet patterns.
02.06.2017 - 04:56
|
|||||||
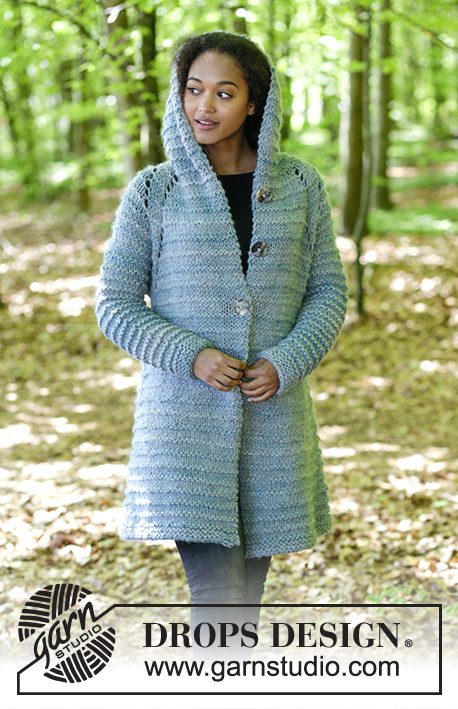
Reine#reinejacket |
|||||||
 |
 |
||||||
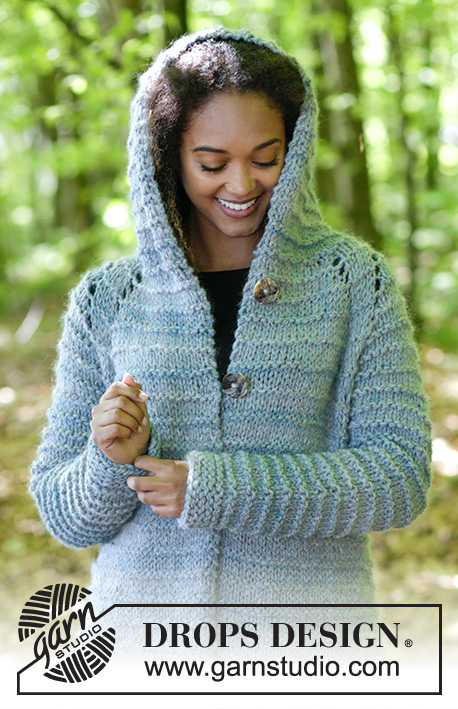
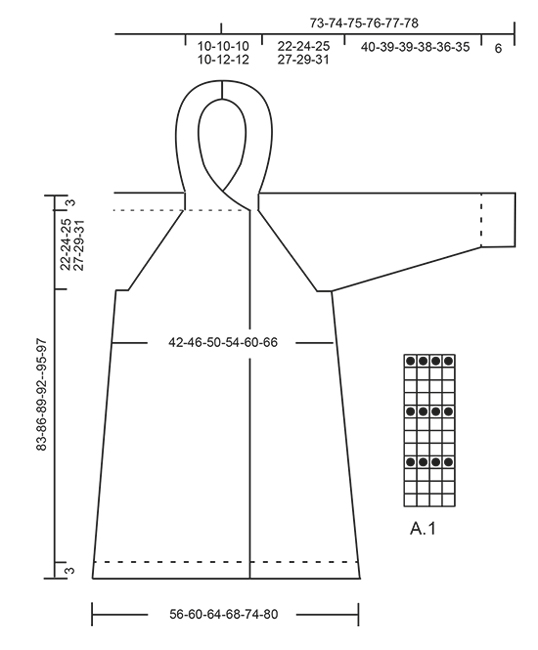
Knitted jacket with hood, raglan and textured pattern, worked top down. Sizes S - XXXL. The piece is worked in 1 strand DROPS Andes and 1 strand DROPS Kid-Silk.
DROPS 181-30 |
|||||||
|
INFORMATION FOR THE PATTERN: RIDGE/GARTER STITCH (worked back and forth): 1 ridge = Knit 2 rows. RIDGE/GARTER STITCH (worked in the round): 1 ridge = 2 rounds. Knit 1 round and purl 1 round. PATTERN: See diagram A.1. The diagram shows all the rows in the pattern seen from the right side. RAGLAN: All increases are worked from the right side! Increase to raglan on each side of 4 stitches in each transition between body and sleeves as follows: Start 2 stitches before the marker thread, make 1 yarn over, knit 4 stitches (the marker thread sits in the middle of these 4 stitches), make 1 yarn over (= 2 stitches increased). On the next row, work the yarn overs as normal stitches (i.e. they are knitted or purled as described in A.1) so that you get holes. The increased stitches are worked in to diagram A.1 as you go. MEASURING TIP: Due to the weight of the yarn, all measurements are taken while holding the piece up, or else the garment will be too long when worn. DECREASE TIP-1: To work out how to decrease evenly, count the total number of stitches on the needle (e.g. 70 stitches), minus the bands/overlap (e.g. 20 stitches) and divide the remaining stitches by the number of decreases to be made (e.g. 18) = 2.8. In this example, knit approx. every 2nd and 3rd stitch together, but do not decrease over the outermost 10 stitches in each side (= band/overlap). DECREASE TIP-2 (for sleeves): Decrease 2 stitches mid under the sleeve as follows (decrease on a knit round): Knit the first stitch on the round, slip 1 stitch as if to knit, knit 1, pass the slipped stitch over the knitted stitch, knit until there are 3 stitches left on the round, knit 2 together and knit the last stitch (= 2 stitches decreased). INCREASE TIP (for the sides in the body): Start 5 stitches before the marker thread, make 1 yarn over, work 10 stitches (the marker thread sits in the middle of these 10 stitches), make 1 yarn over (= 2 stitches increased). On the next round, work the yarn overs twisted to prevent holes. The increased stitches are worked into diagram A.1 as you go. BUTTONHOLE: Decrease for buttonhole on right band (when the garment is worn). Decrease from the right side when you have 5 stitches left on the row as follows: Make 1 yarn over, knit the next 2 stitches together and work 3 band stitches in garter stitch. On the next row knit the yarn over so that there is a hole. The first buttonhole is worked when the piece measures approx. 3 cm / 1" from the marker thread in the band mid front. Then work the next 2 buttonholes with approx. 10 cm / 4" between each. ---------------------------------------------------------- JACKET: The piece is worked back and forth with circular needle from mid front and top down. The sleeves are worked in the round with double pointed needles. HOOD: Cast on 70 stitches with circular needle size 9 mm / US 13 and 1 strand Andes + 1 strand Kid-Silk (= 2 strands). Knit 1 row from the wrong side. Continue by working PATTERN according to diagram A.1 back and forth with 3 band stitches in GARTER STITCH – see description above, in each side. When the piece measures 34 cm / 13½"' – read MEASURING TIP, knit 1 row from the right side where you decrease 18-18-18-18-14-14 stitches evenly on row – read DECREASE TIP-1 = 52-52-52-52-56-56 stitches. Insert a marker thread in the band mid front. THE PIECE IS NOW MEASURED FROM HERE! Continue A.1 back from the wrong side as follows: Work 15-15-15-15-16-16 stitches (= right front piece), insert 1 marker thread before the next stitch (make sure the marker thread shows on the right side), work 6 stitches (= right sleeve), insert 1 marker thread before the next stitch, work 10-10-10-10-12-12 stitches (= back piece), insert 1 marker thread before the next stitch, work 6 stitches (= left sleeve), insert 1 marker thread before the next stitch, work 15-15-15-15-16-16 stitches (= left front piece). YOKE: Continue A.1 back and forth over all stitches with 3 band stitches in garter stitch in each side. AT THE SAME TIME on the first row from the right side increase to RAGLAN – see description above (= 8 stitches increased). Increase in this way every 2nd row (i.e. every row from the right side) a total of 14-15-16-18-20-22 times = 164-172-180-196-216-232 stitches on needle. Remember BUTTONHOLE – see description above, When the piece measures 3, 13 and 23 cm / 1", 5" and 9". Continue until the piece measures 25-27-28-30-32-34 cm / 9¾"-10½"-11"-11¾"-12½"-13½" from the shoulder down – remember MEASURING TIP! The next row is worked as follows from the wrong side: Work 29-30-31-33-36-38 stitches as before (= right front piece), place the next 34-36-38-42-46-50 stitches on 1 thread (= right sleeve), cast on 4-6-8-8-8-10 new stitches on the needle (= in the side mid under the sleeve), work the next 38-40-42-46-52-56 stitches as before (= back piece), place the next 34-36-38-42-46-50 stitches on 1 thread (= left sleeve), cast on 4-6-8-8-8-10 new stitches on the needle (= in the side mid under the sleeve) and work the last 29-30-31-33-36-38 stitches as before. The body and sleeves are now finished separately. THE PIECE IS NOW MEASURED FROM HERE! BODY: = 104-112-120-128-140-152 stitches. Insert 1 marker thread in each side, i.e. in the middle of the 4-6-8-8-8-10 new stitches, which were cast on under the sleeves in each side – allow the marker thread to follow the piece as you work. Continue A.1 as before with 3 band stitches in garter stitch in each side. When the piece measures 3 cm / 1" from the separation, increase 2 stitches in each side – read INCREASE TIP (= 4 stitches increased). Increase in this way approx. every 12th row (= every 6th row from the right side) a total of 7 times in all sizes = 132-140-148-156-168-180 stitches. When the piece measures 55-56-58-59-60-60 cm / 21½"-22"-22¾"-23¼"-23½"-23½" from the separation – remember MEASURING TIP, work 3 ridges back and forth over all stitches before binding off loosely from the right side. The jacket measures approx. 83-86-89-92-95-97 cm / 32¾"-33⅞"-35"-36¼"-37⅜"-38 ¼" from the shoulder down. SLEEVE: The sleeve is worked in the round with double pointed needles. Place the 34-36-38-42-46-50 stitches from the thread in the one side of the piece on double pointed needles size 9 mm / US 13 and, in addition, knit up 1 stitch in each of the 4-6-8-8-8-10 new stitches cast on under the sleeve = 38-42-46-50-54-60 stitches on the needle. Continue A.1 in the round. When you have worked 2 rounds of A.1 decrease 2 stitches mid under the sleeve – read DECREASE TIP-2. Decrease in this way approx. every 2nd round a total of 4-5-5-5-5-6 times, then decrease every 12th-12th-6th-6th-4th-2nd round a total of 4-4-6-7-9-10 times = 22-24-24-26-26-28 stitches left. Continue working until the piece measures 40-39-39-38-36-35 cm / 15¾"-15¼"-15¼"-15"-14¼"-13¾" from the separation. Work GARTER STITCH in the round – see description above, for 6 cm / 2⅜". Bind off with knit. Work the other sleeve in the same way. ASSEMBLY: Fold cast on edge and sew together to close top of hood. Sew buttons on to left band |
|||||||
Diagram explanations |
|||||||
|
|||||||
 |
|||||||
Have you finished this pattern?Tag your pictures with #dropspattern #reinejacket or submit them to the #dropsfan gallery. Do you need help with this pattern?You'll find 25 tutorial videos, a Comments/Questions area and more by visiting the pattern on garnstudio.com. © 1982-2026 DROPS Design A/S. We reserve all rights. This document, including all its sub-sections, has copyrights. Read more about what you can do with our patterns at the bottom of each pattern on our site. |
|||||||


With over 40 years in knitting and crochet design, DROPS Design offers one of the most extensive collections of free patterns on the internet - translated to 17 languages. As of today we count 324 catalogs and 12290 patterns - 12280 of which are translated into English (US/in).
We work hard to bring you the best knitting and crochet have to offer, inspiration and advice as well as great quality yarns at incredible prices! Would you like to use our patterns for other than personal use? You can read what you are allowed to do in the Copyright text at the bottom of all our patterns. Happy crafting!
Post a comment to pattern DROPS 181-30
We would love to hear what you have to say about this pattern!
If you want to leave a question, please make sure you select the correct category in the form below, to speed up the answering process. Required fields are marked *.