
Looking for a yarn?


Comments / Questions (62)
![]() Monika Waiblinger wrote:
Monika Waiblinger wrote:
Die Angaben zu Maschenprobe und Angaben in der Anleitung stimmen nicht überein. Maschenprobe sagt, 20 R =10 cm. Die Anleitung sagt A1 + A2=43 cm. A1 + A 2 = 102 R = 51 cm wenn 20 R = 10 cm. Damit hätte ich nach Musterende bereits 8 cm mehr als in der Anleitung angegeben. D.h. Dass alles länger wird als angegeben wenn die Maschenprobe stimmt. Ich bitte um Erklärung. Danke.
10.01.2025 - 14:18DROPS Design answered:
Liebe Frau Waiblinger, beachten Sie, daß die Maschenprobe glattrechts gestrickt wird (= 20 Reihen glattrechts), aber beim A.1 und A.2 sind es Rückreihen rechts gestrickt (also Krausrippen), das wird dann die Reihenanzahl ändern. Mit solchen Muster ist die Maschenprobe in der Höhe nicht so wichtig, auch wenn Sie die 20 Reihen Glattrechts in der Höhe nicht haben, wiederholen Sie einfach A.1 und A.2 wie erklärt. Viel Spaß beim Stricken!
10.01.2025 - 15:56
![]() Monique wrote:
Monique wrote:
In the right band collar, how do we knit the increased stitches in each purl section , knit or purl? The added stitch breaks the k3 p3 rib pattern.
29.11.2024 - 03:38DROPS Design answered:
Dear Monique, you will change to a purl 4, knit 3 pattern (you increase with a purl stitch in between the 3 purl stitches). Happy knitting!
07.12.2024 - 19:36
![]() Nicole wrote:
Nicole wrote:
Ik brei maat L. Begin met A1 1 kantsteek en dan A1 in patroon. Ik begin met 1 kantsteek, 2 st naturel, 1 fog maar eindig met 1 steek fog, 1 steek naturel (ipv 2) 1 kantsteek. Er lijkt dus een steek te weinig te zijn? Ik kom nu niet symmetrisch uit.
01.11.2024 - 06:02
![]() Monique wrote:
Monique wrote:
What button size should be used for this pattern?
28.10.2024 - 04:17DROPS Design answered:
Dear Monique, these buttons were approx. 23 mm diameter. Happy knitting!
28.10.2024 - 10:04
![]() Maria wrote:
Maria wrote:
Ich habe eine Frage zu einer Anleitung von Drops design(Svalbard) Ich verstehe die Erklärung zur Reihe mit dem Pfeil der nach links zeigt nicht. Was genau bedeutet das? „In dieser Reihe die ersten 2 Maschen von A1/A2 statt die 1. Masche von A1/A2 stricken und am Ende der Reihe 1 Randmasche kraus rechts Stricken“. Fehlt da nicht ein Verb?
18.12.2023 - 16:10DROPS Design answered:
Liebe Maria, am Ende von diesen Reihen (mit dem Pfeil) wiederholen Sie das Diagram bis 3 Maschen übrig sind, dann stricken Sie die 2 ersten Maschen vom A.1 bzw A.2 und 1 Randmasche Krausrechts. Viel Spaß beim stricken!
19.12.2023 - 08:14
![]() Kerstin Strömwall wrote:
Kerstin Strömwall wrote:
Undrar om jag kan får diagrammet i en pdf-fil så att jag kan lägga in den mitt program KnitCompanion? Måste förstora mönstret då jag ser dåligt. Har köpt Air-garn så jag vill börja sticka snarast! Tacksam för svar./Kerstin Strömwall
25.12.2022 - 19:04
![]() Kerstin Strömwall wrote:
Kerstin Strömwall wrote:
Är framkanten enfärgad eller hur randar man den? Blir inte bra med aviga på räta på rätsidan. Tänkte sticka enfärgad eller randig nedifrån och upp och sy på den efteråt. Kan man göra det? Dessutom sticka bålen på rundsticka med steek i mitten och klippa. Snyggare mönsterstickning då som i norska tröjor. Gör så även för ärmen. Är det OK?
25.09.2022 - 09:04DROPS Design answered:
Hei Kerstin. Stolpen strikkes i 1 farge, perlegrå. Man strikker opp masker fra retten innenfor 1 kantmaske, deretter strikkes det 1 pinne rett fra vrangen, så 1 pinne rett fra retten. Deretter starter man å strikke 3 rett / 3 vrang. Du kan strikke stolpen nedenifra og opp og sy den på tilslutt, bare tilpass den (blir litt anderledes stolpe enn hva du ser på bildet). Du kan fint strikke rundt og klippe opp. Ermene strikkes rundt, men når arbeidet måler 46-45-45-42-41-39 cm felles de midterste maskene og ermene strikkes frem og tilbake i ca 4-5-5-8-9-11 cm. mvh DROPS Design
26.09.2022 - 11:46
![]() Dagmar wrote:
Dagmar wrote:
Braucht man wirklich nur so wenig Wolle??
13.01.2022 - 17:31DROPS Design answered:
Liebe Dagmar, 1 Knäuel DROPS Air ist 50 g und ca 150 Meter - sollte Ihre Maschenprobe (in der Breite sowie in der Höhe) stimmen, dann stimmt auch die Garnmenge. Viel Spaß beim stricken!
14.01.2022 - 09:12
![]() Diane wrote:
Diane wrote:
Merci beaucoup Drops. C'est beaucoup plus clair. De ce que je peux constater en ce moment c'est un merveilleux modèle. J'ai eu beaucoup de plaisirs à le monter.
06.04.2021 - 14:16
![]() Diane wrote:
Diane wrote:
Modèle 181-17 En ce qui concerne le col et les augmentations afin que le col tombe bien: les augmentations entre deux mailles se font-elles à tous les rangs aller-retour ou aux deux rangs? Ou aux deux cm comme l'a mentionnée une autre correspondante?
04.04.2021 - 20:50DROPS Design answered:
Bonjour Diane, vous augmentez - sur l'endroit - à 2 cm puis à 4 cm puis à 6-6-6-7-7-7 cm et enfin à 8-8-8-9-9-9 cm. !bon tricot!
06.04.2021 - 13:56
|
|||||||||||||||||||||||||
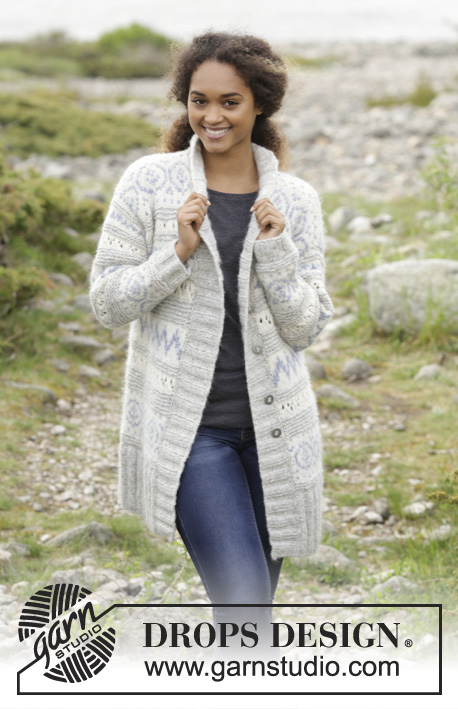
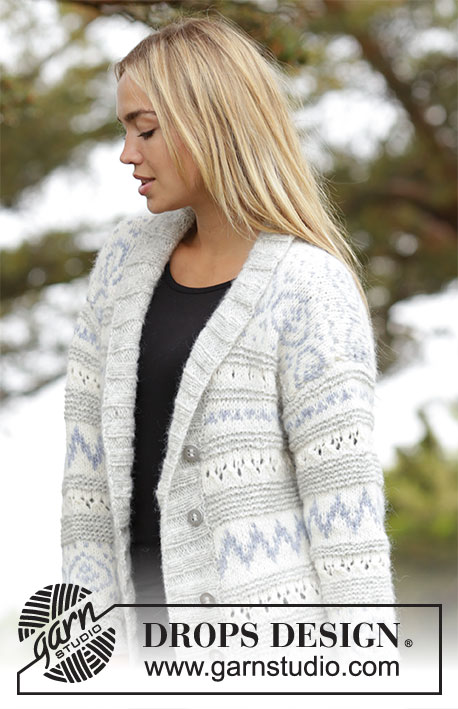
Svalbard#svalbardjacket |
|||||||||||||||||||||||||
 |
 |
||||||||||||||||||||||||
Knitted jacket with multi-colored Norwegian pattern, garter stitch and band collar in rib. Sizes S - XXXL. The piece is worked in DROPS Air.
DROPS 181-17 |
|||||||||||||||||||||||||
|
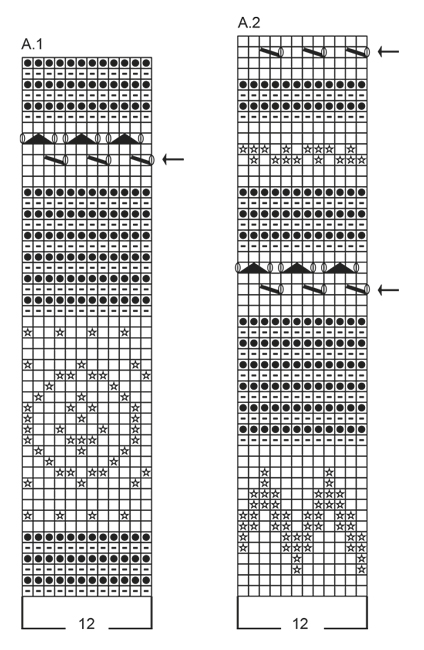
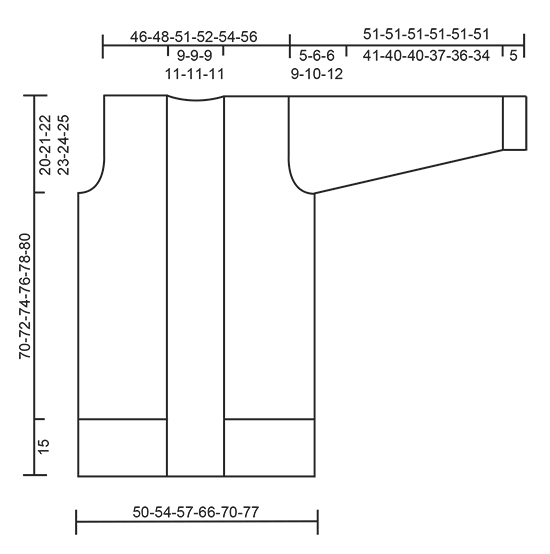
INFORMATION FOR THE PATTERN: RIDGE/GARTER STITCH (worked back and forth): 1 ridge = Knit 2 rows. PATTERN: See diagrams A.1 and A.2. The diagrams show all the rows in the pattern seen from the right side. * Work A.1 once in height, then A.2 once in height *, work from *-* to finished length. A.1 + A.2 together measure approx. 43 cm / 17" in height. DECREASE TIP (for mid front): All decreases are worked from the right side! Decrease on the inside of 1 edge stitch in garter stitch. Decrease as follows after the 1 edge stitch: Slip 1 stitch as if to knit, knit 1, pass the slipped stitch over. Decrease as follows before the 1 edge stitch: Start 2 stitches before the edge stitch and knit 2 together. DECREASE TIP/INCREASE TIP (evenly on row): To work out how to decrease/increase evenly on row, count the total number of stitches on the row (e.g. 185 stitches) and divide by the number of decrease/increases to be made (e.g. 38) = 4.9. In other words, in this example you decrease by knitting together approx. every 4th and 5th stitch. If you are increasing, do this after approx. every 5th stitch. Increase 1 stitch by making 1 yarn over, on the next row, work the yarn overs twisted to prevent holes. INCREASE TIP (for the band): Increase 1 stitch at the end of every purl section (seen from the right side) by picking up the loop between 2 stitches in the transition between purl and knit. Purl the loop twisted to prevent holes. The next time you increase will be at the end of each knit section and the loop is knitted twisted. BUTTONHOLE: Decrease for the buttonhole on the right band collar (when the garment is worn). Decrease from the right side in a purl section. 1 BUTTONHOLE = purl 2 together and make 1 yarn over. On the next row (= wrong side) knit the yarn over so that there is a hole. The top buttonhole should be approx. 18-19-20-21-22-23 cm / 7"-7½"-8"-8¼"-8 ¾"-9" from the shoulder and down, the 3 next in every other purl section (count out from the top buttonhole where the bottom buttonhole should be made). ---------------------------------------------------------- BODY: The piece is worked back and forth with circular needle from mid front. The band collar is worked at the end by knitting up stitches mid front. Cast on 185-197-215-245-257-287 stitches with circular needle size 5 mm / US 8 and pearl gray. Purl 1 row from the wrong side. The next row is worked as follows from the right side: 1 edge stitch in GARTER STITCH – see description above, * knit 3, purl 3 *, work from *-* until there are 4 stitches left on the row, finish with knit 3 and 1 edge stitch in garter stitch. Continue rib in this way, but after every 5th row, purl 1 row from the wrong side with 1 edge stitch in garter stitch in each side (this is done to prevent the rib being tight). When the rib measures 15 cm / 6", knit 1 row from the right side where you decrease 38-38-44-50-50-56 stitches evenly on row – read DECREASE TIP/INCREASE TIP (evenly spaced) = 147-159-171-195-207-231 stitches. Change to circular needle SIZE 5.5 mm/US 9 / US 9. Purl 1 row from the wrong side with 1 edge stitch in garter stitch in each side. The next row is worked as follows from the right side: 1 edge stitch in garter stitch, work PATTERN according to diagram A.1 – see description above, until there are 2 stitches left on the row, work the first stitch in A.1 and finish with 1 edge stitch in garter stitch. Continue the pattern in this way until the piece measures 50-51-52-53-54-55 cm / 19¾"-20"-20½"-21"-21¼"-21⅝" (after A.1 continue with A.2 in the same way). REMEMBER THE GAUGE! The next row is worked as follows: Work 32-35-37-42-44-50 stitches (= front piece), bind off 4-4-6-6-8-8 stitches for armhole, work 75-81-85-99-103-115 stitches (= back piece), bind off 4-4-6-6-8-8 stitches for armhole and work the last 32-35-37-42-44-50 stitches (= front piece). The front and back pieces are now finished separately. BACK PIECE: = 75-81-85-99-103-115 stitches. Continue the pattern back and forth as before and bind off for the armhole at the beginning of each row in each side as follows: bind off 2 stitches 0-0-0-2-2-4 times and 1 stitch 1-2-2-4-4-5 times = 73-77-81-83-87-89 stitches. Continue the pattern with1 edge stitch in garter stitch in each side. When the piece measures 68-70-72-74-76-78 cm / 26¾"-27½"-28⅜"-29⅛"-30"-30¾" bind off the middle 13-13-13-15-15-15 stitches for the neck and each shoulder is finished separately. Continue the pattern and bind off 1 stitch on the next row from the neck = 29-31-33-33-35-36 stitches left on the shoulder. Continue working until the piece measures 70-72-74-76-78-80 cm / 27½"-28⅜"-29⅛"-30"-30¾"-31½. Bind off. Repeat on the other shoulder. RIGHT FRONT PIECE: = 32-35-37-42-44-50 stitches. Continue the pattern and bind off for the armhole at the beginning of each row from the side as for the back piece. AT THE SAME TIME when the piece measures 52-53-54-55-56-57 cm / 20½"-21"-21¼"-21⅝"-22"-22½" decrease 1 stitch for the neck towards mid front – read DECREASE TIP. Repeat the decrease in sizes S + M + L when the piece measures 62-63-64 cm / 24½"-24¾"-25¼" (do not work anymore decreases in the other sizes). After all the decreases for armhole and neck, there are 29-31-33-33-35-36 stitches on the row for the shoulder. Continue working until the piece measures 70-72-74-76-78-80 cm / 27½"-28⅜"-29⅛"-30"-30¾"-31½. Bind off. LEFT FRONT PIECE: Work as for the right but reversed. SLEEVE: The piece is worked in the round with double pointed needles. Change to short circular needle when you have enough stitches. Cast on 36-36-36-48-48-48 stitches with double pointed needles size 5 mm / US 8 and pearl gray. Knit 1 round. Then work rib (= knit 3 / purl 3) for 5 cm / 2". Insert 1 marker thread at the beginning of the round (= mid under the sleeve) and allow the marker thread to follow your work upwards. Change to double pointed needles SIZE 5.5 mm/US 9 / US 9 and work PATTERN in the round according to diagram A.1 – see description above. When the piece measures 6-6-6-8-8-9 cm / 2⅜"-2⅜"-2⅜"-3"-3"-3½" increase 2 stitches mid under the sleeve (increase by working 2 stitches in the first and the last stitch on the round – NOTE: The increased stitches are worked into the pattern as you go). Increase in this way every 3½-3-2½-3-2½-2 cm / 1¼"-1⅛"-⅞"-1⅛"-⅞"-¾" a total of 12-13-15-11-13-14 times = 60-62-66-70-74-76 stitches. When the piece measures 46-45-45-42-41-39 cm / 18"-17¾"-17¾"-16½"-16"-15¼" (NOTE: Shorter measurements in larger sizes because of longer sleeve cap and wider shoulders) bind off the middle 4-4-6-6-8-8 stitches under the sleeve (i.e. Bind off 2-2-3-3-4-4 stitches on each side of the marker thread). Continue by working the sleeve cap back and forth with circular needle. Continue the pattern and bind off for the sleeve cap at the beginning of each row in each side as follows: bind off 3 stitches 1-1-2-2-2-2 times, 2 stitches 1 time and 1 stitch 1-1-1-3-3-6 times. Continue by binding off 2 stitches at the beginning of each row in each side until the piece measures 50 cm / 19¾" in all sizes. Bind off 3 stitches at the beginning of the next 2 rows and then LOOSELY bind off the remaining stitches. Work another sleeve in the same way. ASSEMBLY: Sew the shoulder seams. RIGHT BAND COLLAR: Start from the right side at the bottom of the right front piece and knit up approx. 122 to 140 stitches along the front piece to mid back of the neck with circular needle size 5 mm / US 8 and pearl gray (knit up inside the 1 edge stitch in garter stitch). Knit 1 row from the wrong side where you increase evenly along the row to 149-155-161-167-173-179 stitches. Knit 1 row from the right side. The next row is worked as follows from the wrong side (starting mid back of neck): 2 edge stitches in garter stitch, * knit 3, purl 3 *, work from *-* until there are 3 stitches left on the row and finish with 3 edge stitches in garter stitch (from the right side, this will be 3 stitches garter stitch and knit 3 at the bottom of the front piece and purl 3 and 2 edge stitches in garter stitch mid back of neck). When the band collar measures 2 cm / ¾" insert 1 marker after 38-38-38-44-44-50 stitches counted from mid back of neck and down. On the next row from the right side increase 1 stitch in each purl section over these 38-38-38-44-44-50 stitches (= 6-6-6-7-7-8 stitches increased) - read INCREASE TIP (this is done so that the collar will lie neatly when folded over). When the band collar measures 4 cm / 1½" increase in the same way in each knit section (= 6-6-6-7-7-8 stitches increased). Repeat the increases in each purl section when the band collar measure 6-6-6-7-7-7 cm / 2⅜"-2⅜"-2⅜"-2¾"-2¾"-2¾" and in each knit section when the band collar measures 8-8-8-9-9-9 cm / 3"-3"-3"-3½"-3½"-3½". AT THE SAME TIME when the band collar measures 7-7-7-9-9-9 cm / 2¾"-2¾"-2¾"-3½"-3½"-3½" decrease for 4 BUTTONHOLES – see description above. After all the increases, there are 173-179-185-195-201-211 stitches on the row. When the band collar measures 9-9-9-11-11-11 cm / 3½"-3½"-3½"-4½"-4½"-4½" bind off with garter stitch over garter stitch, knit over knit and purl over purl. LEFT BAND COLLAR: Start from the right side mid back of neck and knit up stitches in the same way as for the right band collar. Work as for the right band collar, but in reverse, i.e. the first row of rib is worked from the wrong side as follows (= from the bottom of the front piece): 3 edge stitches in garter stitch, * purl 3, knit 3 *, work from *-* until there are 2 stitches left and finish with 2 edge stitches in garter stitch. Do not decrease for buttonholes on the left band collar. ASSEBLY: Sew in the sleeves. Sew the collar together mid back – sew in the outermost loop of the outermost stitch. When the collar is turned down, there will be 4 stitches garter stitch mid back with knit 3 on each side of these stitches. Lay the right band over the left band and mark the position of the buttons. Sew the buttons onto the left band. |
|||||||||||||||||||||||||
Diagram explanations |
|||||||||||||||||||||||||
|
|||||||||||||||||||||||||
|
|||||||||||||||||||||||||
|
|||||||||||||||||||||||||
Have you finished this pattern?Tag your pictures with #dropspattern #svalbardjacket or submit them to the #dropsfan gallery. Do you need help with this pattern?You'll find 34 tutorial videos, a Comments/Questions area and more by visiting the pattern on garnstudio.com. © 1982-2025 DROPS Design A/S. We reserve all rights. This document, including all its sub-sections, has copyrights. Read more about what you can do with our patterns at the bottom of each pattern on our site. |
|||||||||||||||||||||||||


With over 40 years in knitting and crochet design, DROPS Design offers one of the most extensive collections of free patterns on the internet - translated to 17 languages. As of today we count 314 catalogs and 11822 patterns - 11812 of which are translated into English (US/in).
We work hard to bring you the best knitting and crochet have to offer, inspiration and advice as well as great quality yarns at incredible prices! Would you like to use our patterns for other than personal use? You can read what you are allowed to do in the Copyright text at the bottom of all our patterns. Happy crafting!
Post a comment to pattern DROPS 181-17
We would love to hear what you have to say about this pattern!
If you want to leave a question, please make sure you select the correct category in the form below, to speed up the answering process. Required fields are marked *.