
Popular categories
Looking for a yarn?


Comments / Questions (144)
![]() Silke wrote:
Silke wrote:
Meine Frage hat sich erledigt, habe in Reihe 11, wie Susi vor mir immer 4 Maschen Abstand gestrickt, müsste aber 1 x nur 3 Maschen sein.
31.03.2024 - 11:38
![]() Silke wrote:
Silke wrote:
Hallo, entweder ich bin vom Kurs abgekommen, oder da ist ein Fehler. Wenn ich A3 in Größe S stricke, kommt es bei mir ab Runde 13 nicht mehr im Muster hin. Es sind einmal 8 Maschen bis zum Farb Punkt (Masche) und einmal 9 Maschen. Das im Wechsel. Bei mir müssten es immer 9 Maschen sein. Würde mich über Antwort freuen. LG Silke
31.03.2024 - 11:32
![]() Ramona wrote:
Ramona wrote:
Hallo, Wie erfahre ich, welche Größe in der Anleitung steht? Ich muß für meine Größe dementsprechend die Wolle bestellen.
04.02.2024 - 03:07DROPS Design answered:
Liebe Ramona, der Pullover ist in S bis XXXL erhältlich = alle 1. Nummer/Angaben sind für die 1. Größe, 2. für die 2. Grösse usw, genauso für die Mütze aber mit nur 2 Grössen. Viel Spaß beim stricken!
05.02.2024 - 09:14
![]() Gabriela wrote:
Gabriela wrote:
Ganz herzlichen Dank für diese super Anleitung! Ich habe den Pullover in 3 Wochen gestrickt, es hat mich völlig in den Bann gezogen. Die Wolle ist zwar recht dünn, aber unglaublich angenehm in der Hand und zum tragen. Die Anleitung finde ich sehr gut, es hat alles von Anfang an geklappt und ein paar Videos hatte ich mir im Vorfeld angeschaut, da ich zum ersten Mal von oben nach unten stricke. Ich bin Fan geworden von Ihrer Website und bin bereits beim 2. Pullover. Herzlichen Dank
23.01.2024 - 00:20
![]() Merete Sandanger wrote:
Merete Sandanger wrote:
Kan denne strikkes nedenfra og opp?
11.11.2023 - 19:21DROPS Design answered:
Hei Merete. Ja, det kan du. Veldig lurt å lese godt igjennom oppskriften og tilpass oppskriften, f.eks fellinger/økninger, diagrammene må snus osv. God Fornøyelse. mvh DROPS Design
13.11.2023 - 14:08
![]() Susi wrote:
Susi wrote:
Danke, ich habe alles noch einmal gecheckt und meinen Fehler nun gefunden: Nach Reihe 11 in A3 sind nicht gleichmäßig immer 4 Maschen zwischen den Stäbchen, sondern 3x4 und 1x nur 3 !!! Das wird dann weiter oben durch den Umschlag ausgeglichen, sodaß nun die Spitzen der Rhomben tatsächlich aufeinander stoßen. Dies zur Ehrenrettung Ihrer Designer und Danke. Es war mein Fehler... alles rückwärts.
12.10.2023 - 16:11
![]() Susi wrote:
Susi wrote:
Es kann geometrisch gar nicht anders sein, daß sich das Muster verschiebt wenn man am Ende in jedem Rapport eine Masche durch einen Umschlag ersetzt! Daher nochmal die Frage: Wie haben die anderen Strickerinnen das Problem gelöst da es hier vom Team trotz mehrfacher Nachfragen aus verschiedenen Ländern offenbar ignoriert wird ?
12.10.2023 - 13:21DROPS Design answered:
Liebe Susi, ich verstehe leider nicht, wie Sie das Muster verschieben können, beachten Sie, daß das Muster immer genau gestrickt wird wie im Diagram gezeigt, helfen Sie sich mit Markierungen (siehe vorrige Antwort), es könnte vielleicht helfen?
12.10.2023 - 14:18
![]() Susi wrote:
Susi wrote:
Ach ja... noch zur Information: Ich stricke Größe L
12.10.2023 - 12:59
![]() Susi wrote:
Susi wrote:
Ich beziehe mich auf den Einwand von Nicoletta. In A3 führen 2 Zunahmen zur Verschiebung des Musters, es kann gar nicht anders sein! Da das immer wieder zurück stricken sehr mühsam und zeitaufwändig ist, lassen Sie das bitte überprüfen. Oder erklären Sie bitte genau, wie ich ohne Verschiebung der Rhomben Maschen im Muster zunehmen kann. Ich verstehe es einfach nicht. :-(
12.10.2023 - 12:55DROPS Design answered:
Liebe Susi, es wird keine Verschiebung sein, setzen Sie Markierungen zwischen jedem A.3 und dann wiederholen Sie A.3 zwischen jede Markierungen, wenn Sie 1Umschlag am Anfang A.3 stricken, wird die Zunahmen bei der nächsten Runde als 1. Masche in A.3 gestrickt; wenn Sie 1 Umschlag am Ende A.3 stricken, wird diese Zunahme als letzte Masche in A.3 gestrickt. So wird sich jede A.3 von 16 auf 21 Maschen erweitert. Viel Spaß beim stricken!
12.10.2023 - 14:16
![]() Merete Byrøygard wrote:
Merete Byrøygard wrote:
Strikka denne jakka i str M for nokre år sidan, men det var fleire feil i mønsteret. Er dette retta opp nå? Etter mykje strev fann eg eg den gongen rettingane på nettet, men finn dei ikkje nå? Vart ein favoritt, så vil gjerne strikke ei til.
19.08.2023 - 22:52DROPS Design answered:
Hei Merete. Det er ikke noterte noen rettelser/feil til denne modellen, men mange har lagt inn kommentarer / spørsmål til genseren. Mange har ikke lest/forstått oppskriften godt nok (bortsett fra en feil forklaring til et diagram ikon i den danske teksten). Det fins også en lignende jakke og i denne var det en rettelse (da vises rettelse teksten med en rød link nederst på oppskriften / over diagrammene). Les gjerne igjennom Spørsmål og Svarene, kan gi deg noe tips på veien, ellers så skriv gjerne tilbake om du finner noe du mener er feil, så hjelper vi deg så godt vi kan. mvh DROPS Design
21.08.2023 - 12:03
|
||||||||||||||||||||||
Perles du Nord#perlesdunordsweater |
||||||||||||||||||||||
 |
 |
|||||||||||||||||||||
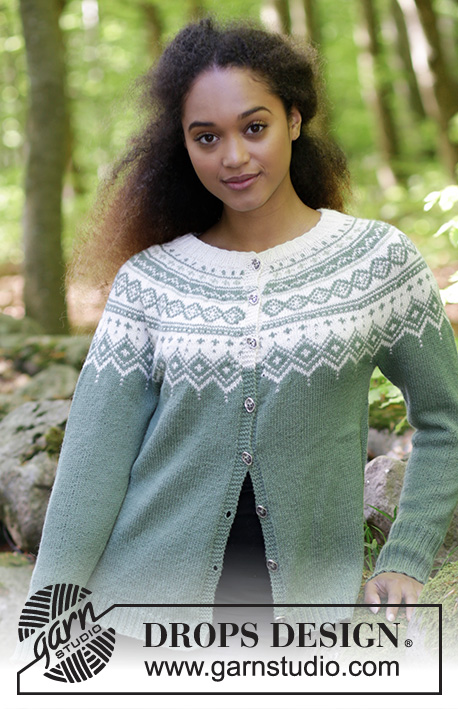
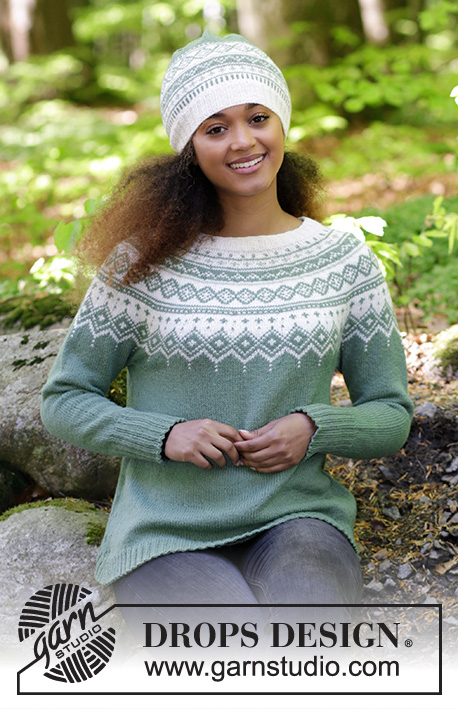
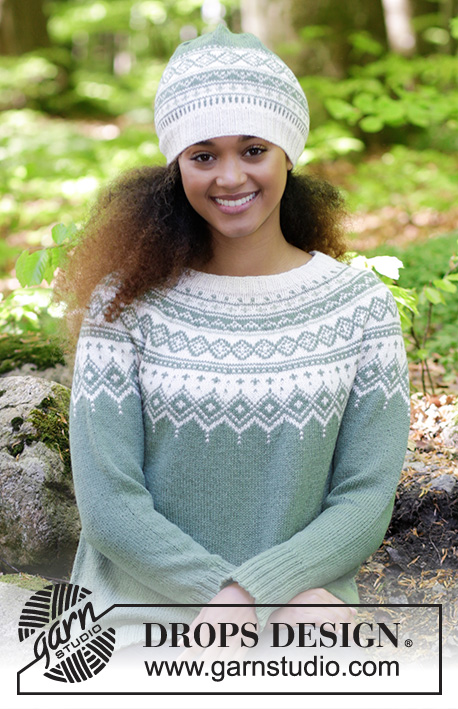
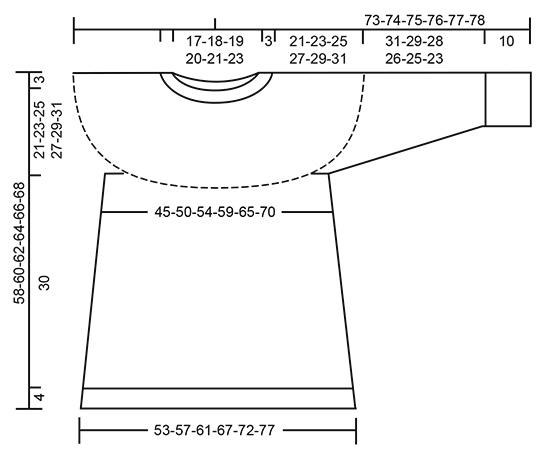
The set consists of: Knitted jumper with round yoke, multi-colored Norwegian pattern and A-shape, worked top down. Sizes S - XXXL. Hat with multi-colored Norwegian pattern. The set is worked in DROPS Flora.
DROPS 180-2 |
||||||||||||||||||||||
|
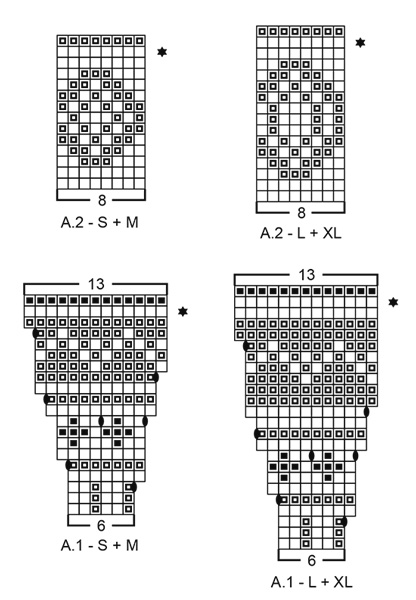
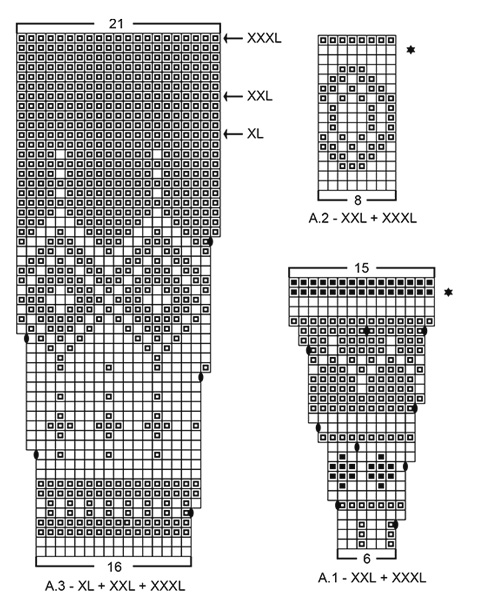
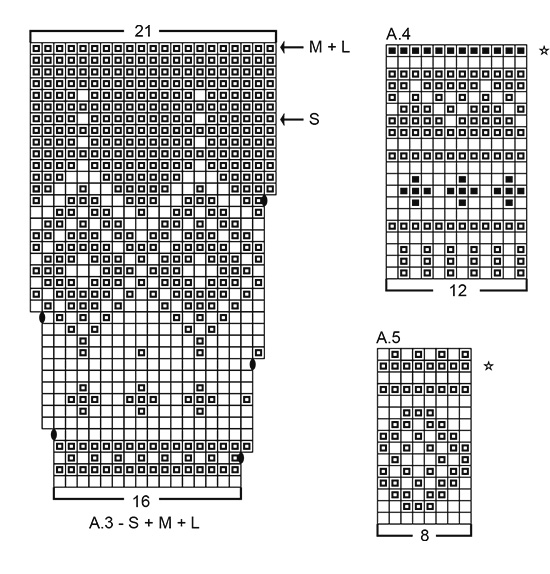
INFORMATION FOR THE PATTERN: DECREASE/INCREASE TIP: To work out how to decrease/increase evenly, count the total number of stitches on the needle (e.g. 120 stitches) and divide by the number of decreases/increases to be made (e.g. 18) = 6.6. In this example, decrease by knitting alternately every 5th and 6th stitch and every 6th and 7th stitch together. If you are increasing, do this after alternately every 6th and 7th stitch (increase 1 stitch by making 1 yarn over, on the next round, knit the yarn overs twisted and into the pattern so that there are no holes). ELEVATION: Insert 1 marker at the beginning of the round = mid back. Start from the right side with off white and knit until you have worked 8-8-9-10-10-11 stitches past the marker, turn, tighten the strand and purl 16-16-18-20-20-22 stitches. Turn, tighten the strand and knit 24-24-27-30-30-33 stitches, turn, tighten the strand and purl 32-32-36-40-40-44 stitches. Turn, tighten the strand and knit 40-40-45-50-50-55 stitches, turn, tighten the strand and purl 48-48-54-60-60-66 stitches. Turn, tighten the strand and knit 56-56-63-70-70-77 stitches, turn, tighten the strand and purl 64-64-72-80-80-88 stitches. Turn, tighten the strand and knit to mid back. PATTERN: Jumper: See diagrams A.1 to A.3. Choose diagram for your size. Hat: See diagrams A.4 and A.5. The diagrams show all the rows in the pattern seen from the right side. The whole of the pattern is worked in stockinette stitch. KNITTING TIP (for the multi-colored pattern): To prevent the knitting gauge from becoming tighter when working pattern, it is important that the strands do not tighten at the back of the piece. You can increase the size of your needle when working pattern if you find you are working too tightly. INCREASE TIP (for the sides of the body): Start 2 stitches before the marker thread, make 1 yarn over, knit 4 (the marker thread sits in the middle of these 4 stitches), make 1 yarn over (= 2 stitches increased). On the next round knit the yarn overs twisted so that there are no holes. DECREASE TIP-1 (for mid under the sleeve): Work until there are 4 stitches left before the marker thread, knit 2 together, knit 4 (the marker thread sits in the middle of these 4 stitches), slip 1 stitch as if to knit, knit 1, pass the slipped stitch over the knitted stitch (= 2 stitches decreased). DECREASE TIP-2 (for the hat): Decrease after each marker thread as follows: Slip 1 stitch as if to knit, knit 1, pass the slipped stitch over the knitted stitch (= 1 stitch decreased). ---------------------------------------------------------- JUMPER: The piece is worked in the round with circular needle, top down. The sleeve is worked in the round with short circular needle, top down. Change to double pointed needles when you have decreased enough stitches. NECKLINE: Cast on 120-124-128-132-140-148 stitches with circular needle size 2.5 mm / US 1.5 and off white. Knit 1 round. Then work rib (= knit 2 / purl 2). When the rib measures 3 cm / 1", knit 1 round where you decrease 18-16-14-12-14-16 stitches evenly on round – read DECREASE/INCREASE TIP = 102-108-114-120-126-132 stitches. Continue to work the yoke as described below. YOKE: Change to circular needle size 3 mm / US 2.5. Knit 1 round. For a better fit you can now work a small ELEVATION in the back of the neck – see description above. When the elevation is complete, work A.1 in the round (= 17-18-19-20-21-22 repeats of 6 stitches). Continue the pattern in this way and increase as shown in the diagram. Read KNITTING TIP and REMEMBER THE GAUGE! On the round marked with a star in A.1 (i.e. the next to last round in A.1) there are 221-234-247-260-315-330 stitches on the needle, increase at the same time 11-22-33-36-21-22 stitches evenly on this round – read DECREASE/INCREASE TIP = 232-256-280-296-336-352 stitches. When A.1 is complete, work A.2 in the round (= 29-32-35-37-42-44 repeats of 8 stitches). Continue the pattern in this way, but on the round marked with a star in A.2 (i.e. the next to last round in A.2) increase 8-16-24-24-16-16 stitches evenly on round = 240-272-304-320-352-368 stitches. When A.2 is complete, work A.3 in the round (= 15-17-19-20-22-23 repeats of 16 stitches). Continue the pattern in this way and increase as shown in the diagram. When the last round in A.3 remains (marked with an arrow in each size) there are 315-357-399-420-462-483 stitches on the needle, increase at the same time 11-11-1-12-0-5 stitches evenly on the round = 326-368-400-432-462-488 stitches. The piece now measures approx. 24-26-28-30-32-34 cm / 9½"-10¼"-11"-11¾"-12½"-13½" from the cast-on edge, measured mid front. NOTE: If the piece measures less than this, continue working stockinette stitch with green to the required length. The next round is worked as follows: Knit 50-55-59-65-71-76 stitches (= ½ back piece), place the next 64-75-83-86-90-93 stitches on a thread for sleeve, cast on 10-10-12-12-14-16 new stitches on the needle (= in the side under the sleeve), knit 99-109-117-130-141-151 stitches (= front piece), place the next 64-75-83-86-90-93 stitches on a thread for sleeve, cast on 10-10-12-12-14-16 new stitches on the needle (= in the side under the sleeve) and knit the remaining 49-54-58-65-70-75 stitches (= ½ back piece). Cut the strand. Body and sleeves are finished separately. THE PIECE IS NOW MEASURED FROM HERE! BODY: = 218-238-258-284-310-334 stitches. Insert 1 marker thread in the middle of the 10-10-12-12-14-16 stitches cast on under the sleeve in each side. Start the round by one of the marker threads and work stockinette stitch in the round with green. When the piece measures 2 cm / ¾" from the division, increase 1 stitch on each side of both marker threads – read INCREASE TIP (= 4 stitches increased). Increase in this way every 10th round (approx. every 3 cm / 1") until required length (if the knitting gauge is correct in height, there should be approx. 9 increase rows in each side). When the piece measures 30 cm / 11¾" from the division in all sizes, there are approx 254-274-294-320-346-370 stitches on the needle. Knit 1 round where you increase 82-90-98-104-114-122 stitches evenly on round – read DECREASE/INCREASE TIP = 336-364-392-424-460-492 stitches. Change to circular needle size 2.5 mm / US 1.5 and work rib in the round (= knit 2 / purl 2) for 4 cm / 1½". Then bind off with knit over knit and purl over purl, but to prevent the bind-off edge being tight, you can make 1 yarn over on the needle after every 4th stitch AT THE SAME TIME as you bind off (the yarn overs are bind off as normal stitches). The jumper measures approx. 58-60-62-64-66-68 cm / 22¾"-23⅝"-24⅜"-25¼"-26"-26¾" from the shoulder down. SLEEVE: Place the 64-75-83-86-90-93 stitches from the thread on one side of the piece on a short circular needle size 3 mm / US 2.5 and in addition, knit up 1 stitch in each of the 10-10-12-12-14-16 stitches cast on under the sleeve = 74-85-95-98-104-109 stitches on the needle. Insert 1 marker thread in the middle of the 10-10-12-12-14-16 stitches under the sleeve. Start the round here and work stockinette stitch in the round with green. When the sleeve measures 2 cm / ¾" from the division, decrease 2 stitches mid under the sleeve – read DECREASE TIP. Decrease a total of 11-15-19-19-21-22 times in S: Every 9th round, in M: Every 6th round, in L and XL: Every 4th round, in XXL: Alternately every 3rd and 4th round and in XXXL: Every 3rd round = 52-55-57-60-62-65 stitches. When the sleeve measures 31-29-28-26-25-23 cm / 12¼"-11½"-11"-10¼"-9¾"-9" from the division (shorter measurements in the larger sizes due to longer yoke), knit 1 round where you increase 16-17-19-20-18-19 stitches evenly on round = 68-72-76-80-80-84 stitches. Change to double pointed needles size 2.5 mm / US 1.5 and work rib in the round (= knit 2 / purl 2). When the rib measures 10 cm / 4" (or desired length) bind off with knit over knit and purl over purl, but to prevent the bind-off edge being tight, you can make 1 yarn over after every 4th stitch AT THE SAME TIME as you bind off (the yarn overs are bind off as normal stitches). The sleeve measures approx. 41-39-38-36-35-33 cm / 16"-15¼"-15"-14¼"-13½"-13" from the division. Work the second sleeve in the same way. ---------------------------------------------------------- HAT: The piece is worked in the round with short circular needle, bottom up. Change to double pointed needles as the number of stitches decreases. Cast on 128-136 stitches with circular needle size 2.5 mm / US 1.5 and off white. Knit 1 round. Then work rib (= knit 2 / purl 2) for 4 cm / 1½". Change to short circular needle size 3 mm / US 2.5 and knit 2 rounds – AT THE SAME TIME on the first round, increase 4-8 stitches evenly on round – read DECREASE/INCREASE TIP = 132-144 stitches. Work A.4 in the round (= 11-12 repeats of 12 stitches). On the last round in A.4 (marked with a star in the diagram), decrease 4-8 stitches evenly on round = 128-136 stitches. REMEMBER THE GAUGE! Now work A.5 in the round (= 16-17 repeats of 8 stitches). On the next to last round in A.5 (marked with a star in the diagram), decrease 8-4 stitches evenly on round = 120-132 stitches. The piece now measures approx. 16 cm / 6¼" in height. Continue working stockinette stitch with green until the piece measures 20-23 cm / 8"-9". Insert 10-11 marker threads in the piece with 12 stitches between each marker thread. On the next round, decrease 1 stitch after each marker thread – read DECREASE TIP (= 10-11 stitches decreased). Decrease in this way every 2nd round a total of 8 times and then every round a total of 2 times = 20-22 stitches. On the next round knit all stitches together, 2 and 2 = 10-11 stitches. Cut the strand, pull it through the remaining stitches, tighten the strand and fasten well. The hat measures approx. 25-28 cm / 9¾"-11" top down. |
||||||||||||||||||||||
Diagram explanations |
||||||||||||||||||||||
|
||||||||||||||||||||||
 |
||||||||||||||||||||||
 |
||||||||||||||||||||||
 |
||||||||||||||||||||||
 |
||||||||||||||||||||||
Have you finished this pattern?Tag your pictures with #dropspattern #perlesdunordsweater or submit them to the #dropsfan gallery. Do you need help with this pattern?You'll find 26 tutorial videos, a Comments/Questions area and more by visiting the pattern on garnstudio.com. © 1982-2026 DROPS Design A/S. We reserve all rights. This document, including all its sub-sections, has copyrights. Read more about what you can do with our patterns at the bottom of each pattern on our site. |
||||||||||||||||||||||


With over 40 years in knitting and crochet design, DROPS Design offers one of the most extensive collections of free patterns on the internet - translated to 17 languages. As of today we count 324 catalogs and 12290 patterns - 12280 of which are translated into English (US/in).
We work hard to bring you the best knitting and crochet have to offer, inspiration and advice as well as great quality yarns at incredible prices! Would you like to use our patterns for other than personal use? You can read what you are allowed to do in the Copyright text at the bottom of all our patterns. Happy crafting!
Post a comment to pattern DROPS 180-2
We would love to hear what you have to say about this pattern!
If you want to leave a question, please make sure you select the correct category in the form below, to speed up the answering process. Required fields are marked *.