
Popular categories
Looking for a yarn?


Comments / Questions (144)
![]() Elisabeth wrote:
Elisabeth wrote:
Dank je wel voor je antwoord. Sorry dat ik toch nog even doorvraag. In het telpatroon A3 staan de groene steken van de 12e naald recht boven de groene steken van de 9e naald (met steeds 4 witte steken ertussen). De meerdering van de 11e naald wordt toch om de 18 steken herhaald? Waardoor de symmetrie van het patroon doorbroken wordt? Of is het "scheef trekken" van het patroon te voorkomen?
01.12.2025 - 21:19
![]() Elisabeth wrote:
Elisabeth wrote:
In maat S wordt in patroon A3 in de 11e naald gemeerderd, maar in de 12e naald moeten de groene steken (met 4 witte steken ertussen) wel recht boven de groene steken van de 9e naald uitkomen. Hoe kan dit / hoe krijg ik dit voor elkaar?
29.11.2025 - 21:56DROPS Design answered:
Dag Elisabeth,
Die steek aan het begin van de 12e naald zit niet precies boven de groene steek van de 9e naald, maar er zit 1 steek extra tussen; de gemeerderde steek 😊)
30.11.2025 - 15:59
![]() Kathrin Mittelstädt wrote:
Kathrin Mittelstädt wrote:
Hallo, was heißt Zunahmerunde..wo der Stern am Rand bei der Zeichnung ist. Was soll ich da machen...was bedeutet das? LG Kathrin
18.11.2025 - 18:00DROPS Design answered:
Liebe Kathrin, in der Anleitung ist unter PASSE beschrieben, was Sie in der jeweiligen Zunahmerunde tun müssen, d.h. wie viele Maschen Sie in dieser Runde zunehmen müssen. Viel Spaß beim Stricken!
18.11.2025 - 19:56
![]() Kathrin wrote:
Kathrin wrote:
Hallo. Laut Diagramm müsste ich die Farben grün und Pistazie gemeinsam stricken,was jedoch von der Fadenlänge gar nicht aufgeht. Liegt da ein Fehler vor oder wo ist mein Denkfehler? Danke für die ansonsten tolle Anleitung.
03.11.2025 - 18:57DROPS Design answered:
Liebe Kathrin, ich vermute, dass Sie die verschränkt gestrickten Umschläge als Pistazie deuten, Grün und Pistazie tauchen im Diagramm nämlich nicht zusammen in einer Runde auf. Die schwarzen Kästchen sind die Farbe Pistazie, die schwarzen Ovale sind Zunahme-Umschläge, die Sie in der nächsten Runde verschränkt stricken. Viel Spaß beim Stricken!
03.11.2025 - 22:25
![]() Brigitte wrote:
Brigitte wrote:
Supermooi
20.10.2025 - 05:45
![]() Margreet wrote:
Margreet wrote:
Het is logisch dat je voordat je begint aan een voord steken mindert, maar in het patroon moet je juist meerderen. Dat begrijp ik dus niet...
08.10.2025 - 20:40
![]() Margreet wrote:
Margreet wrote:
Het is logisch dat je voordat je begint aan een voord steken mindert, maar in het patroon moet je juist meerderen. Dat begrijp ik dus niet...
08.10.2025 - 20:40
![]() Margreet wrote:
Margreet wrote:
Goedemiddag, voor je aan de boord begint van het lijf moet je steken meerderen en dan met een kleinere naald de boord breien. Ik brei de boord met dezelfde naald als de hele trui. Moet ik dan evengoed zoveel steken meerderen of moet het minder?
03.10.2025 - 14:26DROPS Design answered:
Dag Margreet,
Ook als je de boord met dezelfde naalden breit moet je minderen, omdat de boorsteek het werk samentrekt. Maar je kunt dan ietsje minder steken minderen.
08.10.2025 - 20:19
![]() Mireille wrote:
Mireille wrote:
Bonjour , Modèle perles du nord Pour ce modèle en taille L qd j’attaque la ligne 11 du graphique A3 taille L , les augmentations de la ligne 10 ne me permettent pas d’aligner toutes les pointes des motifs suivants avec les croix du rangs 6,7et 8 . Au bout de qq motifs il y a un décalage qui s’accentue très vite …..EST CE NORMAL ??? Merci pour votre collaboration Cordialement
15.09.2025 - 08:46DROPS Design answered:
Bonjour Mireille, placez un marqueur entre chaque A.3 à tricoter et tricotez les mailles entre ces marqueurs exactement comme dans le diagramme, vous aurez ainsi le même résultat: au 3ème rang, vous commencez le diagramme par 1 jeté, puis vous alternez 1 m de chaque couleur 8 fois; vous avez ainsi 1 jeté + 16 mailles pour chaque A.3. Bon crochet!
17.09.2025 - 07:30
![]() Carole wrote:
Carole wrote:
Ou trouvé les correction concernant le graphique A3 -S-M-L
05.09.2025 - 23:28DROPS Design answered:
Bonjour Carole, si vous avez imprimé les explications après la date de la correction, les diagrammes sont justes ainsi, cette correction ne s'applique que si vous aviez imprimé les explications avant cette date. Bon tricot!
08.10.2025 - 09:23
|
||||||||||||||||||||||
Perles du Nord#perlesdunordsweater |
||||||||||||||||||||||
 |
 |
|||||||||||||||||||||
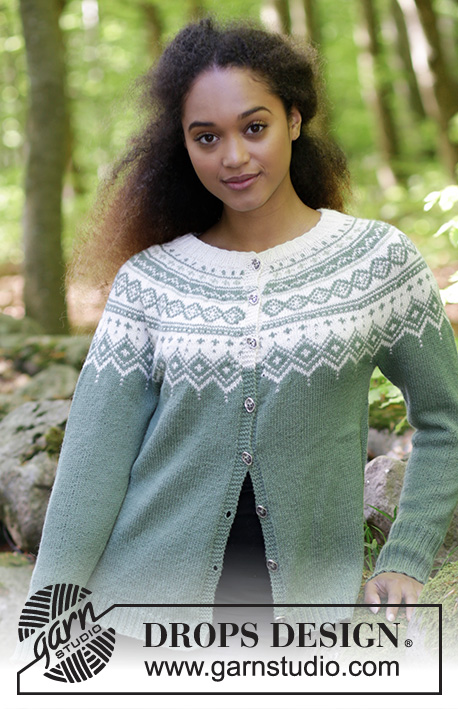
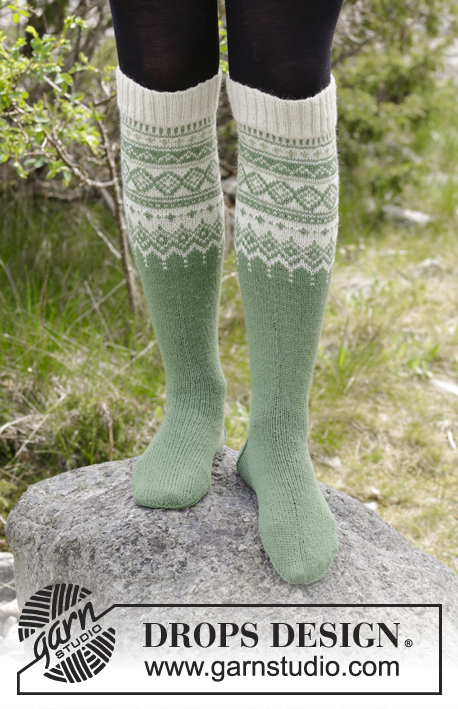
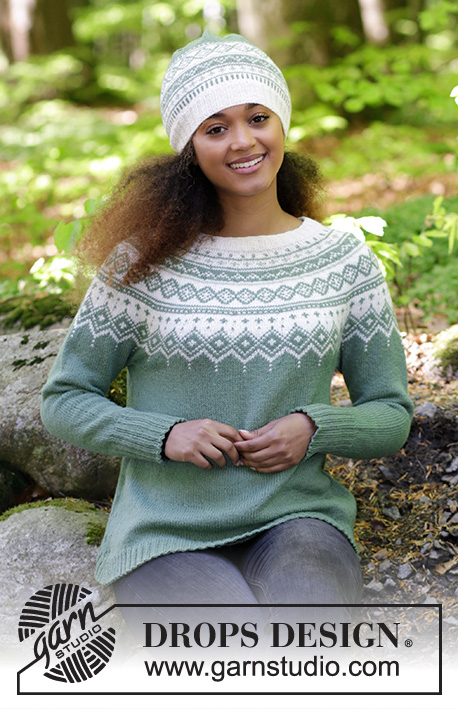
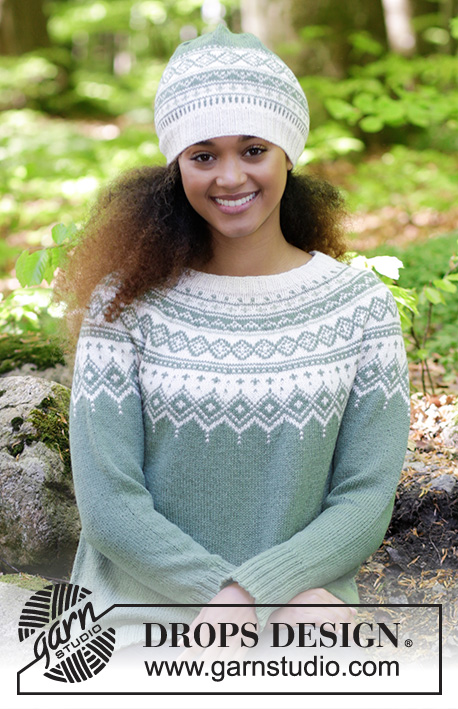
The set consists of: Knitted jumper with round yoke, multi-colored Norwegian pattern and A-shape, worked top down. Sizes S - XXXL. Hat with multi-colored Norwegian pattern. The set is worked in DROPS Flora.
DROPS 180-2 |
||||||||||||||||||||||
|
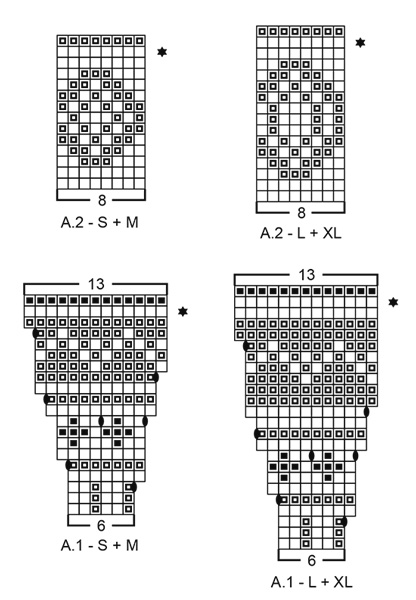
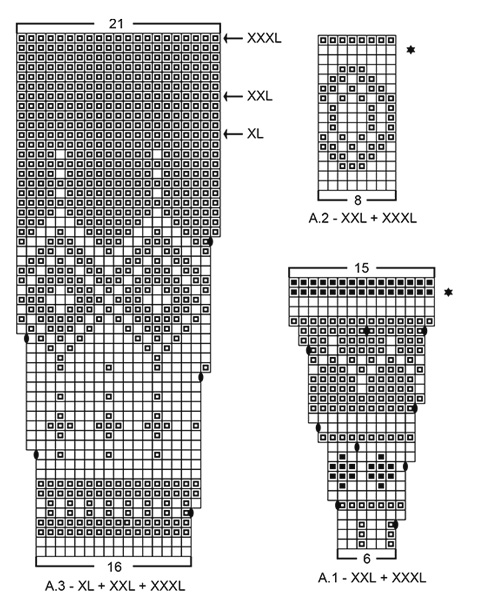
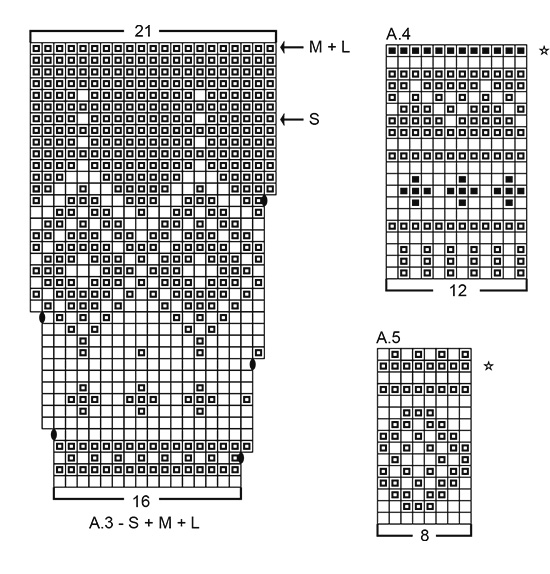
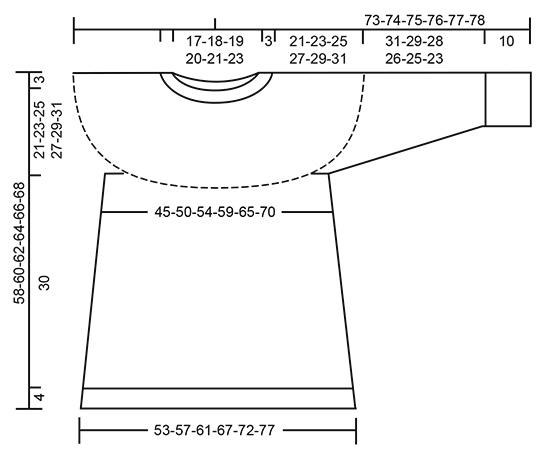
INFORMATION FOR THE PATTERN: DECREASE/INCREASE TIP: To work out how to decrease/increase evenly, count the total number of stitches on the needle (e.g. 120 stitches) and divide by the number of decreases/increases to be made (e.g. 18) = 6.6. In this example, decrease by knitting alternately every 5th and 6th stitch and every 6th and 7th stitch together. If you are increasing, do this after alternately every 6th and 7th stitch (increase 1 stitch by making 1 yarn over, on the next round, knit the yarn overs twisted and into the pattern so that there are no holes). ELEVATION: Insert 1 marker at the beginning of the round = mid back. Start from the right side with off white and knit until you have worked 8-8-9-10-10-11 stitches past the marker, turn, tighten the strand and purl 16-16-18-20-20-22 stitches. Turn, tighten the strand and knit 24-24-27-30-30-33 stitches, turn, tighten the strand and purl 32-32-36-40-40-44 stitches. Turn, tighten the strand and knit 40-40-45-50-50-55 stitches, turn, tighten the strand and purl 48-48-54-60-60-66 stitches. Turn, tighten the strand and knit 56-56-63-70-70-77 stitches, turn, tighten the strand and purl 64-64-72-80-80-88 stitches. Turn, tighten the strand and knit to mid back. PATTERN: Jumper: See diagrams A.1 to A.3. Choose diagram for your size. Hat: See diagrams A.4 and A.5. The diagrams show all the rows in the pattern seen from the right side. The whole of the pattern is worked in stockinette stitch. KNITTING TIP (for the multi-colored pattern): To prevent the knitting gauge from becoming tighter when working pattern, it is important that the strands do not tighten at the back of the piece. You can increase the size of your needle when working pattern if you find you are working too tightly. INCREASE TIP (for the sides of the body): Start 2 stitches before the marker thread, make 1 yarn over, knit 4 (the marker thread sits in the middle of these 4 stitches), make 1 yarn over (= 2 stitches increased). On the next round knit the yarn overs twisted so that there are no holes. DECREASE TIP-1 (for mid under the sleeve): Work until there are 4 stitches left before the marker thread, knit 2 together, knit 4 (the marker thread sits in the middle of these 4 stitches), slip 1 stitch as if to knit, knit 1, pass the slipped stitch over the knitted stitch (= 2 stitches decreased). DECREASE TIP-2 (for the hat): Decrease after each marker thread as follows: Slip 1 stitch as if to knit, knit 1, pass the slipped stitch over the knitted stitch (= 1 stitch decreased). ---------------------------------------------------------- JUMPER: The piece is worked in the round with circular needle, top down. The sleeve is worked in the round with short circular needle, top down. Change to double pointed needles when you have decreased enough stitches. NECKLINE: Cast on 120-124-128-132-140-148 stitches with circular needle size 2.5 mm / US 1.5 and off white. Knit 1 round. Then work rib (= knit 2 / purl 2). When the rib measures 3 cm / 1", knit 1 round where you decrease 18-16-14-12-14-16 stitches evenly on round – read DECREASE/INCREASE TIP = 102-108-114-120-126-132 stitches. Continue to work the yoke as described below. YOKE: Change to circular needle size 3 mm / US 2.5. Knit 1 round. For a better fit you can now work a small ELEVATION in the back of the neck – see description above. When the elevation is complete, work A.1 in the round (= 17-18-19-20-21-22 repeats of 6 stitches). Continue the pattern in this way and increase as shown in the diagram. Read KNITTING TIP and REMEMBER THE GAUGE! On the round marked with a star in A.1 (i.e. the next to last round in A.1) there are 221-234-247-260-315-330 stitches on the needle, increase at the same time 11-22-33-36-21-22 stitches evenly on this round – read DECREASE/INCREASE TIP = 232-256-280-296-336-352 stitches. When A.1 is complete, work A.2 in the round (= 29-32-35-37-42-44 repeats of 8 stitches). Continue the pattern in this way, but on the round marked with a star in A.2 (i.e. the next to last round in A.2) increase 8-16-24-24-16-16 stitches evenly on round = 240-272-304-320-352-368 stitches. When A.2 is complete, work A.3 in the round (= 15-17-19-20-22-23 repeats of 16 stitches). Continue the pattern in this way and increase as shown in the diagram. When the last round in A.3 remains (marked with an arrow in each size) there are 315-357-399-420-462-483 stitches on the needle, increase at the same time 11-11-1-12-0-5 stitches evenly on the round = 326-368-400-432-462-488 stitches. The piece now measures approx. 24-26-28-30-32-34 cm / 9½"-10¼"-11"-11¾"-12½"-13½" from the cast-on edge, measured mid front. NOTE: If the piece measures less than this, continue working stockinette stitch with green to the required length. The next round is worked as follows: Knit 50-55-59-65-71-76 stitches (= ½ back piece), place the next 64-75-83-86-90-93 stitches on a thread for sleeve, cast on 10-10-12-12-14-16 new stitches on the needle (= in the side under the sleeve), knit 99-109-117-130-141-151 stitches (= front piece), place the next 64-75-83-86-90-93 stitches on a thread for sleeve, cast on 10-10-12-12-14-16 new stitches on the needle (= in the side under the sleeve) and knit the remaining 49-54-58-65-70-75 stitches (= ½ back piece). Cut the strand. Body and sleeves are finished separately. THE PIECE IS NOW MEASURED FROM HERE! BODY: = 218-238-258-284-310-334 stitches. Insert 1 marker thread in the middle of the 10-10-12-12-14-16 stitches cast on under the sleeve in each side. Start the round by one of the marker threads and work stockinette stitch in the round with green. When the piece measures 2 cm / ¾" from the division, increase 1 stitch on each side of both marker threads – read INCREASE TIP (= 4 stitches increased). Increase in this way every 10th round (approx. every 3 cm / 1") until required length (if the knitting gauge is correct in height, there should be approx. 9 increase rows in each side). When the piece measures 30 cm / 11¾" from the division in all sizes, there are approx 254-274-294-320-346-370 stitches on the needle. Knit 1 round where you increase 82-90-98-104-114-122 stitches evenly on round – read DECREASE/INCREASE TIP = 336-364-392-424-460-492 stitches. Change to circular needle size 2.5 mm / US 1.5 and work rib in the round (= knit 2 / purl 2) for 4 cm / 1½". Then bind off with knit over knit and purl over purl, but to prevent the bind-off edge being tight, you can make 1 yarn over on the needle after every 4th stitch AT THE SAME TIME as you bind off (the yarn overs are bind off as normal stitches). The jumper measures approx. 58-60-62-64-66-68 cm / 22¾"-23⅝"-24⅜"-25¼"-26"-26¾" from the shoulder down. SLEEVE: Place the 64-75-83-86-90-93 stitches from the thread on one side of the piece on a short circular needle size 3 mm / US 2.5 and in addition, knit up 1 stitch in each of the 10-10-12-12-14-16 stitches cast on under the sleeve = 74-85-95-98-104-109 stitches on the needle. Insert 1 marker thread in the middle of the 10-10-12-12-14-16 stitches under the sleeve. Start the round here and work stockinette stitch in the round with green. When the sleeve measures 2 cm / ¾" from the division, decrease 2 stitches mid under the sleeve – read DECREASE TIP. Decrease a total of 11-15-19-19-21-22 times in S: Every 9th round, in M: Every 6th round, in L and XL: Every 4th round, in XXL: Alternately every 3rd and 4th round and in XXXL: Every 3rd round = 52-55-57-60-62-65 stitches. When the sleeve measures 31-29-28-26-25-23 cm / 12¼"-11½"-11"-10¼"-9¾"-9" from the division (shorter measurements in the larger sizes due to longer yoke), knit 1 round where you increase 16-17-19-20-18-19 stitches evenly on round = 68-72-76-80-80-84 stitches. Change to double pointed needles size 2.5 mm / US 1.5 and work rib in the round (= knit 2 / purl 2). When the rib measures 10 cm / 4" (or desired length) bind off with knit over knit and purl over purl, but to prevent the bind-off edge being tight, you can make 1 yarn over after every 4th stitch AT THE SAME TIME as you bind off (the yarn overs are bind off as normal stitches). The sleeve measures approx. 41-39-38-36-35-33 cm / 16"-15¼"-15"-14¼"-13½"-13" from the division. Work the second sleeve in the same way. ---------------------------------------------------------- HAT: The piece is worked in the round with short circular needle, bottom up. Change to double pointed needles as the number of stitches decreases. Cast on 128-136 stitches with circular needle size 2.5 mm / US 1.5 and off white. Knit 1 round. Then work rib (= knit 2 / purl 2) for 4 cm / 1½". Change to short circular needle size 3 mm / US 2.5 and knit 2 rounds – AT THE SAME TIME on the first round, increase 4-8 stitches evenly on round – read DECREASE/INCREASE TIP = 132-144 stitches. Work A.4 in the round (= 11-12 repeats of 12 stitches). On the last round in A.4 (marked with a star in the diagram), decrease 4-8 stitches evenly on round = 128-136 stitches. REMEMBER THE GAUGE! Now work A.5 in the round (= 16-17 repeats of 8 stitches). On the next to last round in A.5 (marked with a star in the diagram), decrease 8-4 stitches evenly on round = 120-132 stitches. The piece now measures approx. 16 cm / 6¼" in height. Continue working stockinette stitch with green until the piece measures 20-23 cm / 8"-9". Insert 10-11 marker threads in the piece with 12 stitches between each marker thread. On the next round, decrease 1 stitch after each marker thread – read DECREASE TIP (= 10-11 stitches decreased). Decrease in this way every 2nd round a total of 8 times and then every round a total of 2 times = 20-22 stitches. On the next round knit all stitches together, 2 and 2 = 10-11 stitches. Cut the strand, pull it through the remaining stitches, tighten the strand and fasten well. The hat measures approx. 25-28 cm / 9¾"-11" top down. |
||||||||||||||||||||||
Diagram explanations |
||||||||||||||||||||||
|
||||||||||||||||||||||
 |
||||||||||||||||||||||
 |
||||||||||||||||||||||
 |
||||||||||||||||||||||
 |
||||||||||||||||||||||
Have you finished this pattern?Tag your pictures with #dropspattern #perlesdunordsweater or submit them to the #dropsfan gallery. Do you need help with this pattern?You'll find 26 tutorial videos, a Comments/Questions area and more by visiting the pattern on garnstudio.com. © 1982-2026 DROPS Design A/S. We reserve all rights. This document, including all its sub-sections, has copyrights. Read more about what you can do with our patterns at the bottom of each pattern on our site. |
||||||||||||||||||||||


With over 40 years in knitting and crochet design, DROPS Design offers one of the most extensive collections of free patterns on the internet - translated to 17 languages. As of today we count 324 catalogs and 12290 patterns - 12280 of which are translated into English (US/in).
We work hard to bring you the best knitting and crochet have to offer, inspiration and advice as well as great quality yarns at incredible prices! Would you like to use our patterns for other than personal use? You can read what you are allowed to do in the Copyright text at the bottom of all our patterns. Happy crafting!
Post a comment to pattern DROPS 180-2
We would love to hear what you have to say about this pattern!
If you want to leave a question, please make sure you select the correct category in the form below, to speed up the answering process. Required fields are marked *.