
Popular categories
Looking for a yarn?


Comments / Questions (34)
![]() Magda Ripmeeser wrote:
Magda Ripmeeser wrote:
Patroon 178-31 waar kan ik dat bestellen?
24.02.2018 - 11:27DROPS Design answered:
Hallo Magda, Je kunt geen losse patronen bij ons bestellen, maar je kunt het patroon gratis afdrukken via de knop 'patroon' (met het printpictogrammetje) bovenaan het patroon. Verder is dit patroon gepubliceerd in brochure nr 178, dat is een vrij recent nummer en deze kun je misschien nog kopen bij je verkooppunt.
25.02.2018 - 18:55
![]() Gunn wrote:
Gunn wrote:
Er maskeantallet riktig i str M? Får ikke dette til å stemme
04.02.2018 - 19:31DROPS Design answered:
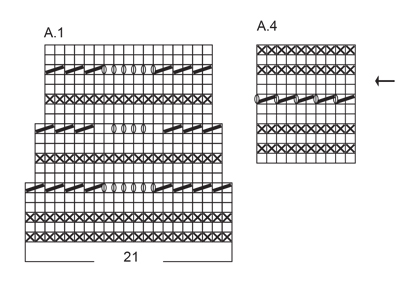
Hei Gunn. Ja, maskeantallet i str M er riktig. Mønster A.1 på starten av arbeidet folder seg som en bølgekant, det er derfor lagt til flere masker her å kompensere for denne strukturen. God fornøyelse!
26.02.2018 - 12:47
![]() Yvonne wrote:
Yvonne wrote:
De raglan de eerste mouw begrijp ik maar als je nu bij de tweede mouw komt begin je dan ook met 2 rechtsamen breien 2 recht dan 1afhalen . Voor bij de eertse mouw komt de 2 samenbreien op de voorkant en de tweede op de achterkant , word dan de ene kant anders dan de anderekant.kan u mij uitleggen.
15.09.2017 - 20:34DROPS Design answered:
Hallo Yvonne, Als het goed is heb je vier markeerdraden in het werk voor de overgangen van de panden naar de raglan of andersom en bij elke markeerdraad minder je inderdaad op dezelfde wijze, dus voor de markeerdraad door samen te breien en na de markeerdraad door af te halen, 1 breien en de afgehaalde steek over te halen. Op die manier worden de steken symmetrisch gemaakt en ziet het er op de voor en achterkant hetzelfde uit.
18.09.2017 - 10:07
![]() Yvonne wrote:
Yvonne wrote:
Maat L ,ik ben nu van A2 bij de 25ste en zit al op 30cm als ik nog keer 25 reken is dat 60cm moet dan nog 20 stuks doen dan kom ik over de lengte die jullie hebben geschreven hoe kan dat , ook zijn er dan te weinig knoopsgaten laatste staat op 54 cm en na A2 moet je nog eens 35 cm door breien .Is het dan niet zo dat de eerste rij vakjes staat voor rechts de tweede voor averechts en ga zo door . Denk dat het dan beter uit komt met de maat.
17.05.2017 - 13:33DROPS Design answered:
Hallo Yvonne, In het telpatroon zijn alle naalden opgenomen. Zowel de heengaande als de teruggaande naalden staan in het telpatroon. Waarschijnlijk is het daar mis gegaan, als ik het zo lees...
22.05.2017 - 17:22
![]() Monika wrote:
Monika wrote:
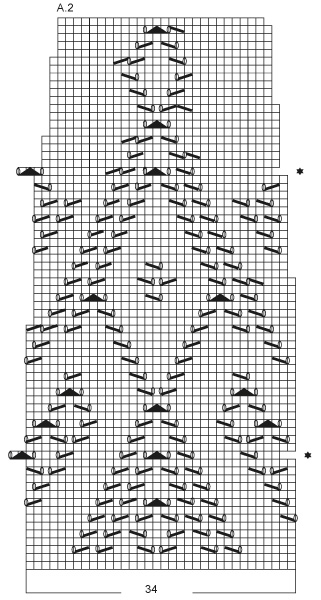
Hallo, wenn A2 und A 3 einmal in der Höhe gestrickt wurde , soll die Maschenzahl bei Grösse L 219 sein. Woher kommen die Abnahmen von 64 Maschen ?
16.05.2017 - 20:24DROPS Design answered:
Liebe Monika, wenn A.2 einmal in der Höhe gestrickt wird, gibt es 26 M übrig, wenn A.3 einmal in der Höhe gestrickt wird, gibt es 27 M übrig: 5 Blendem + A.2 = (7 x 26 M (= 182)) + A.3 (= 27 M) + 5 Blendem = 5+182+27+5 = 219 M. Viel Spaß beim stricken!
17.05.2017 - 08:59
![]() Yvonne wrote:
Yvonne wrote:
Hej ik heb twee dagen terug wat gevraagd en bericht van gisteren heefd al antwoord gehad , plus weekend komt eraan en ik ben bijna klaar met A1 zou u de vraag van 10-5-17 kunnen beantwoorden zodat ik in weekend kan door breien . Hartelijke dank
12.05.2017 - 09:50
![]() Leah Vallance wrote:
Leah Vallance wrote:
Is the bottom of the sweater supposed to measure over 60" ? When I cast on 388 sts, it seems huge to me. I am using the correct gauge. Thank you
11.05.2017 - 19:41DROPS Design answered:
Dear Leah, the pattern at the bottom of the pattern is a feather and fan, which will be decreased over the rows. If you start with 388 stitch that means you are knitting the size L: For that size, by the time you finish the A.1 pattern, you will only have 316 stitch, which will be then further decreased, giving it a distinct A line. So do not be afraid of the number of stitches, by the time you get to the waistline. they will be reduced to more or less the number you are used to. I hope this helped. Happy Knitting!
11.05.2017 - 22:16
![]() Yvonne wrote:
Yvonne wrote:
Geld dat dan ook voor A2 en A3 en A4 ik heb namelijk hem zo gebreien toen ik tot de ontdekking kwam dat hij te groot was toen was ik al op 48 cm moest toen nos 23 rijtjes doen , daarna komt de 35 cm =dat is al 83 cm komt nog bij die van de 23 rijtjes het was wel maat XXL nu doe ik L dan komt hij veel langer uit dan op de tekeninger onder . of is zo dat A2 A3 wel 1 rij heen de 2de terug is .Ik weet ben een zeur kous maar wil nu wel zeker weten niet dat ik hem weer moet uithalen==0
10.05.2017 - 10:07DROPS Design answered:
Hallo Yvonne, Ja, dat geldt ook voor alle andere telpatronen. Alle naalden zijn weergegeven: zowel de heengaande als de teruggaande naalden.
12.05.2017 - 13:40
![]() Yvonne wrote:
Yvonne wrote:
Ik begrijp A1 niet zo , de eerste regel is averechts staat de tweede dan voor recht terug , dan heb je weer averechts zou de vierde weer recht moeten zijn ,dan de vijfde weer averechts als je zo door telt komt de 9de toch gewoon op de verkeerde kant uit dan krijg je niet de ribbel tussendoor ? Of is de eerste regel gelijk voor averechts en rechts de tweede rdan voor recht en averechts ? Raak helemaal de kluts kwijt hoop dat jullie mij kunnen helpen
08.05.2017 - 22:13DROPS Design answered:
Hallo Yvonne, De eerste naald van A.1, dus de naald waar kruisjes in de hokjes staan, is averecht op de goede kant (en recht op de verkeerde kant), de tweede naald van A.1, dus de toer waar niks staat in de hokjes is recht op de goede kant (en averecht op de verkeerde kant). Omdat je in dit geval heen en weer breit en de tweede naald een teruggaande naald is, brei je dus in de tweede naald averecht. Je moet dus altijd even opletten of je op de goede kant of de verkeerde kant van het werk bezig bent en dan in het telpatroon kijken wat je moet doen.
09.05.2017 - 22:50
![]() Rosy Nickel wrote:
Rosy Nickel wrote:
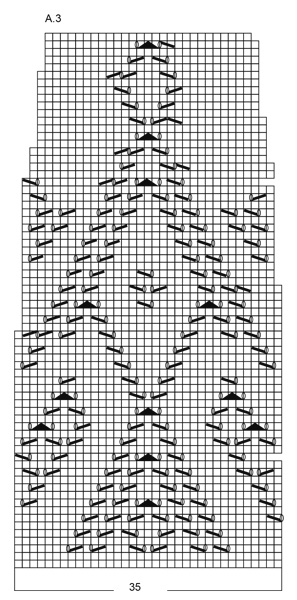
Müssten bei A3 in der 7. Reihe am Ende nicht 2 M zusammengestrickt und ein Umschlag gemacht werden?? Ist nicht eingezeichnet … Vielen Dank für eine kurze Rückinfo.
04.05.2017 - 22:44DROPS Design answered:
Liebe Frau Nickel, Diagram ist richtig so, es wird kein 2 M zs, Umschlag am ende 7. Reihe gestrickt. Ein neues Diagram wurde gerade hochgeladen. Viel Spaß beim stricken!
24.05.2017 - 14:49
|
||||||||||||||||||||||
Summer Swing Cardigan#summerswingcardigan |
||||||||||||||||||||||
 |
 |
|||||||||||||||||||||
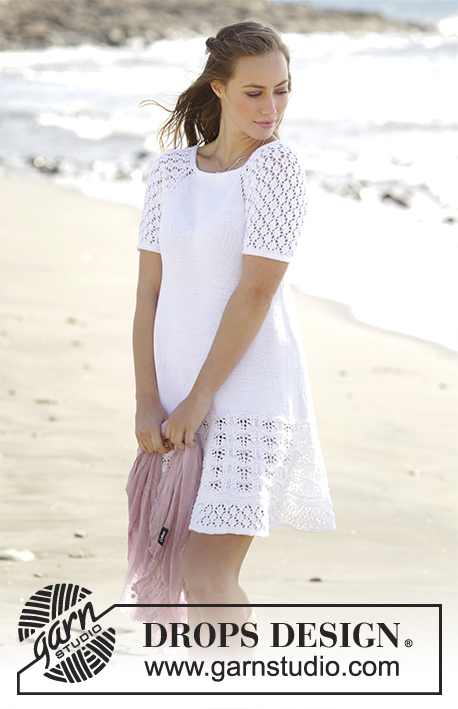
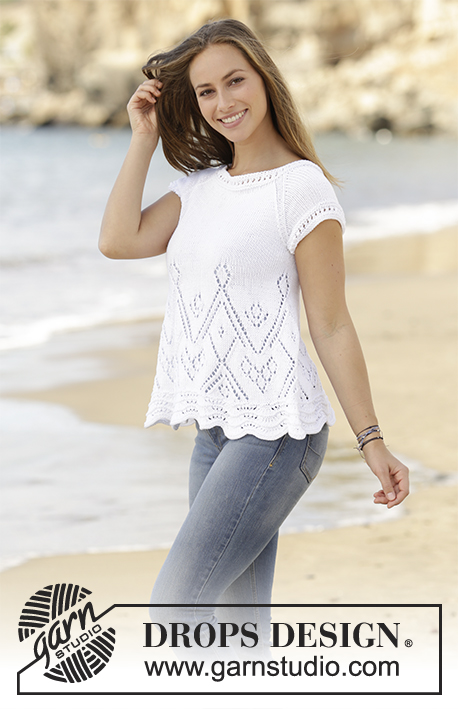
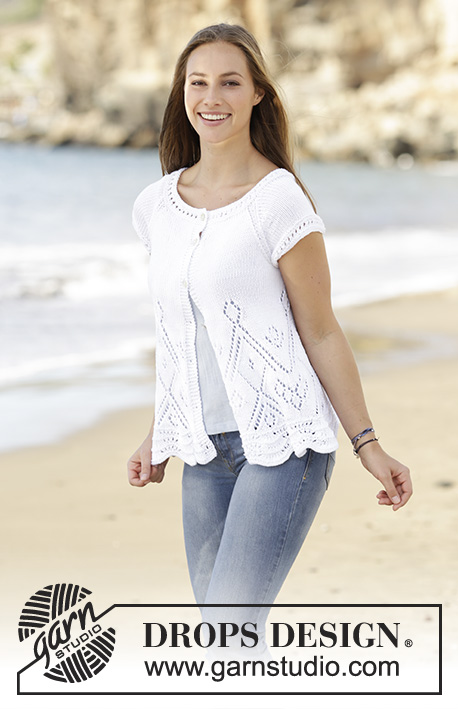
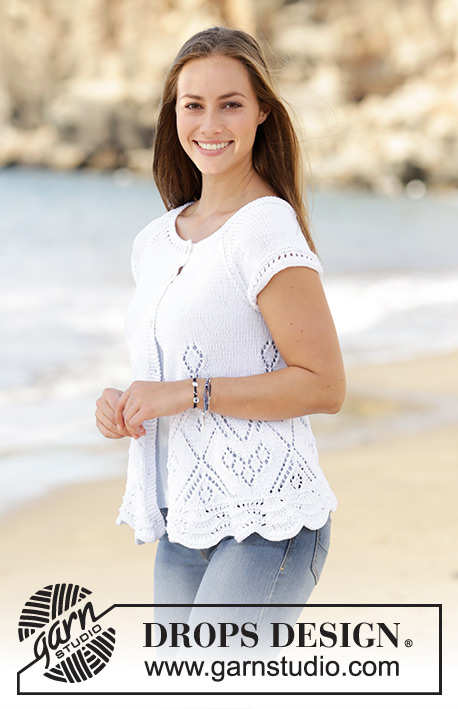
Jacket with lace pattern and raglan, worked bottom up in DROPS Muskat. Size: S - XXXL.
DROPS 178-31 |
||||||||||||||||||||||
|
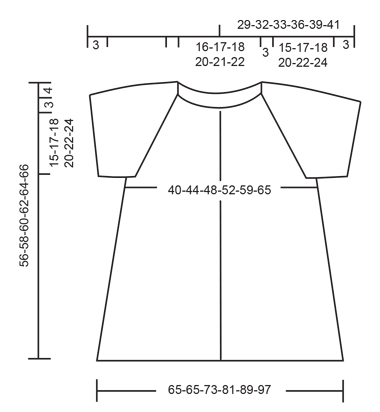
GARTER STITCH (back and forth): Knit all rows. 1 ridge = knit 2 rows. PATTERN: See diagrams A.1 to A.4. Diagrams show all rows in pattern seen from the right side. DECREASE TIP: To calculate how to decrease evenly, use the total number of stitches on row (e.g. 282 stitches), minus bands (10 stitches) and divide the remaining stitches by number of decreases to be done (e.g. 33) = 8.5. I.e. in this example work alternately approx. every 7th and 8th stitch and every 8th and 9th stitch together (do not decrease over bands). RAGLAN: Decrease as follows: Begin 3 stitches before marker thread: Knit 2 together, knit 2 (marker thread is between these stitches), slip 1 stitch knitwise, knit 1, pass slipped stitch over stitch worked (= 8 stitches decreased on row). BUTTONHOLES: Decrease for buttonholes on right band. 1 buttonhole = begin from wrong side and work until 2 stitches remain on needle towards mid front, make 2 yarn overs and knit the 2 last stitches. Turn piece, knit 1, knit next stitch together with first yarn over, knit second yarn over together with next stitch, then continue as before. Decrease for buttonholes when piece measures: S: 2, 10, 18, 26, 34, 42 and 50 cm M: 3, 12, 20, 28, 36, 44 and 52 cm L: 3, 12, 21, 30, 38, 46 and 54 cm XL: 2, 11, 20, 29, 38, 47 and 56 cm XXL: 3, 13, 22, 31, 40, 49 and 58 cm XXXL: 3, 13, 23, 33, 42, 51 and 60 cm ---------------------------------------------------------- JACKET: Work piece back and forth on circular needle. Work sleeve edges in the round on double pointed needles. Cast on 346-346-388-430-472-514 stitches on circular needle size 4 mm / US 6 with Muskat. REMEMBER BUTTONHOLES! Work as follows from WS: Work 5 band stitches in GARTER STITCH - see explanation above, work A.1 (= 21 stitches) 16-16-18-20-22-24 times, finish with 5 band stitches in garter stitch. When entire A.1 has been worked vertically, 282-282-316-350-384-418 stitches remain on needle. Knit 1 row from wrong side while decreasing 33 stitches evenly - READ DECREASE TIP (evenly) = 249-249-283-317-351-385 stitches. REMEMBER THE KNITTING TENSION/GAUGE Then work as follows from RS: Work 5 band stitches in garter stitch, work A.2 (= 34 stitches) 6-6-7-8-9-10 times, work A.3 (= 35 stitches), finish with 5 band stitches in garter stitch. Continue this pattern and decrease as shown in diagrams. When entire A.2 and A3 have been worked vertically, 193-193-219-245-271-297 stitches remain on needle. Knit 1 row from right side while adjusting number of stitches to 178-194-210-230-258-282 (i.e. in size M increase 1 stitch. In size S, L, XL, XXL and XXXL decrease 15-9-15-13-15 stitches evenly). Continue in stockinette stitch with garter stitch on band. When piece measures 34-34-35-35-35-35 cm / 13½"-13½"-13¾"-13¾"-13¾"-13¾", work next row from right side as follows: Work the first 43-47-50-55-61-66 stitches (= front piece), cast/bind off the next 8-8-10-10-12-14 stitches for armhole, work the next 76-84-90-100-112-122 stitches (= back piece), cast/bind off the next 8-8-10-10-12-14 stitches, work the remaining 43-47-50-55-61-66 stitches (= front piece). Put piece aside and work the sleeve edges. SLEEVE EDGES: Work sleeve edges in the round on double pointed needles. Cast on 68-76-84-88-92-98 stitches on double pointed needles size 3.5 mm / US 4 with Muskat. Work A.4 in the round. When A.4 has been vertically, work next round as follows: Cast/bind off the first 8-8-10-10-12-14 stitches (= under sleeves), knit the remaining stitches and decrease 1-0-0-0-0-1 stitch evenly = 59-68-74-78-80-83 stitches. Put piece aside and work another sleeve edge the same way. YOKE: Slip sleeve edges on to same circular needle as body where armholes were bound off = 280-314-338-366-394-420 stitches. Insert 1 marker thread in all transitions between sleeves and body piece (= 4 marker threads). Continue in stockinette stitch and garter st as before, AT THE SAME TIME on 1st row from right side begin decrease for RAGLAN – see explanation above. Decrease like this on every other row (every row from right side) 21-23-25-28-30-33 times in total = 112-130-138-142-154-156 stitches. Switch to a short circular needle size 3.5 mm / US 4. Work A.4 with 5 band stitches in garter stitch in each side. On row marked with arrow in diagram decrease 2-14-18-16-24-20 stitches evenly (do not decrease over bands ) = 110-116-120-126-130-136 stitches. Cast/bind off when A.4 has been worked one time vertically. ASSEMBLY: Sew together holes under the sleeves. Sew the buttons on to the left band. Fasten off. |
||||||||||||||||||||||
Diagram explanations |
||||||||||||||||||||||
|
||||||||||||||||||||||
 |
||||||||||||||||||||||
 |
||||||||||||||||||||||
 |
||||||||||||||||||||||
 |
||||||||||||||||||||||
Have you finished this pattern?Tag your pictures with #dropspattern #summerswingcardigan or submit them to the #dropsfan gallery. Do you need help with this pattern?You'll find 25 tutorial videos, a Comments/Questions area and more by visiting the pattern on garnstudio.com. © 1982-2026 DROPS Design A/S. We reserve all rights. This document, including all its sub-sections, has copyrights. Read more about what you can do with our patterns at the bottom of each pattern on our site. |
||||||||||||||||||||||


With over 40 years in knitting and crochet design, DROPS Design offers one of the most extensive collections of free patterns on the internet - translated to 17 languages. As of today we count 324 catalogs and 12291 patterns - 12281 of which are translated into English (US/in).
We work hard to bring you the best knitting and crochet have to offer, inspiration and advice as well as great quality yarns at incredible prices! Would you like to use our patterns for other than personal use? You can read what you are allowed to do in the Copyright text at the bottom of all our patterns. Happy crafting!
Post a comment to pattern DROPS 178-31
We would love to hear what you have to say about this pattern!
If you want to leave a question, please make sure you select the correct category in the form below, to speed up the answering process. Required fields are marked *.