DROPS Muskat
DROPS Muskat
100% Cotton
from 3.90 CAD /50g
Get the yarn to make this pattern from 31.20CAD.

The yarn cost is calculated from the pattern’s smallest size and the yarn’s cheapest product type. Looking for an even better price? You might find it on the DROPS Deals!

DROPS SS24

Summer Swing Cardigan

Jacket with lace pattern and raglan, worked bottom up in DROPS Muskat. Size: S - XXXL.

DROPS 178-31
DROPS design: Pattern r-710
Yarn group B
----------------------------------------------------------
Size: S - M - L - XL - XXL - XXXL
Materials:
DROPS MUSKAT from Garnstudio (belongs to yarn group B)
400-400-450-500-550-600 g color 18, white

DROPS CIRCULAR NEEDLE (80 cm / 32") SIZE 4 mm/US 6 – or size needed to get 21 stitches and 28 rows in stockinette stitch = width 10 cm / 4" and 10 cm / 4" vertically.

DROPS DOUBLE POINTED NEEDLES AND CIRCULAR NEEDLE (60 cm / 24") SIZE 3.5 mm/US 4 for sleeve and neck edge – or size needed to get 22 stitches and 30 rows in stockinette stitch = width 10 cm / 4" and 10 cm / 4" vertically.

DROPS MOTHER-OF-PEARL BUTTON ARCHED (white), NO: 521: 7 pieces for all sizes

-------------------------------------------------------

Alternative Yarn – See how to change yarns here
Yarn Groups A to F – Use the same pattern and change the yarn here
Yarn usage using an alternative yarn – Use our yarn converter here

-------------------------------------------------------

DROPS Muskat
DROPS Muskat
100% Cotton
from 3.90 CAD /50g
Get the yarn to make this pattern from 31.20CAD.

The yarn cost is calculated from the pattern’s smallest size and the yarn’s cheapest product type. Looking for an even better price? You might find it on the DROPS Deals!

Pattern instructions

NOTE: This pattern is written in American English. All measurements in charts are in cm. For conversion from inches to cm - click here. There are different terms for crocheting in American and British English. If this pattern includes crochet, click for "crochet terms" here. For this pattern in British English, please click here.
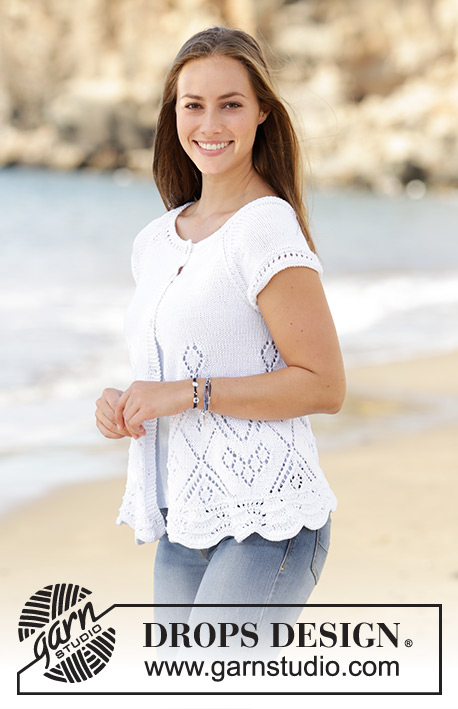
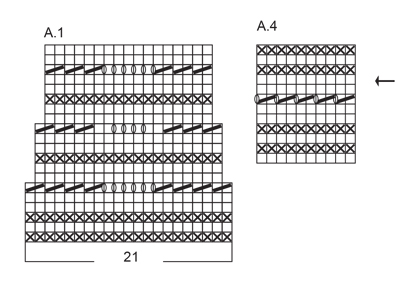
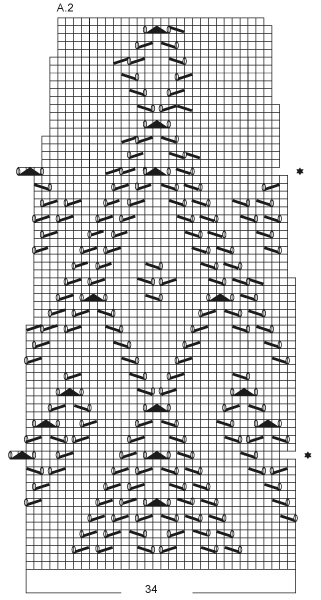
GARTER STITCH (back and forth):
Knit all rows. 1 ridge = knit 2 rows.

PATTERN:
See diagrams A.1 to A.4. Diagrams show all rows in pattern seen from the right side.

DECREASE TIP:
To calculate how to decrease evenly, use the total number of stitches on row (e.g. 282 stitches), minus bands (10 stitches) and divide the remaining stitches by number of decreases to be done (e.g. 33) = 8.5. I.e. in this example work alternately approx. every 7th and 8th stitch and every 8th and 9th stitch together (do not decrease over bands).

RAGLAN:
Decrease as follows: Begin 3 stitches before marker thread: Knit 2 together, knit 2 (marker thread is between these stitches), slip 1 stitch knitwise, knit 1, pass slipped stitch over stitch worked (= 8 stitches decreased on row).

BUTTONHOLES:
Decrease for buttonholes on right band. 1 buttonhole = begin from wrong side and work until 2 stitches remain on needle towards mid front, make 2 yarn overs and knit the 2 last stitches. Turn piece, knit 1, knit next stitch together with first yarn over, knit second yarn over together with next stitch, then continue as before.
Decrease for buttonholes when piece measures:
S: 2, 10, 18, 26, 34, 42 and 50 cm
M: 3, 12, 20, 28, 36, 44 and 52 cm
L: 3, 12, 21, 30, 38, 46 and 54 cm
XL: 2, 11, 20, 29, 38, 47 and 56 cm
XXL: 3, 13, 22, 31, 40, 49 and 58 cm
XXXL: 3, 13, 23, 33, 42, 51 and 60 cm
----------------------------------------------------------

JACKET:
Work piece back and forth on circular needle. Work sleeve edges in the round on double pointed needles.

Cast on 346-346-388-430-472-514 stitches on circular needle size 4 mm / US 6 with Muskat. REMEMBER BUTTONHOLES! Work as follows from WS: Work 5 band stitches in GARTER STITCH - see explanation above, work A.1 (= 21 stitches) 16-16-18-20-22-24 times, finish with 5 band stitches in garter stitch. When entire A.1 has been worked vertically, 282-282-316-350-384-418 stitches remain on needle. Knit 1 row from wrong side while decreasing 33 stitches evenly - READ DECREASE TIP (evenly) = 249-249-283-317-351-385 stitches. REMEMBER THE KNITTING TENSION/GAUGE Then work as follows from RS: Work 5 band stitches in garter stitch, work A.2 (= 34 stitches) 6-6-7-8-9-10 times, work A.3 (= 35 stitches), finish with 5 band stitches in garter stitch. Continue this pattern and decrease as shown in diagrams. When entire A.2 and A3 have been worked vertically, 193-193-219-245-271-297 stitches remain on needle. Knit 1 row from right side while adjusting number of stitches to 178-194-210-230-258-282 (i.e. in size M increase 1 stitch. In size S, L, XL, XXL and XXXL decrease 15-9-15-13-15 stitches evenly). Continue in stockinette stitch with garter stitch on band. When piece measures 34-34-35-35-35-35 cm / 13½"-13½"-13¾"-13¾"-13¾"-13¾", work next row from right side as follows: Work the first 43-47-50-55-61-66 stitches (= front piece), cast/bind off the next 8-8-10-10-12-14 stitches for armhole, work the next 76-84-90-100-112-122 stitches (= back piece), cast/bind off the next 8-8-10-10-12-14 stitches, work the remaining 43-47-50-55-61-66 stitches (= front piece). Put piece aside and work the sleeve edges.

SLEEVE EDGES:
Work sleeve edges in the round on double pointed needles.
Cast on 68-76-84-88-92-98 stitches on double pointed needles size 3.5 mm / US 4 with Muskat. Work A.4 in the round. When A.4 has been vertically, work next round as follows: Cast/bind off the first 8-8-10-10-12-14 stitches (= under sleeves), knit the remaining stitches and decrease 1-0-0-0-0-1 stitch evenly = 59-68-74-78-80-83 stitches. Put piece aside and work another sleeve edge the same way.

YOKE:
Slip sleeve edges on to same circular needle as body where armholes were bound off = 280-314-338-366-394-420 stitches. Insert 1 marker thread in all transitions between sleeves and body piece (= 4 marker threads). Continue in stockinette stitch and garter st as before, AT THE SAME TIME on 1st row from right side begin decrease for RAGLAN – see explanation above. Decrease like this on every other row (every row from right side) 21-23-25-28-30-33 times in total = 112-130-138-142-154-156 stitches. Switch to a short circular needle size 3.5 mm / US 4. Work A.4 with 5 band stitches in garter stitch in each side. On row marked with arrow in diagram decrease 2-14-18-16-24-20 stitches evenly (do not decrease over bands ) = 110-116-120-126-130-136 stitches. Cast/bind off when A.4 has been worked one time vertically.

ASSEMBLY:
Sew together holes under the sleeves. Sew the buttons on to the left band. Fasten off.

This pattern has been corrected.

Updated online: 21.04.2017
Pattern and diagrams A.2 and A.3 has been updated.
Updated online: 27.04.2017
Chart A.2 and A.3 - row 41 updated.

Diagram

symbols = knit from the right side, purl from the wrong side
symbols = purl from the right side, knit from the wrong side
symbols = 1 yarn over between 2 stitches
symbols = slip 1 stitch knitwise, knit 1, pass slipped stitch over
symbols = knit 2 together
symbols = slip 1 stitch knitwise, knit 2 together, pass slipped stitch over
symbols = on this row knit 2 after the 5 band stitches in garter stitch before continuing with pattern as shown in diagram
diagram
diagram
diagram
diagram

Each of our patterns has specific tutorial videos to help you.

Do you have a question? See a list of frequently asked questions (FAQ)

Knitting tension is what determines the final measurements of your work, and is usually measured per 10 x 10 cm. It is provided like so: number of stitches in width x number of rows in height - eg: 19 stitches x 26 rows = 10 x 10 cm.

The knitting tension is very individual; some people knit/crochet loosely while others work tightly. You adjust the knitting tension with the needle size, which is why the suggested needle size only serve as a guide! You need to adjust this (up or down) to ensure that YOUR knitting tension matches the knitting tension provided in the pattern. If you work with a different knitting tension than provided you will have a different yarn consumption, and your work will have different measurements than what the pattern suggests.

The knitting tension also determines which yarns can replace each other. As long as you achieve the same knitting tension you can replace one yarn with another.

See DROPS lesson: How to measure your tension/gauge

See DROPS video: How to make a gauge tension swatch

The required amount of yarn is provided in grams, eg: 450 g. To calculate how many balls you’ll need you first need to know how many grams are in 1 ball (25g, 50g or 100g). This information is available if you click on the individual yarn quality on our pages. Divide the amount required with the amount of each ball. For example, if each ball is 50g (the most common amount), the calculation will be as follows: 450 / 50 = 9 balls.

The important thing when changing from one yarn to another is that the knitting/crochet tension remains the same. This is so that the measurements of the finished piece will be the same as on the sketch provided. It is easier to achieve the same knitting tension using yarns from the same yarn group. It is also possible to work with multiple strands of a thinner yarn to achieve the knitting tension of a thicker one. Please try our yarn converter. We recommend you to always work a test swatch.

Please NOTE: when changing yarn the garment might have a different look and feel to the garment in the photo, due to individual properties and qualities of each yarn.

See DROPS lesson: Can I use a different yarn than the one mentioned in the pattern?

All our yarns are categorised into yarn groups (from A to F) according to thickness and knitting tension – group A contains the thinnest yarns and group F the thickest. This makes it easier for you to find alternative yarns to our patterns, should you wish to switch yarn. All yarns within the same group have a similar knitting tension and can easily replace each other. However, different yarn qualities have different structures and properties which will give the finished work a unique look and feel.

Click here for an overview of the yarns in each yarn group

At the top of all our patterns you’ll find a link to our yarn converter, which is a helpful tool should you wish to use a different yarn than suggested. By filling in the yarn quality you wish to replace, the amount (in your size) and number of strands, the converter will present good alternative yarns with the same knitting tension. Additionally it will tell you how much you’ll require in the new qualities and whether you’ll need to work with multiple strands. Most skeins are 50g (some are 25g or 100g).

If the pattern is worked with multiple colours, every colour will have to be converted separately. Similarly, if the pattern is worked with several strands of different yarns (for example 1 strand Alpaca and 1 strand Kid-Silk) you will have to find alternatives for each, individually.

Click here to see our yarn converter

Since different yarns have different qualities and textures we have chosen to keep the original yarn in our patterns. However, you can easily find options among our available qualities by using our yarn converter, or simply pick a yarn from the same yarn group.

It is possible that some retailers still have discontinued yarns in stock, or that someone has a few skeins at home that they would like to find patterns for.

The yarn converter will provide both alternative yarn as well as required amount in the new quality.

If you think it's hard to decide what size to make, it can be a good idea to measure a garment you own already and like the size of. Then you can pick the size by comparing those measures with the ones available in the pattern's size chart.

You'll find the size chart at the bottom of the pattern.

See DROPS lesson: How to read size chart

The needle size provided in the pattern serves only as a guide, the important thing is to follow the knitting tension. And since knitting tension is very individual, you will have to adjust the needle size to ensure that YOUR tension is the same as in the pattern – maybe you’ll have to adjust 1, or even 2 needle sizes, up or down to achieve the correct tension. For this, we recommend that you work test swatches.

Should you work with a different knitting tension than the one provided, the measurements of the finished garment might deviate from the measurement sketch.

See DROPS lesson: How to measure your tension/gauge

See DROPS video: How to make a gauge tension swatch

Working a garment top-down provides more flexibility and room for personal adjustment. For example it is easier to try the garment on while working, as well as making adjustments to length of yoke and shoulder caps.

The instructions are carefully explaining every step, in the correct order. Diagrams are adjusted to the knitting direction and are worked as usual.

The diagram depicts all rows/rounds, and every stitch seen from the right side. It is read from bottom to top, from right to left. 1 square = 1 stitch.

When working back and forth, every other row is worked from the right side and every other row is worked from the wrong side. When working from the wrong side, the diagram will have to be worked reversed: from left to right, knit stitches are purled, purl stitches are knit etc.

When working in the round every round is worked from the right side and the diagram are worked from right to left on all rounds.

See DROPS lesson: How to read knitting diagrams

The diagram depicts all rows/rounds, and every stitch seen from the right side. It is worked from bottom to top, from right to left.

When working back and forth every other row is worked from the right side: from right to left and every other row is worked from the wrong side: from left to right.

When working in the round, every row in the diagram are worked from the right side, from right to left.

When working a circular diagram you start in the middle and work your way outwards, counter clockwise, row by row.

The rows usually start with a given number of chain stitches (equivalent to the height of the following stitch), this will either be depicted in the diagram or explained in the pattern.

See DROPS lesson: How to read crochet diagrams

Instructions for working several diagrams after each other on the same row/round, will often be written like so: “work A.1, A.2, A.3 a total of 0-0-2-3-4 times". This means you work A.1 once, then A.2 is worked once, and A.3 is repeated (in width) the number of times provided for your size – in this case like so: S = 0 times, M = 0 times, L=2 times, XL= 3 times and XXL = 4 times.

The diagrams are worked as usual: begin with the first row in A.1, then work the first row in A.2 etc.

See DROPS lesson: How to read knitting diagrams

See DROPS lesson: How to read crochet diagrams

The total width of the garment (from wrist-to-wrist) will be larger in the larger sizes, despite the actual sleeves being shorter. The larger sizes have longer sleeve caps and wider shoulders, so there will be a good fit in all sizes.

The measurement sketch/schematic drawing provides information regarding the full length of the garment. If it’s a jumper or a jacket the length is measured from the highest point on the shoulder (usually closest to the neckline), and straight down to the bottom of the garment. It is NOT measured from the tip of shoulder. Similarly, the length of yoke is measured from the highest point on the shoulder and down to where yoke is split into body and sleeves.

See DROPS lesson: How to read a schematic drawing

Diagrams are often repeated on the round or in height. 1 repeat is the diagram the way it appears in the pattern. If it says to work 5 repeats of A.1 in the round, then you work A.1 a total of 5 times after/next to each other in the round. If it says to work 2 repeats of A.1 vertically/in height you work the entire diagram once, then begin again at the start and work the entire diagram one more time.

Chain stitches are slightly narrower than other stitches and to avoid working the cast-on edge too tight, we simply chain more stitches to begin with. The stitch count will be adjusted on the following row to fit the pattern and measurement sketch.

The rib edge is more elastic and will contract slightly compared to, for example, stocking stitch. By increasing before the rib edge, you avoid a visible difference in width between the rib edge and the rest of the body.

It’s very easy to cast off too tightly, and by making yarn overs while casting off (and simultaneously casting these off) you avoid a too tight cast off edge.

See DROPS video: How to bind off with yarn overs (yo)

To achieve an even increase (or decrease) you can increase on, for example: every 3rd and 4th row alternately, like so: work 2 rows and increase on the 3rd row, work 3 rows and increase on the 4th. Repeat this until the increase is complete.

See DROPS lesson: Increase or decrease 1 st on every 3rd and 4th row alternately

Should you prefer to work in the round instead of back and forth, you may of course adjust the pattern. You’ll need to add steeks mid-front (usually 5 stitches), and follow the instructions. When you would normally turn and work from the wrong side, simply work across the steek and continue in the round. At the end you’ll cut the piece open, pick up stitches to work bands, and cover the cut edges.

See DROPS video: How to knit steeks and cut open

Should you prefer to work back and forth instead of in the round, you may of course adjust the pattern so you work the pieces separately and then assemble them at the end. Divide the stitches for the body in 2, add 1 edge stitch in each side (for sewing) and work the front and back pieces separately.

See DROPS lesson: Can I adapt a pattern for circular needles into straight needles?

Pattern repeats can vary slightly in the different sizes, in order to get the correct proportions. If you’re not working the exact same size as the garment in the photo, yours might deviate slightly. This has been carefully developed and adjusted so that the complete impression of the garment is the same in all sizes.

Make sure to follow instructions and diagrams for your size!

If you have found a pattern you like which is available in women’s size it’s not very difficult to convert it to men’s size. The biggest difference will be the length of sleeves and body. Start working on the women size that you think would fit across the chest. The additional length will be worked right before you cast off for the armhole/sleeve cap. If the pattern is worked top-down you can add the length right after the armhole or before the first decrease on sleeve.

Regarding additional yarn amount, this will depend on how much length you add, but it is better with a skein too many than too few.

All yarns will have excess fibres (from production) that might come off as lint or shedding. Brushed yarns (ie hairier yarns) have more of these loose, excess fibres, causing more shedding.

Shedding also depends on what is worn under or over the garment, and whether this pulls at the yarn fibres. It’s therefore not possible to guarantee that there will be no shedding

Below are some tips on how to get the best result when working with hairier yarns:

1. When the garment is finished (before you wash it) shake it vigorously so the looser hairs come off. NOTE: do NOT use a lint roller, brush or any method that pulls at the yarn.

2. Place the garment in a plastic bag and put it in your freezer - the temperature will cause the fibres to become less attached to each other, and excess fibres will come off easier.

3. Leave in the freezer for a few hours before taking it out and shaking it again.

4. Wash the garment according to the instructions on the yarn label.

Pilling is a natural process that happens to even the most exclusive of fibers. It's a natural sign of wear and tear that is hard to avoid, and that is most visible in high friction areas of your garment like a sweater's arms and cuffs.

You can make your garment look as new by removing the pilling, using a fabric comb or a pill/lint remover.

Still can't find the answer you need? Then scroll down and leave your question so one of our experts can try to help you. This will be done normally within 5 to 10 working days.
In the meantime, you can read the questions and answers that others have left to this pattern or join the DROPS Workshop on Facebook to get help from fellow knitters/crocheters!

You might also like...

Post a comment to pattern DROPS 178-31

We would love to hear what you have to say about this pattern!

If you want to leave a question, please make sure you select the correct category in the form below, to speed up the answering process. Required fields are marked *.

Comments / Questions (32)

country flag Marine wrote:

Bonjour . Je ne comprends pas très bien le calcul: après les 33 mailles de diminution il reste 351 ( xxl) comment peut on faire 9 x A2 et A3 plus 10 mailles de la boutonnière ( total 34+35+10 = 79 mailles ( 351:79= 4,44??) mon dernier dessin ne sera pas complet . Merci pour votre réponse

20.04.2022 - 09:23

DROPS Design answered:

Bonjour Marine, tricotez ainsi: 5 m de bordure devant, 9 x les 34 m de A.2 (= 306 mailles), les 35 m de A.3 et 5 m de bordure devant soit: 5+306+35+5=351 mailles. Bon tricot!

20.04.2022 - 13:33

country flag Angelika Wolf wrote:

Hallo, ich habe eine Frage zum Muster A2: In der 15. Reihe soll ich nach den Blendenmaschen 2 rechte Maschen stricken und dann das Muster von A2 stricken. Muss ich auch bei den anderen Wiederholungen in der 15. Reihe immer 2 rechte Maschen stricken?

21.03.2022 - 22:41

DROPS Design answered:

Liebe Frau Wolf, so stricken Sie nur am Anfang der Reihe, dh bei der ersten A.2 der Reihe, dann stricken Sie die letzte Masche in A.2 mit den 2 ersten Maschen vom nächsten A.2 / und dann A.3 zusammen. Viel Spaß beim stricken!

22.03.2022 - 10:23

country flag Marine wrote:

Vous avez très bien expliqué ( cela m’aidera après le cardigan) mais cest moi qui me suis trompée de drop . c’est pour le Summer swing cardigan 178/31 ou il y a une étoile dans le A2 ligne 15 et ligne 56 . Merci encore pour vos explications .

28.02.2022 - 12:03

DROPS Design answered:

Bonjour Marine et merci, là je vois l'étoile :) Lorsque vous tricotez ce rang, vous allez devoir ajuster le début du 1er motif: tricotez 2 mailles endroit (les 2 cases qui manquent) lorsque vous tricotez le diagramme la 1ère fois, puis, à la fin du diagramme, tricotez la dernière maille avec les 2 mailles du A.2suivant/de A.3 (= les 2 mailles qui manquent au début). Bon tricot!

28.02.2022 - 13:42

country flag Ruth Bealer wrote:

I need some clarification. I'm on the yoke and have put the sleeves on the needle and inserted the marker. When I continue in stockinette and garter stitch , am I knitting the sleeves at this point. in A4pattern? Also with the reglan decrease-If I go up to the marker, I will eb reducing the stitches in the sleeve each time, I don't understand how I get to the138 Stitches. thank you for your time. I love this pattern and have had no problem up to this point. Ruth Bealer

19.05.2021 - 20:53

DROPS Design answered:

Dear Ruth, after you put together the sleeves and the body, and continue to knit the cardivan in one piece, you should knit in stockinett stitch and garter stitch only on teh button babnds. A.1 pattern is only for the edge of the sleeves and the neckline. You have not stated which size, but from teh 138 stitches I am guessing M. For raglan decreases see the explanations in the pattern, in eevery other row you are decreasing 8 stitches 25 times. You start with 338 stitches - (8X25 = 200)= 138 stitches. Happy Knitting

20.05.2021 - 00:38

country flag Beverley wrote:

On diagram A2, row 51 you have 32 stitches which reduces by 1 stitch. On the next row, it is shown to be reduced by 2 stitch’s ? When I go to stitch row 53, I have 1 extra stitch ?

02.04.2020 - 10:14

DROPS Design answered:

Dear Beverly, diagram A.2 will be checked, but it might take some time sorry in advance. Continue diagram as shown to get the lace pattern coming in a triangle so that the lace pattern continue from previous row - the number of sts on each side of the lace pattern/decreases might then be different on the next 2 rows. Happy knitting!

02.04.2020 - 12:50

country flag Beverley wrote:

Just about to start this on the jacket and it says “ Work as follows from WS: Work 5 band stitches in GARTER STITCH - see explanation above, work A.1 (= 21 stitches) 16-16-18-20-22-24 times, finish with 5 band stitches in garter stitch.” Do i start on the WS after cast on? Does this mean I start with my first row of A1 after cast on with Knit? It is not clear why my first row should start with “WS”?

19.03.2020 - 22:38

DROPS Design answered:

Dear Beverly, after casting on, you should knit the first row, according to the first row of the diagram and go from there. However, the side, from which you knitted the first row, will be the wrong side of the sweater, the feather and fan pattren's right side will be on the other side (the right side) of teh sweater. I hope this helps. Happy Knitting!

19.03.2020 - 22:55

country flag Mrs Stephanie Greenside wrote:

Hi, I am not a fan of garter stitch, has anyone tried a seed or moss stitch. I would really have to play with the increases and decreases, using another stitch but I don't know if it is possible with this pattern?

31.12.2019 - 20:04

DROPS Design answered:

Dear Mrs Greenside, except if I'm misunderstanding your question, garter stitch is here used most in the front band edges + bottom of sleeve + in the diagram (this sections in garter stitch shouldn't been removed). Hope this can help. Do not hesitate to contact your DROPS store - even per mail or telephone - for any individual assistance. Happy knitting!

02.01.2020 - 14:13

country flag Leigh wrote:

Hi, please can you tell me if it is possible to make this pattern long sleeve? Thanks a lot Leigh

21.12.2019 - 08:06

DROPS Design answered:

Dear Leigh, Yes, you can make this with long sleeves. to do so, instead of the sleeve edges, you sould knit sleeves, until the underarm, and put them on the needles woth the stotches of the body (where you cast off teh stitches for the armhole) and continue according to the pattern. Be careful to have the sleeves end up with as many stitches as the sleeve edges would, befre putting them together with the other stitches. Happy Knitting!

24.12.2019 - 17:24

country flag Marcia wrote:

Under the Jacket heading, it says to work until you reach 13 3/4 inches for the large size. The bottom has a scalloped edge which measures 1 1/4 inches in depth. So do you measure from the center of the scallop or the beginning/end of the scallop? Thanks.

27.09.2019 - 21:33

DROPS Design answered:

Dear Marcia, measurements are taken from the langest length, along front band stitches, ie at the bottom of scallop. Happy knitting!

30.09.2019 - 08:14

country flag Hanne Bækgård Jensen wrote:

Jeg savner nogle forklaringer til diagrammerne.

26.07.2019 - 17:10

DROPS Design answered:

Hej Hanne, diagramforklaringerne står lige over selve diagrammerne, nederst i opskriften. God fornøjelse!

01.08.2019 - 15:57