
Popular categories
Looking for a yarn?


Comments / Questions (32)
![]() Diane wrote:
Diane wrote:
Bonjour. Ma question, pour allonger les manches et poursuivre le motif sans faire d’augmentation. Comment dois-je faire? Pour le devant/dos je poursuis le rang 3 et 4 ( augmentation tous les 4 tours). ? Merci beaucoup à l’avance. Bonne journée à vous. Diane
15.06.2025 - 16:41DROPS Design answered:
Bonjour Diane, pour continuer le diagramme du point ajouré sans augmenter le nombre de mailles, notez dans le diagramme le dernier rang d'augmentations et tricotez le point ajouré de sorte que chaque jeté sera compensé par 1 diminution, si vous n'avez pas suffisamment de mailles, tricotez alors ces mailles en jersey et non en point fantaisie. Bon tricot!
16.06.2025 - 08:35
![]() Diane wrote:
Diane wrote:
Bonjour à vous: ma question est à la fin du rang 5 A.1A Pour faire le triangle et le jeté (j’ai due emprunter une maille dans le A.1B pour faire les deux mailles ensemble). Est ce que c’était la bonne procédure? Au rang suivant j’ai remis les mailles à leur place respective. C’était la première fois que je voyais ça. Merci beaucoup à vous à l’avance. Bonne fin de journée. Diane
22.05.2025 - 21:07DROPS Design answered:
Bonjour Diane, c'est tout à fait juste ainsi, les 2 dernières mailles de A.1A / A.1B se tricotent avec la 1ère m de A.1B / A.1C, cette maille est désormais la 1ère maille de A.1B/A.1C et le nombre de mailles reste juste car les diminutions ont été compensées par des jetés. Bon tricot!
23.05.2025 - 08:46
![]() Anja Meier wrote:
Anja Meier wrote:
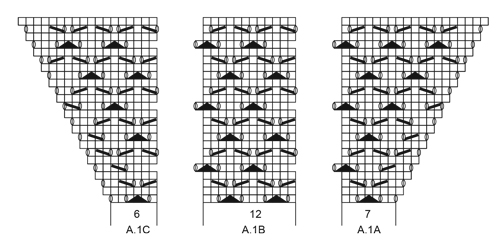
Hallo, habe eine Frage zu den Ärmeln Stricke in xxxl Muss ich rechter Ärmel A1A,A1B,A1C in der Reihenfolge am anfang stricken danach die 52 re Maschen, danach den Ärmel spiegelverkehrt stricken. Also dann A1C,A1B,A1A? An sich sieht das Kleid schön aus. Nur die Anleitung ist sehr schwer zu deuten. Wirft viele Fragen auf
04.03.2024 - 15:16DROPS Design answered:
Liebe Frau Meier, das Lochmuster lesen Sie für beide Ärmel gleich, A.1A zeigt wie das Lochmuster beginnt, A.1B wird dann gestrickt bzw wiederholt, und A.1C zeigt wie das Muster endet, so werden beide Ärmel gleich. Viel Spaß beim Stricken!
04.03.2024 - 15:44
![]() Teresa wrote:
Teresa wrote:
W schemacie A2 między 3. a 4. sekwencją ażuru są dodatkowe dwa rzędy oczek prawych (rzędy 29-32). Tak zrobiłam, nie podobało mi się, po spruciu pomijam 2 rzędy. O ile można wnioskować coś ze zdjęcia, tych rzędów na fotografii nie widać. Czy schemat A2 nie ma błędu?
02.06.2023 - 08:41DROPS Design answered:
Witaj Tereso, faktycznie schemat wydaje się nielogiczny. Zadam pytanie do działu projektów i jeśli w schemacie jest błąd, we wzorze pojawi się korekta. Bardzo dziękuję za zwrócenie uwagi na problem. Dziękujemy za zainteresowanie naszymi wzorami i pozdrawiamy serdecznie!
02.06.2023 - 09:16
![]() Tina wrote:
Tina wrote:
Jeg skjønner ikke hvordan jeg skal øke på bolen. Hvilke masker er det som tilsvarer økningene på bolen? De maskene som er før A.1A er jo til ermene, men hvor skal jeg øke til bolen? Dette var en vanskelig oppskrift.
24.05.2023 - 20:28DROPS Design answered:
Hej Tina, økningen på bolen er kastet som er beskrevet under RAGLAN: ØKNING PÅ HVER 2.OMGANG: Det økes til raglan på hver side av A.1 i hver overgang mellom bol og ermer slik: Start 1 maske før A.1A, lag 1 kast om pinnen, strikk 1 maske rett, strikk A.1A-A.1C (det økes 2 masker til raglan i diagrammene), strikk 1 maske rett, lag 1 kast om pinnen. På neste omgang strikkes kastene rett slik at det blir hull.
25.05.2023 - 07:49
![]() Tove Enid wrote:
Tove Enid wrote:
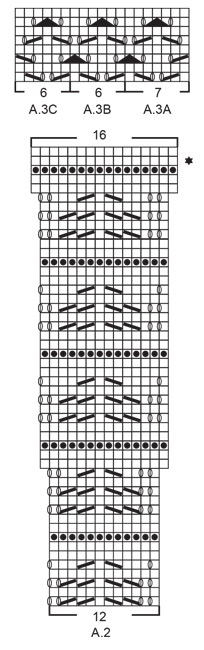
Hei. Jeg oppdaget feil i mønster A.3C og A.3B. A.3C må være på 7 masker og A.3B må være på 5 masker. Hvis ikke stemmer ikke mønsteret. Dermed står det også feil i teksten under BOL. \r\nMed hilsen Tove.
07.07.2022 - 10:16
![]() Grancea Mariana wrote:
Grancea Mariana wrote:
Das KLeid ist Spanisch Sonate.Wenn Sie in der Anleitung ueber dieses Kleid sprechen, sagen Sie,: Jedes Mal, wenn A1A bis A1C x in der Hoehe gestrickt wurden, werden 2 Rapporte mehr von A1B zwischen A.1 A und A1C gestrickt. Bitte, was meinen Sie damit. Ich glaube, dass ich eine erfahrene Strickerin bin, aber dieser Satz weis ich nicht wie ich machen sollte. Koenten Sie mir erkleren ? Mit Vielen Dank im Voraus M.Grancea
13.06.2022 - 17:44DROPS Design answered:
Liebe Frau Grancea, wenn die Diagramme A.1 fertig sind haben Sie 12 Maschen in A.1A und A.1C zugenommen, bei der nächsten Reihe stricken Sie A.1A über die ersten 7 Maschen vorrigen A.1A + A.1B über die letzten Maschen vorrigen A.1A, A.1B wie zuvor und dann A.1B über die ersten 12 Maschen vorrigen A.1C und dann stricken Sie A.1C (= 6 M) über die letzten Maschen vorrigen A.1C, so haben Sie jeweils 1 x A.1B beidseitig gestrickt = 2 Rapporte mehr zwischen A.1A und A.1C. Kann das Ihnen helfen?
14.06.2022 - 08:50
![]() Brigitte Boß wrote:
Brigitte Boß wrote:
Hallo Habe mir zum 2ten Mal alles für das Modell Sonata drops 178-47 bestellt bloss nicht mit drops muskat sondern nach IHRER Empfehlung wegen eines leichteren Garnes drops belle genommen. Jetzt fällt das Teil aber viel viel kleiner aus und davon wurde absolut NICHTS erwähnt. Muss alles wieder aufmachen und weiß nicht was ich jetzt machen soll. Bitte um Antwort würde gern ein Foto senden aber weiss nicht wo. Was kann ich jetzt machen
19.03.2021 - 20:30DROPS Design answered:
Liebe Frau Boß, gerne können Sie dieses Modell mit DROPS Belle stricken, da beide Garne selbe Garngruppe = selbe Maschenprobe haben. Maschenprobe muss aber wie in der Anleitung stimmen, dh 21 M x 28 Reihen glatt rechts = 10 x 10 cm sein - hier lesen Sie mehr über Garnalternativen und hier über Maschenprobe. Senden Sie bitte Fotos Ihrem DROPS Laden, dort wird man Ihnen weiterhelfen. Viel Spaß beim stricken!
22.03.2021 - 07:21
![]() Brigitte Boss wrote:
Brigitte Boss wrote:
Ich brauche ein leichteres weißes Garn für Artikel Nr 178 47 spanish sonata
02.02.2021 - 17:17DROPS Design answered:
Liebe Frau Boss, dieses Kleid wird mit einem Garn der Garngruppe B (Muskat) gestrickt - hier finden Sie unsere Kleider, die mit einem Garn der Garngruppe A (wie Safran, Alpaca,..) gestrickt bzw gehäkelt sind. Viel Spaß beim stricken!
03.02.2021 - 08:21
![]() Michał wrote:
Michał wrote:
Przejrzysty układ informacje zapodane w sposób czytelny
28.08.2020 - 11:01
|
||||||||||||||||||||||
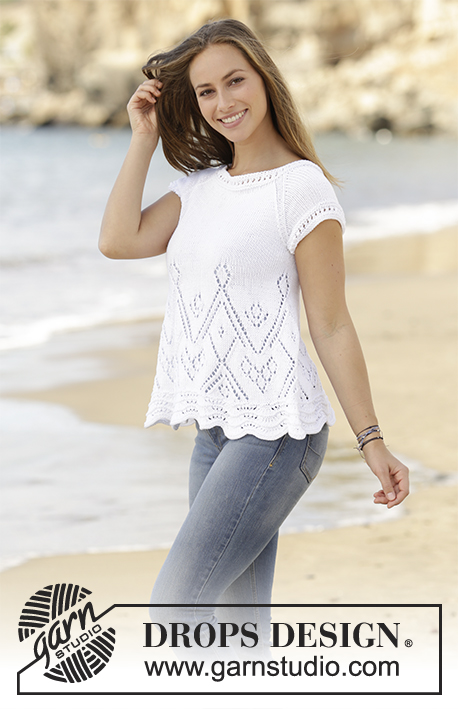
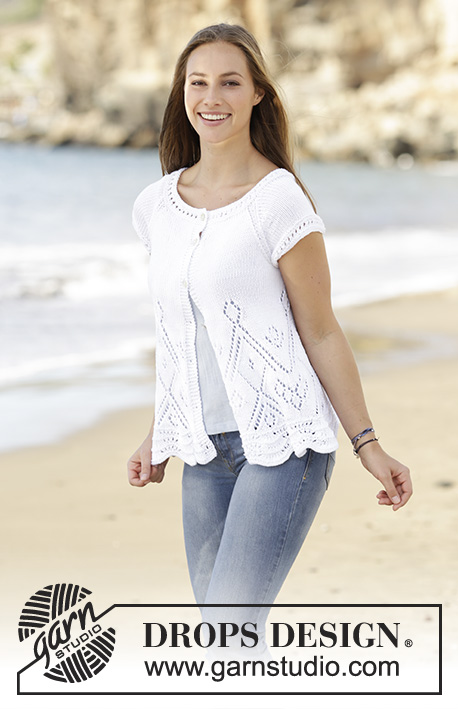
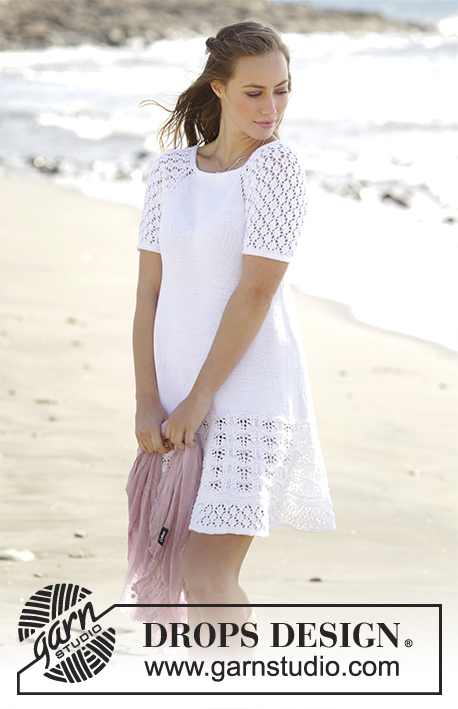
Spanish Sonata#spanishsonatadress |
||||||||||||||||||||||
 |
 |
|||||||||||||||||||||
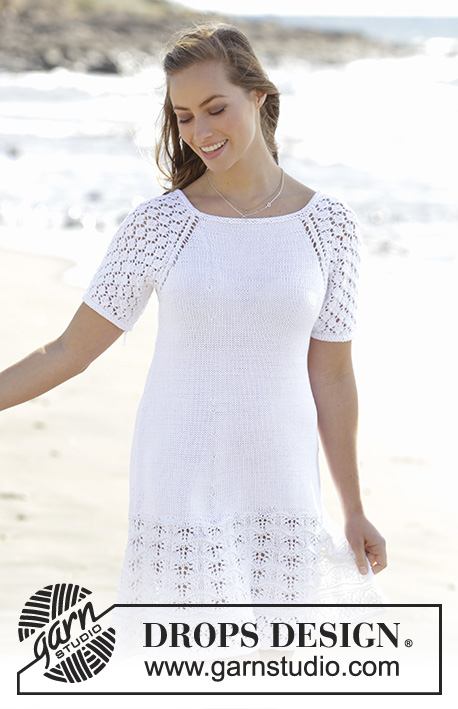
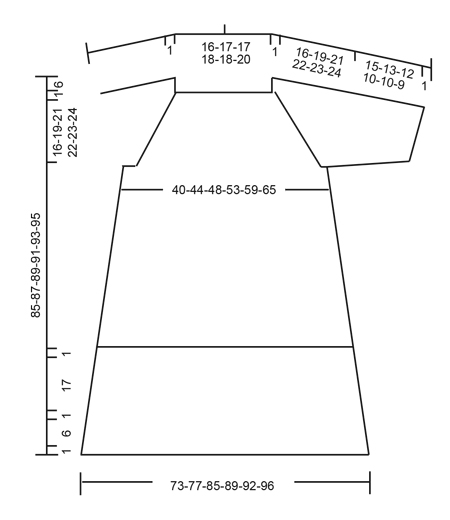
Dress with raglan, A-shape and lace pattern, worked top down in Muskat. Sizes S - XXXL.
DROPS 178-47 |
||||||||||||||||||||||
|
RIDGE/GARTER STITCH (worked in the round): 1 ridge = 2 rounds. Knit 1 round and purl 1 round. PATTERN: See diagrams A.1 to A.3. INCREASE TIP-2: Work as far as 2 stitches before the marker thread in the side, 1 yarn over, knit 4 stitches (the marker sits in the middle of these stitches), 1 yarn over. Repeat in the other side (= 4 stitches increased on the round). On the next round knit the yarn overs twisted to prevent holes. INCREASE TIP-1 (evenly spaced): To work out how to increase evenly along the round, count the total number of stitches on the needle (e.g. 122 stitches) and divide the stitches by the number of increases to be made (e.g. 12) = 10.1. In this example, increase after approx. every 10th stitch. RAGLAN: INCREASE EVERY 2ND ROUND: Increase to raglan on each side of A.1 in each transition between body and sleeves as follows: Start 1 stitch before A.1A, make 1 yarn over, knit 1, work A.1A-A.1C (there are 2 stitches increased to raglan in the diagrams), knit 1, make 1 yarn over. On the next round knit the yarn overs so that there are holes. INCREASE EVERY 4TH ROUND: ROUND 1: Start 1 stitch before A.1A: 1 yarn over, knit 1, work A.1a-A.1c, knit 1, 1 yarn over. Repeat before and after the next A.1a-A.1c. ROUND 2: Knit the yarn overs so that there are holes. ROUND 3: Start 2 stitches before A.1A: Knit 2 stitches together, 1 yarn over, knit 1, work A.1A-A.1C, knit 1, 1 yarn over, slip 1 stitch as if to knit, knit 1, pass the slipped stitch over the knitted stitch – no increase in stitches, but the row of holes is continued as before. Repeat before and after the next A.1A-A.1C. ROUND 4: Knit the yarn overs, there will be holes. DECREASE TIP (for the sleeve): Decrease 2 stitches as follows: Work until there are 4 stitches left before the marker, knit 3 stitches together (= 2 stitches decreased), knit 2 (the marker thread sits in the middle of these stitches), knit 3 stitches twisted together (= 2 stitches decreased). Decrease 1 stitch as follows: Work until there are 3 stitches left before the marker thread, knit 2 stitches together (= 1 stitch decreased), knit 2 (the marker thread sits in the middle of these stitches), slip 1 stitch as if to knit, knit 1, pass the slipped stitch over (= 1 stitch decreased). ---------------------------------------------------------- DRESS: The piece is worked in the round with circular needle from mid back, top down. Cast on 118-122-122-126-126-134 stitches with circular needle size 3,5 mm / US 4 and Muskat. Work 2 RIDGES – see description above, on the next to last round of the ridges increase 12-12-16-16-20-24 stitches evenly along the round – READ INCREASE TIP-1 (evenly spaced) = 130-134-138-142-146-158 stitches. Change to circular needles 4 mm and work pattern as follows: Knit 19-20-21-22-23-26 stitches (= half the back piece), 1 yarn over, knit 1, A.1A (= 7 stitches), A.1B (= 12 stitches), A.1C (= 6 stitches) (= right sleeve), knit 1, 1 yarn over, knit 38-40-42-44-46-52 stitches (= front piece), 1 yarn over, knit 1, A.1A, A.1B, A.1C (= left sleeve), knit 1, 1 yarn over, knit 19-20-21-22-23-26 stitches (= half the back piece). The first increase to RAGLAN – see description above, is now finished = 138-142-146-150-154-166 stitches. From now onwards, the increases on the body and sleeves are different. On the body, you increase every 2nd round a total of 14-16-17-25-32-34 times and then every 4th round 4-5-6-3-0-0 times. On the sleeve, you increase every 2nd round (the increases are shown in diagram A.1) 21-25-28-30-32-34 times. Each time you have completed A.1A to A.1C once in height, continue with 2 more repeats of A.1B between A.1A and A.1C. When you have increased a total of 21-25-28-30-32-34 times on the sleeves and 18-21-23-28-32-34 times on the front and back pieces, there will be 67-75-81-85-89-93 stitches on each sleeve, 76-84-90-102-112-122 stitches on the front and back pieces = 286-318-342-374-402-430 stitches in total. The yoke should now measure 17-20-22-23-24-25 cm / 6¾"-8"-8¾"-9"-9½"-9¾" from the neckline mid front and down. If the measurements are not correct, you need to continue with pattern on the sleeves and stockinette stitch on the front and back pieces until you get the right length. The next round is worked as follows: Knit 38-42-45-51-56-61 stitches (= half the back piece), place the next 67-75-81-85-89-93 stitches on a thread (= sleeve), cast on 8-8-10-10-12-14 new stitches under the sleeve, knit the next 76-84-90-102-112-122 stitches (= front piece), place the next 67-75-81-85-89-93 stitches on a thread (= sleeve), cast on 8-8-10-10-12-14 new stitches under the sleeve, knit the last 38-42-45-51-56-61 stitches (= half the back piece). BODY: There are now 168-184-200-224-248-272 stitches on the body. Continue with stockinette stitch. Insert a marker thread in each side, in the middle of the 8-8-10-10-12-14 new stitches which were cast on under the sleeves. THE PIECE IS NOW MEASURED FROM HERE! When the piece measures 3 cm / 1" increase 1 stitch on each side of each marker thread – READ INCREASE TIP-2! Increase in this way approx. every 6th-7th-6th-7th-10th-15th round, 15-14-16-13-10-7 times = 228-240-264-276-288-300 stitches. Continue with stockinette stitch until the piece measures 36-35-35-36-37-38 cm / 14¼"-13¾"-13¾"-14¼"-14½"-15". Now work 2 ridges. Then work pattern as follows: Work according to diagram A.2 (= 19-20-22-23-24-25 repeats of 12 stitches on the first round). On the next to last round of A.2 (the round with the star) increase 3-5-3-5-1-3 stitches evenly along the round = 307-325-355-373-385-403 stitches on the round. Work 2 ridges. Now work pattern as follows: Work A.3A (= 7 stitches), A.3B (= 6 stitches) until there are 6 stitches left on the round, A.3C (= 6 stitches). When you have completed the whole of diagrams A.3a to A.3c in height, work the repeat one more time in height. Change to circular needle size 3.5 mm / US 4. Work 2 ridges. Change back to circular needle size 4 mm / US 6 and bind off in knit. SLEEVES: Place the stitches from the thread back on double pointed needles size 4 mm / US 6 and knit up 1 stitch in each of the 8-8-10-10-12-14 stitches which were cast on under the sleeve = 75-83-91-95-101-107 stitches. Insert 1 marker thread in the middle of the new stitches = mid under the sleeve. Continue with A.1B, the stitches which do not fit the pattern mid under the sleeve are worked in stockinette stitch. Continue with this pattern. When the piece measures 3 cm / 1" start decreasing under the sleeve – READ DECREASE TIP. Decrease 2 stitches on each side of the marker thread, every 2nd round 0-0-0-4-5-6 times and 1 stitch on each side of the marker thread every 5th-3rd-2nd-2nd-2nd-2nd round 7-10-13-5-4-3 times = 61-63-65-69-73-77 stitches. The stitches that do not fit the pattern under the sleeve are worked in stockinette stitch. When the piece measures 15-13-12-10-10-9 cm / 6"-5"-4¾"-4"-4"-3½" (shorter measurements in the larger sizes due to wider shoulder measurements and longer sleeve cap) change to double pointed needles size 3.5 mm / US 4. Work 2 ridges. Change back to double pointed needles size 4 mm / US 6 and bind off in knit. Work the other sleeve in the same way. |
||||||||||||||||||||||
Diagram explanations |
||||||||||||||||||||||
|
||||||||||||||||||||||
|
||||||||||||||||||||||
|
||||||||||||||||||||||
|
||||||||||||||||||||||
Have you finished this pattern?Tag your pictures with #dropspattern #spanishsonatadress or submit them to the #dropsfan gallery. Do you need help with this pattern?You'll find 26 tutorial videos, a Comments/Questions area and more by visiting the pattern on garnstudio.com. © 1982-2025 DROPS Design A/S. We reserve all rights. This document, including all its sub-sections, has copyrights. Read more about what you can do with our patterns at the bottom of each pattern on our site. |
||||||||||||||||||||||


With over 40 years in knitting and crochet design, DROPS Design offers one of the most extensive collections of free patterns on the internet - translated to 17 languages. As of today we count 314 catalogs and 11822 patterns - 11812 of which are translated into English (US/in).
We work hard to bring you the best knitting and crochet have to offer, inspiration and advice as well as great quality yarns at incredible prices! Would you like to use our patterns for other than personal use? You can read what you are allowed to do in the Copyright text at the bottom of all our patterns. Happy crafting!
Post a comment to pattern DROPS 178-47
We would love to hear what you have to say about this pattern!
If you want to leave a question, please make sure you select the correct category in the form below, to speed up the answering process. Required fields are marked *.