
Popular categories
Looking for a yarn?


Comments / Questions (28)
![]() Jenny Nilsson wrote:
Jenny Nilsson wrote:
Kan det stämma att det vara går åt 100 g garn till detta mönster? Jag har än så länge använt 150 g och har 4 repetitioner kvar av mönstret. Garnet jag använder är 50% bamboo 50% bomull 170 meter/50gram.
31.10.2019 - 10:04DROPS Design answered:
Hej. Garnåtgången är uträknad efter det garn som halsduken är gjord i; DROPS Lace som är 400 m per 50 g. Använder du ett annat garn måste beräkna att du har det antal meter som går åt totalt i det alternativa garnet. Lycka till!
31.10.2019 - 10:54
![]() Agatha wrote:
Agatha wrote:
Huhu. Was bedeutet beim schwarzen Kästchen\" keine Masche Kästchen übersprinhen.. \"? Ich habe ja eine Masche an der Stelle, nehme ich die nur über ohne sie in irgendeiner Form zu stricken? Gruß Agatha
06.10.2019 - 19:15DROPS Design answered:
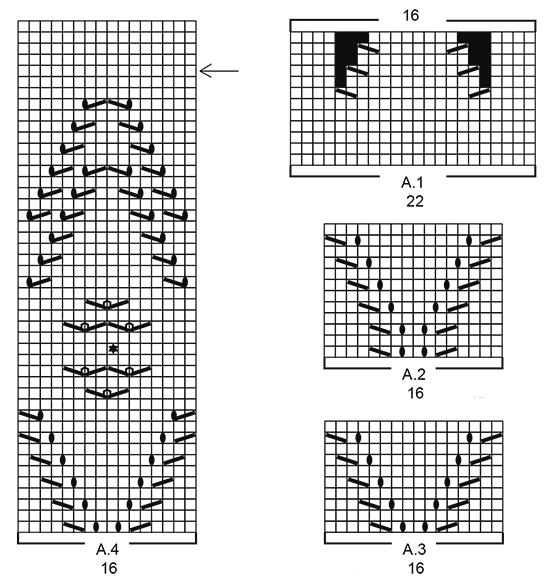
Liebe Agatha, es wird in A.1 abgenommen, bei der nächsten Reihe gibt es dann weniger Maschen = die schwarze Kästchen. Wenn A.1 fertig ist, sind es nur noch 16 M in jedem A.1. Viel Spaß beim stricken!
07.10.2019 - 10:25
![]() Eliabeth wrote:
Eliabeth wrote:
J'arrive à la fin de la première partie et pour éviter un grafting de côtes mousse au milieu, je me demande s'il serait possible de continuer directement la deuxième partie en retournant le motif du diagramme de haut en bas. Est-ce que ça pourrait fonctionner? Merci de votre réponse.
05.10.2019 - 12:10DROPS Design answered:
Bonjour Elisabeth, pour que les deux extrémités de l'écharpe soient bien identiques, il vaut mieux les tricoter en 2 parties, vous pouvez peut-être en revanche ne pas tricoter les côtes mousse et faire votre grafting sur du jersey pour une démarcation moins visible au milieu de l'écharpe. Bon tricot!
07.10.2019 - 08:56
![]() Yolande Bilodeau wrote:
Yolande Bilodeau wrote:
En A.4. à partir de la 13e ligne, il y a 2 diminutions et une seule augmentation... Aux lignes 15 et 19, il y a toujours plus de diminutions que de jetées... Est-ce normal? Merci
06.07.2019 - 22:43DROPS Design answered:
Bonjour Mme Bilodeau, le nombre de mailles doit rester le même sur chacun de ces rangs, par ex. au rang 13, on diminue 1 m, on fait 3 jetés, et on diminue 1 m = on a diminué 2 mailles et augmenté 3 mailles, mais dans ces 3 jettés d'augmentation, on lâche le 3ème au rang 14 = il reste bien 2 augmentations pour 2 diminutions, le nombre de mailles reste le même. N'hésitez pas à bien placer des marqueurs entre chaque A.4 à tricoter, vous pourrez ainsi mieux vérifier votre nombre de mailles. Bon tricot!
08.07.2019 - 09:19
![]() Desiree wrote:
Desiree wrote:
Goedendag, in het patroon gedeelte van A.2 begint het onderaan met 2 x hetzelfde stukje patroon. Door het samen breien van de steken komt dit niet uit met het aantal steken technisch. Klopt het dat A.2 een regel te veel heeft? Het is de eerste keer dat ik zo iets brei, en dat ik het niet snap misschien. Alvast dankjewel :)
13.06.2019 - 20:46DROPS Design answered:
Dag Desiree,
Je breit A.2 een aantal keren in de breedte en 1 keer in de hoogte. Het aantal steken op de naald blijft hetzelfde, doordat het samenbreien gecompenseerd wordt door de omslagen. De derde naald van A.2 is inderdaad exact hetzelfde als de eerste naald, dus de gaatjes komen boven elkaar.
23.06.2019 - 20:41
![]() Isabella Lederer wrote:
Isabella Lederer wrote:
Guten Tag Ein wunderschöner Schal. Meine Frage ist wieso strickt man 2 teile und nicht gleich die ganze Länge am Stück? Ich habe wahrscheinlich einen Denkfehler aber bitte helfen Sie mit den zu lösen ;) vielen Dank
22.02.2019 - 09:10DROPS Design answered:
Liebe Frau Lederer, die beiden Teile werden beide von der kürzen Seite angefangen, damit die kürzer Seite gleich sind, dann werden die beiden Teilen zusammen genäht. Viel Spaß beim stricken!
22.02.2019 - 09:18
![]() Christelle wrote:
Christelle wrote:
Bonjour j ai fait a1 et j ai 106 mailles ??? Faut il le faire qu une fois? Merci
13.09.2018 - 12:49DROPS Design answered:
Bonjour Christelle, on diminue 6 m dans chaque A.1; comme on répète 5 fois A.1 en largeur, on va diminuer 5 x 6 m = 30 mailles au total quand A.1 est terminé, on avait 116 m - 30= il doit vous rester 86 mailles. Bon tricot!
13.09.2018 - 13:19
![]() VIVIANE wrote:
VIVIANE wrote:
Bonjour, merci pour votre tutoriel. Je suis habituée à réaliser des écharpes en dentelles et je cherche de nouveaux modèles. Je ne comprends pourquoi le modèle se fait en 2 parties, à assembler. En fait ma question est : ne peut-on le faire en une seule partie, sans faire d'assemblage ? Je vous remercie pour votre attention.
08.04.2018 - 16:18DROPS Design answered:
Bonjour Viviane, ce modèle se réalise en 2 parties pour que les extrémités soient identiques, et ces 2 parties seront ensuite assemblées entre elles (en grafting pour un assemblage plus invisible, c'est-à-dire sans rabattre les mailles à la fin de chacune de ces 2 parties). Bon tricot!
09.04.2018 - 10:37
![]() Ingeborg Gruber wrote:
Ingeborg Gruber wrote:
Der Musterbeginn A1 mit Abnahme von 30 M nach dem Bündchen ist mir nicht schlüssig. Soll der Schal dadurch Wellen schlagen?
26.02.2018 - 15:46DROPS Design answered:
Liebe Frau Gruber, in jedem A.1 werden 2 Maschen bei der 7., 9. und 11. Reihe abgenommen, dh bei der letzte Reihe in A.1 bleiben 16 M = 5 x 6 Abnahmen in jedem Rapport = 30 Abnahme nach A.1. Viel Spaß beim stricken!
26.02.2018 - 15:53
![]() ANNICK LE BOEDEC wrote:
ANNICK LE BOEDEC wrote:
Bonjour, je commence le modèle sea hug 177-30 sur le diagramme A.1 il y a des cases noires qui sont indiquées "pas de maille, sauter cette case" je ne comprends pas bien car des mailles il y en a !!! : faut-il passer les mailles sans les tricoler ?? merci pour vos explications
02.12.2017 - 11:19DROPS Design answered:
Bonjour Mme Le Boedec, au rang 7 de A.1, vous avez diminué 2 mailles, au rang suivant, il restera 2 m en moins, ces mailles diminuées sont marquées par une case noire. Ainsi, au dernier rang de A.1, vous avez diminué 6 m au total, et on retrouve ces 6 cases noires = 6 diminutions. Bon tricot!
04.12.2017 - 09:14
|
||||||||||||||||||||||
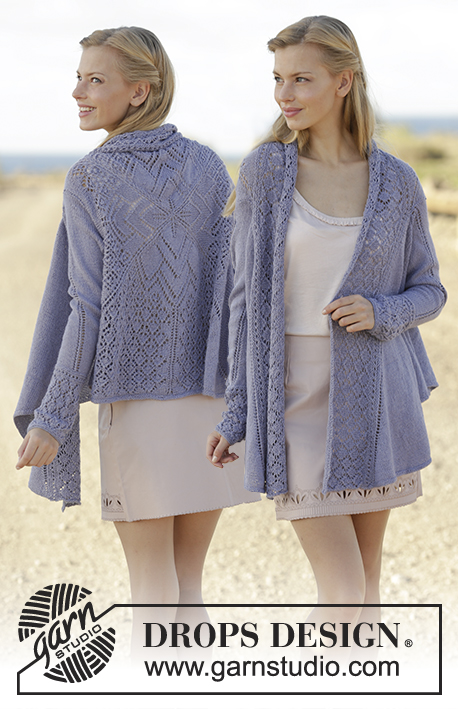
Sea Hug#seahugshawl |
||||||||||||||||||||||
|
|
||||||||||||||||||||||
Knitted scarf with lace pattern in DROPS Lace.
DROPS 177-30 |
||||||||||||||||||||||
|
KNITTING GAUGE: The scarf will be soaked and stretched to size afterwards. The knitting gauge is therefore not that important, but to get a sense of whether you are knitting to loose/hard work a test in stockinette stitch on needle size 3 mm / US 2.5. The test should give approx. 24 stitches and 32 rows = 10 cm / 4" in width and 10 cm / 4" vertically. GARTER STITCH (back and forth): 1 ridge = knit 2 rows. PATTERN: See diagrams A.1 to A.4. Diagrams show all rows in pattern seen from the right side. SHAPING: When using another yarn from yarn group A, there is no need to stretch to measurements, but place it gently out in shape and leave to dry. Repeat the process when the scarf has been washed. ---------------------------------------------------------- SCARF: Worked in 2 parts that are sewn together in the middle. PART 1: Cast on 116 stitches on 2 circular needles size 3 mm / US 2.5 with Lace. Pull out one circular needle (cast-on is done like this to avoid a tight cast-on edge). Work 2 ridges in GARTER STITCH - see explanation above. Work next row as follows from the right side: 3 edge stitches in garter stitch, work A.1 over the next 110 stitches (= 5 repetitions of 22 stitches), finish with 3 edge stitches in garter stitch. Continue pattern like this. When A.1 has been worked 1 time vertically, there are 86 stitches on row. * Work next row as follows from right side: 3 edge stitches in garter stitch, work A.2 over the next 80 stitches (= 5 repetitions of 16 stitches), finish with 3 edge stitches in garter stitch. Continue pattern like this. When A.2 has been worked 1 time vertically, work A.3 the same way. When A.3 has been worked 2 times vertically, work A.4 the same way *. After A.4 repeat from *-* 3 more times (= 4 repetitions in total) but finish last repetition after row marked with arrow in diagram. Work 2 ridges in garter stitch, slip stitches on 1 stitch holder or LOOSELY bind off by knitting from right side. PART 2: Work as part 1. ASSEMBLY: Sew the two part tog in the middle with grafting/kitchener stitches (if stitches have been bind off sew together inside bind-off edge). BLOCKING: Place the scarf in lukewarm water until it is soaking wet. Carefully squeeze out the water - do not twist. Roll the scarf in a towel and squeeze to remove more water - the scarf will now only be moist. Place the scarf on a carpet or mattress - carefully stretch it out to size and fasten it with pins. Leave to dry. Repeat the process when the piece has been washed. NOTE: If another yarn in yarn group A has been used - READ SHAPING! |
||||||||||||||||||||||
Diagram explanations |
||||||||||||||||||||||
|
||||||||||||||||||||||
 |
||||||||||||||||||||||
Have you finished this pattern?Tag your pictures with #dropspattern #seahugshawl or submit them to the #dropsfan gallery. Do you need help with this pattern?You'll find 21 tutorial videos, a Comments/Questions area and more by visiting the pattern on garnstudio.com. © 1982-2026 DROPS Design A/S. We reserve all rights. This document, including all its sub-sections, has copyrights. Read more about what you can do with our patterns at the bottom of each pattern on our site. |
||||||||||||||||||||||


With over 40 years in knitting and crochet design, DROPS Design offers one of the most extensive collections of free patterns on the internet - translated to 17 languages. As of today we count 325 catalogs and 12298 patterns - 12288 of which are translated into English (US/in).
We work hard to bring you the best knitting and crochet have to offer, inspiration and advice as well as great quality yarns at incredible prices! Would you like to use our patterns for other than personal use? You can read what you are allowed to do in the Copyright text at the bottom of all our patterns. Happy crafting!
Post a comment to pattern DROPS 177-30
We would love to hear what you have to say about this pattern!
If you want to leave a question, please make sure you select the correct category in the form below, to speed up the answering process. Required fields are marked *.