
Popular categories
Looking for a yarn?


Comments / Questions (70)
![]() Pernilla wrote:
Pernilla wrote:
Hej! Jag har köpt ett mönster av er som jag är lite osäker på... Drops 174/22 Bild A1 är det som jag undrar över.. Ska man först sticka et varv räta hela varvet sen avig,rät, avig,avig, rät osv och sen ett helt varv rät igen o fortsätta så eller är det bara avig, rät, avig, avig, rät som gäller hela tiden resten av mönstret? Tacksam för svar! MVH Pernilla
11.10.2017 - 13:23DROPS Design answered:
Hej Pernilla, första varvet stickas rät, nästa varvet stickas; avig, rät, avig, avig, rät osv, 3:e (5:e, 7:e osv) varvet stickas rät igen. Lycka till!
12.10.2017 - 13:15
![]() Jorunn Sola wrote:
Jorunn Sola wrote:
Hei Jeg har strikket 2 voksne gensere i dette mønsteret og er veldig fornøyd. Er det mulig og få oppskrift i str. 4 år og 9 mnd? Mvh Jorunn Sola
08.07.2017 - 21:27DROPS Design answered:
Hei Jorunn. Så fint å høre at du likte dette mønstret. Jeg har formidlet ditt ønske videre til design avdelingen.
10.07.2017 - 07:15
![]() Vigi wrote:
Vigi wrote:
Bonjour et merci pour votre réponse. J'ai à nouveau un petit souci. Je ne sais comment relever les 5 mailles pour le devant gauche. Sur quoi je me base ?? Un grand merci.
19.06.2017 - 19:46DROPS Design answered:
Bonjour Vigi, on va relever les 5 mailles sur l'envers comme on le fait dans cette vidéo. Bon tricot!
20.06.2017 - 08:21
![]() Vigi wrote:
Vigi wrote:
Bonjour, je ne comprends pas comment faire pour le devant à partir de 54 cm. Le devant droit est le côté droit quand on porte le pull ou quand on le regarde en face ? De plus les diminutions emmanchures sont finies depuis longtemps...!? Merci d'avance
16.06.2017 - 08:41DROPS Design answered:
Bonjour Vigi, à 54 cm gardez sur l'aiguille uniquement les mailles du devant gauche (= quand on le porte = sur le côté droit, vu sur l'endroit): les mailles jusqu'au marqueur + celle avec le marqueur et 1 m après le marqueur et tricote ces mailles avec 5 m point mousse côté encolure et A.1 comme avant sur les autres mailles. Il est possible que dans votre taille les emmanchures soient terminées, diminuez alors simplement pour l'encolure comme indiqué. Pour le devant droit, glissez les mailles en attente (= à gauche, vu sur l'endroit), relevez 5 m derrière la bordure du devant gauche et tricotez les mailles restantes. Bon tricot!
16.06.2017 - 09:06
![]() Nina Wiebe wrote:
Nina Wiebe wrote:
Armausschnitte besser erklärt laut Fachgeschäft: am Anfang jeder Reihe 2 M abketten, dann bis zur letzten M normal stricken, umdrehen, wieder 2M abketten usw - 2x5 = 10x. Neue Frage. Im Muster sind viel mehr Reihen zu stricken um auf auf gleiche Höhe zu kommen wie in glatt re. Trotzdem werden die Abnahmen beim Pullover u Ärmel gleich gemacht. Warum?
16.05.2017 - 19:05DROPS Design answered:
Liebe Frau Wiebe, beim Armausschnitt (Rücken- und Vorderteil) wird keine Masche abgekettet sondern wie unter ABNAHMETIPP ARMAUSSCHNITT abgenommen (= 1 M insgesamt 6x in der 1. Größe) - Nur bei dem Armkugel werden Sie Maschen abketten. Viel Spaß beim stricken!
17.05.2017 - 08:50
![]() Nina Wiebe wrote:
Nina Wiebe wrote:
Immer noch das Problem mit den Armausschnitten. Ich habe die Abnahmen am Ärmel mit denen am Vorder- und Rückenteil verglichen und kann mir auch nicht vorstellen wie das passen soll. Kann ich den Pullover auf isländische Art fertig stricken d.h. ab unter Arm Höhe alles auf 1 Nadel und mit "Raglan"Abnahmen 4x jede zweite Runde hoch stricken? Mein Mann ist der V-Ausschnitt sowieso zu weit, ich mache einen Rundhalsausschnitt. Lg
06.05.2017 - 10:12DROPS Design answered:
Liebe Frau Wiebe, Sie dürfen immer die Anleitung anpassen, wie Sie lieber haben. Unten finden Sie wie man die Abnahmen für die Ärmel stricken soll. Für einen Raglan werden Sie mit Hilfe von einem anderen Modell anpassen. Viel Spaß beim stricken!
08.05.2017 - 10:23
![]() Nina Wiebe wrote:
Nina Wiebe wrote:
Hallo, ich bin dabei den ersten Ärmel zu stricken und bin an dem Punkt wo 6M an der unteren Ärmelmitte abgekettet werden und nun hin und zurück gestrickt wird. Ich verstehe nicht wie die Annahmen zu machen sind. Ich stricke Größe S. Können Sie das detaillierter erklären?
05.05.2017 - 19:47DROPS Design answered:
Liebe Frau Wiebe, wenn die 6M an der unteren Ärmelmitte abgekettet sind, stricken Sie in Hin- und Rück-R weiter, gleichzeitig am Anfang jeder Reihe auf beiden Seiten so abketten: 2 M 5x, 1 M 2 x, dann 2 M beidseitig abketten, bis die Ärmel 63 cm misst, dann 3 M 1 x beidseitig und dann die restlichen Maschen abketten. Viel Spaß beim stricken!
08.05.2017 - 09:46
![]() Britta wrote:
Britta wrote:
Die Anleitung für den Kragen ist falsch. Wenn Sie für das linke Vorderteil 4 Maschen vom rechten dazu nehmen, fehlen diese beim rechten Vorderteil. Somit sind entweder 4 Abnahmen weniger möglich oder es bleiben für die Schulter 4 Maschen weniger. Es muss heißen: 2 Maschen nach dem Markierer . Wenn dann 5 Maschen für das rechte Vorderteil aufgenommen werden, stimmt es wieder. Alles eine Frage der Logik... :) Insgesamt ein wunderschöner Pullover.
20.02.2017 - 09:25DROPS Design answered:
Liebe Britta, eine Korrektur wird gemacht, es wird nur 2 M nach dem Markierer gestrickt, und die Abnahmen für Neck werden auch korrigiert. Viel Spaß beim stricken!
22.02.2017 - 09:50
![]() Jeanette Matzau wrote:
Jeanette Matzau wrote:
Hei - har du et problem med denne oppskrift så bare si ifra :) alt ser helt ok ut
29.12.2016 - 20:30Anny wrote:
Please check that the pattern for knitting. Thank you.
06.12.2016 - 08:18
|
|||||||
Riley#rileysweater |
|||||||
 |
 |
||||||
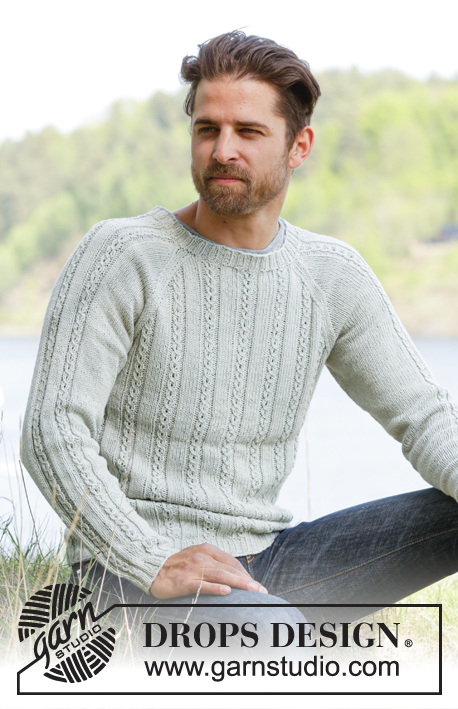
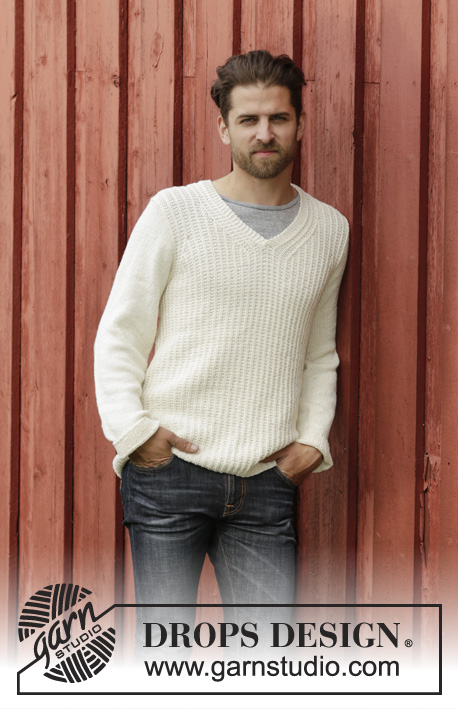
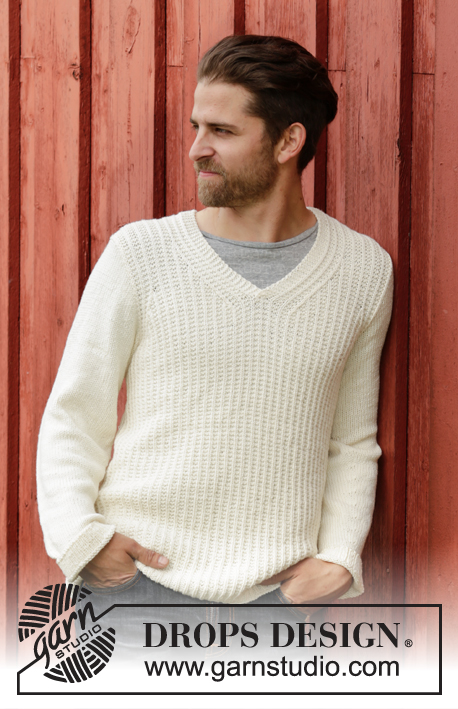
Knitted DROPS men’s jumper with textured pattern and V-neck in Cotton Merino. Size: S - XXXL.
DROPS 174-22 |
|||||||
|
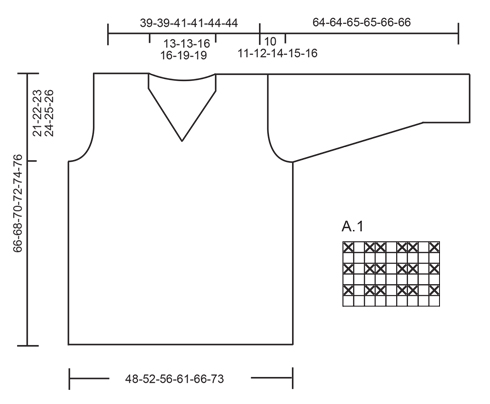
GARTER ST (in the round on circular needle): * K 1 round and P 1 round *, repeat from *-*. 1 ridge = 2 rounds. PATTERN: See diagram A.1. DECREASE TIP ARMHOLE: Dec inside 7 sts in each side. Dec at beg of row as follows: Work 7 sts as before, slip 1 st as if to K, K next st, psso. Dec at end of row as follows: Work until 9 sts remain, K the next 2 tog, work the last 7 sts as before. DECREASE TIP NECK: All dec are done from RS. Dec inside 11 sts in each side. Dec as follows before band (left front piece). Work until 13 sts remain, K the next 2 tog, work the last 11 sts as before. Dec as follows after band (right front piece). Work 11 sts as before (= band st + 6 sts pattern), slip next st as if to K, K 1, psso. ---------------------------------------------------------- JUMPER: Worked in the round on circular needle. Cast on 198-222-234-258-282-306 sts on circular needle size 3.5 mm / US 4 with Cotton Merino. K 1 round, on next round work rib over all sts as follows: P 1, * K 1, P 2 *, repeat from *-* the entire round and finish with K 1 and P 1. Work rib for 4 cm / 1½". Switch to circular needle size 4 mm / US 6 and work A.1 over all sts. When piece measures 45-46-47-48-49-50 cm / 17¾"-18"-18½"-19"-19¼"-19¾", bind off for armholes in each side as follows: bind off the first 3-3-3-6-6-6 sts, work 93-105-111-117-129-141 sts, bind off the next 6-6-6-12-12-12 sts, work 93-105-111-117-129-141 sts, bind off the last 3-3-3-6-6-6 sts. Finish front and back piece separately. BACK PIECE: = 93-105-111-117-129-141 sts. Continue with A.1 as before. AT THE SAME TIME on next row from RS continue bind off for armholes in each side - dec 1 st in each side every other row 6-12-12-15-18-24 times in total – READ DECREASE TIP ARMHOLE! = 81-81-87-87-93-93 sts. When piece measures 62-64-66-68-70-72 cm / 24⅜"-25¼"-26"-26¾"-27½"-28⅜", work in garter st over the middle 35-35-41-41-47-47 sts, continue the remaining sts in pattern. When piece measures 64-66-68-70-72-74 cm / 25¼"-26"-26¾"-27½"-28⅜"-29⅛", bind off the middle 25-25-31-31-37-37 sts for neck = 28 sts remain on each shoulder in all sizes. Bind off when piece measures 66-68-70-72-74-76 cm / 26"-26¾"-27½"-28⅜"-29⅛"-30". FRONT PIECE: = 93-105-111-117-129-141 sts. Insert a marker in the middle st. Continue to dec for armholes as on back piece. When piece measures 54-56-55-55-57-59 cm / 21¼"-22"-21½"-21½"-22½"-23¼", keep sts until marker, st with marker and 2 sts after marker on needle, slip the remaining sts on a stitch holder. Now work in GARTER ST – see explanation above, over 5 sts towards mid front (= band), continue with A.1 over the remaining sts as before. Continue with bind off for armhole, AT THE SAME TIME dec for neck as follows - READ DECREASE TIP NECK: Dec on every other row 15-15-18-18-21-21 times in total. After all bind off for armhole and neck, 28 sts remain on shoulder in all sizes. Bind off when piece measures 66-68-70-72-74-76 cm / 26"-26¾"-27½"-28⅜"-29⅛"-30". RIGHT FRONT PIECE: Slip sts from stitch holder back on needle and pick up 5 sts in garter st at the back of band on left front piece. Work as left front piece. SLEEVE: Worked in the round on double pointed needles. Cast on 54-57-60-60-63-66 sts on double pointed needles size 3.5 mm / US 4 with Cotton Merino. Insert 1 marker at the beg of round. K 1 round, then work rib = K 1/P 2. When piece measures 4 cm / 1½", switch to double pointed needle size 4 mm / US 6, continue with stockinette st, on 1st rnd with stockinette st dec 4-5-6-4-5-6 sts evenly = 50-52-54-56-58-60 sts on round. When piece measures 8 cm / 3⅛", inc 1 st on each side of marker. Inc every 4½-3-2½-2-2-1½ cm / 1¾"-1"-⅞"-¾"-¾"-½" 8-11-12-18-20-22 times in total, then inc every 2 cm / ¾" 5-5-5-0-0-0 times = 76-84-88-92-98-104 sts. When piece measures 54-53-53-51-51-50 cm / 21¼"-21"-21"-20"-20"-19¾" (shorter measurements in the larger sizes because of longer sleeve cap and wider shoulders), bind off 6 sts mid under sleeve (= 3 sts on each side of marker) and work sleeve back and forth on circular needle until finished measurements. Bind off for sleeve cap at beg of every row in each side: bind off 2 sts 5 times and 1 st 2-3-5-6-9-10 times, then bind off 2 sts in each side until piece measures 63-63-64-64-65-65 cm / 24¾"-24¾"-25¼"-25¼"-25½"-25½", then bind off 3 sts 1 time in each side. Bind off the remaining sts, piece measures approx. 64-64-65-65-66-66 cm / 25¼"-25¼"-25½"-25½"-26"-26". Make another sleeve. ASSEMBLY: Sew the shoulder seams. Sew in sleeves. |
|||||||
Diagram explanations |
|||||||
|
|||||||
 |
|||||||
Have you finished this pattern?Tag your pictures with #dropspattern #rileysweater or submit them to the #dropsfan gallery. Do you need help with this pattern?You'll find 20 tutorial videos, a Comments/Questions area and more by visiting the pattern on garnstudio.com. © 1982-2026 DROPS Design A/S. We reserve all rights. This document, including all its sub-sections, has copyrights. Read more about what you can do with our patterns at the bottom of each pattern on our site. |
|||||||


With over 40 years in knitting and crochet design, DROPS Design offers one of the most extensive collections of free patterns on the internet - translated to 17 languages. As of today we count 324 catalogs and 12291 patterns - 12281 of which are translated into English (US/in).
We work hard to bring you the best knitting and crochet have to offer, inspiration and advice as well as great quality yarns at incredible prices! Would you like to use our patterns for other than personal use? You can read what you are allowed to do in the Copyright text at the bottom of all our patterns. Happy crafting!
Post a comment to pattern DROPS 174-22
We would love to hear what you have to say about this pattern!
If you want to leave a question, please make sure you select the correct category in the form below, to speed up the answering process. Required fields are marked *.