
Popular categories
Looking for a yarn?


Comments / Questions (12)
![]() Kathy Jellow wrote:
Kathy Jellow wrote:
How is the bottom of the basket made when all the stitching is in the round?
06.12.2025 - 01:00DROPS Design answered:
Dear Mrs Jellow, the bottom is worked from the middle, casting on 8 sts and increasing as explained every other round to make the circle always larger, see for example how we work a square in the round in this video; the only difference is that the increases will be made differently to get a circle instead of a square. Happy knitting!
08.12.2025 - 07:57
![]() Lise wrote:
Lise wrote:
Ferdig med 6 omg. Nå skal jeg gjenta 5 og 6 omgang. I oppskriften står det gjenta 5 og 6 omgang, men for hver gang det økes skal det være 1 m mer mellom økningene. Den skjønte jeg ikke 🙈🤔. Skal jeg øke etter hver 3 m eller... Sikkert et dumt spørsmål...
15.03.2025 - 20:10DROPS Design answered:
Hej Lise, på 6.omgang har du 3 ret, 1 kast. På 8.omgang har du 4 ret, 1 kast, på 10.omgang har du 5 ret, 1 kast osv :)
20.03.2025 - 14:09
![]() Terresa wrote:
Terresa wrote:
I have followed pattern and re-knitted it 4 times but get a wrong count after last increase row. Pattern states I should have 112 stitches on needle before increasing by 13 stitches. I consistently have 98 or 130 stitches. I can't figure out what I'm doing wrong. Please help!
03.02.2022 - 02:42DROPS Design answered:
Dear Teresa, you should increase 8 sts on every other round, ie on 8th round work (K4, YO)x8 times around, on 10th round (K5,YO), on 12th round (K6,YO), on 14th round (K7, YO), on 16th round (K8, YO), on 18th round (K9,YO), and so on until you work 26th round (K13, YO)x8=112 sts. Hope it will help. Happy knitting!
03.02.2022 - 08:52
![]() Celine Francoeur wrote:
Celine Francoeur wrote:
Bonjour je ne vois pas d'instructions pour l'assemblage??? comment assembler le panier...couture ?
03.07.2021 - 17:07DROPS Design answered:
Bonjour Mme Francoeur, il n'y a pas d'assemblage car ce panier se tricote en rond à partir du milieu du fond (= on monte 8 m et on va augmenter tous les 2 tours jusqu'au diamètre souhaité), puis on tricote "droit" = sans augmenter en jacquard. Si vous voulez adapter ce modèle sur aiguilles droites, cette leçon pourra vous aider. Bon tricot!
05.07.2021 - 07:40
![]() Hetty Stok wrote:
Hetty Stok wrote:
When the pattern indicates to increase 13 stitches evenly across 112 stitches, what is the preferred technique of the increase stitch? Is it a ‘yo’? Or something else?
11.10.2020 - 03:02DROPS Design answered:
Dear Hetty, increases could be done as either yarnovers that are knitted twisted in the next row, or as make one (in which you pill up the yarn between two stitch of teh previous roow, put it on the left needle twosted and knit it. I hope this helps. Happy Knitting!
12.10.2020 - 03:07
![]() Dagmar wrote:
Dagmar wrote:
Hallihallo, ich habe versehentlich zu lang rund gestrickt und habe jetzt für den Boden zu viele Maschen auf der Nadel. Ich überlege nun, den Durchmesser um 25 Maschen zu erhöhen, um dann das Muster immer einmal mehr zu stricken. Können Sie mir sagen, ob die genannte Wollmenge trotzdem reichen würde, oder wieviel Wolle ich von jeder Farbe nachkaufen muss? Vielen Dank für Eure Antwort! Gruss Dagmar
07.12.2018 - 13:22DROPS Design answered:
Liebe Dagmar, leider können wir nicht alle Anleitung nach jeder Anfrange kalkulieren nor anpassen. Nehmen Sie bitte Kontakt mit Ihrem DROPS Laden auf, gerne werden sie Ihnen weiterhelfen -auch telefonisch oder per E-mail. Viel Spaß beim stricken!
07.12.2018 - 14:39
![]() Marita wrote:
Marita wrote:
Hvor stor i diameter blir selve bunnen, når man har oppnådd 125m tilsammen på pinnen...? Jeg fikk den bare til å bli 26cm, men i mønsteret står d ca 36cm før toving 🙈. Ca hvor mange omganger blir det før oppnådd antall masker? Jeg gjør noe feil her, siden bunnen blir så knapp.. 🙈Og hva menes med: ...men for hver gang det økes, blir det 1 m mer mellom økningene...? Skal jeg øke noe ITILLEGG til kastene? Hilsen en fersking 🥴
30.11.2018 - 00:43DROPS Design answered:
Hei Marita. Du øker 8 masker på hver omgang med øking, så du må strikke 13 økeomganger for å få 112 masker på pinnen. Siden annenhver omgang er uten øking har du strikket 26 omganger, 27 med den omgangen du øker de siset 13 maskene. Siden du strikker rundt vil det si 27 omganger fra midten og ut = 54 omganger tvers over hele. Med strikkefasthet på 15 rader i høyden = 10 cm blir dette 36 cm. Kan det være du ikke overholder strikkefastheten? Det er veldig viktig for at målene skal bli riktige. 1 maske mer mellom hvert kast betyr at du strikker: 6 omg: 3 rett, 1 kast. 8 omg:4 rett, 1 kast, 10 omg: 5 rett, 1 kast osv. God fornøyelse.
30.11.2018 - 08:48
![]() Nora wrote:
Nora wrote:
Thanks for reply! I ended up tumble drying it.....pretty good result now, but the pattern area did shrink more than plain knit. But the basket is beautiful and I will try again.....thanks Drops. Only discovered Drops this year....and am loving knitting and crocheting again, your yarns and patterns are the best!
27.10.2017 - 08:46
![]() Nora wrote:
Nora wrote:
My basket has not shrunk! It has felted a bit on the base but is all floppy......so disappointed. Made in Eskimo. Any help appreciated!
26.10.2017 - 14:28DROPS Design answered:
Dear Nora, Eskimo is a great yarn for felting, make sure you followed all the steps for felting - see here and make sure you used a "normal" wash program. Your DROPS store will help you if you have any further questions. Happy knitting!
26.10.2017 - 15:22
![]() Barbara wrote:
Barbara wrote:
Pur avendo seguito fedelmente le istruzioni, uno dei due colori, quello del fondo, non sarà sufficiente per finire la seconda parte del motivo. Dovró procurarmi il quarto gomitolo.
12.12.2016 - 00:25DROPS Design answered:
Buongiorno Barbara. Trasmettiamo la sua osservazione al settore design. La ringraziamo e buon lavoro!
12.12.2016 - 06:39
|
|||||||
Holiday Project |
|||||||
 |
 |
||||||
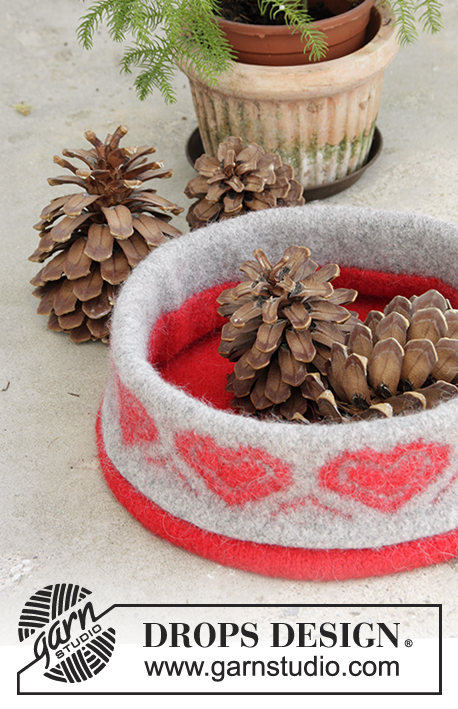
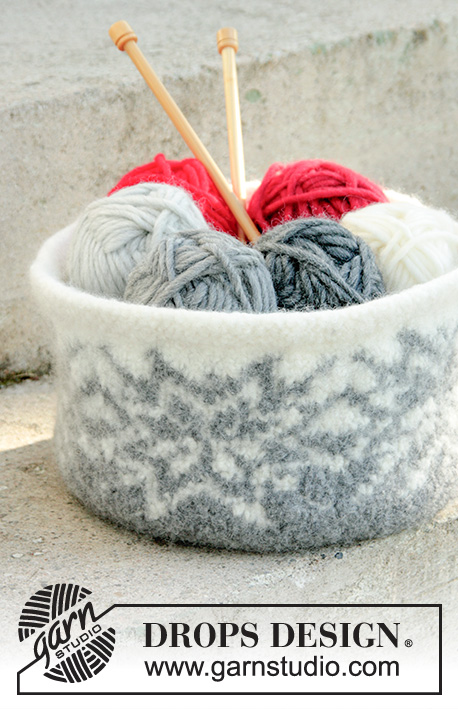
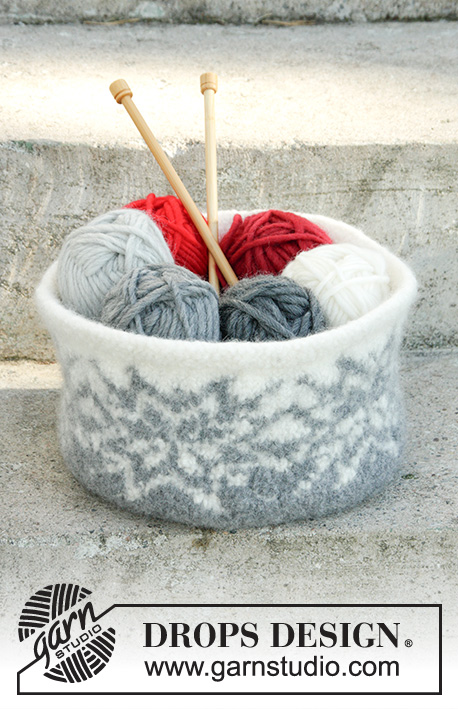
Knitted and felted basket with multi-coloured star pattern in DROPS Snow. Theme: Christmas
DROPS Extra 0-1332 |
|||||||
|
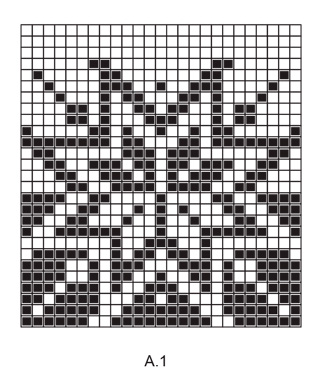
GARTER ST (worked in the round): 1 ridge = 2 rounds. * K 1 round and P 1 round *, repeat from *-*. PATTERN: See diagram A.1. Work all sts in stockinette st. ---------------------------------------------------------- BASKET: Worked in the round. Cast on 8 sts on double pointed needles size 8 mm / US 11 with medium gray. ROUND 1: K all sts. ROUND 2: * K 1, 1 YO *, repeat from *-*. ROUND 3: K all sts - K the YOs twisted (i.e. work in the back loop of sts instead of front) to avoid holes (= 16 sts). ROUND 4: * K 2, 1 YO *, repeat from *-*. ROUND 5: As 3rd round (= 24 sts). ROUND 6: * K 3, 1 YO *, repeat from *-*. REMEMBER THE KNITTING GAUGE Repeat 5th and 6th round but on every inc there is 1 st more between inc (switch to circular needle when needed). When there are 112 sts on needle, K 1 round while inc 13 sts evenly = 125 sts. The bottom is now done. P 1 round. Now measure the piece from here. Work in stockinette st in the round until piece measures 4 cm / 1½". Now work A.1 (= 25 sts) 5 times on round. When entire diagram has been worked vertically, work 2 ridges in GARTER ST - see explanation above, with off white. Loosely bind off - make sure that the bind-off edge is not too tight. FELTING: The piece can be felted either in the washing machine or the tumble dryer – read description below. Remember: Subsequent washes are as for a normal wool garment. IN WASHING MACHINE: Washing machines will vary when felting. If the piece is not felted enough, it can be felted again. If it is felted too much, it can be stretched to the correct size while still wet. DO THE FOLLOWING: Lay the piece in the washing machine, using a programme of approx. 40 minutes (not a wool programme). Wash at 40 degrees C (104 degrees F) without pre-wash, detergent is optional. After washing, shape the piece while it is still wet. IN TUMBLE DRYER: Felting in a tumble dryer gives good control over the degree of felting. The tumble dryer can be opened during drying to check the size of the piece. If it is not felted enough it can be thoroughly wetted and felted again. If it is felted too much it can be stretched to the correct size while still wet. DO THE FOLLOWING: Lay the piece in water so it becomes completely wet, then place it in the tumble dryer and begin the drying process. Dry to the desired size, checking regularly. |
|||||||
Diagram explanations |
|||||||
|
|||||||
 |
|||||||
Have you finished this pattern?Tag your pictures with #dropspattern or submit them to the #dropsfan gallery. Do you need help with this pattern?You'll find 14 tutorial videos, a Comments/Questions area and more by visiting the pattern on garnstudio.com. © 1982-2026 DROPS Design A/S. We reserve all rights. This document, including all its sub-sections, has copyrights. Read more about what you can do with our patterns at the bottom of each pattern on our site. |
|||||||


With over 40 years in knitting and crochet design, DROPS Design offers one of the most extensive collections of free patterns on the internet - translated to 17 languages. As of today we count 325 catalogs and 12298 patterns - 12288 of which are translated into English (US/in).
We work hard to bring you the best knitting and crochet have to offer, inspiration and advice as well as great quality yarns at incredible prices! Would you like to use our patterns for other than personal use? You can read what you are allowed to do in the Copyright text at the bottom of all our patterns. Happy crafting!
Post a comment to pattern DROPS Extra 0-1332
We would love to hear what you have to say about this pattern!
If you want to leave a question, please make sure you select the correct category in the form below, to speed up the answering process. Required fields are marked *.