
Popular categories
Looking for a yarn?


Comments / Questions (41)
![]() Frida wrote:
Frida wrote:
Perfekt!
19.06.2016 - 16:54
![]() Marina Clé wrote:
Marina Clé wrote:
Een zalig warme prachtige vest! love it !
15.06.2016 - 19:28
![]() Federica wrote:
Federica wrote:
è veramente molto bello.a guardare il modello viene subito voglia di realizzarlo...il problema per me sarebbe adattarlo al mio fisico.
14.06.2016 - 00:34
![]() Lene Sørensen wrote:
Lene Sørensen wrote:
Jeg er helt pjattet med kraven, super smart og varm!
13.06.2016 - 20:49
![]() Heike Koenig wrote:
Heike Koenig wrote:
Der Winter kann kommen.
12.06.2016 - 21:58
![]() Ramo wrote:
Ramo wrote:
Sooo beautiful and practical. My favourite color as well.
08.06.2016 - 21:39
![]() Annwe wrote:
Annwe wrote:
Love this one, practical and nice🐝🐝
07.06.2016 - 10:18
![]() PAOLA wrote:
PAOLA wrote:
Stupendo! Colore meraviglioso che fa risaltare i vari lavori eseguiti. Solo a vederlo fa volare la fantasia negli intrecci.
06.06.2016 - 09:44
![]() FruStrik wrote:
FruStrik wrote:
Very special model with lovely cable knitting and in my favorite yarn, Eskimo!
04.06.2016 - 22:25
![]() Jane wrote:
Jane wrote:
Stunning! Seriously pretty and looks perfect for a Norwegian autumn.
03.06.2016 - 20:26
|
||||||||||
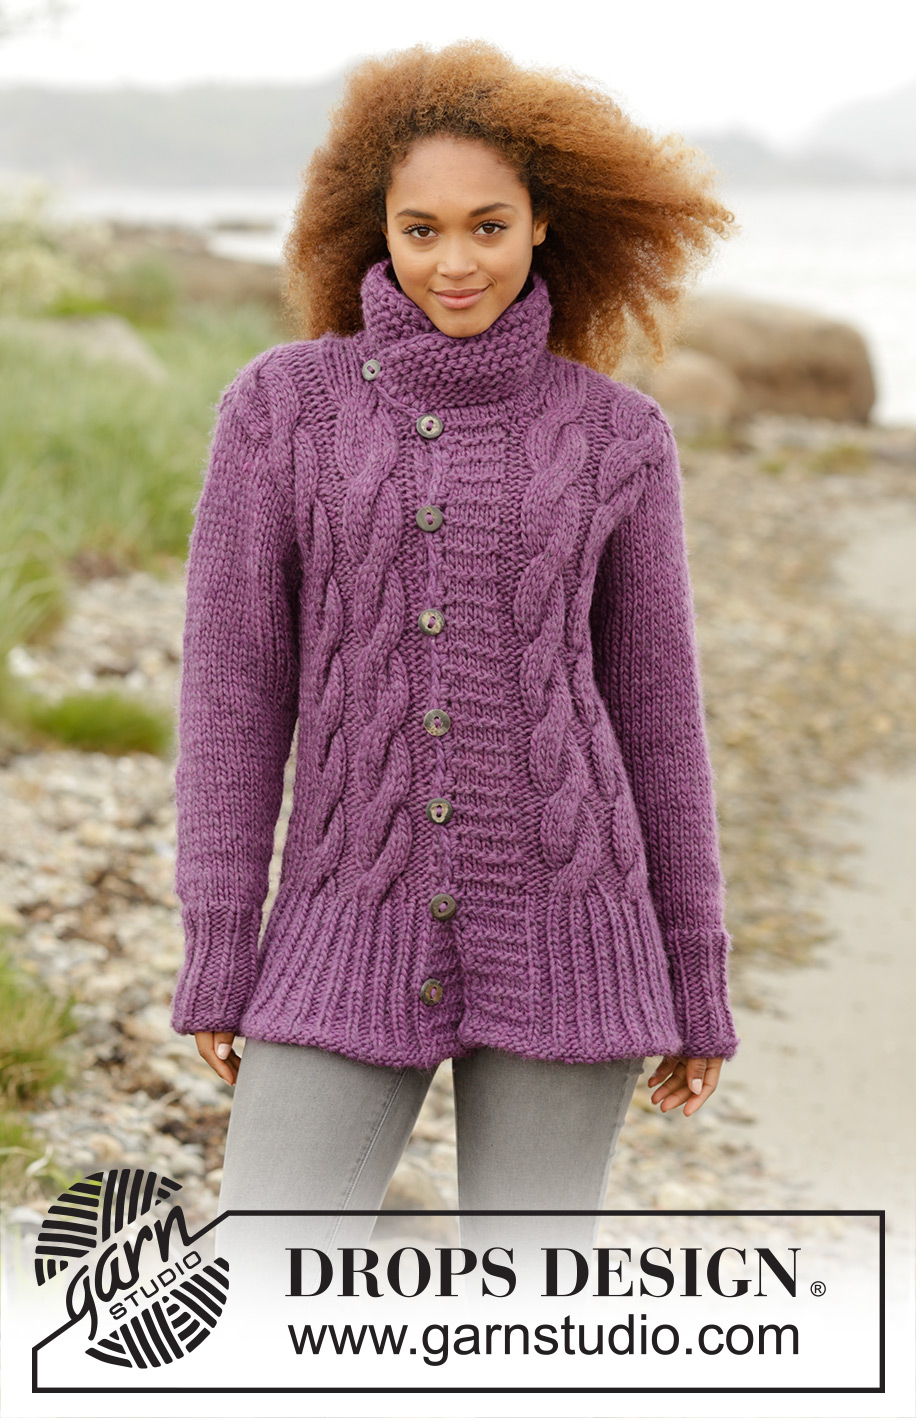
Winter Orchid#winterorchidjacket |
||||||||||
|
|
||||||||||
Knitted DROPS jacket with cables and collar in ”Snow”. Size: S - XXXL.
DROPS 172-39 |
||||||||||
|
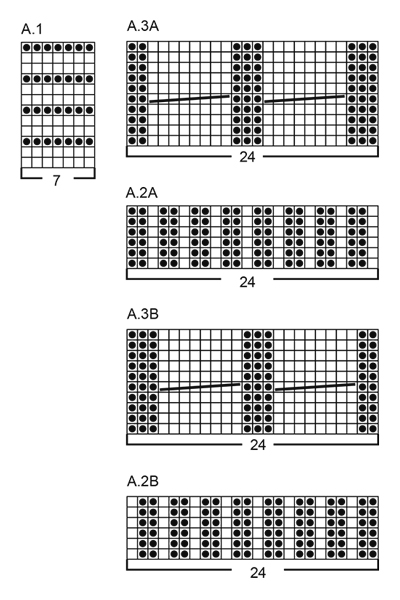
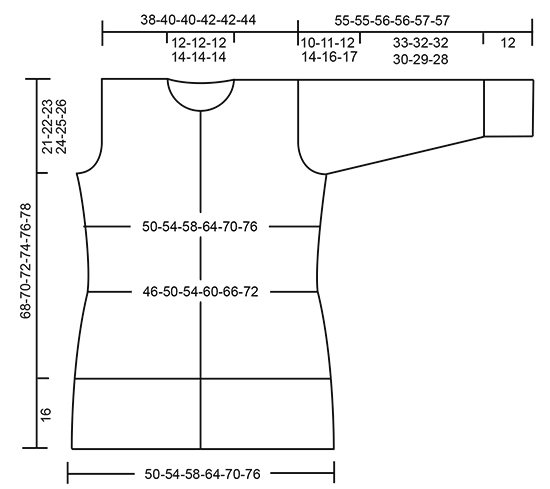
GARTER ST (back and forth): K all rows. 1 ridge = K2 rows. BAND: Work band in pattern according to diagram A.1 until finished measurements - NOTE: Slip first st at beg of every row from mid front (as if to K). PATTERN: See diagrams A.1 to A.3. The diagrams show all rows in pattern seen from RS. DECREASE TIP-1: To calculate how often dec should be done, use the total no of sts on row (e.g. 73 sts) and divide by no of dec to be done (e.g. 13) = 5.6. I.e. in this example work alternately approx. every 4th and 5th st and every 5th and 6th st tog. DECREASE TIP-2 (applies to sides of body): All dec are done from RS! Beg 4 sts before marker and K 2 tog, K 4 (marker is between these 4 sts), slip 1 st as if to K, K 1, psso (= 2 sts dec). INCREASE TIP (applies to sides on body and mid under sleeve): Work until 2 sts remain before marker: Make 1 YO, K 4 (marker is in the middle of these 4 sts), make 1 YO (= 2 sts inc). On next row/round work YOs twisted to avoid holes - work inc sts in stockinette st. BUTTONHOLES: Dec for buttonholes on right band. 1 buttonhole = beg from RS, slip first st as before, work 2 sts in next st (i.e. work front and back in same st = 1 st inc) and work the next 2 tog (= 1 st dec). Dec for buttonholes when piece measures: SIZE S: 5, 14, 23, 32, 41, 50 and 59 cm SIZE M: 7, 16, 25, 34, 43, 52 and 61 cm SIZE L: 9, 18, 27, 36, 45, 54 and 63 cm SIZE XL: 7, 15, 23, 31, 39, 47, 55 and 63 cm SIZE XXL: 9, 17, 25, 33, 41, 49, 57 and 65 cm SIZE XXXL: 11, 19, 27, 35, 43, 51, 59 and 67 cm Conversion to inch - see page 4. ---------------------------------------------------------- JACKET: Work back and forth on circular needle from mid front up to armholes. Then finish front and back piece separately. Work sleeves in the round on double pointed needle/a short circular needle and work from bottom up. BODY: Cast on 135-147-156-168-183-195 sts (includes 7 band sts in each side towards mid front) on circular needle size 8 mm / US 11 with Snow. Work first row as follows from RS: Work 7 sts BAND - see explanation above - work rib according to diagram A.2A (= 24 sts), * K 1, P 2 *, repeat from until 32 sts remain on needle, K 1, A.2B (= 24 sts) and finish with 7 sts band. Continue rib like this with 7 band sts in each side towards mid front – remember BUTTONHOLES on right band – see explanation above. When piece measures 16 cm / 6¼", work next row as follows from RS: 7 band sts as before, work A.3A (= 24 sts), work in stockinette st over the next 73-85-94-106-121-133 sts AT THE SAME TIME dec 13-17-18-18-21-21 sts evenly over these sts – READ DECREASE TIP-1, work A.3B (= 24 sts) and finish with 7 band sts as before = 122-130-138-150-162-174 sts. Switch to circular needle size 9 mm / US 13. Insert 2 markers in the piece; 36-38-40-43-46-49 sts in from each side (= 50-54-58-64-70-76 sts between markers on back piece). Continue in stockinette st + A.3 and 7 band sts in each side towards mid front. REMEMBER THE KNITTING GAUGE When piece measures 18 cm / 7" in all sizes, dec 1 st on each side of both markers - READ DECREASE TIP-2 (= 4 sts dec). Repeat dec when piece measures 28 cm / 11" in all sizes = 114-122-130-142-154-166 sts. When piece measures 34 cm / 13½" in all sizes, inc 1 st on each side of both markers - READ INCREASE TIP (= 4 sts inc). Repeat inc when piece measures 42-42-44-44-46-46 cm / 16½"-16½"-17¼"-17¼"-18"-18" = 122-130-138-150-162-174 sts. When piece measures 47-48-49-50-51-52 cm / 18½"-19"-19¼"-19¾"-20"-20½", work next row from WS as follows: Work as before over the first 33-35-37-40-43-46 sts (= left front piece), bind off 6 sts for armhole (i.e. 3 sts on each side of marker), work stockinette st over the next 44-48-52-58-64-70 sts (= back piece), bind off 6 sts for armhole and work as before over the remaining 33-35-37-40-43-46 sts (= right front piece). Finish front and back piece separately. RIGHT FRONT PIECE: = 33-35-37-40-43-46 sts. Continue back and forth with 7 band sts, A.3A and stockinette st. AT THE SAME TIME bind off for armhole at beg of every row from the side as follows: bind off 3 sts 0-0-0-0-1-1 time, 2 sts 1-1-2-3-3-3 times, and 1 st 1-2-2-2-2-4 times = 30-31-31-32-32-33 sts on needle. Continue pattern as before with 0-0-0-1-1-2 sts in stockinette st towards the armhole - NOTE: In size S there is now 1 st less in A.3A towards armhole. When piece measures 60-62-64-64-66-68 cm / 23½"-24½"-25¼"-25¼"-26"-26¾", slip the first 5-5-5-6-6-6 sts at beg of row from mid front on 1 stitch holder for neck (work them before slipping them on stitch holder to avoid cutting the yarn). Continue with the pattern as before while AT THE SAME TIME bind off for neck at beg of every row from mid front as follows: bind off 2 sts 1 time and 1 st 2 times = 21-22-22-22-22-23 sts. Work until 2 rows remain before piece measures approx. 68-70-72-74-76-78 cm / 26¾"-27½"-28⅜"-29⅛"-30"-30¾", adjust so that next row is worked from RS. On next row work sts in the two cables K tog 2 by 2 (= 8 sts dec) = 13-14-14-14-14-15 sts remain on shoulder. K 1 row from WS and bind off with K from RS. Piece measures approx. 68-70-72-74-76-78 cm / 26¾"-27½"-28⅜"-29⅛"-30"-30¾" from shoulder and down. LEFT FRONT PIECE: = 33-35-37-40-43-46 sts. Work as right front piece but reversed (i.e. continue in stockinette st, A.3B and 7 band sts). BACK PIECE: 44-48-52-58-64-70 sts. Work in stockinette st back and forth over all sts AT THE SAME TIME bind off for armholes at beg of every row in each side as follows: bind off 3 sts 0-0-0-0-1-1 time, 2 sts 1-1-2-3-3-3 times, and 1 st 1-2-2-2-2-4 times = 38-40-40-42-42-44 sts on needle. Continue to work until piece measures 66-68-70-72-74-76 cm / 26"-26¾"-27½"-28⅜"-29⅛"-30". Now bind off the middle 10-10-10-12-12-12 sts for neck and finish each shoulder separately. Bind off 1 st on next row from neck = 13-14-14-14-14-15 sts remain on the shoulder. Work until 1 rows remain before piece measures approx. 68-70-72-74-76-78 cm / 26¾"-27½"-28⅜"-29⅛"-30"-30¾", adjust so that next row is worked from WS. K 1 row from WS and bind off with K from RS. Repeat on the other shoulder. SLEEVE: Work in the round on double pointed needles bottom up, switch to a short circular needle when needed. Cast on 24-27-27-27-30-30 sts on double pointed needles size 8 mm / US 11 with Snow. Work rib in the round (= K 1/P 2). When rib measures 12 cm / 4¾", K 1 round while dec 4-5-3-3-4-4 sts evenly = 20-22-24-24-26-26 sts. Insert 1 marker at beg of round (= mid under sleeve) and move the marker upwards. Switch to double pointed needles size 9 mm / US 13 and work in stockinette st. When piece measures 14-14-14-13-13-15 cm / 5½"-5½"-5½"-5"-5"-6", inc 1 st on each side of marker – READ INCREASE TIP (= 2 sts inc). Inc like this every 3½-3½-3½-3-2½-2 cm / 1¼"-1¼"-1¼"-1⅛"-⅞"-¾" 9-9-9-10-11-12 times in total = 38-40-42-44-48-50 sts. When piece measures 45-44-44-42-41-40 cm / 17¾"-17¼"-17¼"-16½"-16"-15¾"(shorter measurements in the larger sizes because of longer sleeve cap and wider shoulders), bind off the middle 6 sts mid under sleeve and work sleeve back and forth on circular needle until finished measurements. Continue with stockinette st and bind off for sleeve cap at beg of every row in each side as follows: bind off 2 sts 2 times in all sizes, 1 st 2-2-2-4-5-6 times. Then bind off 2 sts in each side until piece measures approx. 54-54-55-55-56-56 cm / 21¼"-21¼"-21½"-21½"-22"-22", then bind off 3 sts 1 time in each side. Bind off the remaining sts, sleeve measures approx. 55-55-56-56-57-57 cm / 21⅝"-21⅝"-22"-22"-22½"-22½". Make another sleeve. ASSEMBLY: Sew the shoulder seams. NECK EDGE: Pick up from RS approx. 40 to 48 sts around the neck (includes sts on stitch holders at the front) on circular needle size 8 mm / US 11 with Snow. K 1 row from WS while at the same time inc evenly to 48-50-52-54-56-58 sts. Work 3 rows in stockinette st, K 1 row from WS and 3 rows in stockinette st, then bind off. Fold the neck edge double towards the WS and fasten with neat stitches. COLLAR: Beg from RS and pick up 1 st in every P st where neck edge was folded on circular needle size 9 mm / US 13 with 1 strand Snow = 48-50-52-54-56-58 sts. Then work in garter st back and forth with 2 strands in Snow. AT THE SAME TIME on first row from RS inc 1 st inside 1 edge st in each side (inc 1 st by making 1 YO, on next row K YO twisted to avoid holes). Inc like this every other row (i.e. every row from RS), 4 times in total = 56-58-60-62-64-66 sts. When collar measures 8-9-10-10-11-11 cm / 3"-3½"-4"-4"-4½"-4½", bind off with K from RS. CROCHET BORDER: Work a finishing edge along front pieces and around collar on hook size 8 mm / L/11 with 1 strand Snow as follows: Beg from RS at the bottom of right front piece, work 1 sc (UK dc) in first st, * ch 1, skip 1 st/row, 1 sc (UK dc) in next st/row *, repeat from *-* up along entire right front piece, around the collar and then along left front piece. Fasten off. MORE ASSEMBLY: Sew in the sleeves inside 1 edge st. Sew the buttons on to left front piece. Sew on the small button approx. 8-9-10-10-11-11 cm / 3"-3½"-4"-4"-4½"-4½" from the top along neck line. Button this through crochet edge in the corner on collar - see picture. |
||||||||||
Diagram explanations |
||||||||||
|
||||||||||
 |
||||||||||
 |
||||||||||
Have you finished this pattern?Tag your pictures with #dropspattern #winterorchidjacket or submit them to the #dropsfan gallery. Do you need help with this pattern?You'll find 29 tutorial videos, a Comments/Questions area and more by visiting the pattern on garnstudio.com. © 1982-2026 DROPS Design A/S. We reserve all rights. This document, including all its sub-sections, has copyrights. Read more about what you can do with our patterns at the bottom of each pattern on our site. |
||||||||||


With over 40 years in knitting and crochet design, DROPS Design offers one of the most extensive collections of free patterns on the internet - translated to 17 languages. As of today we count 324 catalogs and 12290 patterns - 12280 of which are translated into English (US/in).
We work hard to bring you the best knitting and crochet have to offer, inspiration and advice as well as great quality yarns at incredible prices! Would you like to use our patterns for other than personal use? You can read what you are allowed to do in the Copyright text at the bottom of all our patterns. Happy crafting!
Post a comment to pattern DROPS 172-39
We would love to hear what you have to say about this pattern!
If you want to leave a question, please make sure you select the correct category in the form below, to speed up the answering process. Required fields are marked *.