
Popular categories
Looking for a yarn?


Comments / Questions (41)
![]() Lorène wrote:
Lorène wrote:
Bonjour, Je ne comprend pas à quoi correspond "le milieu devant"? Lorsqu'il faut glisser la 1ere m. à partir du milieu devant ou glisser les mailles en attente à partir du milieu devant pour l'encolure? Merci de votre réponse
08.06.2025 - 19:16DROPS Design answered:
Bonjour Lorène, le "milieu devant" correspond à la partie qui se trouve au milieu du devant: le début et les fins de rangs, autrement dit les bordures des devants. Ici les 7 mailles de bordure des devants de chaque côté/de chaque devant sont tricotées au point mousse. Bon tricot!
09.06.2025 - 10:15
![]() Mary-Anne wrote:
Mary-Anne wrote:
Thank you so much for your quick response. I just thought that for the size of the button, the buttonhole would be larger. Anyways, I just love all of your patterns and have made quite a few of them for gifts. There is only one shop here that sells only a small amount of 'drops' yarn. I just wish there were more shops in BC that sold your yarn. But unfortunately that is not the case. I buy drops yarn anytime I see it!!! Thanks again!
06.12.2023 - 06:14
![]() Mary-Anne wrote:
Mary-Anne wrote:
I have a question about pattern 172-39 concerning the buttonholes. I have read everything in the pattern & have done the buttonhole according to the instructions which says sl 1st st, work 2 sts in next st and work the next 2 tog & I assume I continue the rest of the row (rows) according to chart. I am an experienced knitter. What am I missing?? I am making for a Christmas gift. Also the picture looks like the buttonholes are on the left side and the buttons on the right. Thanks!
04.12.2023 - 20:13DROPS Design answered:
Dear Mary-Anne, that's the way the buttonholes are worked on this jacket; the hole will not be that large, just enough; but feel free to adjust the way to work them with your own favorite technique, the picture might have been flipped, reason why the buttonholes look to be on the left front piece. Happy knitting!
05.12.2023 - 09:20
![]() Laurence wrote:
Laurence wrote:
Bonjour Pour le montage des mailles au tout début faut il rajouter 7m pour la bordure ou est elle déjà comptée dans les mailles indiquées (ex 147 m+7 ou seulement 147 m ?
31.12.2022 - 06:57DROPS Design answered:
Bonjour Laurence, ces 7 mailles de bordure devant de chaque côté sont déjà comprises dans le nombre de mailles à monter et n'ont pas besoin d'être ajoutées. Bon tricot!
02.01.2023 - 13:42
![]() Meike wrote:
Meike wrote:
Guten Tag, ich möchte die Jacke länger stricken (Kleidergröße 84) und dachte daran, einen Zopf mehr in der Höhe zu arbeiten. Würde es genügen, erst ab 30cm Gesamtlänge der Anleitung und dem Abnehmen zu folgen, damit der Schnitt erhalten bleibt? Mit freundlichen Grüßen Meike
14.10.2022 - 09:34DROPS Design answered:
Liebe Meike, leider können wir nicht jede Anleitung nach jeder Anfrage anpassen, am besten inspirieren Sie sich von einer ähnlichen aber längere Jacke. Gerne kann Ihnen auch Ihr DROPS Händler damit (auch per Telefon oder per E-Mail) weiterhelfen. Viel Spaß beim stricken!
14.10.2022 - 13:22
![]() Eyrún Halla wrote:
Eyrún Halla wrote:
Það virðist vanta útskýringar á leiðbeiningunum, því það stendur í textanum sjá að ofan en svo eru engar útskýringar um það að ofan.
19.10.2021 - 15:40DROPS Design answered:
Eyrún Halla. Takk fyrir ábendinguna. Útskýringarnar hafa eitthvað orðið viðskila við textann. Það er búið að laga þetta.
21.10.2021 - 13:09
![]() Rosemarie Lavway wrote:
Rosemarie Lavway wrote:
I am just starting DROPS 172-39. .I noticed at first it states Garter st back & forth knit all rows. But in the instructions it refers to stockinette st. Help. I love your patterns and am very anxious to complete this one
10.11.2019 - 01:49DROPS Design answered:
Dear Rosemary, after the ribbing there are reverse stockinett stitches between the cable which are in the charts and the back (and later the sleeves) are knitted with stockinett stitches. happy Knitting!
10.11.2019 - 11:03
![]() MARIA wrote:
MARIA wrote:
Your largest width is 76cm is too small.. How to resize to a larger size?
30.06.2019 - 02:20DROPS Design answered:
Dear Maria, we are unfortunately not able to adjust every single pattern to every request, please contact your DROPS store - even per mail or telephone - or any knitting forum for any further individual assistance. Happy knitting!
01.07.2019 - 07:10
![]() MARIA wrote:
MARIA wrote:
How to find which size to knit for the bust size?
29.06.2019 - 21:22DROPS Design answered:
Dear Maria, you can find the relevant measurements on the schematic drawing below the pattern, at the bottom of the page. Happy Knitting!
30.06.2019 - 01:04
![]() Lesley Hooser wrote:
Lesley Hooser wrote:
I am not sure what I did, but the back shoulder has 15 stitches at cast off and the fronts both have 23 stitches at the shoulder at cast off, what do I do with the extra 8 on the fronts? or have I messed up the pattern? thank you
30.04.2019 - 23:35DROPS Design answered:
Hello Lesley. On both front pieces, you must knit the sts in the cables together 2 by 2 (so you decrease 8 sts); you then remain with 15 sts for the shoulder. Happy knitting!
01.05.2019 - 09:38
|
||||||||||
Winter Orchid#winterorchidjacket |
||||||||||
|
|
||||||||||
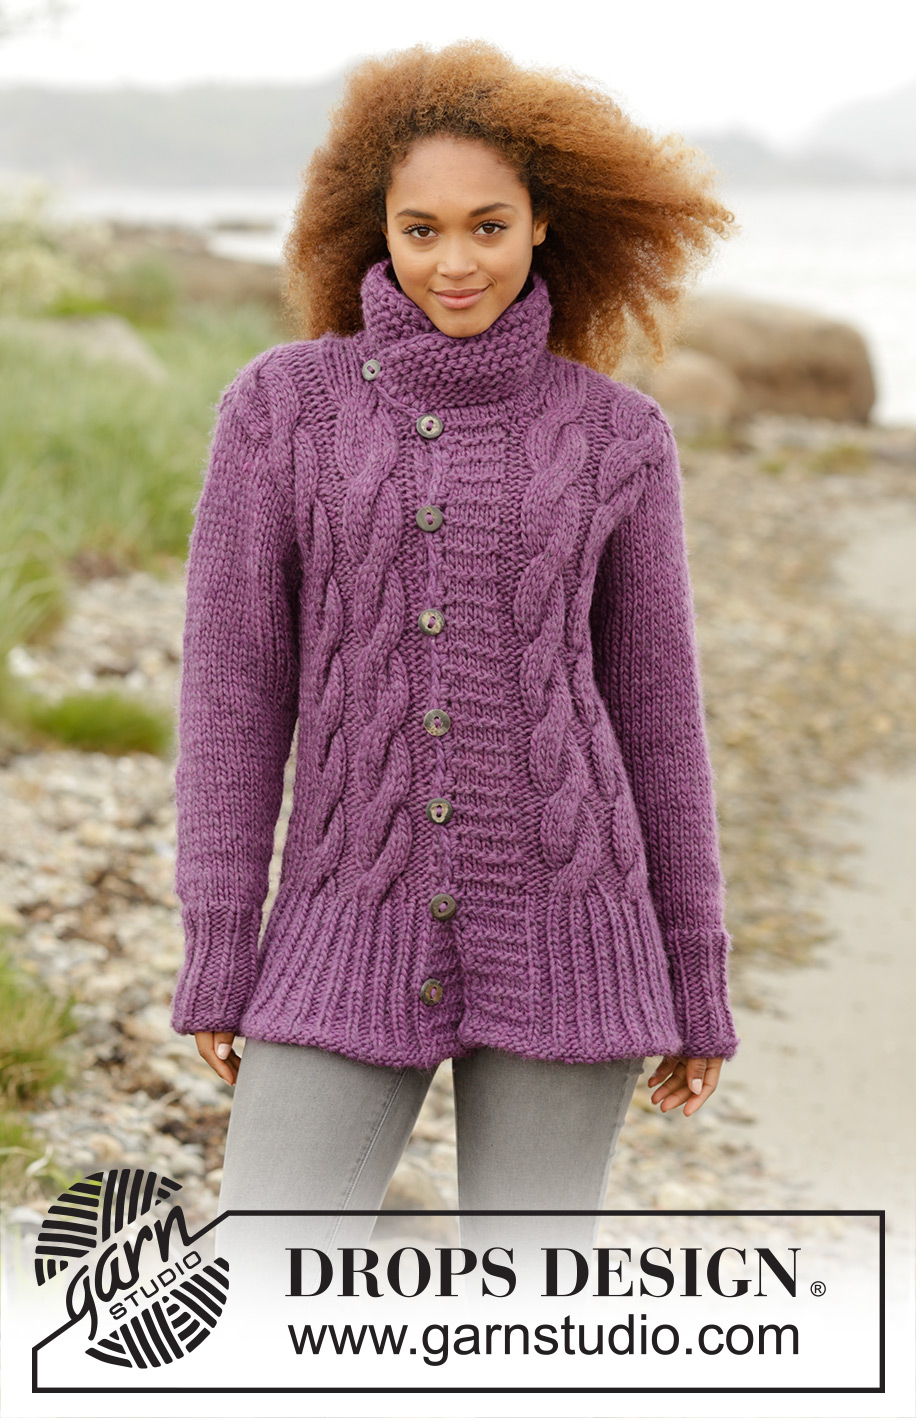
Knitted DROPS jacket with cables and collar in ”Snow”. Size: S - XXXL.
DROPS 172-39 |
||||||||||
|
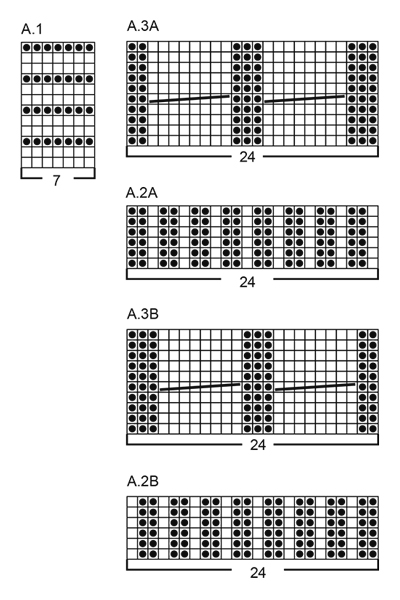
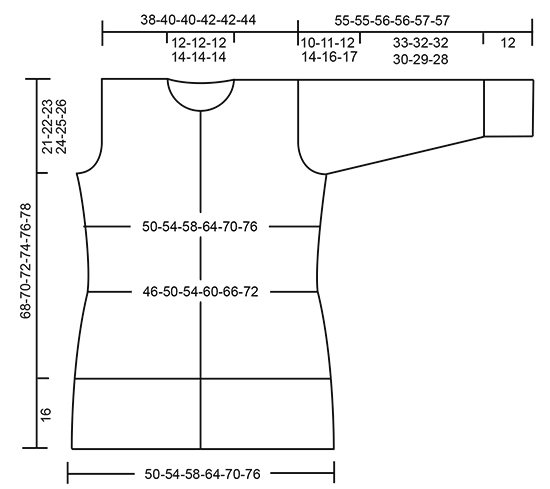
GARTER ST (back and forth): K all rows. 1 ridge = 2 rows K. BAND: Work band in pattern according to diagram A.1 until finished measurements - NOTE: Slip first st at beg of every row from mid front (as if to K). PATTERN: See diagrams A.1 to A.3. The diagrams show all rows in pattern seen from RS. DECREASE TIP-1: To calculate how often dec should be done, use the total no of sts on row (e.g. 73 sts) and divide by no of dec to be done (e.g. 13) = 5.6. I.e. in this example work alternately approx. every 4th and 5th st and every 5th and 6th st tog. DECREASE TIP-2 (applies to sides of body): All dec are done from RS! Beg 4 sts before marker and K 2 tog, K 4 (marker is between these 4 sts), slip 1 st as if to K, K 1, psso (= 2 sts dec). INCREASE TIP (applies to sides on body and mid under sleeve): Work until 2 sts remain before marker: Make 1 YO, K 4 (marker is in the middle of these 4 sts), make 1 YO (= 2 sts inc). On next row/round work YOs twisted to avoid holes - work inc sts in stocking st. BUTTONHOLES: Dec for buttonholes on right band. 1 buttonhole = beg from RS, slip first st as before, work 2 sts in next st (i.e. work front and back in same st = 1 st inc) and work the next 2 tog (= 1 st dec). Dec for buttonholes when piece measures: SIZE S: 5, 14, 23, 32, 41, 50 and 59 cm SIZE M: 7, 16, 25, 34, 43, 52 and 61 cm SIZE L: 9, 18, 27, 36, 45, 54 and 63 cm SIZE XL: 7, 15, 23, 31, 39, 47, 55 and 63 cm. SIZE XXL: 9, 17, 25, 33, 41, 49, 57 and 65 cm. SIZE XXXL: 11, 19, 27, 35, 43, 51, 59 and 67 cm. ---------------------------------------------------------- JACKET: Work back and forth on circular needle from mid front up to armholes. Then finish front and back piece separately. Work sleeves in the round on double pointed needle/a short circular needle and work from bottom up. BODY: Cast on 135-147-156-168-183-195 sts (incl 7 band sts in each side towards mid front) on circular needle size 8 mm with Snow. Work first row as follows from RS: Work 7 sts BAND - see explanation above - work rib according to diagram A.2A (= 24 sts), * K 1, P 2 *, repeat from until 32 sts remain on needle, K 1, A.2B (= 24 sts) and finish with 7 sts band. Continue rib like this with 7 band sts in each side towards mid front – remember BUTTONHOLES on right band – see explanation above. When piece measures 16 cm, work next row as follows from RS: 7 band sts as before, work A.3A (= 24 sts), work in stocking st over the next 73-85-94-106-121-133 sts AT THE SAME TIME dec 13-17-18-18-21-21 sts evenly over these sts – READ DECREASE TIP-1, work A.3B (= 24 sts) and finish with 7 band sts as before = 122-130-138-150-162-174 sts. Switch to circular needle size 9 mm. Insert 2 markers in the piece; 36-38-40-43-46-49 sts in from each side (= 50-54-58-64-70-76 sts between markers on back piece). Continue in stocking st + A.3 and 7 band sts in each side towards mid front. REMEMBER THE KNITTING TENSION When piece measures 18 cm in all sizes, dec 1 st on each side of both markers - READ DECREASE TIP-2 (= 4 sts dec). Repeat dec when piece measures 28 cm in all sizes = 114-122-130-142-154-166 sts. When piece measures 34 cm in all sizes, inc 1 st on each side of both markers - READ INCREASE TIP (= 4 sts inc). Repeat inc when piece measures 42-42-44-44-46-46 cm = 122-130-138-150-162-174 sts. When piece measures 47-48-49-50-51-52 cm, work next row from WS as follows: Work as before over the first 33-35-37-40-43-46 sts (= left front piece), cast off 6 sts for armhole (i.e. 3 sts on each side of marker), work stocking st over the next 44-48-52-58-64-70 sts (= back piece), cast off 6 sts for armhole and work as before over the remaining 33-35-37-40-43-46 sts (= right front piece). Finish front and back piece separately. RIGHT FRONT PIECE: = 33-35-37-40-43-46 sts. Continue back and forth with 7 band sts, A.3A and stocking st. AT THE SAME TIME cast off for armhole at beg of every row from the side as follows: Cast off 3 sts 0-0-0-0-1-1 time, 2 sts 1-1-2-3-3-3 times, and 1 st 1-2-2-2-2-4 times = 30-31-31-32-32-33 sts on needle. Continue pattern as before with 0-0-0-1-1-2 sts in stocking st towards the armhole - NOTE: In size S there is now 1 st less in A.3A towards armhole. When piece measures 60-62-64-64-66-68 cm, slip the first 5-5-5-6-6-6 sts at beg of row from mid front on 1 stitch holder for neck (work them before slipping them on stitch holder to avoid cutting the yarn). Continue with the pattern as before while AT THE SAME TIME cast off for neck at beg of every row from mid front as follows: Cast off 2 sts 1 time and 1 st 2 times = 21-22-22-22-22-23 sts. Work until 2 rows remain before piece measures approx. 68-70-72-74-76-78 cm, adjust so that next row is worked from RS. On next row work sts in the two cables K tog 2 by 2 (= 8 sts dec) = 13-14-14-14-14-15 sts remain on shoulder. K 1 row from WS and cast off with K from RS. Piece measures approx. 68-70-72-74-76-78 cm from shoulder and down. LEFT FRONT PIECE: = 33-35-37-40-43-46 sts. Work as right front piece but reversed (i.e. continue in stocking st, A.3B and 7 band sts). BACK PIECE: 44-48-52-58-64-70 sts. Work in stocking st back and forth over all sts AT THE SAME TIME cast off for armholes at beg of every row in each side as follows: Cast off 3 sts 0-0-0-0-1-1 time, 2 sts 1-1-2-3-3-3 times, and 1 st 1-2-2-2-2-4 times = 38-40-40-42-42-44 sts on needle. Continue to work until piece measures 66-68-70-72-74-76 cm. Now cast off the middle 10-10-10-12-12-12 sts for neck and finish each shoulder separately. Cast off 1 st on next row from neck = 13-14-14-14-14-15 sts remain on the shoulder. Work until 1 rows remain before piece measures approx. 68-70-72-74-76-78 cm, adjust so that next row is worked from WS. K 1 row from WS and cast off with K from RS. Repeat on the other shoulder. SLEEVE: Work in the round on double pointed needles bottom up, switch to a short circular needle when needed. Cast on 24-27-27-27-30-30 sts on double pointed needles size 8 mm with Snow. Work rib in the round (= K 1/P 2). When rib measures 12 cm, K 1 round while dec 4-5-3-3-4-4 sts evenly = 20-22-24-24-26-26 sts. Insert 1 marker at beg of round (= mid under sleeve) and move the marker upwards. Switch to double pointed needles size 9 mm and work in stocking st. When piece measures 14-14-14-13-13-15 cm, inc 1 st on each side of marker – READ INCREASE TIP (= 2 sts inc). Inc like this every 3½-3½-3½-3-2½-2 cm 9-9-9-10-11-12 times in total = 38-40-42-44-48-50 sts. When piece measures 45-44-44-42-41-40 cm (shorter measurements in the larger sizes because of longer sleeve cap and wider shoulders), cast off the middle 6 sts mid under sleeve and work sleeve back and forth on circular needle until finished measurements. Continue with stocking st and cast off for sleeve cap at beg of every row in each side as follows: Cast off 2 sts 2 times in all sizes, 1 st 2-2-2-4-5-6 times. Then cast off 2 sts in each side until piece measures approx. 54-54-55-55-56-56 cm, then cast off 3 sts 1 time in each side. Cast off the remaining sts, sleeve measures approx. 55-55-56-56-57-57 cm. Knit another sleeve. ASSEMBLY: Sew the shoulder seams. NECK EDGE: Pick up from RS approx. 40 to 48 sts around the neck (incl sts on stitch holders at the front) on circular needle size 8 mm with Snow. K 1 row from WS while at the same time inc evenly to 48-50-52-54-56-58 sts. Work 3 rows in stocking st, K 1 row from WS and 3 rows in stocking st, then cast off. Fold the neck edge double towards the WS and fasten with neat stitches. COLLAR: Beg from RS and pick up 1 st in every P st where neck edge was folded on circular needle size 9 mm with 1 strand Snow = 48-50-52-54-56-58 sts. Then work in garter st back and forth with 2 strands in Snow. AT THE SAME TIME on first row from RS inc 1 st inside 1 edge st in each side (inc 1 st by making 1 YO, on next row K YO twisted to avoid holes). Inc like this every other row (i.e. every row from RS), 4 times in total = 56-58-60-62-64-66 sts. When collar measures 8-9-10-10-11-11 cm, cast off with K from RS. CROCHET BORDER: Work a finishing edge along front pieces and around collar on hook size 8 mm with 1 strand Snow as follows: Beg from RS at the bottom of right front piece, work 1 dc in first st, * 1 ch, skip 1 st/row, 1 dc in next st/row *, repeat from *-* up along entire right front piece, around the collar and then along left front piece. Fasten off. MORE ASSEMBLY: Sew in the sleeves inside 1 edge st. Sew the buttons on to left front piece. Sew on the small button approx. 8-9-10-10-11-11 cm from the top along neck line. Button this through crochet edge in the corner on collar - see picture. |
||||||||||
Diagram explanations |
||||||||||
|
||||||||||
|
||||||||||
|
||||||||||
Have you finished this pattern?Tag your pictures with #dropspattern #winterorchidjacket or submit them to the #dropsfan gallery. Do you need help with this pattern?You'll find 30 tutorial videos, a Comments/Questions area and more by visiting the pattern on garnstudio.com. © 1982-2025 DROPS Design A/S. We reserve all rights. This document, including all its sub-sections, has copyrights. Read more about what you can do with our patterns at the bottom of each pattern on our site. |
||||||||||


With over 40 years in knitting and crochet design, DROPS Design offers one of the most extensive collections of free patterns on the internet - translated to 17 languages. As of today we count 314 catalogues and 11822 patterns translated into English (UK/cm).
We work hard to bring you the best knitting and crochet have to offer, inspiration and advice as well as great quality yarns at incredible prices! Would you like to use our patterns for other than personal use? You can read what you are allowed to do in the Copyright text at the bottom of all our patterns. Happy crafting!
Post a comment to pattern DROPS 172-39
We would love to hear what you have to say about this pattern!
If you want to leave a question, please make sure you select the correct category in the form below, to speed up the answering process. Required fields are marked *.