
Popular categories
Looking for a yarn?


Comments / Questions (149)
Paula wrote:
What does this mean....? Then dec on every row from neck by dec 1 st inside 3 edge sts on every row from RS. Thank you
02.04.2017 - 01:27DROPS Design answered:
Hi, your question has been already answered. Happy knitting!
02.04.2017 - 22:27Paula Kennedy wrote:
How to do this... On last repetition of 8th row slip the first 3 sts from stitch holder back on needle.
20.03.2017 - 18:41DROPS Design answered:
Dear Mrs Kennedy, you will work as on row 3 where you worked the 2 sts from domino tog with the st from bottom edge, but this time you will work the 3 sts from domino tog with the st from bottom edge, ie work 4 sts tog. Happy knitting!
21.03.2017 - 09:00
![]() Janine Catterall wrote:
Janine Catterall wrote:
Good morning. Could you please confirm the stitch pattern for the sleeves? It looks as if the main part of the sleeve is reverse/inside out stocking stitch - is that right? Also, are the cuffs worked in garter stitch or do they come up as stocking stitch as they are worked in the round? Thank you for all your help, the jumper is coming along nicely. 😊
14.03.2017 - 09:03DROPS Design answered:
Dear Mrs Catterall, sleeves are worked in the round following PATTERN (applies to sleeve) at the beg of the pattern, ie work in garter stitch with strips then turn piece inside out and continue in stocking st (= you will work sleeve from WS, since the P side will be facing outwards). Happy knitting!
14.03.2017 - 09:53
![]() Jannie wrote:
Jannie wrote:
Skal starte med ærmer. Retstrik på strømpepinde er en omgang vrang og en omgang ret. Med der står strikkes Frem og Tilbage. Vil det så sige alle retmasker med omslag ved tilbage og ved frem ? Når jeg så derefter skal vende arb så vrang vender ud, og jeg har tråd på venstre pind, hvordan starter jeg så med glatstrik ? Hjælp mine tænker kører rundt.
07.03.2017 - 09:50DROPS Design answered:
Hej Jannie. Du starter med at strikke MØNSTER rundt - du skal ikke strikke frem og tilbage. Retstrik rundt er rigtig nok 1 p r, 1 p vr. Naar du er faerdig vender du vrangen ud paa det og fortsaetter i glat - saa vender du jo det hele om og den venstre pind saetter du til venstre og strikker nu glat rundt - du starter saa med at traaden er paa venstre pind, men strik den förste m og fortsaet som normalt. Lidt svaert at forklare paa skrift, men jeg tror du ser det, naar du er saa langt :)
07.03.2017 - 14:24
![]() Barbara Christine wrote:
Barbara Christine wrote:
Von vorne gesehen, schließt sich an das linke Rückenteil das linke(!) Vorderteil an, Bitte um Hilfe, denn lt. Anleitung schließt sich ein rechts Vorderteil an?
27.02.2017 - 13:33DROPS Design answered:
Liebe Barbara Christine, Sie stricken zuerst das linke Rückenteil unterer Rand, dann das linke Vorderteil unterer Rand, dann wird das rechte Vorterteil unterer Rand gestrickt und mit dem rechten Rückenteil unterer Rand enden. Viel Spaß beim stricken!
27.02.2017 - 14:07
![]() Janine Catterall wrote:
Janine Catterall wrote:
Hello, thank you for your continued help! I think I'm nearly there. So I have 139 sts from tip of left back to tip of left front dominoes. I have done 17 repeats of 8 rows and one repeat of rows 1 and 2 in grey which has used up all 70 sts on left back. Now do I complete the 8 row pattern by increasing in sand or do I hop to row 3 from left front pattern and start decreasing in sand? I am ending up with 18 stitches at front at the moment. Thank you!
23.02.2017 - 11:59DROPS Design answered:
Dear Mrs Catterall, along bottom of left back piece, you will work 2 sts from domino tog with the bottom edge, then work the bottom of left front piece, working 2 sts tog with bottom edge to tip mid front, and work here 4 sts tog (= 3 sts from domino with 1 st from bottom edge), at the same time, continue stripes, short rows and dec. Happy knitting!
23.02.2017 - 13:36
![]() Janine Catterall wrote:
Janine Catterall wrote:
Hi, thank you for your response on the sleeves. I'm afraid I'm having another dilemma. I'm doing the bottom edge in small so the dominoe squares when completed have 278 stitches. The 8 row repeat will decrease 4 stitches each time. I work this out at 72 stitches per half dominoe but there are only 70 stitches per half dominoe (including the stitch that makes the dominoe tip). This is causing the repeat to overrun the allotted number of stitches. Do you know what I'm doing wrong please?
14.02.2017 - 20:40DROPS Design answered:
Dear Mrs Catterall, along bottom of left back piece, ie from tip of domino to the side, you will dec 2 sts from domino, and from along bottom of left front piece (= from the side to the tip), you will dec 2 sts from domino finishing with dec 3 sts from domino on last dec row. Then you work along bottom of right front piece (2 sts from domino dec), then along bottom of right back piece (2 sts from domino dec + 3 sts from domino dec on last dec row). Happy knitting!
15.02.2017 - 09:36
![]() Felicia wrote:
Felicia wrote:
Hallo, ich habe die beiden Dominoquadrate gestrickt und frage mich nun, wie es weitergeht. Wenn ich die Abnahme (bzw. das Zusstricken) an der untern Spitze des (Rücken-) Dominoquadrates beginnen soll, frage ich mich, wie ich an die Maschen komme. Die Maschen der Spitze liegen ja in der Mitte und nicht am Anfang meiner Rundnadel. Verstehn würde ich es, wenn das Zusstricken an der Seite des Pullovers beginnen würde. Danke für Ihre Hilfe.
04.02.2017 - 12:55DROPS Design answered:
Liebe Felicia, die Maschen für den unteren Rand stricken Sie mit einem anderen Nadel (separat von den Nadeln mit Maschen von dem beiden Dominoquadraten), dann stricken Sie die Maschen von dem unteren Rand wie beschrieben, und gleichzeitig werden Sie diese Maschen zs mit dem stillgelegten Maschen vom Dominoquadrat stricken. Viel Spaß beim stricken!
06.02.2017 - 09:22
![]() Maikki Oksa wrote:
Maikki Oksa wrote:
Huomasin, että kohdan ALAREUNA suomennos poikkeaa ruotsinkielisestä. Miksi?
20.01.2017 - 10:33
![]() Maikki Oksa wrote:
Maikki Oksa wrote:
Ohjeen kohta ALAREUNA on epäselvä. Voisiko sitä tarkentaa?
20.01.2017 - 10:28
|
||||||||||||||||
Tauriel#taurielsweater |
||||||||||||||||
|
|
||||||||||||||||
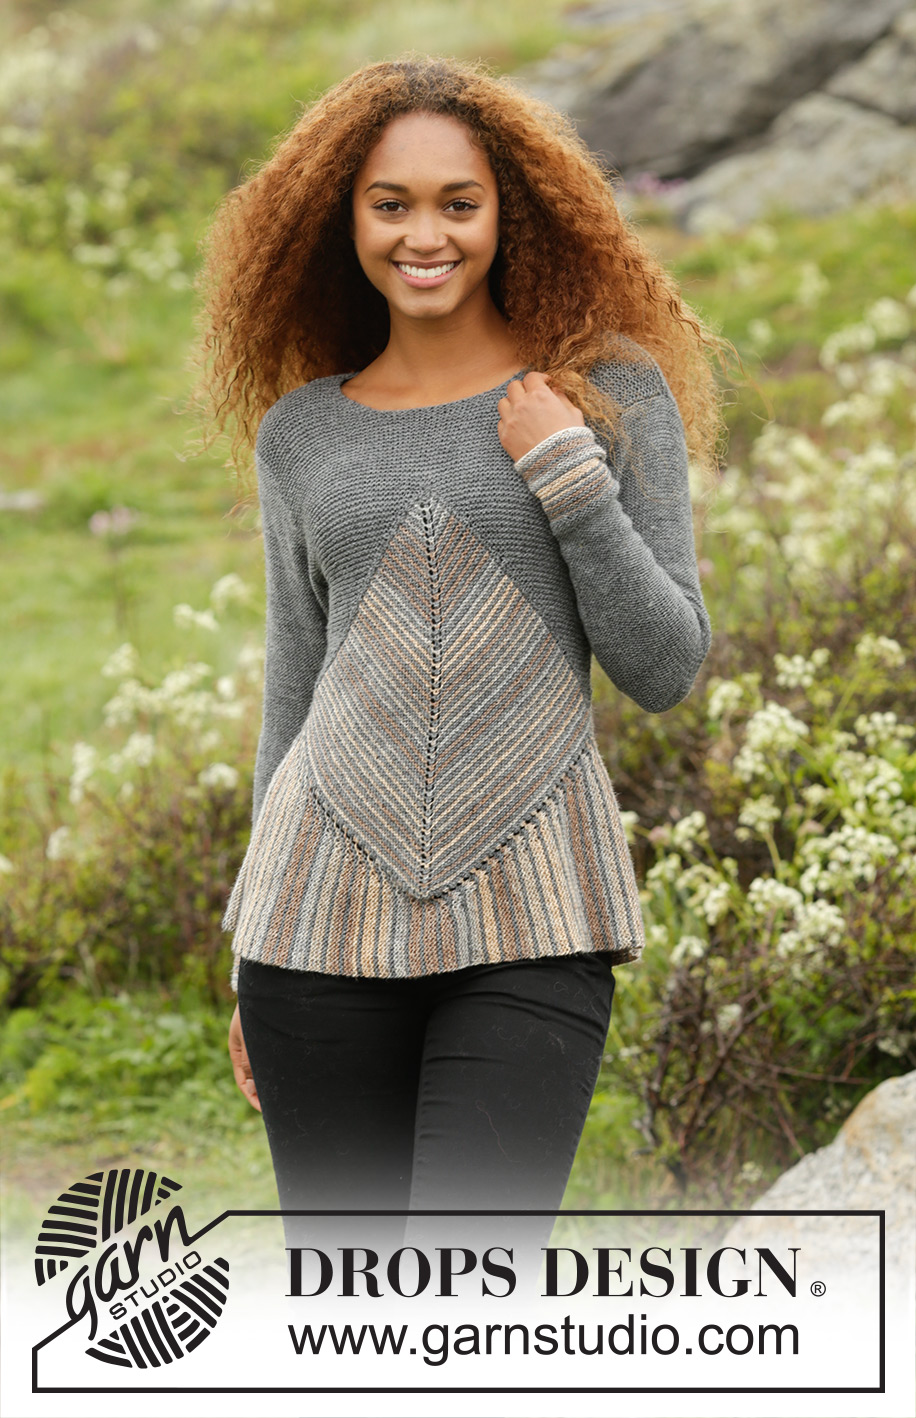
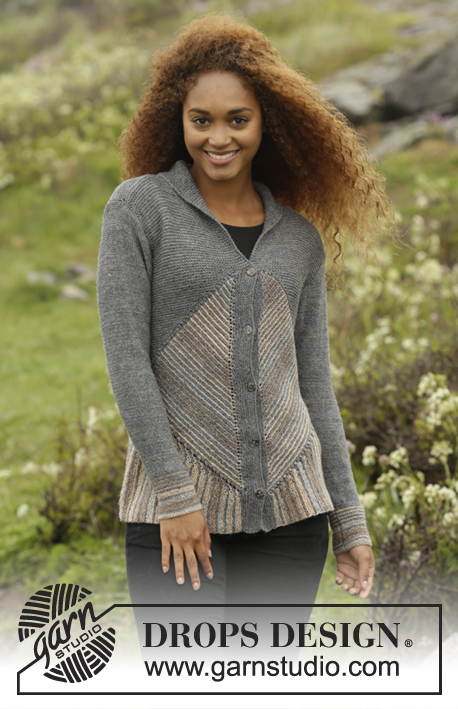
Knitted DROPS jumper in garter st with domino squares and stripes in ”Fabel”. Size: S - XXXL.
DROPS 173-4 |
||||||||||||||||
|
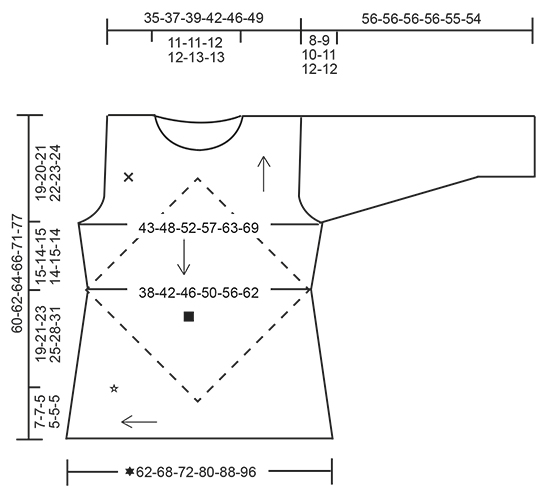
GARTER ST (back and forth): K all rows. 1 ridge = K2 rows. STRIPES: * Work 1 ridge in GARTER ST - see explanation above, with sand. Work 1 ridge with gray. *, repeat from *-* until finished measurements. First row with new color is always from RS. DOMINO SQUARE: Insert 1 marker in the middle st. ROW 1 (= RS): K until st with marker, 1 YO, K 1 (st with marker), 1 YO, K the rest of row (= 2 sts inc). ROW 2 (= WS): K all sts. Repeat 1st and 2nd row, i.e. inc 2 sts in the middle of the square on every row from RS. INCREASE TIP (applies to sleeve): All inc are done from RS. Work until 2 sts remain before marker, 1 YO (= 1 st inc), K 4 (marker is in the middle of these sts), 1 YO (= 1 sts inc). Work YO twisted on next round. PATTERN (applies to sleeve): Work * 3 ridges with sand, work 1 ridge with gray *, repeat from *-* 4 times in total, then work stripes as follows: Work * 1 ridge with sand, work 1 ridge with gray *, repeat from *-* 4 times in total. Now work piece in gray until finished measurements. Turn piece inside out to that WS is outwards and continue in stockinette st. ---------------------------------------------------------- JUMPER: Work first 2 domino squares – see square on chart, then work 1 edge to sts on domino square (i.e. bottom edge of jumper) with short rows - see star on chart. Edge is worked from mid back to mid front and mid back again. Finally work a yoke on jumper over domino square - se cross on chart. BACK PIECE: DOMINO SQUARE: Cast on 5 sts on circular needle size 3.5 mm / US 4 with gray. K 1 row from WS. Switch color to sand and work DOMINO SQUARE - see explanation above, back and forth and STRIPES – see explanation above. REMEMBER THE KNITTING GAUGE Work Domino square and stripes until piece measures 38-42-46-50-56-62 cm / 15"-16½"-18"-19 3/4"-22"-24½" at the widest = approx. 62-68-74-82-90-100 ridges, adjust so that last ridge is with sand, and approx. 64-70-76-84-92-102 sts on each side of st with marker (= approx. 129-141-153-169-185-205 sts in total on needle). Work 1 ridge with gray and inc as before (i.e. 1 st on each side of st with marker) and inc 4 sts evenly on each side of mid st on row from RS (= 10 sts inc in total on row from RS) = approx. 69-75-81-89-97-107 sts on each side of st with marker (= approx. 139-151-163-179-195-215 sts in total on needle). Slip sts on a stitch holder and work front piece domino square. FRONT PIECE: DOMINO SQUARE: Cast on and work as back piece domino square. Slip sts from domino on back piece back on needle tog with sts from front piece domino square. Insert 1 marker between transition between them (= 2 markers) = approx. 278-302-326-358-390-430 sts in total. BOTTOM EDGE: Work piece tog with sts from mid back (i.e. tip of domino) and to the side, down to tip mid front, up to the side and down to mid back. Cast on 16-16-12-12-12-12 sts on circular needle size 3.5 mm / US 4 with gray. Work short rows and stripes as follows: LEFT BACK PIECE BOTTOM EDGE: Work tog with sts from tip mid back and out to marker in the side as follows: ROW 1 (= RS): K 1, 1 YO and K rest of row (= 1 st inc). ROW 2 (= WS): K until 1 st remains on row, work next st tog with the first 2 sts from domino (= K 3 tog = 2 sts dec from domino) Switch to sand. ROW 3 (= RS): As 1st row. ROW 4 (= WS): K until 5 sts remain on row, turn piece. ROW 5 (= RS): K all sts. ROW 6 (= WS): K until 3 sts remain on row, turn piece. ROW 7 (= RS): K all sts. ROW 8 (= WS): K until 1 st remains on row, work next st tog with the first 2 sts from domino (= K 3 tog = 2 sts dec from domino). Switch color to gray. Repeat 1st to 8th row until all sts from tip of domino out to the side until marker has been worked tog with the edge. LEFT FRONT PIECE BOTTOM EDGE: Worked tog with sts from the side and down to tip of domino square on front piece as follows: ROW 1 (= RS): K 1, 1 YO, K 2 twisted tog, K 2 twisted tog, K the rest of row (= 1 st dec). ROW 2 (= WS): K until 1 st remains on row, work next st tog with the first 2 sts from domino (= K 3 tog = 2 sts dec from domino). Switch to sand. ROW 3 (= RS): As 1st row. ROW 4 (= WS): K until 5 sts remain on row, turn piece. ROW 5 (= RS): K all sts. ROW 6 (= WS): K until 3 sts remain on row, turn piece. ROW 7 (= RS): K all sts. ROW 8 (= WS): K until 1 st remains on row, work next st tog with the first 2 sts from domino (= K 3 tog = 2 sts dec from domino) Switch color to gray. Repeat 1st to 8th row down to tip mid front. NOTE: On last repetition of 8th or 2nd row slip the first 3 sts from stitch holder back on needle. RIGHT FRONT PIECE BOTTOM EDGE: Work tog with sts from tip of domino square on front piece and out to marker in the side as left back piece bottom edge. RIGHT BACK PIECE BOTTOM EDGE: Worked tog with sts from the side and down to tip of domino square on front piece as left front piece bottom edge. Adjust so that last stripe is with sand. Bind off. BACK PIECE: Now work yoke on back piece with gray as follows: RIGHT BACK PIECE: Pick up 64-70-76-84-92-102 sts with gray from RS on needle size 3.5 mm / US 4 on one side of domino, pick up 2 sts on tip of domino, pick up 64-70-76-84-92-102 sts down the other side of domino = 130-142-154-170-186-206 sts. K 1 row from WS and inc 15-13-13-11-13-9 sts evenly on each side of tip (= 30-26-26-22-26-18 sts inc in total) = 80-84-90-96-106-112 sts on each side (= 160-168-180-192-212-224 sts in total). Then work over the first 80-84-90-96-106-112 sts (i.e. in right side of piece seen from RS) as follows: READ ALL OF THE FOLLOWING SECTION BEFORE CONTINUING! WORK SHORT ROWS, SHORT RIDGES AND INC IN THE SIDE AT THE SAME TIME AS FOLLOWS: Row 1 (= RS): K the first 2 sts tog, turn piece (= 1 st). Row 2 (= WS): K back. Row 3 (= RS): K 1, insert 1 marker, K the next 2 sts from domino tog, turn piece (= 2 sts). Move the marker upwards when working. Row 4 (= WS): K back. Row 5 (= RS): K 2, K the next 2 sts tog, turn piece (= 3 sts). Row 6 (= WS): K back. Row 7 (= RS): K 3, K the next 2 sts tog, turn piece (= 4 sts). Row 8 (= WS): K back. Continue the short rows like this, i.e. work over 2 sts more on every row from RS but work them 2 K tog, i.e. 2 sts become 1 st. Continue like this until all sts up to tip of domino have been worked. SHORT RIDGES: Applies only to size L-XL-XXL-XXXL: When piece measures 0-0-2-2-2-2 cm / 0"-0"-3/4"-3/4"-3/4"-3/4", work 0-0-1-1-1-1 short ridge (i.e. work from RS until where the last turn was, turn piece and work back = 2 rows = 1 short ridge) over the sts already worked, work short ridge every 0-0-5-4-3-2 cm / 0"-0"-2"-1½"-1"-3/4" 0-0-4-6-8-11 times in total. INC IN THE SIDE: When yoke measures 1 cm / 3/8'', inc 1 st inside 1 edge st at beg of next row from RS. Inc like this every 1½-1-1-½-½-½ cm/½"-3/8"-3/8"-1/4"-1/4"-1/4" 9-12-14-17-19-22 times in total = 10-13-15-18-20-23 sts before marker. When yoke measures 15-14-15-14-15-17 cm / 6"-5½"-6"-5½"-6"-6 3/4" (measured along the side), bind off for armhole at beg of every row from RS as follows: bind off 3 sts a total of 1-1-2-2-2-3 times, 2 sts a total of 1-2-2-3-4-4 times and 1 st a total of 4-5-4-5-5-5 times (i.e. 1 st remains before marker). Piece measures approx. 19-21-23-25-28-31 cm / 7½"-8 1/4"-9"-9 3/4"-11"-12 1/4" measured in the side from domino and up. When the short rows have been worked, there are 40-42-45-48-53-56 sts in total on needle. Slip sts on 1 stitch holder and work left back piece. LEFT BACK PIECE: = 80-84-90-96-106-112 sts. READ ALL OF THE FOLLOWING SECTION BEFORE CONTINUING! WORK SHORT ROWS, SHORT RIDGES AND INC IN THE SIDE AT THE SAME TIME AS FOLLOWS: SHORT ROWS: Row 1 (= WS): Work the first 2 sts from domino, turn piece. Row 2 (= RS): Work the 2 sts K tog (= 1 st). Row 3 (= WS): K 1, insert 1 marker, work the next 2 sts from domino, turn piece (= 3 sts). Move the marker upwards when working. Row 4 (= RS): K 2 tog, K 1 (= 2 sts). Row 5 (= WS): K 2, work the next 2 sts from domino, turn piece (= 4 sts). Row 6 (= RS): K 2 tog, K the rest of row. Row 7 (= WS): K, work the next 2 sts from domino, turn piece (= 4 sts). Row 8 (= RS): K 2 tog, K the rest of row. Continue the short rows like this, i.e. work over 2 sts more from domino on every row from WS and dec 1 st at beg of the every row from RS, i.e. 2 sts become 1 st. Continue like this until all sts up to tip of domino have been worked. SHORT RIDGES: Applies only to size L-XL-XXL-XXXL: When piece measures 0-0-2-2-2-2 cm / 0"-0"-3/4"-3/4"-3/4"-3/4", work 0-0-1-1-1-1 short ridge (i.e. work from WS until where the last turn was, turn piece and work back = 2 rows = 1 short ridge) over the sts already worked, work short ridge every 0-0-5-4-3-2 cm / 0"-0"-2"-1½"-1"-3/4" 0-0-4-6-8-11 times in total. INC IN THE SIDE: When yoke measures 1 cm / 3/8'', inc 1 st inside 1 edge st at end of next row from RS. Inc like this every 1½-1-1- ½-½-½ cm/½"-3/8"-3/8"-1/4"-1/4"-1/4" 9-12-14-17-19-22 times in total = 10-13-15-18-20-23 sts before marker. When yoke measures 15-14-15-14-15-17 cm / 6"-5½"-6"-5½"-6"-6 3/4" (measured along the side), bind off for armhole at beg of every row from WS as follows: bind off 3 sts a total of 1-1-2-2-2-3 times, 2 sts a total of 1-2-2-3-4-4 times and 1 st a total of 4-5-4-5-5-5 times (i.e. 1 st remains after marker). Piece measures approx. 19-21-23-25-28-31 cm / 7½"-8 1/4"-9"-9 3/4"-11"-12 1/4" measured in the side from domino and up. When the short rows have been worked, there are 40-42-45-48-53-56 sts in total on needle. BACK PIECE: Slip sts from right and left back piece on to same needle = 80-84-90-96-106-112 sts. Work in garter st. When piece measures 13-11-11-9-8-8 cm / 5"-4½"-4½"-3½"-3½"-3" from tip of domino (approx. 2 cm / 3/4'' remain), bind off the middle 34-34-38-38-40-40 sts for neck and finish each shoulder separately = 23-25-26-29-33-36 sts remain on shoulder. On next row from the neck dec 1 st = 22-24-25-28-32-35 sts. Work in garter st until piece measures 15-13-13-11-10-10 cm / 6"-5"-5"-4½"-4"-4'' from tip of domino. Bind off. The whole piece measures approx. 60-62-64-66-71-77 cm / 23½"-24½"-25 1/4"-26"-28"-30½". Work the other shoulder the same way. FRONT PIECE: RIGHT FRONT PIECE: Work as left back piece. LEFT FRONT PIECE: Work as right back piece. FRONT PIECE: Slip sts from right and left front piece on to same needle = 80-84-90-96-106-112 sts. Work in garter st. When piece measures 8-6-4-2-1-1 cm / 3"-2 1/4"-1½"-3/4"-½"-½" from tip of domino, loosely bind off the middle 20 sts for neck and finish each shoulder separately = 30-32-35-38-43-46 sts remain on shoulder. Then dec on every row from neck by dec 1 st inside 3 edge sts on every row from RS 8-8-10-10-11-11 times in total = 22-24-25-28-32-35 sts remain on shoulder. Work in garter st until piece measures 7-7-8-8-9-9 cm / 2¾''-2¾''-3 1/8''-3 1/8''-3½''-3½'' in total from the 20 sts bind off for neck, bind off. The whole piece measures approx. 60-62-64-66-71-77 cm / 23½"-24½"-25 1/4"-26"-28"-30½". Work the other shoulder the same way. SLEEVE: Worked in the round on double pointed needles. Cast on 46-48-50-54-56-58 sts on double pointed needles size 3.5 mm / US 4 with sand. Work PATTERN - see explanation above. When piece measures 14-12-10-8-3 cm / 5½"-4 3/4"-4"-3"-1", insert 1 marker at beg of round, inc 1 st on each side of marker – see INCREASE TIP. Inc like this every 1½ cm / ½'' 21-22-23-24-25-26 times in total = 88-92-96-102-106-110 sts. When piece measures 48-47-46-45-43-42 cm / 19"-18½"-18"-17 3/4"-17"-16½" (shorter measurements in the larger sizes because of longer sleeve cap and wider shoulders). Continue to work back and forth and bind off for sleeve cap at beg of every row in each side of piece as follows: bind off 4 sts 2 times, 2 sts 3 times and 1 st 2 times, then bind off 2 sts in each side until piece measures 56-56-56-56-55-54 cm / 22"-22"-22"-22"-21½"-21½", then bind off 3 sts 1 time in each side of piece. Bind off the remaining sts. Make another sleeve the same way. ASSEMBLY: Assemble with gray. Sew bottom edge tog mid back in outer loop of outermost st. Sew the shoulder seams. Sew in sleeves with WS outwards, i.e. stockinette st is turned inwards. Sew side seams down to bottom edge in outer loop of edge sts. |
||||||||||||||||
Diagram explanations |
||||||||||||||||
|
||||||||||||||||
 |
||||||||||||||||
Have you finished this pattern?Tag your pictures with #dropspattern #taurielsweater or submit them to the #dropsfan gallery. Do you need help with this pattern?You'll find 26 tutorial videos, a Comments/Questions area and more by visiting the pattern on garnstudio.com. © 1982-2026 DROPS Design A/S. We reserve all rights. This document, including all its sub-sections, has copyrights. Read more about what you can do with our patterns at the bottom of each pattern on our site. |
||||||||||||||||


With over 40 years in knitting and crochet design, DROPS Design offers one of the most extensive collections of free patterns on the internet - translated to 17 languages. As of today we count 324 catalogs and 12290 patterns - 12280 of which are translated into English (US/in).
We work hard to bring you the best knitting and crochet have to offer, inspiration and advice as well as great quality yarns at incredible prices! Would you like to use our patterns for other than personal use? You can read what you are allowed to do in the Copyright text at the bottom of all our patterns. Happy crafting!
Post a comment to pattern DROPS 173-4
We would love to hear what you have to say about this pattern!
If you want to leave a question, please make sure you select the correct category in the form below, to speed up the answering process. Required fields are marked *.