
Popular categories
Looking for a yarn?


Comments / Questions (149)
![]() Carmen wrote:
Carmen wrote:
Buenos días. En la orilla inferior, frente izquierdo no entiendo esta parte (la nota). “NOTA: En la última repetición de la hilera 8 o de la 2, deslizar los primeros 3 pts del gancho auxiliar de vuelta en la ag.” Significa que antes de enganchar el último punto de la orilla junto con los dos del dominó juntos tengo que deslizar a la aguja de la orilla tres puntos del dominó y después ya hacer lo anterior? Muchas gracias
05.12.2017 - 13:32
![]() Coutarel wrote:
Coutarel wrote:
J'en suis apres les rayures de la manche je tourne la manche à l'envers il faut tricoter tout en maille endroit cela fera du point mousse sur l'endroit ou faut il tricoter sur des aiguilles circulaires et tricoter en jersey endroit ?
29.11.2017 - 16:50DROPS Design answered:
Bonjour Mme Coutarel, après la bordure rayée (tricotée normalement en rond, sur l'endroit) tournez l'ouvrage pour tricoter maintenant sur l'envers et tricotez tout en mailles endroit, vous êtes désormais sur l'envers de la manche. Si vous ne voulez pas tourner l'ouvrage, continuez simplement en rond, en jersey envers (= toutes les mailles à l'envers). Bon tricot!
30.11.2017 - 08:13
![]() Coutarel wrote:
Coutarel wrote:
Comment tricotez vous les manches le point mousse en rond ? et puis après vous dites de tricoter sur l'envers en jersey
28.11.2017 - 15:20DROPS Design answered:
Bonjour Mme Coutarel, pour tricoter du point mousse en rond, tricotez: 1 tour end, 1 tour env = 1 côte mousse - voir aussi "POINT FANTAISIE (manches)" pour les rayures. Quand ces rayures sont faites, on continue en jersey envers, pour que ce soit plus simple et pour ne tricoter que des mailles endroit, on tourne pour continuer sur l'envers et ainsi tricoter en rond, en mailles endroit, et à la fin de la manche, on retournera la manche sur l'endroit. Bon tricot!
28.11.2017 - 15:46
![]() Coutarel wrote:
Coutarel wrote:
Merci aux stylistes pour ces modèles originaux et unique dans la manière d'être tricoter
16.11.2017 - 09:54
![]() Coutarel wrote:
Coutarel wrote:
J'ai fait le 1er rang du demi dos droit pour commencer mes rangs raccourcis, donc je me retrouve avec mes 2 premières mailles tricotées ensemble et mon marqueur à droite du travail, je tourne sur l'envers puis le rang 3 jusque la pas de problème au rang 5 j'ai 1 maille avant le marqueur à droite donc expliquez moi comment vous avez 2 m endroit avant le marqueur moi je n'en ai qu'une seule avant le marqueur ?
15.11.2017 - 14:05DROPS Design answered:
Bonjour Mme Coutarel, vous commencez les côtes raccourcies quand vous avez déjà tricoté 2 cm de ce côté du domino, et vous avez déjà commencé à augmenter sur le côté (1ère augmentation à 1 cm): tricotez toutes les mailles sur l'endroit (sans les 2 mailles ens du domino), tournez et tricotez le rang retour sur l'envers = 1 côte mousse raccourcie. C'est-à-dire que les côtes raccourcies se tricotent sur les mailles du côté du domino, sans tricoter 2 m en plus du domino (augmentez si besoin sur le côté après la m lisière si nécessaire). Bon tricot!
15.11.2017 - 14:43
![]() Coutarel wrote:
Coutarel wrote:
Je voudrais être sure de bien comprendre les augmentations avant le marqueur se font naturellement en rajoutant une maille à chaque rang avant le marqueur , puisqu'on a une maille au début puis 2 puis 3 puis 4 et ainsi de suite donc on ne tiens pas compte des augmentations sur le côté ?
15.11.2017 - 06:02DROPS Design answered:
Bonjour Mme Coutarel, les augmentations se font à 1 m du bord, en début de rang sur l'endroit (demi-dos droit) 14 x au total tous les 1 cm. Ces augmentations vont se situer avant le marqueur, donc après la 1ère augmentation, on aura 2 m avant le marqueur, puis 3 etc.. il y aura 15 m avant le marqueur quand toutes les augmentations seront faites (les 14 augmentations à 1 m du bord + la 1ère maille du rang 3, celle qui est juste avant le marqueur) + toutes les autres mailles à gauche, celles du domino que vous aurez intégré progressivement au côté. Bon tricot!
15.11.2017 - 08:53
![]() Coutarel wrote:
Coutarel wrote:
Faut il faire les côtes mousses raccourcies en taille L à 2 cm ?
14.11.2017 - 18:56DROPS Design answered:
Bonjour Mme Coutarel, oui tout à fait, à 2 cm depuis le début du côté, vous tricotez 1 côte mousse raccourcie 4 fois tous les 5 cm; Bon tricot!
15.11.2017 - 08:46
![]() Coutarel wrote:
Coutarel wrote:
Vous dites côtes mousses raccourcies à faire seulement en taille L c'est bien ça ?
14.11.2017 - 09:58DROPS Design answered:
Tout à fait, hors il semble qu'en taille L, on ne les tricote pas (0 côte mousse, 0 fois tous les 0 cm), la confirmation a été demandée à nos stylistes. Merci pour votre patience.
14.11.2017 - 11:12
![]() Coutarel wrote:
Coutarel wrote:
à droite du marqueur vous dites 2 mailles ensemble au rang 1 que fait on de la maille augmentée vous augmentez sur l'endroit on ne peut pas faire les 2 m ensemble puis que j'ai une maille le marqueur ?
14.11.2017 - 09:56DROPS Design answered:
Bonjour Madame Coutarel, au 1er rang, on tricote 2 m ens à l'end, et on place le marqueur après la 1ère m au rang 3 - faites suivre ce marqueur, après cette maille tricotée (= 1ère du rang), tricotez les 2 m suivantes du dommino ensemble à l'endroit = vous avez 2 mailles. Suivez bien les rangs 1 à 8 et continuez ensuite en tricotant les mailles du côté + les 2 m suivantes du domino ensemble à l'end = 1 m en plus tous les rangs sur l'endroit. Vous avez toujours 1 m avant le marqueur jusqu'à ce que vous commenciez les augmentations. Bon tricot!
14.11.2017 - 11:11
![]() Coutarel wrote:
Coutarel wrote:
Je tricote l'empiècement coté demi dos droit je ne comprends pas vos rangs raccourcis ? je fais une taille L pour la cote mousse raccourcie on suit toujours les explications ?ou mesurez ?
14.11.2017 - 06:36DROPS Design answered:
Bonjour Mme Coutarel, il semble qu'en taille L on ne fait pas les côtes mousses raccourcies - continuez les rangs raccourcis comme les 8 premiers rangs, mais en tricotant 2 m ensemble à l'endroit du domino tous les rangs sur l'endroit (sur l'envers, tricotez les mailles à l'endroit) jusqu'à ce que toutes les mailles du côté droit aient été tricotées, en même temps, augmentez à partir d'1 cm sur le côté (= en début de rang sur l'endroit) 14 x tous les 1 cm (= 15 m avant le marqueur soit 14 augm+ la m avant le marqueur). Mesurez à partir du 1er rang de cette partie. Bon tricot!
14.11.2017 - 09:34
|
||||||||||||||||
Tauriel#taurielsweater |
||||||||||||||||
|
|
||||||||||||||||
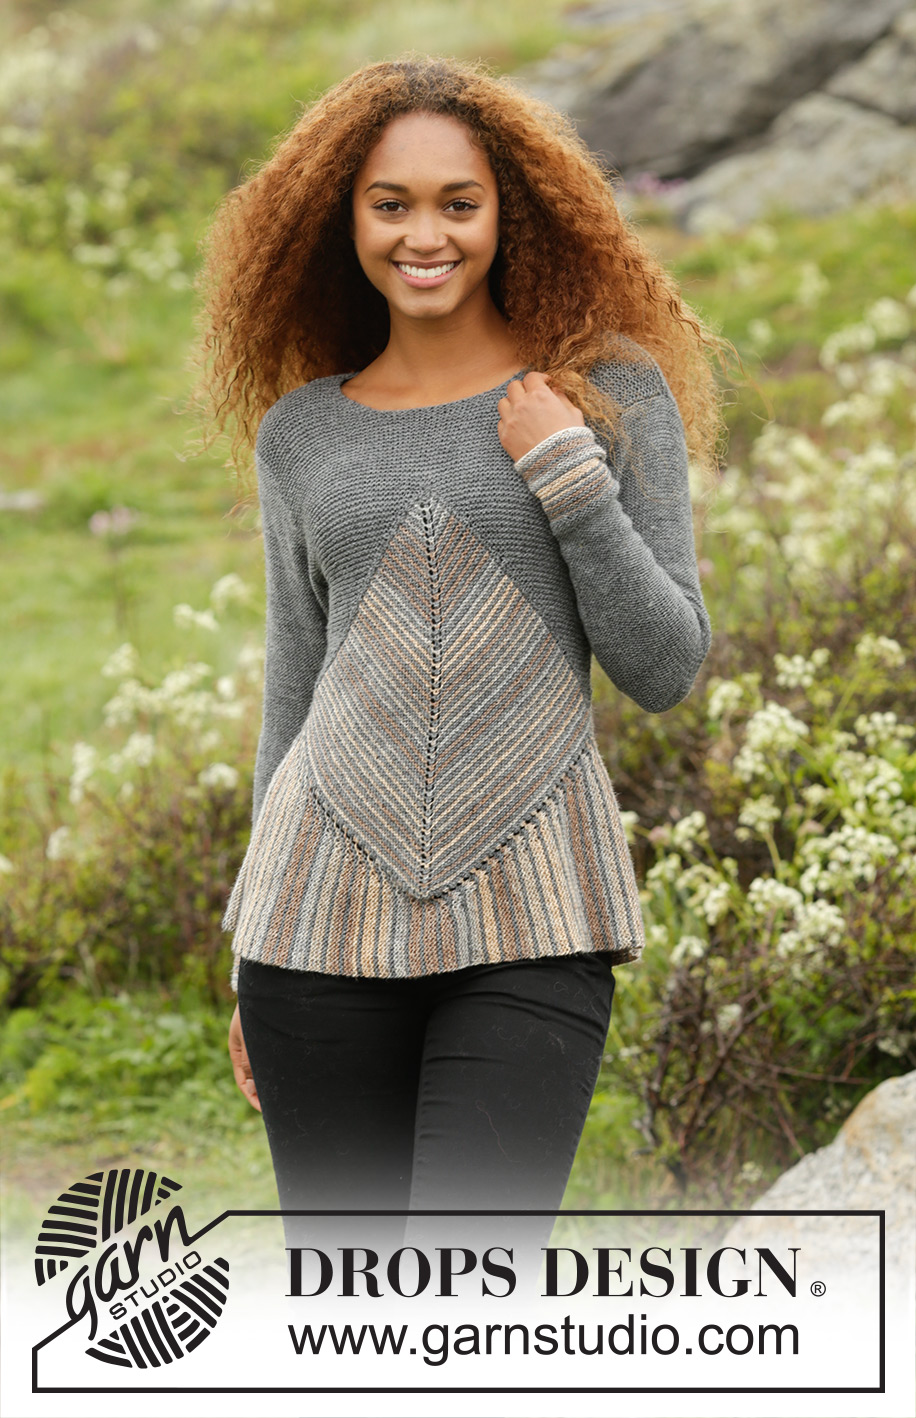
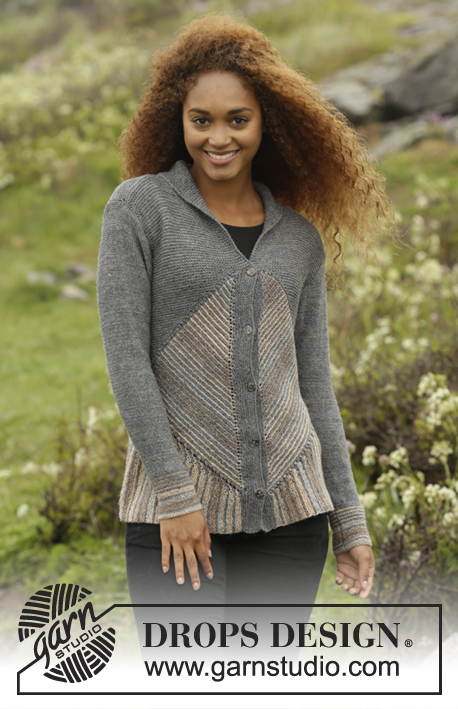
Knitted DROPS jumper in garter st with domino squares and stripes in ”Fabel”. Size: S - XXXL.
DROPS 173-4 |
||||||||||||||||
|
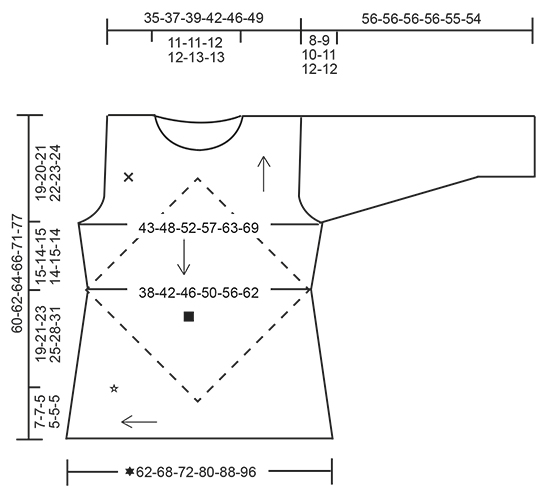
GARTER ST (back and forth): K all rows. 1 ridge = K2 rows. STRIPES: * Work 1 ridge in GARTER ST - see explanation above, with sand. Work 1 ridge with gray. *, repeat from *-* until finished measurements. First row with new color is always from RS. DOMINO SQUARE: Insert 1 marker in the middle st. ROW 1 (= RS): K until st with marker, 1 YO, K 1 (st with marker), 1 YO, K the rest of row (= 2 sts inc). ROW 2 (= WS): K all sts. Repeat 1st and 2nd row, i.e. inc 2 sts in the middle of the square on every row from RS. INCREASE TIP (applies to sleeve): All inc are done from RS. Work until 2 sts remain before marker, 1 YO (= 1 st inc), K 4 (marker is in the middle of these sts), 1 YO (= 1 sts inc). Work YO twisted on next round. PATTERN (applies to sleeve): Work * 3 ridges with sand, work 1 ridge with gray *, repeat from *-* 4 times in total, then work stripes as follows: Work * 1 ridge with sand, work 1 ridge with gray *, repeat from *-* 4 times in total. Now work piece in gray until finished measurements. Turn piece inside out to that WS is outwards and continue in stockinette st. ---------------------------------------------------------- JUMPER: Work first 2 domino squares – see square on chart, then work 1 edge to sts on domino square (i.e. bottom edge of jumper) with short rows - see star on chart. Edge is worked from mid back to mid front and mid back again. Finally work a yoke on jumper over domino square - se cross on chart. BACK PIECE: DOMINO SQUARE: Cast on 5 sts on circular needle size 3.5 mm / US 4 with gray. K 1 row from WS. Switch color to sand and work DOMINO SQUARE - see explanation above, back and forth and STRIPES – see explanation above. REMEMBER THE KNITTING GAUGE Work Domino square and stripes until piece measures 38-42-46-50-56-62 cm / 15"-16½"-18"-19 3/4"-22"-24½" at the widest = approx. 62-68-74-82-90-100 ridges, adjust so that last ridge is with sand, and approx. 64-70-76-84-92-102 sts on each side of st with marker (= approx. 129-141-153-169-185-205 sts in total on needle). Work 1 ridge with gray and inc as before (i.e. 1 st on each side of st with marker) and inc 4 sts evenly on each side of mid st on row from RS (= 10 sts inc in total on row from RS) = approx. 69-75-81-89-97-107 sts on each side of st with marker (= approx. 139-151-163-179-195-215 sts in total on needle). Slip sts on a stitch holder and work front piece domino square. FRONT PIECE: DOMINO SQUARE: Cast on and work as back piece domino square. Slip sts from domino on back piece back on needle tog with sts from front piece domino square. Insert 1 marker between transition between them (= 2 markers) = approx. 278-302-326-358-390-430 sts in total. BOTTOM EDGE: Work piece tog with sts from mid back (i.e. tip of domino) and to the side, down to tip mid front, up to the side and down to mid back. Cast on 16-16-12-12-12-12 sts on circular needle size 3.5 mm / US 4 with gray. Work short rows and stripes as follows: LEFT BACK PIECE BOTTOM EDGE: Work tog with sts from tip mid back and out to marker in the side as follows: ROW 1 (= RS): K 1, 1 YO and K rest of row (= 1 st inc). ROW 2 (= WS): K until 1 st remains on row, work next st tog with the first 2 sts from domino (= K 3 tog = 2 sts dec from domino) Switch to sand. ROW 3 (= RS): As 1st row. ROW 4 (= WS): K until 5 sts remain on row, turn piece. ROW 5 (= RS): K all sts. ROW 6 (= WS): K until 3 sts remain on row, turn piece. ROW 7 (= RS): K all sts. ROW 8 (= WS): K until 1 st remains on row, work next st tog with the first 2 sts from domino (= K 3 tog = 2 sts dec from domino). Switch color to gray. Repeat 1st to 8th row until all sts from tip of domino out to the side until marker has been worked tog with the edge. LEFT FRONT PIECE BOTTOM EDGE: Worked tog with sts from the side and down to tip of domino square on front piece as follows: ROW 1 (= RS): K 1, 1 YO, K 2 twisted tog, K 2 twisted tog, K the rest of row (= 1 st dec). ROW 2 (= WS): K until 1 st remains on row, work next st tog with the first 2 sts from domino (= K 3 tog = 2 sts dec from domino). Switch to sand. ROW 3 (= RS): As 1st row. ROW 4 (= WS): K until 5 sts remain on row, turn piece. ROW 5 (= RS): K all sts. ROW 6 (= WS): K until 3 sts remain on row, turn piece. ROW 7 (= RS): K all sts. ROW 8 (= WS): K until 1 st remains on row, work next st tog with the first 2 sts from domino (= K 3 tog = 2 sts dec from domino) Switch color to gray. Repeat 1st to 8th row down to tip mid front. NOTE: On last repetition of 8th or 2nd row slip the first 3 sts from stitch holder back on needle. RIGHT FRONT PIECE BOTTOM EDGE: Work tog with sts from tip of domino square on front piece and out to marker in the side as left back piece bottom edge. RIGHT BACK PIECE BOTTOM EDGE: Worked tog with sts from the side and down to tip of domino square on front piece as left front piece bottom edge. Adjust so that last stripe is with sand. Bind off. BACK PIECE: Now work yoke on back piece with gray as follows: RIGHT BACK PIECE: Pick up 64-70-76-84-92-102 sts with gray from RS on needle size 3.5 mm / US 4 on one side of domino, pick up 2 sts on tip of domino, pick up 64-70-76-84-92-102 sts down the other side of domino = 130-142-154-170-186-206 sts. K 1 row from WS and inc 15-13-13-11-13-9 sts evenly on each side of tip (= 30-26-26-22-26-18 sts inc in total) = 80-84-90-96-106-112 sts on each side (= 160-168-180-192-212-224 sts in total). Then work over the first 80-84-90-96-106-112 sts (i.e. in right side of piece seen from RS) as follows: READ ALL OF THE FOLLOWING SECTION BEFORE CONTINUING! WORK SHORT ROWS, SHORT RIDGES AND INC IN THE SIDE AT THE SAME TIME AS FOLLOWS: Row 1 (= RS): K the first 2 sts tog, turn piece (= 1 st). Row 2 (= WS): K back. Row 3 (= RS): K 1, insert 1 marker, K the next 2 sts from domino tog, turn piece (= 2 sts). Move the marker upwards when working. Row 4 (= WS): K back. Row 5 (= RS): K 2, K the next 2 sts tog, turn piece (= 3 sts). Row 6 (= WS): K back. Row 7 (= RS): K 3, K the next 2 sts tog, turn piece (= 4 sts). Row 8 (= WS): K back. Continue the short rows like this, i.e. work over 2 sts more on every row from RS but work them 2 K tog, i.e. 2 sts become 1 st. Continue like this until all sts up to tip of domino have been worked. SHORT RIDGES: Applies only to size L-XL-XXL-XXXL: When piece measures 0-0-2-2-2-2 cm / 0"-0"-3/4"-3/4"-3/4"-3/4", work 0-0-1-1-1-1 short ridge (i.e. work from RS until where the last turn was, turn piece and work back = 2 rows = 1 short ridge) over the sts already worked, work short ridge every 0-0-5-4-3-2 cm / 0"-0"-2"-1½"-1"-3/4" 0-0-4-6-8-11 times in total. INC IN THE SIDE: When yoke measures 1 cm / 3/8'', inc 1 st inside 1 edge st at beg of next row from RS. Inc like this every 1½-1-1-½-½-½ cm/½"-3/8"-3/8"-1/4"-1/4"-1/4" 9-12-14-17-19-22 times in total = 10-13-15-18-20-23 sts before marker. When yoke measures 15-14-15-14-15-17 cm / 6"-5½"-6"-5½"-6"-6 3/4" (measured along the side), bind off for armhole at beg of every row from RS as follows: bind off 3 sts a total of 1-1-2-2-2-3 times, 2 sts a total of 1-2-2-3-4-4 times and 1 st a total of 4-5-4-5-5-5 times (i.e. 1 st remains before marker). Piece measures approx. 19-21-23-25-28-31 cm / 7½"-8 1/4"-9"-9 3/4"-11"-12 1/4" measured in the side from domino and up. When the short rows have been worked, there are 40-42-45-48-53-56 sts in total on needle. Slip sts on 1 stitch holder and work left back piece. LEFT BACK PIECE: = 80-84-90-96-106-112 sts. READ ALL OF THE FOLLOWING SECTION BEFORE CONTINUING! WORK SHORT ROWS, SHORT RIDGES AND INC IN THE SIDE AT THE SAME TIME AS FOLLOWS: SHORT ROWS: Row 1 (= WS): Work the first 2 sts from domino, turn piece. Row 2 (= RS): Work the 2 sts K tog (= 1 st). Row 3 (= WS): K 1, insert 1 marker, work the next 2 sts from domino, turn piece (= 3 sts). Move the marker upwards when working. Row 4 (= RS): K 2 tog, K 1 (= 2 sts). Row 5 (= WS): K 2, work the next 2 sts from domino, turn piece (= 4 sts). Row 6 (= RS): K 2 tog, K the rest of row. Row 7 (= WS): K, work the next 2 sts from domino, turn piece (= 4 sts). Row 8 (= RS): K 2 tog, K the rest of row. Continue the short rows like this, i.e. work over 2 sts more from domino on every row from WS and dec 1 st at beg of the every row from RS, i.e. 2 sts become 1 st. Continue like this until all sts up to tip of domino have been worked. SHORT RIDGES: Applies only to size L-XL-XXL-XXXL: When piece measures 0-0-2-2-2-2 cm / 0"-0"-3/4"-3/4"-3/4"-3/4", work 0-0-1-1-1-1 short ridge (i.e. work from WS until where the last turn was, turn piece and work back = 2 rows = 1 short ridge) over the sts already worked, work short ridge every 0-0-5-4-3-2 cm / 0"-0"-2"-1½"-1"-3/4" 0-0-4-6-8-11 times in total. INC IN THE SIDE: When yoke measures 1 cm / 3/8'', inc 1 st inside 1 edge st at end of next row from RS. Inc like this every 1½-1-1- ½-½-½ cm/½"-3/8"-3/8"-1/4"-1/4"-1/4" 9-12-14-17-19-22 times in total = 10-13-15-18-20-23 sts before marker. When yoke measures 15-14-15-14-15-17 cm / 6"-5½"-6"-5½"-6"-6 3/4" (measured along the side), bind off for armhole at beg of every row from WS as follows: bind off 3 sts a total of 1-1-2-2-2-3 times, 2 sts a total of 1-2-2-3-4-4 times and 1 st a total of 4-5-4-5-5-5 times (i.e. 1 st remains after marker). Piece measures approx. 19-21-23-25-28-31 cm / 7½"-8 1/4"-9"-9 3/4"-11"-12 1/4" measured in the side from domino and up. When the short rows have been worked, there are 40-42-45-48-53-56 sts in total on needle. BACK PIECE: Slip sts from right and left back piece on to same needle = 80-84-90-96-106-112 sts. Work in garter st. When piece measures 13-11-11-9-8-8 cm / 5"-4½"-4½"-3½"-3½"-3" from tip of domino (approx. 2 cm / 3/4'' remain), bind off the middle 34-34-38-38-40-40 sts for neck and finish each shoulder separately = 23-25-26-29-33-36 sts remain on shoulder. On next row from the neck dec 1 st = 22-24-25-28-32-35 sts. Work in garter st until piece measures 15-13-13-11-10-10 cm / 6"-5"-5"-4½"-4"-4'' from tip of domino. Bind off. The whole piece measures approx. 60-62-64-66-71-77 cm / 23½"-24½"-25 1/4"-26"-28"-30½". Work the other shoulder the same way. FRONT PIECE: RIGHT FRONT PIECE: Work as left back piece. LEFT FRONT PIECE: Work as right back piece. FRONT PIECE: Slip sts from right and left front piece on to same needle = 80-84-90-96-106-112 sts. Work in garter st. When piece measures 8-6-4-2-1-1 cm / 3"-2 1/4"-1½"-3/4"-½"-½" from tip of domino, loosely bind off the middle 20 sts for neck and finish each shoulder separately = 30-32-35-38-43-46 sts remain on shoulder. Then dec on every row from neck by dec 1 st inside 3 edge sts on every row from RS 8-8-10-10-11-11 times in total = 22-24-25-28-32-35 sts remain on shoulder. Work in garter st until piece measures 7-7-8-8-9-9 cm / 2¾''-2¾''-3 1/8''-3 1/8''-3½''-3½'' in total from the 20 sts bind off for neck, bind off. The whole piece measures approx. 60-62-64-66-71-77 cm / 23½"-24½"-25 1/4"-26"-28"-30½". Work the other shoulder the same way. SLEEVE: Worked in the round on double pointed needles. Cast on 46-48-50-54-56-58 sts on double pointed needles size 3.5 mm / US 4 with sand. Work PATTERN - see explanation above. When piece measures 14-12-10-8-3 cm / 5½"-4 3/4"-4"-3"-1", insert 1 marker at beg of round, inc 1 st on each side of marker – see INCREASE TIP. Inc like this every 1½ cm / ½'' 21-22-23-24-25-26 times in total = 88-92-96-102-106-110 sts. When piece measures 48-47-46-45-43-42 cm / 19"-18½"-18"-17 3/4"-17"-16½" (shorter measurements in the larger sizes because of longer sleeve cap and wider shoulders). Continue to work back and forth and bind off for sleeve cap at beg of every row in each side of piece as follows: bind off 4 sts 2 times, 2 sts 3 times and 1 st 2 times, then bind off 2 sts in each side until piece measures 56-56-56-56-55-54 cm / 22"-22"-22"-22"-21½"-21½", then bind off 3 sts 1 time in each side of piece. Bind off the remaining sts. Make another sleeve the same way. ASSEMBLY: Assemble with gray. Sew bottom edge tog mid back in outer loop of outermost st. Sew the shoulder seams. Sew in sleeves with WS outwards, i.e. stockinette st is turned inwards. Sew side seams down to bottom edge in outer loop of edge sts. |
||||||||||||||||
Diagram explanations |
||||||||||||||||
|
||||||||||||||||
 |
||||||||||||||||
Have you finished this pattern?Tag your pictures with #dropspattern #taurielsweater or submit them to the #dropsfan gallery. Do you need help with this pattern?You'll find 26 tutorial videos, a Comments/Questions area and more by visiting the pattern on garnstudio.com. © 1982-2026 DROPS Design A/S. We reserve all rights. This document, including all its sub-sections, has copyrights. Read more about what you can do with our patterns at the bottom of each pattern on our site. |
||||||||||||||||


With over 40 years in knitting and crochet design, DROPS Design offers one of the most extensive collections of free patterns on the internet - translated to 17 languages. As of today we count 324 catalogs and 12290 patterns - 12280 of which are translated into English (US/in).
We work hard to bring you the best knitting and crochet have to offer, inspiration and advice as well as great quality yarns at incredible prices! Would you like to use our patterns for other than personal use? You can read what you are allowed to do in the Copyright text at the bottom of all our patterns. Happy crafting!
Post a comment to pattern DROPS 173-4
We would love to hear what you have to say about this pattern!
If you want to leave a question, please make sure you select the correct category in the form below, to speed up the answering process. Required fields are marked *.