
Popular categories
Looking for a yarn?


Comments / Questions (149)
![]() MARINA wrote:
MARINA wrote:
Hello! complimenti per il modello, ho molta difficoltà a capire come fare il bordo inferiore, purtroppo la spiegazione non mi è sufficiente. Ho comperato il giornale italiano Maglia creativa, ho fatto i 2 quadrati domino, non so come fare i ferri accorciati raccogliendo quelli dei quadrati e soprattutto se hanno un verso ( dx sin) grazie se potete darmi un aiuto o una foto da molto vicino!
14.01.2017 - 19:54DROPS Design answered:
Buongiorno Marina, per lavorare il bordo deve incorporare le maglie del quadrato domino con quelle che lavorerà per il bordo. Deve iniziare dalla punta del quadrato dietro, e spostarsi verso il lato. Deve iniziare avviando il n° di maglie indicato per la sua taglia e lavorando i ferri accorciati dal ferro 1, a partire dal ferro 2 sul rovescio del lavoro inizierà a incorporare le maglie del quadrato domino. Deve ripetere i ferri 1-8 fino a quando arriva al segnapunti sul lato e poi continuerà incorporando le maglie del quadrato domino davanti fino alla punta. Ci riscriva se ha ancora dubbi. Buon lavoro!
15.01.2017 - 10:18Julie Dent wrote:
Can you explain exactly how to increase the following 4 sts each side please. "Work 1 ridge with gray and inc as before (i.e. 1 st on each side of st with marker) and inc 4 sts evenly on each side of mid st on row from RS.........". Is it YO method? Where do I increase? Thanks.
13.01.2017 - 15:35DROPS Design answered:
Dear Mrs Dent, the 4 sts are inc evenly on each side of the middle st (= 8 sts inc + the 2 sts inc on each side of middle st = 10 sts inc on this row), you can inc with a YO but work it then twisted on next row to avoid holes or use the inc technique you rather. Happy knitting!
13.01.2017 - 18:03
![]() Brigitte wrote:
Brigitte wrote:
Hab den Pullover fertig und getragen. Das Schößchen an den Vierecken gefällt mir nicht so gut. Würde beim nächsten Mal die bunten streifen nur mit 2 Rippen stricken. Die Machart hat mich gereizt, aber die Passform von normalen Pullovern ist besser.
07.01.2017 - 11:45
![]() Jannie wrote:
Jannie wrote:
Uha har læst og læst start på Dominorude, men forstår ikke følgende. 1. pind = retsiden og 2.p = vrang. Forstået. Men så slår jeg 5 m op. Min 1. p er ret, men skal strikke 1. p ret fra vrangsiden. Skal jeg så klippe garnet over og starte i anden ende ?
04.01.2017 - 10:33DROPS Design answered:
Hej Jannie. Nej, du strikker bare först en p r fra vrangen og herefter begynder du paa firkanten fra retten.
09.01.2017 - 15:17
![]() Jasmin wrote:
Jasmin wrote:
Hallo, ich habe beide Quadrate gestrickt und nebeneinander auf die Rundnadel genommen, dann die Markierer gesetzt. Aber auf welcher Nadel nehme ich jetzt die 16 Maschen für den unteren Rand auf? Und wie stricke ich das weiter. Stricke ich weiter mit abwechselnd sand und grau? Leider verstehe ich ab da die Anleitung nicht mehr. Lieben Dank!
02.01.2017 - 22:21DROPS Design answered:
Liebe Jasmin, die Maschen für den unteren Rand schlagen Sie auf einem separat Nadeln und jets stricken Sie mit grau die 2 ersten R, dann Reihe 3-8 mit Sand - diese 8 R so wiederholen. Viel Spaß beim stricken!
03.01.2017 - 09:24
![]() Brigitte Heinle wrote:
Brigitte Heinle wrote:
Der Halsausschnitt hat bei mir 15-16cm. Laut Anleitung 11cm?
15.12.2016 - 08:55DROPS Design answered:
Liebe Frau Heinle, beachten Sie, daß Ihre Maschenprobe stimmt. Viel Spaß beim stricken!
01.02.2017 - 11:34
![]() Liesbeth Koetsenruyter wrote:
Liesbeth Koetsenruyter wrote:
Hallo , is de instructievideo al klaar en zo ja , waar kan ik die vinden. Ik kom er echt niet uit ! Volgens mij bij naald 8 bij de onderkant, kan ik die niet aan de domino samenbreien, want dan ben ik onderaan. Als ik duidelijk ben ?
04.12.2016 - 19:38DROPS Design answered:
Hoi Liesbeth. Nee, helaas. Als die beschikbaar is, dan staat ie ook op de site.
05.12.2016 - 12:30
![]() Monika wrote:
Monika wrote:
Passe rechtes Rückenteil: hier heißt es: wenn die Passe eine Länge von 1 cm hat. Was genau ist damit gemeint. Von wo bis wo genau wird gemessen? Von rechts nach links gemessen also die Anzahl der Maschen, oder in die Höhe, also die Reihen, die gestrickt sind. Irgendwie habe ich gerade einen Knoten im Denken...
24.11.2016 - 12:54DROPS Design answered:
Liebe Monika, es wird hier in die Höhe gemessen, von Anfang der Passe. Viel Spaß beim stricken!
24.11.2016 - 13:00
![]() Monika wrote:
Monika wrote:
Unterer Rand: hier stricke ich verkürzte Reihen. Muss dann in R 5 und 7 die erste M re gestrickt oder abgehoben werden? Hier steht re, aber bei verkürzten R kenne ich das mit abheben. Welche Rand-M empfehlen Sie für den unteren Rand als schönen Abschluss?
21.11.2016 - 13:01DROPS Design answered:
Liebe Monika, Sie können die verkürtzten Reihen stricken, wie Sie damit gewöhnt sind. Die erste Masche am unteren Rand wird auch kraus re gestrickt. Viel Spaß beim stricken!
21.11.2016 - 13:22
![]() Monika wrote:
Monika wrote:
1. Li. Rückenteil unterer Rand: "Ab der Spitze des Dominoquadrat" Ich beginne also nicht am Anfang der M des DQ, sondern in der Mitte mit dem Zusammenstricken von Quadrat und Unterteil? Also ist das erste Zusammenstricken über die letzte M des Anschlags , über die Mittel-M und die danebenliegende M? 2. Die 1. Hin-R wird nur über die angeschlagenen 16 M (M) gestrickt, erst in der Rück-R werden dann die angeschlagenen M mit dem Dominoquadrat verbunden? Vielen Dank für die Hilfe!
15.11.2016 - 14:43DROPS Design answered:
Liebe Monika, ja genau, unterer Rand beginnt mit der Maschen in der Mitte des Dominoquadrats. Die ersten 2 Maschen von Domino die zsgestrickt wird sind von der Spitze gezählt + die nächste. Und genau auch, das Zusammenstricken begint mit dem 1. Rückreihe, dh wie beschrieben. Viel Spaß beim stricken!
15.11.2016 - 15:02
|
||||||||||||||||
Tauriel#taurielsweater |
||||||||||||||||
|
|
||||||||||||||||
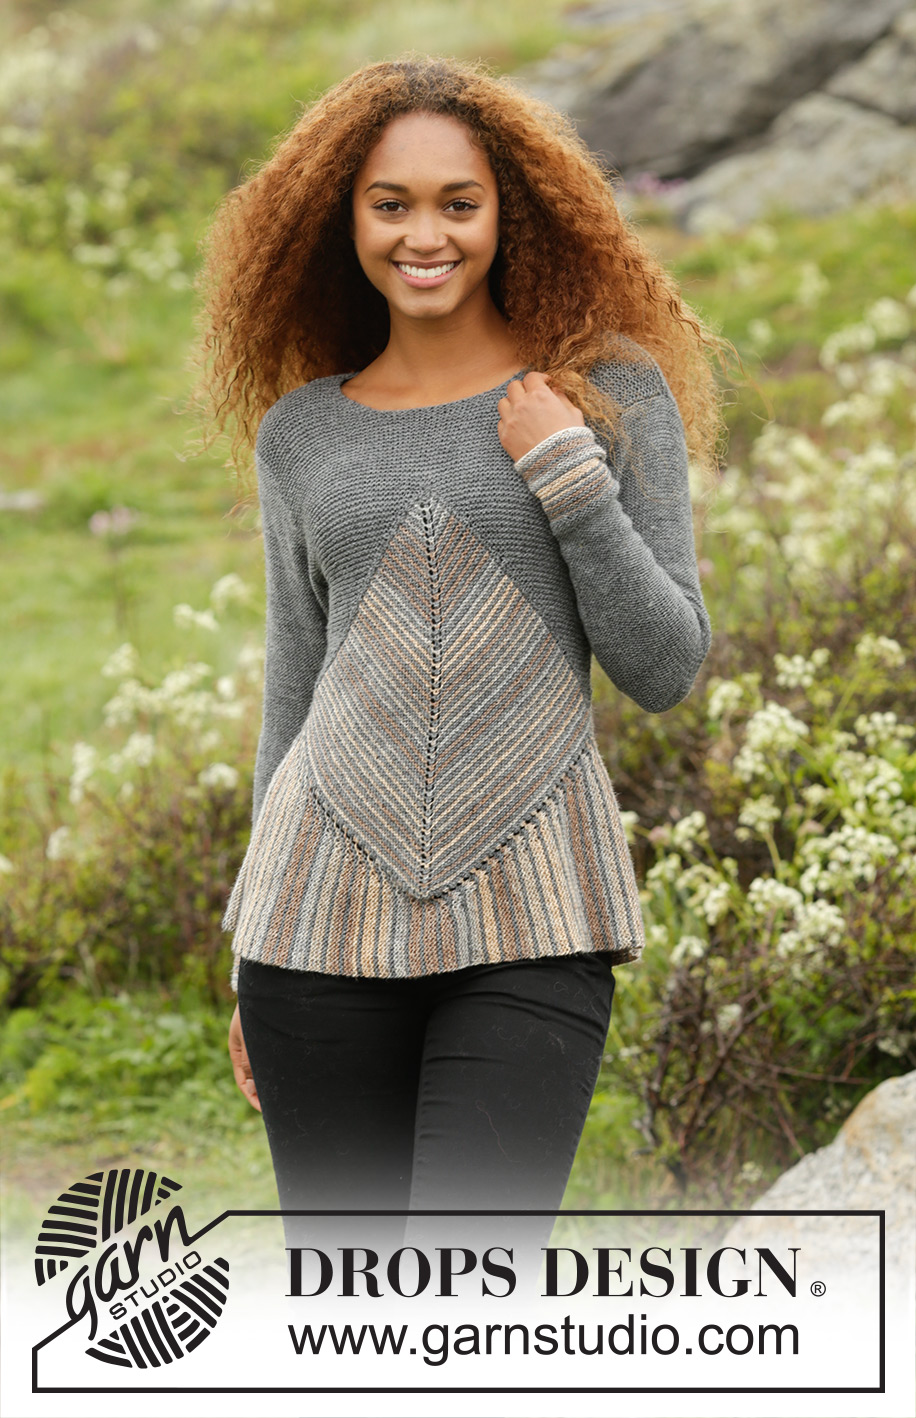
Knitted DROPS jumper in garter st with domino squares and stripes in ”Fabel”. Size: S - XXXL.
DROPS 173-4 |
||||||||||||||||
|
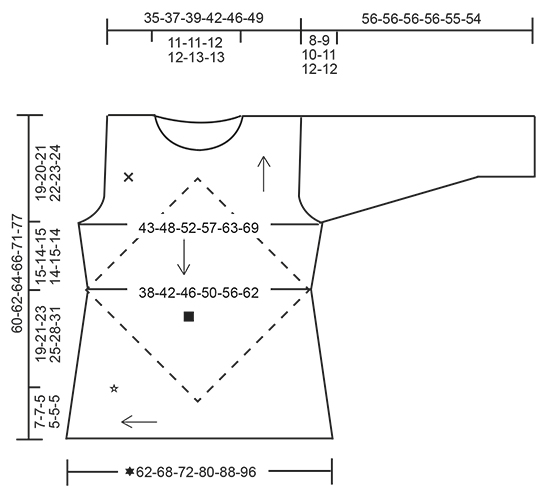
GARTER ST (back and forth): K all rows. 1 ridge = K2 rows. STRIPES: * Work 1 ridge in GARTER ST - see explanation above, with sand. Work 1 ridge with gray. *, repeat from *-* until finished measurements. First row with new color is always from RS. DOMINO SQUARE: Insert 1 marker in the middle st. ROW 1 (= RS): K until st with marker, 1 YO, K 1 (st with marker), 1 YO, K the rest of row (= 2 sts inc). ROW 2 (= WS): K all sts. Repeat 1st and 2nd row, i.e. inc 2 sts in the middle of the square on every row from RS. INCREASE TIP (applies to sleeve): All inc are done from RS. Work until 2 sts remain before marker, 1 YO (= 1 st inc), K 4 (marker is in the middle of these sts), 1 YO (= 1 sts inc). Work YO twisted on next round. PATTERN (applies to sleeve): Work * 3 ridges with sand, work 1 ridge with gray *, repeat from *-* 4 times in total, then work stripes as follows: Work * 1 ridge with sand, work 1 ridge with gray *, repeat from *-* 4 times in total. Now work piece in gray until finished measurements. Turn piece inside out to that WS is outwards and continue in stockinette st. ---------------------------------------------------------- JUMPER: Work first 2 domino squares – see square on chart, then work 1 edge to sts on domino square (i.e. bottom edge of jumper) with short rows - see star on chart. Edge is worked from mid back to mid front and mid back again. Finally work a yoke on jumper over domino square - se cross on chart. BACK PIECE: DOMINO SQUARE: Cast on 5 sts on circular needle size 3.5 mm / US 4 with gray. K 1 row from WS. Switch color to sand and work DOMINO SQUARE - see explanation above, back and forth and STRIPES – see explanation above. REMEMBER THE KNITTING GAUGE Work Domino square and stripes until piece measures 38-42-46-50-56-62 cm / 15"-16½"-18"-19 3/4"-22"-24½" at the widest = approx. 62-68-74-82-90-100 ridges, adjust so that last ridge is with sand, and approx. 64-70-76-84-92-102 sts on each side of st with marker (= approx. 129-141-153-169-185-205 sts in total on needle). Work 1 ridge with gray and inc as before (i.e. 1 st on each side of st with marker) and inc 4 sts evenly on each side of mid st on row from RS (= 10 sts inc in total on row from RS) = approx. 69-75-81-89-97-107 sts on each side of st with marker (= approx. 139-151-163-179-195-215 sts in total on needle). Slip sts on a stitch holder and work front piece domino square. FRONT PIECE: DOMINO SQUARE: Cast on and work as back piece domino square. Slip sts from domino on back piece back on needle tog with sts from front piece domino square. Insert 1 marker between transition between them (= 2 markers) = approx. 278-302-326-358-390-430 sts in total. BOTTOM EDGE: Work piece tog with sts from mid back (i.e. tip of domino) and to the side, down to tip mid front, up to the side and down to mid back. Cast on 16-16-12-12-12-12 sts on circular needle size 3.5 mm / US 4 with gray. Work short rows and stripes as follows: LEFT BACK PIECE BOTTOM EDGE: Work tog with sts from tip mid back and out to marker in the side as follows: ROW 1 (= RS): K 1, 1 YO and K rest of row (= 1 st inc). ROW 2 (= WS): K until 1 st remains on row, work next st tog with the first 2 sts from domino (= K 3 tog = 2 sts dec from domino) Switch to sand. ROW 3 (= RS): As 1st row. ROW 4 (= WS): K until 5 sts remain on row, turn piece. ROW 5 (= RS): K all sts. ROW 6 (= WS): K until 3 sts remain on row, turn piece. ROW 7 (= RS): K all sts. ROW 8 (= WS): K until 1 st remains on row, work next st tog with the first 2 sts from domino (= K 3 tog = 2 sts dec from domino). Switch color to gray. Repeat 1st to 8th row until all sts from tip of domino out to the side until marker has been worked tog with the edge. LEFT FRONT PIECE BOTTOM EDGE: Worked tog with sts from the side and down to tip of domino square on front piece as follows: ROW 1 (= RS): K 1, 1 YO, K 2 twisted tog, K 2 twisted tog, K the rest of row (= 1 st dec). ROW 2 (= WS): K until 1 st remains on row, work next st tog with the first 2 sts from domino (= K 3 tog = 2 sts dec from domino). Switch to sand. ROW 3 (= RS): As 1st row. ROW 4 (= WS): K until 5 sts remain on row, turn piece. ROW 5 (= RS): K all sts. ROW 6 (= WS): K until 3 sts remain on row, turn piece. ROW 7 (= RS): K all sts. ROW 8 (= WS): K until 1 st remains on row, work next st tog with the first 2 sts from domino (= K 3 tog = 2 sts dec from domino) Switch color to gray. Repeat 1st to 8th row down to tip mid front. NOTE: On last repetition of 8th or 2nd row slip the first 3 sts from stitch holder back on needle. RIGHT FRONT PIECE BOTTOM EDGE: Work tog with sts from tip of domino square on front piece and out to marker in the side as left back piece bottom edge. RIGHT BACK PIECE BOTTOM EDGE: Worked tog with sts from the side and down to tip of domino square on front piece as left front piece bottom edge. Adjust so that last stripe is with sand. Bind off. BACK PIECE: Now work yoke on back piece with gray as follows: RIGHT BACK PIECE: Pick up 64-70-76-84-92-102 sts with gray from RS on needle size 3.5 mm / US 4 on one side of domino, pick up 2 sts on tip of domino, pick up 64-70-76-84-92-102 sts down the other side of domino = 130-142-154-170-186-206 sts. K 1 row from WS and inc 15-13-13-11-13-9 sts evenly on each side of tip (= 30-26-26-22-26-18 sts inc in total) = 80-84-90-96-106-112 sts on each side (= 160-168-180-192-212-224 sts in total). Then work over the first 80-84-90-96-106-112 sts (i.e. in right side of piece seen from RS) as follows: READ ALL OF THE FOLLOWING SECTION BEFORE CONTINUING! WORK SHORT ROWS, SHORT RIDGES AND INC IN THE SIDE AT THE SAME TIME AS FOLLOWS: Row 1 (= RS): K the first 2 sts tog, turn piece (= 1 st). Row 2 (= WS): K back. Row 3 (= RS): K 1, insert 1 marker, K the next 2 sts from domino tog, turn piece (= 2 sts). Move the marker upwards when working. Row 4 (= WS): K back. Row 5 (= RS): K 2, K the next 2 sts tog, turn piece (= 3 sts). Row 6 (= WS): K back. Row 7 (= RS): K 3, K the next 2 sts tog, turn piece (= 4 sts). Row 8 (= WS): K back. Continue the short rows like this, i.e. work over 2 sts more on every row from RS but work them 2 K tog, i.e. 2 sts become 1 st. Continue like this until all sts up to tip of domino have been worked. SHORT RIDGES: Applies only to size L-XL-XXL-XXXL: When piece measures 0-0-2-2-2-2 cm / 0"-0"-3/4"-3/4"-3/4"-3/4", work 0-0-1-1-1-1 short ridge (i.e. work from RS until where the last turn was, turn piece and work back = 2 rows = 1 short ridge) over the sts already worked, work short ridge every 0-0-5-4-3-2 cm / 0"-0"-2"-1½"-1"-3/4" 0-0-4-6-8-11 times in total. INC IN THE SIDE: When yoke measures 1 cm / 3/8'', inc 1 st inside 1 edge st at beg of next row from RS. Inc like this every 1½-1-1-½-½-½ cm/½"-3/8"-3/8"-1/4"-1/4"-1/4" 9-12-14-17-19-22 times in total = 10-13-15-18-20-23 sts before marker. When yoke measures 15-14-15-14-15-17 cm / 6"-5½"-6"-5½"-6"-6 3/4" (measured along the side), bind off for armhole at beg of every row from RS as follows: bind off 3 sts a total of 1-1-2-2-2-3 times, 2 sts a total of 1-2-2-3-4-4 times and 1 st a total of 4-5-4-5-5-5 times (i.e. 1 st remains before marker). Piece measures approx. 19-21-23-25-28-31 cm / 7½"-8 1/4"-9"-9 3/4"-11"-12 1/4" measured in the side from domino and up. When the short rows have been worked, there are 40-42-45-48-53-56 sts in total on needle. Slip sts on 1 stitch holder and work left back piece. LEFT BACK PIECE: = 80-84-90-96-106-112 sts. READ ALL OF THE FOLLOWING SECTION BEFORE CONTINUING! WORK SHORT ROWS, SHORT RIDGES AND INC IN THE SIDE AT THE SAME TIME AS FOLLOWS: SHORT ROWS: Row 1 (= WS): Work the first 2 sts from domino, turn piece. Row 2 (= RS): Work the 2 sts K tog (= 1 st). Row 3 (= WS): K 1, insert 1 marker, work the next 2 sts from domino, turn piece (= 3 sts). Move the marker upwards when working. Row 4 (= RS): K 2 tog, K 1 (= 2 sts). Row 5 (= WS): K 2, work the next 2 sts from domino, turn piece (= 4 sts). Row 6 (= RS): K 2 tog, K the rest of row. Row 7 (= WS): K, work the next 2 sts from domino, turn piece (= 4 sts). Row 8 (= RS): K 2 tog, K the rest of row. Continue the short rows like this, i.e. work over 2 sts more from domino on every row from WS and dec 1 st at beg of the every row from RS, i.e. 2 sts become 1 st. Continue like this until all sts up to tip of domino have been worked. SHORT RIDGES: Applies only to size L-XL-XXL-XXXL: When piece measures 0-0-2-2-2-2 cm / 0"-0"-3/4"-3/4"-3/4"-3/4", work 0-0-1-1-1-1 short ridge (i.e. work from WS until where the last turn was, turn piece and work back = 2 rows = 1 short ridge) over the sts already worked, work short ridge every 0-0-5-4-3-2 cm / 0"-0"-2"-1½"-1"-3/4" 0-0-4-6-8-11 times in total. INC IN THE SIDE: When yoke measures 1 cm / 3/8'', inc 1 st inside 1 edge st at end of next row from RS. Inc like this every 1½-1-1- ½-½-½ cm/½"-3/8"-3/8"-1/4"-1/4"-1/4" 9-12-14-17-19-22 times in total = 10-13-15-18-20-23 sts before marker. When yoke measures 15-14-15-14-15-17 cm / 6"-5½"-6"-5½"-6"-6 3/4" (measured along the side), bind off for armhole at beg of every row from WS as follows: bind off 3 sts a total of 1-1-2-2-2-3 times, 2 sts a total of 1-2-2-3-4-4 times and 1 st a total of 4-5-4-5-5-5 times (i.e. 1 st remains after marker). Piece measures approx. 19-21-23-25-28-31 cm / 7½"-8 1/4"-9"-9 3/4"-11"-12 1/4" measured in the side from domino and up. When the short rows have been worked, there are 40-42-45-48-53-56 sts in total on needle. BACK PIECE: Slip sts from right and left back piece on to same needle = 80-84-90-96-106-112 sts. Work in garter st. When piece measures 13-11-11-9-8-8 cm / 5"-4½"-4½"-3½"-3½"-3" from tip of domino (approx. 2 cm / 3/4'' remain), bind off the middle 34-34-38-38-40-40 sts for neck and finish each shoulder separately = 23-25-26-29-33-36 sts remain on shoulder. On next row from the neck dec 1 st = 22-24-25-28-32-35 sts. Work in garter st until piece measures 15-13-13-11-10-10 cm / 6"-5"-5"-4½"-4"-4'' from tip of domino. Bind off. The whole piece measures approx. 60-62-64-66-71-77 cm / 23½"-24½"-25 1/4"-26"-28"-30½". Work the other shoulder the same way. FRONT PIECE: RIGHT FRONT PIECE: Work as left back piece. LEFT FRONT PIECE: Work as right back piece. FRONT PIECE: Slip sts from right and left front piece on to same needle = 80-84-90-96-106-112 sts. Work in garter st. When piece measures 8-6-4-2-1-1 cm / 3"-2 1/4"-1½"-3/4"-½"-½" from tip of domino, loosely bind off the middle 20 sts for neck and finish each shoulder separately = 30-32-35-38-43-46 sts remain on shoulder. Then dec on every row from neck by dec 1 st inside 3 edge sts on every row from RS 8-8-10-10-11-11 times in total = 22-24-25-28-32-35 sts remain on shoulder. Work in garter st until piece measures 7-7-8-8-9-9 cm / 2¾''-2¾''-3 1/8''-3 1/8''-3½''-3½'' in total from the 20 sts bind off for neck, bind off. The whole piece measures approx. 60-62-64-66-71-77 cm / 23½"-24½"-25 1/4"-26"-28"-30½". Work the other shoulder the same way. SLEEVE: Worked in the round on double pointed needles. Cast on 46-48-50-54-56-58 sts on double pointed needles size 3.5 mm / US 4 with sand. Work PATTERN - see explanation above. When piece measures 14-12-10-8-3 cm / 5½"-4 3/4"-4"-3"-1", insert 1 marker at beg of round, inc 1 st on each side of marker – see INCREASE TIP. Inc like this every 1½ cm / ½'' 21-22-23-24-25-26 times in total = 88-92-96-102-106-110 sts. When piece measures 48-47-46-45-43-42 cm / 19"-18½"-18"-17 3/4"-17"-16½" (shorter measurements in the larger sizes because of longer sleeve cap and wider shoulders). Continue to work back and forth and bind off for sleeve cap at beg of every row in each side of piece as follows: bind off 4 sts 2 times, 2 sts 3 times and 1 st 2 times, then bind off 2 sts in each side until piece measures 56-56-56-56-55-54 cm / 22"-22"-22"-22"-21½"-21½", then bind off 3 sts 1 time in each side of piece. Bind off the remaining sts. Make another sleeve the same way. ASSEMBLY: Assemble with gray. Sew bottom edge tog mid back in outer loop of outermost st. Sew the shoulder seams. Sew in sleeves with WS outwards, i.e. stockinette st is turned inwards. Sew side seams down to bottom edge in outer loop of edge sts. |
||||||||||||||||
Diagram explanations |
||||||||||||||||
|
||||||||||||||||
 |
||||||||||||||||
Have you finished this pattern?Tag your pictures with #dropspattern #taurielsweater or submit them to the #dropsfan gallery. Do you need help with this pattern?You'll find 26 tutorial videos, a Comments/Questions area and more by visiting the pattern on garnstudio.com. © 1982-2026 DROPS Design A/S. We reserve all rights. This document, including all its sub-sections, has copyrights. Read more about what you can do with our patterns at the bottom of each pattern on our site. |
||||||||||||||||


With over 40 years in knitting and crochet design, DROPS Design offers one of the most extensive collections of free patterns on the internet - translated to 17 languages. As of today we count 324 catalogs and 12290 patterns - 12280 of which are translated into English (US/in).
We work hard to bring you the best knitting and crochet have to offer, inspiration and advice as well as great quality yarns at incredible prices! Would you like to use our patterns for other than personal use? You can read what you are allowed to do in the Copyright text at the bottom of all our patterns. Happy crafting!
Post a comment to pattern DROPS 173-4
We would love to hear what you have to say about this pattern!
If you want to leave a question, please make sure you select the correct category in the form below, to speed up the answering process. Required fields are marked *.