
Popular categories
Looking for a yarn?


Comments / Questions (135)
![]() Anny wrote:
Anny wrote:
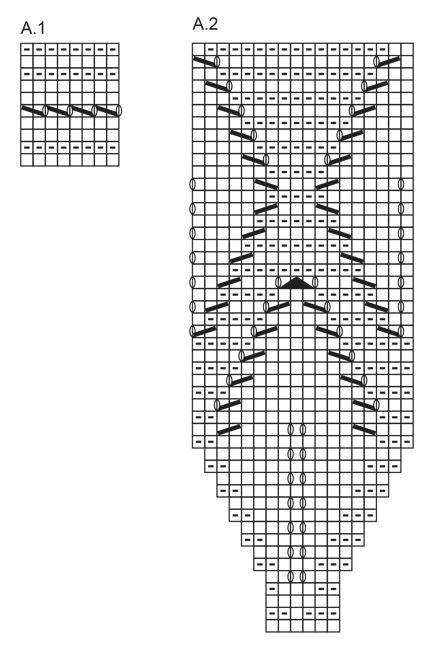
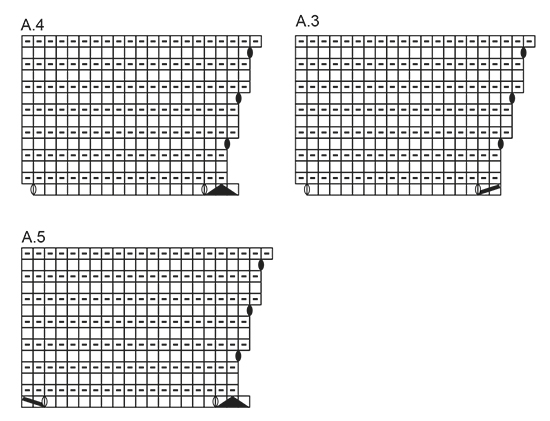
Sorry, meine Fragen haben sich erledigt. Ich las die Diagramme von oben nach unten! Eine Frage habe ich doch noch zu den Symbolen. Nach dem Anschlag kommt ja eine Rück-R. Also ist bei A1 die 1. Reihe links, die 2. Reihe (Hin-R.) links. Ist das so richtig?
28.05.2017 - 19:08DROPS Design answered:
Liebe Anny, bei A.1 wird die 1. Reihe rechts von der Vorderseite (= Hinreihe) gestrickt, dann die 2. Reihe wird rechts von der Rückseite (= Rückreihe) gestrickt. Reihe 3 und 4 sind glatt gestrickt (= Hinreihe rechts, Rückreihe links) und dann kommt die Reihe 5 mit Umschläge (= Hinreihe). Viel Spaß beim stricken!
29.05.2017 - 10:16
![]() Anny wrote:
Anny wrote:
Hallo, noch was, werden alle Diagramme von unten nach oben gelesen oder nur A2. Stehe etwas auf dem Schlauch!
28.05.2017 - 11:18DROPS Design answered:
Liebe Anny, alle Diagramme werden von unten nach oben gelesen. Viel Spaß beim stricken!
29.05.2017 - 09:51Anny wrote:
Hallo, ich komme bei der Beschreibung von A2 nicht weiter. Ich nehme an, ab jetzt müssen Maschen aufgenommen werden. Verteilt in den Reihen? Wie bekomme ich dann 263 Maschen? Könnten Sie mir das bitte genauer erklären. A1 hab ich jetzt erst mal gemacht. Danke und freundliche Grüsse, Anny
28.05.2017 - 09:47DROPS Design answered:
Liebe Anny, die Zunahmen beginnen bei der 5. Reihe und werden in jeder 2. Runde bis 15. Runde wiederholt - Am Anfang haben Sie 6 M x 14 + 1 + die 10 Blendemaschen = 95 M. Dann haben Sie 18 M in jedem A.2 x 14 + 1 + die 10 Blendemaschen = 263 M. Viel Spaß beim stricken!
29.05.2017 - 09:43
![]() Donna Kropa wrote:
Donna Kropa wrote:
Thank you for your response to my question but it is not with A2 that I am having a problem. I can see that by repeating the first stitch of A2 that I would have 101 stitches. My question is about A1. Beginning and ending with 5 stitches in garter pattern (10 stitches) and repeating the eight stitches of A1 on row 5 (of the A1 pattern) I end with an extra stitch before the garter band since it is an even repeat on an odd number of stitches.
20.04.2017 - 04:04DROPS Design answered:
Dear Mrs Kropa, at the end of row 5 in A.1 just K the last st before band sts. Happy knitting!
20.04.2017 - 11:42
![]() Olga Spies wrote:
Olga Spies wrote:
Hallo! Ich bin gerade bei A3-A5 , Aufnahme Krausrippen. Laut Diagramm an der linken Seite gleich nach Blendenmaschen wird aufgenommen, am Ende der Reihe , an der Rechte Seite vor Blendenmaschen nicht. Ist das Korrekt?
19.04.2017 - 20:52DROPS Design answered:
Liebe Frau Spies, so ist es richtig. Viel Spaß beim stricken!
20.04.2017 - 11:41
![]() Grete wrote:
Grete wrote:
Jeg skal begynne på mønster A1 og lurer på om jeg har forstått mønstret riktig hvis det fra retten er 4 rettomganger før hullraden. Vanskelig å se ut fra bildet. Når jeg har lagt opp og skal strikke tilbake, blir det da retten på arbeidet selv om det er vrangen på oppleggskanten? Eller må jeg strikke tilbake først før jeg begynner på mønsteret. Dette er jo vesentlig for utseendet av halskanten... Håper spørsmålet mitt er forståelig.
17.04.2017 - 22:18DROPS Design answered:
Hei Grete, Diagrammet og teksten som hører til viser at du skal strikke rett fra retten (1. omgang), vrang fra vrangen (2. omgang) og rett fra retten (3. omgang). Eller, hvis du begynner fra vrangen, så er det 1. omgang vrang, 2. omgang rett osv. Håper dette hjelper, Mvh Deirdre.
18.04.2017 - 15:21
![]() Donna Kropa wrote:
Donna Kropa wrote:
I can not see how if I begin with an odd number of stitches, I can knit ten stitches (in total) for the button bands and repeat A1 (eight stitches). Is the starting number of stitches correct? I have begun with 101 stitches but it seems that it should be 98 which would be 5 button band, 11 repeats of 8 stitches for A1 and 5 button band stitches. I can't see how the odd number works out. Thank you
26.03.2017 - 16:48DROPS Design answered:
Dear Mrs Kropa, you have to work the 101 sts as follows: 5 sts in garter st, A.2 (= 6 sts), repeat A.2 15 times in total, finish with first st in A.2 (so that pattern is the same in each side), finish with 5 sts in garter st, ie: 5 + (15 x 6 sts) + 1 + 5 = 101 sts. Happy knitting!
27.03.2017 - 09:27
![]() Anitha Kallioniemi wrote:
Anitha Kallioniemi wrote:
Så många fina modeller, men såååååå krångliga o obegripliga mönster! Bir väl som vanligt jag ger upp o river upp det arbete jag gjort...igen!!
18.03.2017 - 16:17
![]() Anitha Kallioniemi wrote:
Anitha Kallioniemi wrote:
Modell169-3 Är det diagram A2 som ska vara 21 cm eller hela arbetet?
13.03.2017 - 20:09
![]() Conny wrote:
Conny wrote:
Bei Diagramm A2 oben rechts anfangen? D. H. Von oben nach unten, wie es in der Anleitung steht?
26.02.2017 - 11:00DROPS Design answered:
Liebe Conny, Diagram A.2 wird von unten nach oben gestrickt (= 6 M an der 1. Rd). Viel Spaß beim stricken!
27.02.2017 - 10:51
|
||||||||||||||||||||||
Summer Leaves#summerleavessweater |
||||||||||||||||||||||
 |
 |
|||||||||||||||||||||
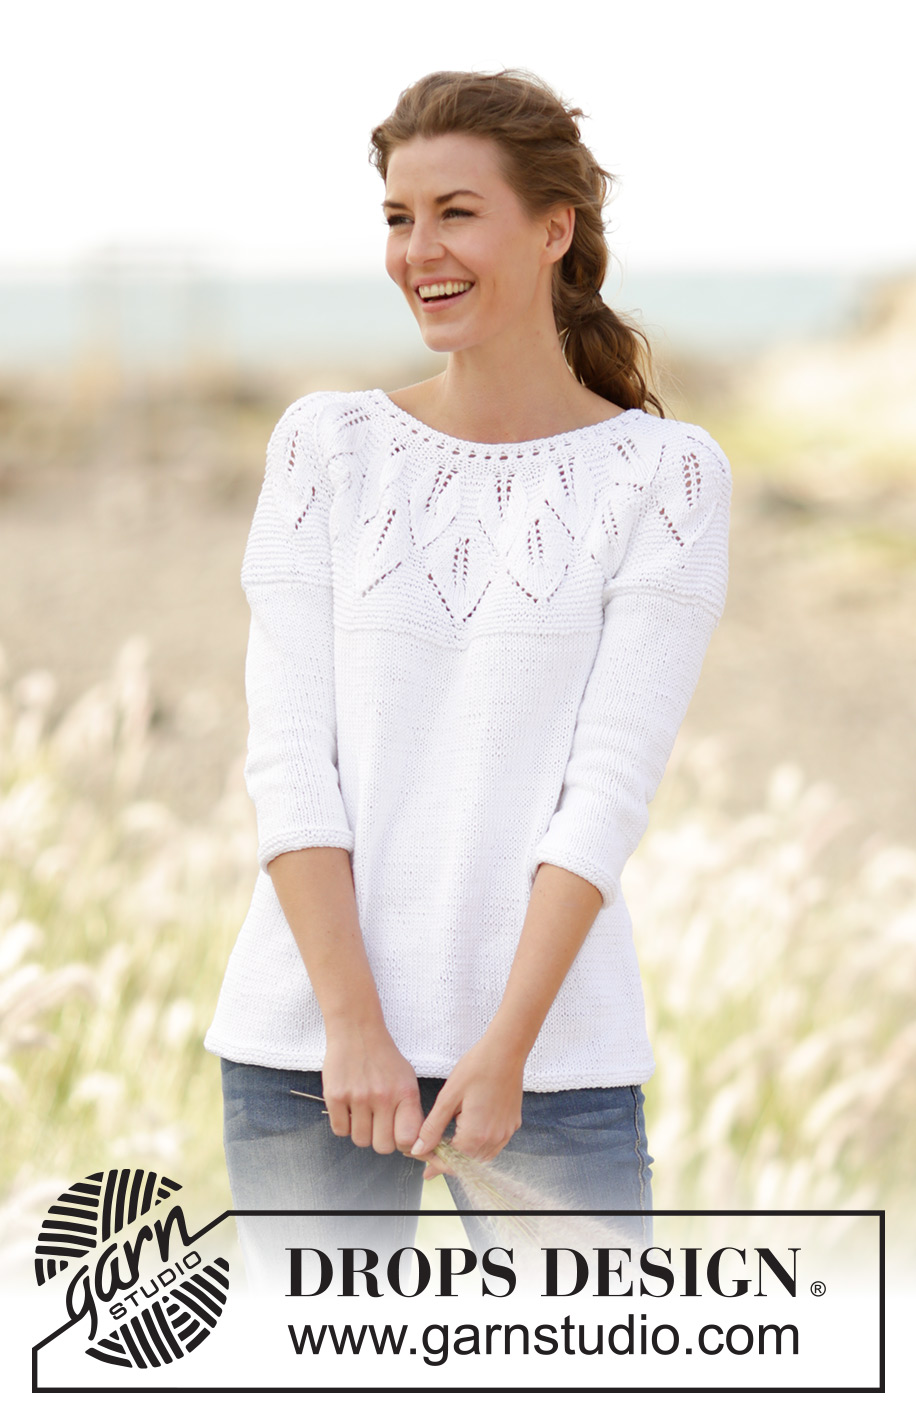
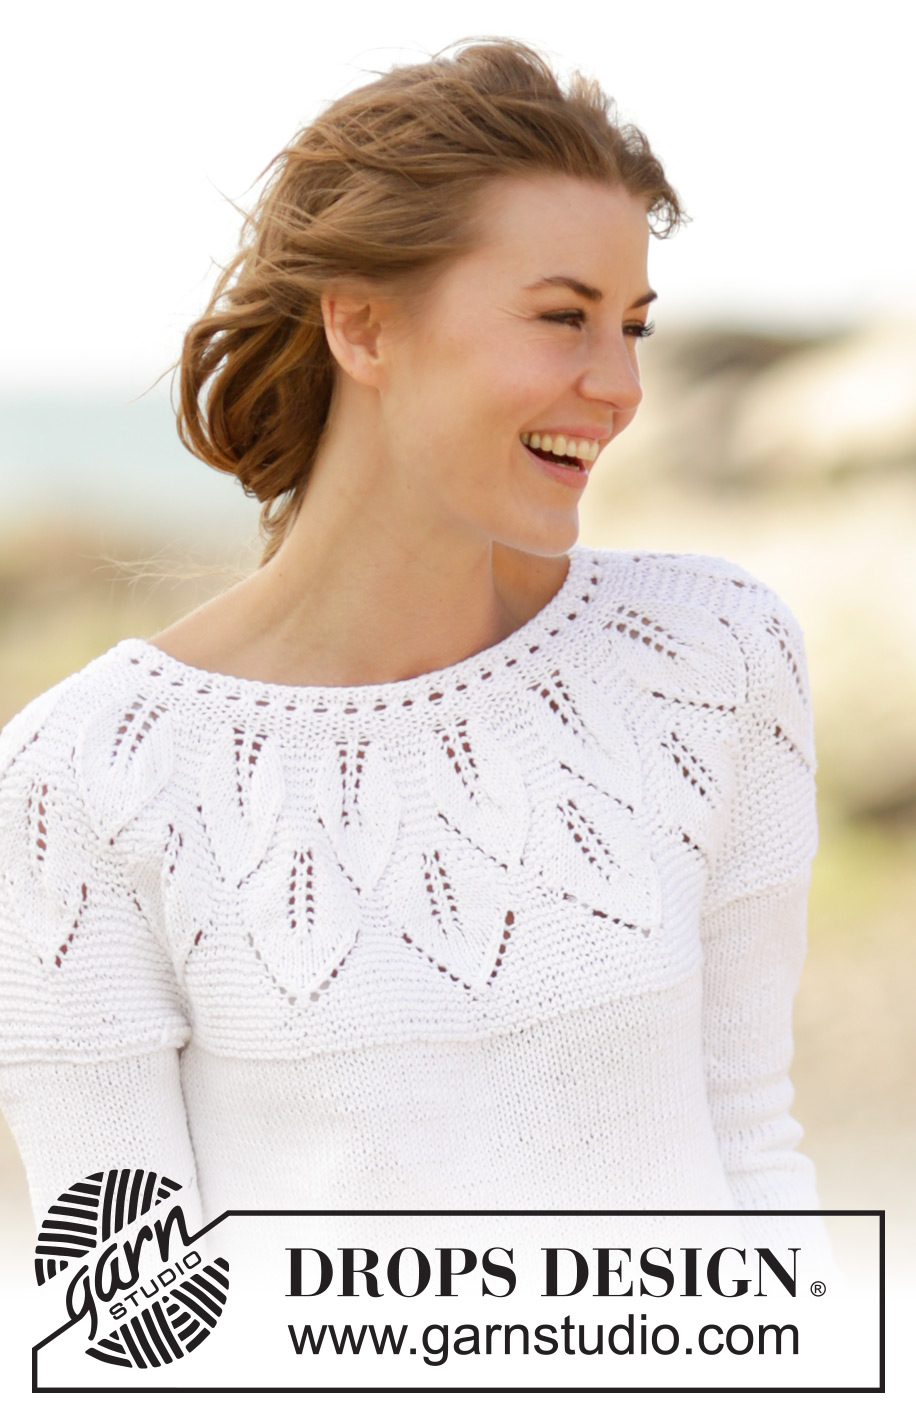
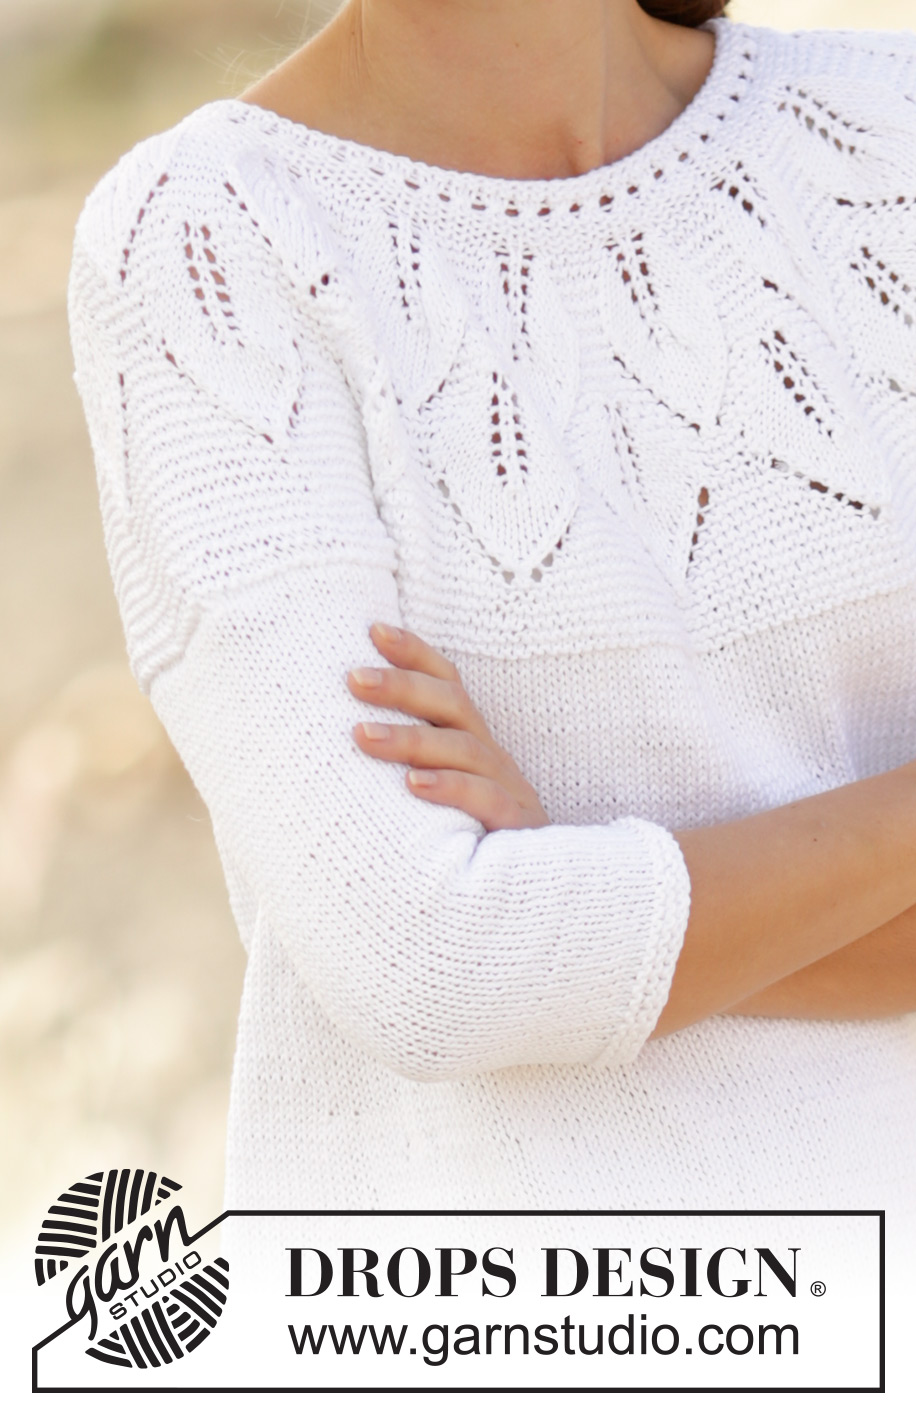
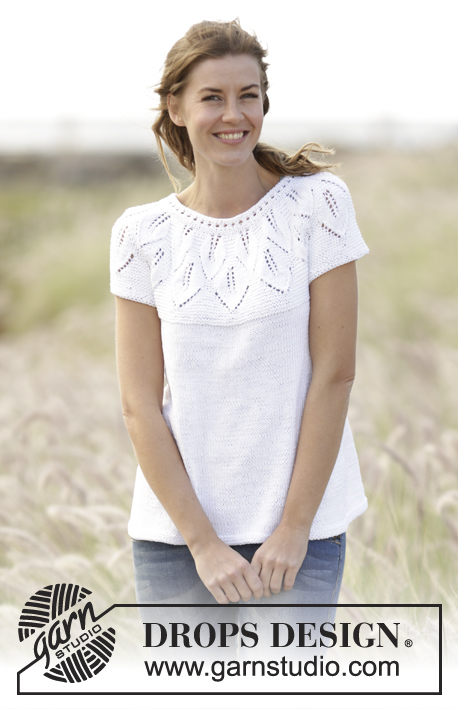
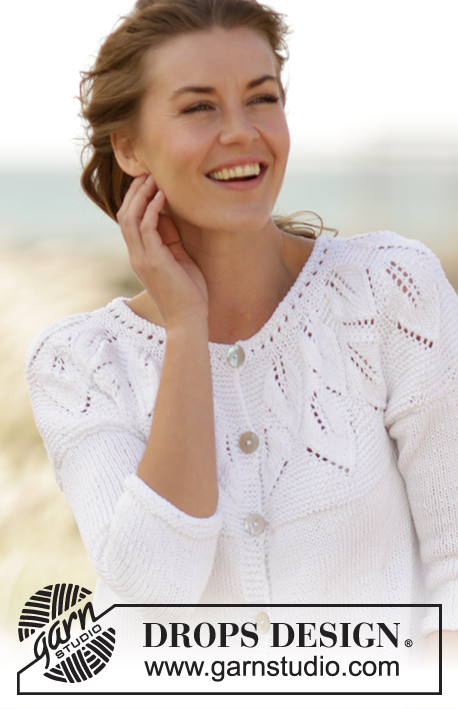
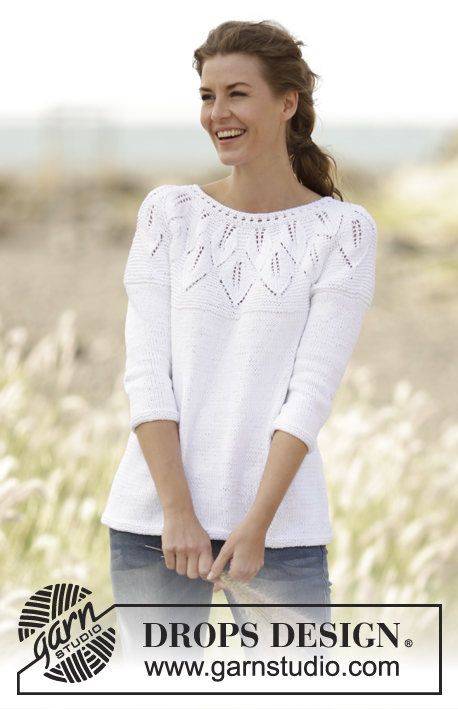
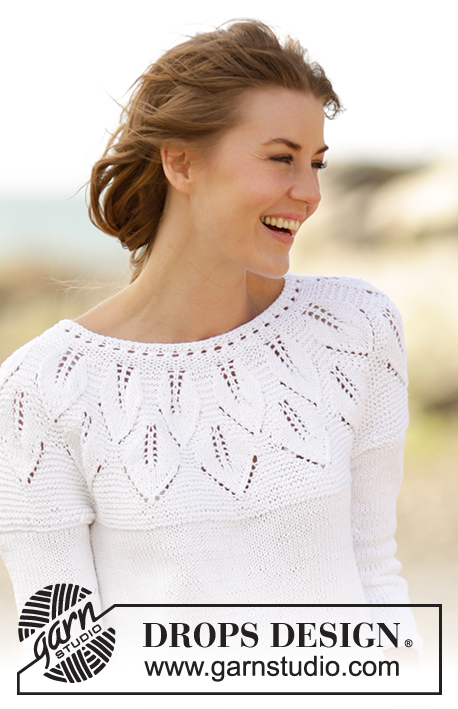
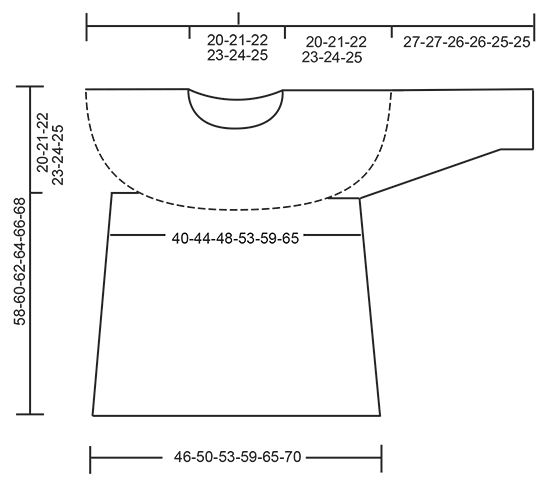
Knitted DROPS jumper with leaf pattern, ridges and round yoke, worked top down in ”Muskat”. Size S-XXXL.
DROPS 169-3 |
||||||||||||||||||||||
|
GARTER ST (back and forth): K all rows. 1 ridge = K2 rows. GARTER ST (worked in the round): 1 ridge = 2 rounds. * K 1 round and P 1 round *, repeat from *-*. PATTERN: See diagrams A.1 to A.5. The diagrams show all rows in pattern seen from RS. BUTTONHOLES: Dec for buttonhole on band at the end of row seen from RS. Work until 4 sts remain. Make 1 YO, K the next 2 sts tog, work the last 2 sts on row. Dec for buttonholes when piece measures (from cast-on edge and along the band): SIZE S: 2, 8, 14 and 19 cm SIZE M: 2, 8, 14 and 20 cm SIZE L: 2, 8, 14 and 21 cm SIZE XL: 2, 8, 15 and 22 cm SIZE XXL: 2, 9, 16 and 23 cm SIZE XXXL: 2, 9, 16 and 24 cm ---------------------------------------------------------- JUMPER: The piece is worked top down. Yoke is worked back and forth on circular needle with button band on the back, then work the body in the round. YOKE: Cast on 89-95-101-113-125-131 sts on circular needle size 3.5 mm / US 4 with Muskat. Bind off for BUTTON HOLES mid back - see explanation above. Work 5 sts in GARTER ST - see explanation above (= band), A.1 until 5 sts remain, 5 sts in garter st (= band). When A.1 has been worked 1 time vertically, continue as follows: 5 sts in garter st, A.2 (= 6 sts), repeat A.2 13-14-15-17-19-20 times in total, finish with first st in A.2 (so that pattern is the same in each side), finish with 5 sts in garter st. REMEMBER THE KNITTING GAUGE When A.2 has been worked 1 time vertically, there are 245-263-281-317-353-371 sts on needle. Then work as follows: 5 sts in garter st, A.3 (= 17 sts), repeat A.4 11-12-13-15-17-18 times, A.5 (= 20 sts) and 5 sts in garter st. When A.3-A.5 have been worked 1 time vertically, there are 284-305-326-368-410-431 sts on needle. Continue in garter st until piece measures 20-21-22-23-24-25 cm / 8"-8¼"-8¾"-9"-9½"-9¾", on last row from WS adjust no of sts to 283-307-331-365-397-429. Continue to work as follows (from RS): bind off the first 5 sts, work the first 39-43-47-53-59-65 sts (= half back piece), slip the next 61-65-69-74-78-82 sts on a stitch holder (= sleeve), cast on 6 new sts under sleeve, work the next 78-86-94-106-118-130 sts (= front piece), slip the next 61-65-69-74-78-82 sts on a stitch holder (= sleeve), cast on 6 new sts under sleeve, work the remaining 39-43-47-53-59-65 sts (= half back piece). BODY: There are now 168-184-200-224-248-272 sts for body. Insert a marker in each side of body where new sts were cast on under sleeve (= 3 new sts on each side of marker). NOW MEASURE THE PIECE FROM HERE. Switch to circular needle size 4 mm / US 6. Continue with stockinette st, now work in the round. When piece measures 4 cm / 1½", inc 1 st on each side of each marker (= 4 sts inc). Repeat inc every 5-5-5-6-6-6 cm / 2"-2"-2"-2 ⅜"-2⅜"-2⅜" 5 more times = 192-208-224-248-272-296 sts. Continue in stockinette st until piece measures 34-35-36-37-38-39 cm / 13⅜"-13¾"-14¼"-14½"-15"-15¼", switch to circular needle size 3.5 mm / US 4 and work 3 ridges in GARTER ST - see explanation above. Bind off. The whole piece measures approx. 58-60-62-64-66-68 cm / 22¾"-23⅝"-24⅜"-25¼"-26"-26¾". SLEEVE: Slip sts from stitch holder back on double pointed needles size 3.5 mm / US 4 (= 61-65-69-74-78-82 sts). Pick up 1 st in each of the 6 sts cast on under sleeve, insert a marker in the middle of these sts = 67-71-75-80-84-88 sts. Work 2 ridges in GARTER ST – see explanation above, switch to double pointed needles size 4 mm / US 6, then work in stockinette st. When piece measures 3 cm / 1", dec 1 st on each side marker, repeat dec every 2-2-1½-1½-1-1 cm / ¾"-¾"-½"-½"-⅜"-⅜" 9-10-11-13-14-15 more times = 47-49-51-52-54-56 sts. Continue in stockinette st until sleeve measures 27-27-26-26-25-25 cm / 10½"-10½"-10¼"-10¼"-9¾"-9¾" (shorter measurements in the larger sizes because of longer yoke), switch to double pointed needle size 3.5 mm / US 4 and work 3 ridges. Bind off. Work the other sleeve the same way. ASSEMBLY: Place band without buttonholes under band with buttonholes and fasten the bottom band. Sew on buttons. |
||||||||||||||||||||||
Diagram explanations |
||||||||||||||||||||||
|
||||||||||||||||||||||
 |
||||||||||||||||||||||
 |
||||||||||||||||||||||
 |
||||||||||||||||||||||
Have you finished this pattern?Tag your pictures with #dropspattern #summerleavessweater or submit them to the #dropsfan gallery. Do you need help with this pattern?You'll find 26 tutorial videos, a Comments/Questions area and more by visiting the pattern on garnstudio.com. © 1982-2026 DROPS Design A/S. We reserve all rights. This document, including all its sub-sections, has copyrights. Read more about what you can do with our patterns at the bottom of each pattern on our site. |
||||||||||||||||||||||


With over 40 years in knitting and crochet design, DROPS Design offers one of the most extensive collections of free patterns on the internet - translated to 17 languages. As of today we count 325 catalogs and 12298 patterns - 12288 of which are translated into English (US/in).
We work hard to bring you the best knitting and crochet have to offer, inspiration and advice as well as great quality yarns at incredible prices! Would you like to use our patterns for other than personal use? You can read what you are allowed to do in the Copyright text at the bottom of all our patterns. Happy crafting!
Post a comment to pattern DROPS 169-3
We would love to hear what you have to say about this pattern!
If you want to leave a question, please make sure you select the correct category in the form below, to speed up the answering process. Required fields are marked *.