
Popular categories
Looking for a yarn?


Comments / Questions (135)
![]() Susanne Schultchen wrote:
Susanne Schultchen wrote:
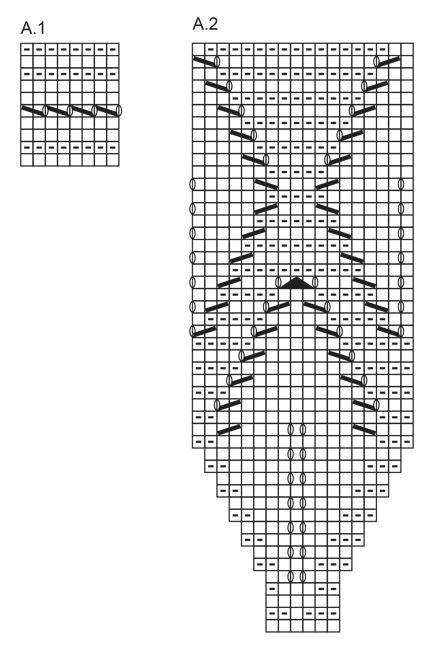
Hallo! Lese ich das richtig: nachdem A2 einmal in der Höhe gestrickt wurde, 1x A3, 18x A4 und 1x A5 stricken? Vorher und nachher natürlich die 5 Maschen für die Blende.
19.08.2018 - 21:59DROPS Design answered:
Ja, wenn Sie die größte Größe stricken, ist das richtig. Weiterhin viel Spaß beim Stricken!
22.08.2018 - 22:47
![]() Ingrid Van Den Bosch wrote:
Ingrid Van Den Bosch wrote:
Bonjour, je voudrais faire ce modèle mais sans patte de boutonnage. Combien de "feuilles" dois-je dès lors faire ? Merci
11.03.2018 - 14:58DROPS Design answered:
Bonjour Mme Van Den Bosch, nous ne sommes malheureusement pas en mesure de pouvoir adapter chacun de nos modèles à chaque demande individuelle. Pour toute assistance, merci de bien vouloir contacter le magasin où vous avez acheté votre laine. Bon tricot!
12.03.2018 - 09:54
![]() Louaked wrote:
Louaked wrote:
Au rang 7 de A2 mes jetés se retrouvent décalés par rapport au rang 5 est normal?
27.02.2018 - 23:03DROPS Design answered:
Bonjour Mme Louaked, non effectivement, les jetés doivent être alignés et de chaque côté de la 4ème m de A.2 au rang 5 et de la 5ème au rang 7 (= 6ème m au rang 9, 7ème m au rang 11 et ainsi de suite). Bon tricot!
28.02.2018 - 10:14Danielle Tremblay wrote:
Hi, I would like to do the short sleeves version. I've completed the yoke, divided for the sleeves but I can see the pic for the short sleeves version but it does not open to the pattern . Thank you
15.02.2018 - 14:44DROPS Design answered:
Dear Mrs Tremblay, you will find the top here. Happy knitting!
15.02.2018 - 16:14Sue Fry wrote:
Knitting gauge - please help. When this pattern talks about remembering the knitting gauge - what does it mean.
29.01.2018 - 22:20DROPS Design answered:
Dear Mrs Fry, make sure you are knitting with same tension as when you checked your tension, ie you should always have 21 sts x 28 rows stockinette = 4"x4" with needle size 4 mm and 21 sts x 35 rows in A.2 = 4"x4" with needle size 3.5 mm. Happy knitting!
30.01.2018 - 08:37
![]() Brigitte wrote:
Brigitte wrote:
Bonjour Quand on arrive au 6ème rang du A2 il faut donc faire une augmentation de part et d'autre des 6 mailles pour obtenir 8 mailles et ainsi de de suite .... ? Par un jeté que l'on tricote torse au rang suivant? Merci de me confirmer. Cordialement
16.01.2018 - 16:12DROPS Design answered:
Bonjour Brigitte, au 5ème rang de A.2, on fait 2 jetés au milieu du motif = on a 8 mailles. Au 6ème rang, les jetés se tricote à l'endroit, ils doivent former des trous. Bon tricot!
16.01.2018 - 16:56
![]() Gunhild wrote:
Gunhild wrote:
Jeg er godt i gang med denne flotte bluse og alt passer fint. Jeg strikker str L. Jeg er færdig med mønster A2 og arbejdet måler 17 cm. Hvis jeg skal strikke A3, A4 og A5 er det 14x3 pinde = 42 pinde, dvs mere end 10 cm ( mønster strikke fastheden på 35 pinde er 10 cm). Hvordan hænger det sammen, at bærestykket bliver næsten 30 cm og der står, at der skal strikkes glatstrikning til arbejdet måler 22 cm....
20.10.2017 - 18:05DROPS Design answered:
Hej, A.3-A.5 består kun af 14 pinde og de strikkes kun én gang i højden. Ikke ovenpå hinanden. Du begynder først på glatstrik når du deler arbejdet. God fornøjelse!
31.10.2017 - 13:32
![]() Inger Blichfeldt wrote:
Inger Blichfeldt wrote:
Hvor finner jeg størrelsesguide for å finne ut hvilken størrelse jeg må ha?
17.08.2017 - 20:21DROPS Design answered:
Hei Inger. Helt nederst i oppskriften, under alle diagrammene finner du en målskisse med alle målene. God Fornøyelse!
18.08.2017 - 06:54
![]() Ursula Schnitker wrote:
Ursula Schnitker wrote:
Sind im Muster Hin und Rückreihen eingezeichnet, oder nur die Hinreihen?
02.06.2017 - 10:37DROPS Design answered:
Liebe Frau Schnittker, alle Reihe/Runden, die Hin- sowie die Rückreihe sind eingezeichnet, dh 1 Kästchen im Diagram = 1 Masche x 1 Runde. Viel Spaß beim stricken!
02.06.2017 - 13:43
![]() Anny wrote:
Anny wrote:
Vielen Dank für die schnelle Beantwortung meiner Fragen. Ups, dann habe ich falsch angefangen. Also nochmals von vorne. Vielen Dank und liebe Grüsse
29.05.2017 - 10:45
|
||||||||||||||||||||||
Summer Leaves#summerleavessweater |
||||||||||||||||||||||
 |
 |
|||||||||||||||||||||
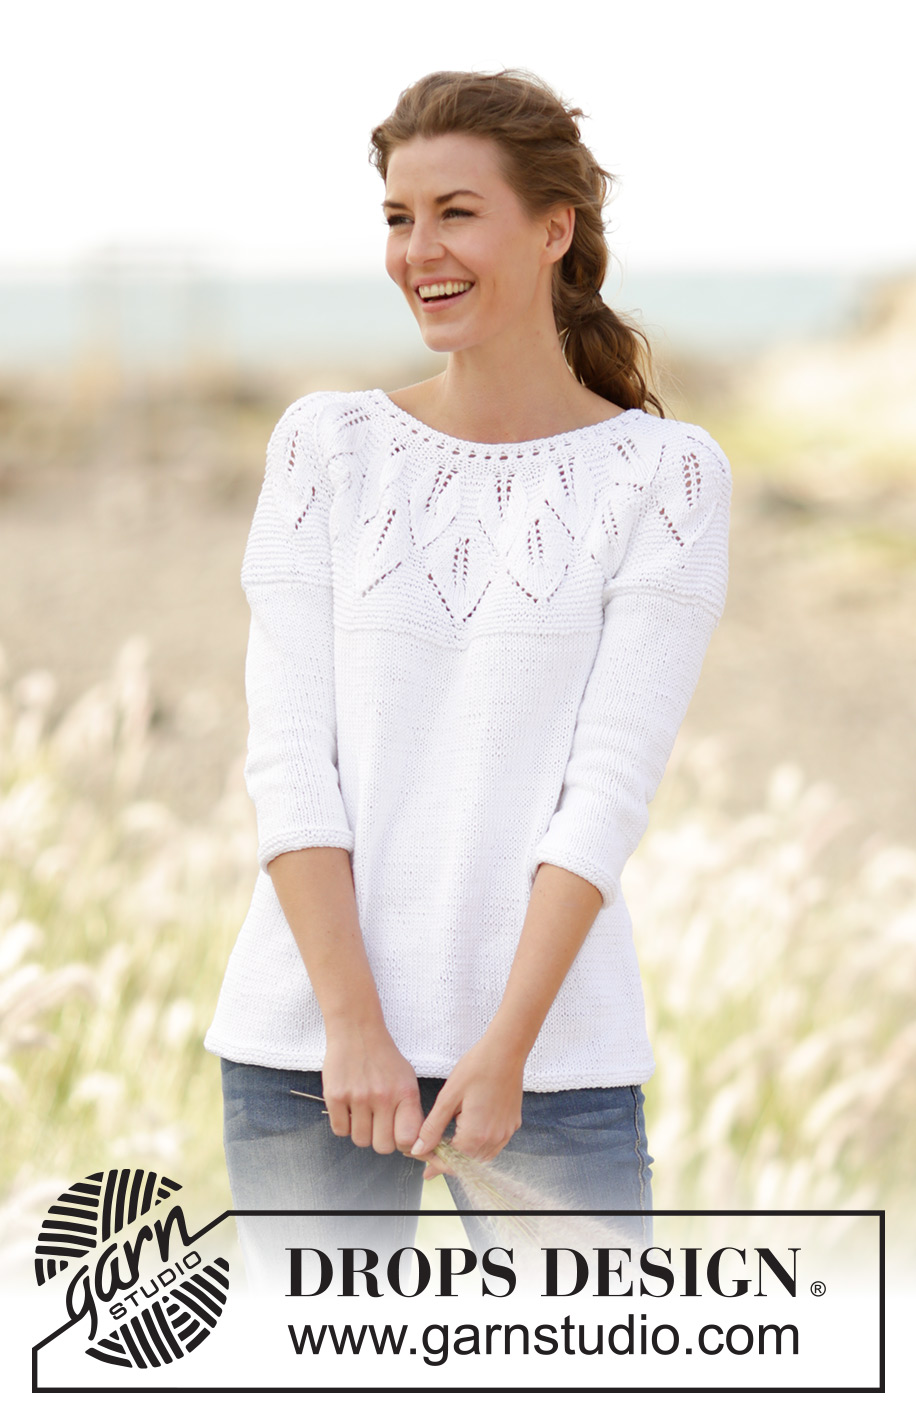
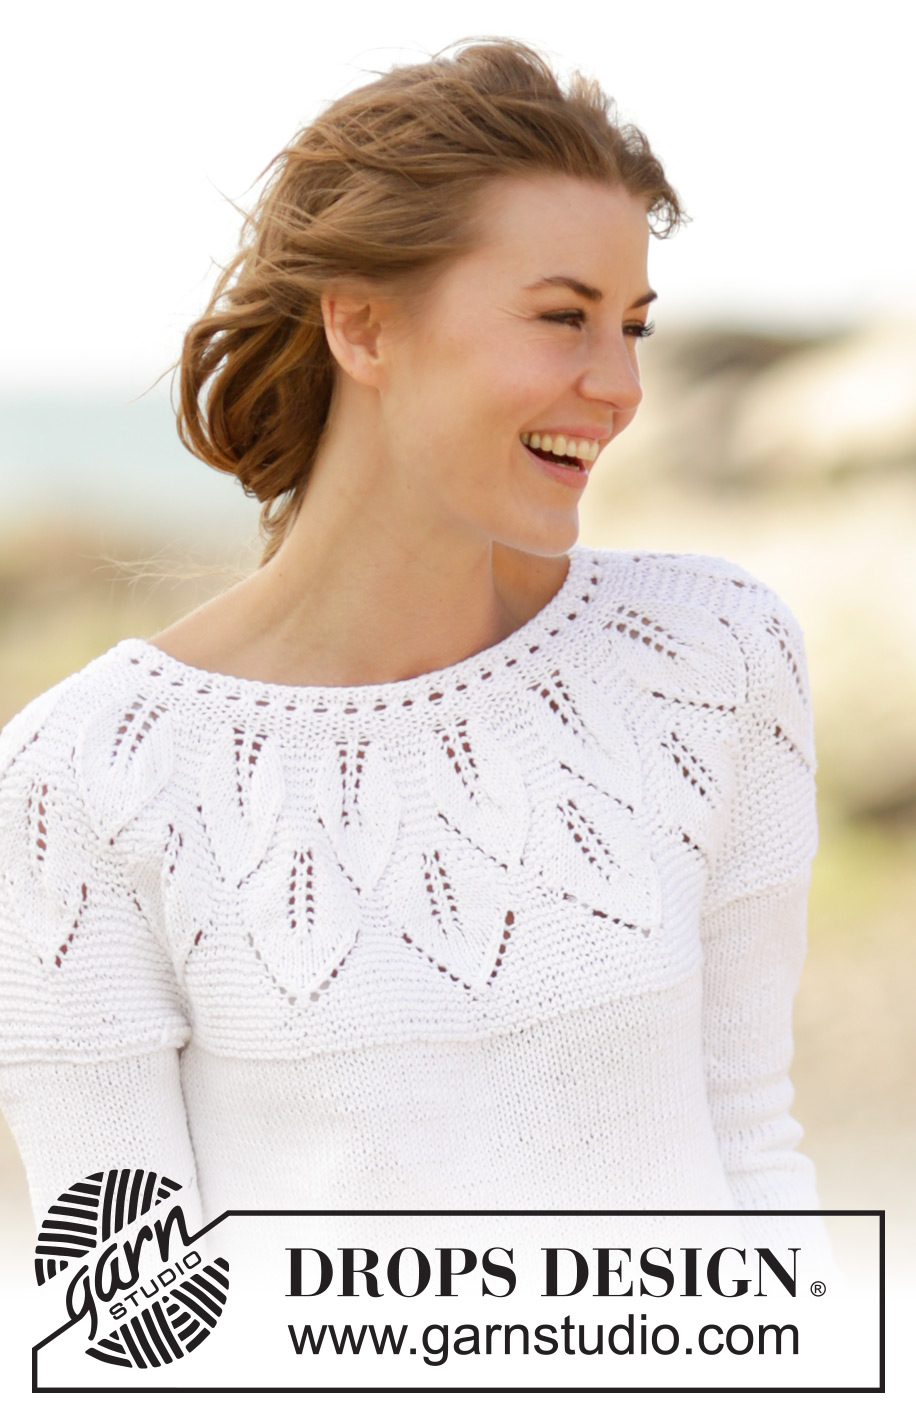
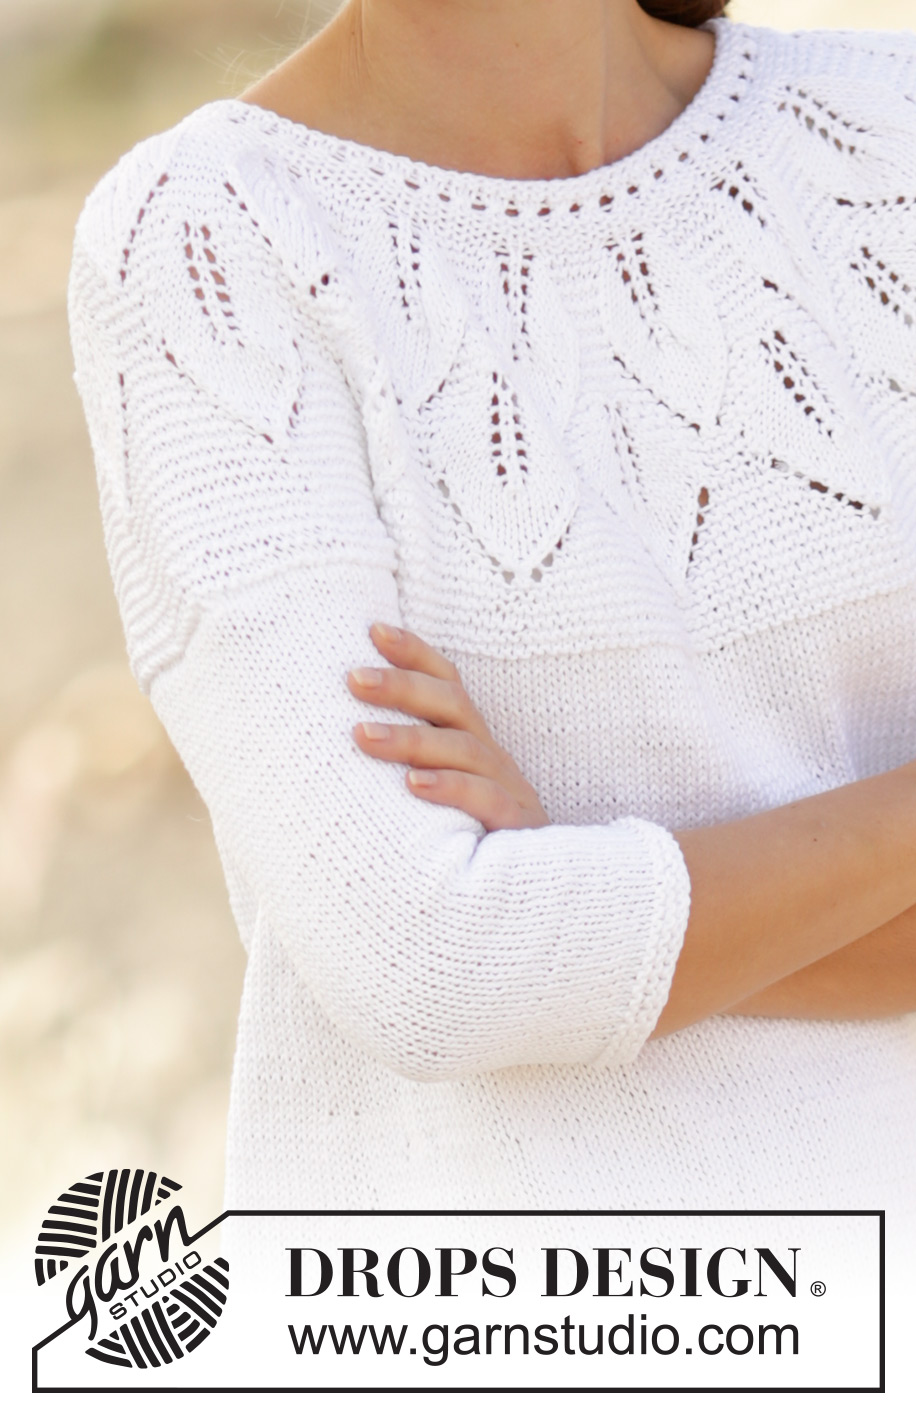
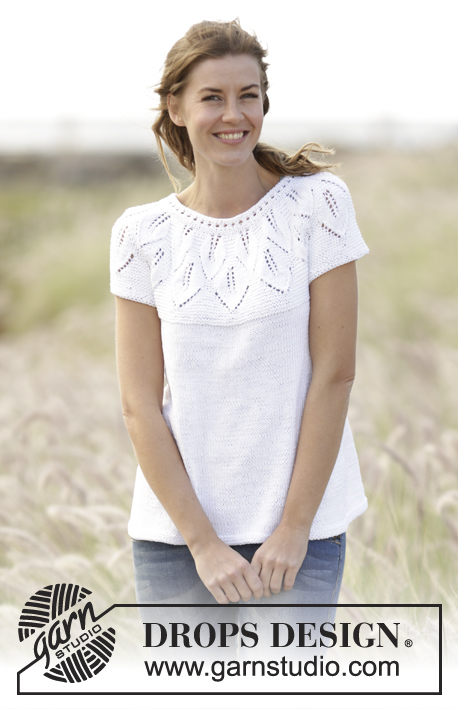
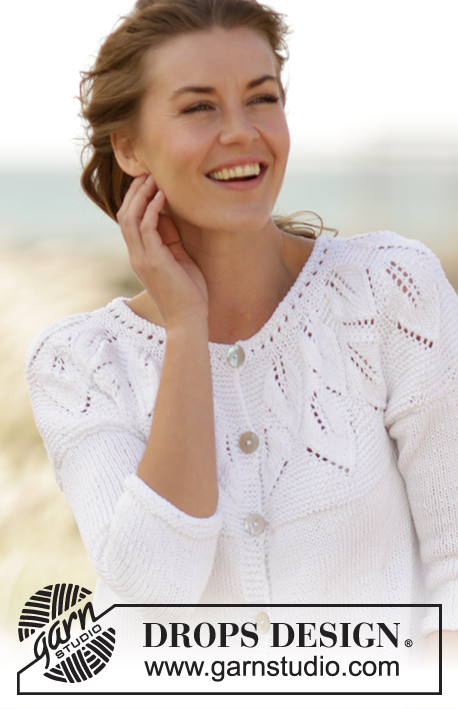
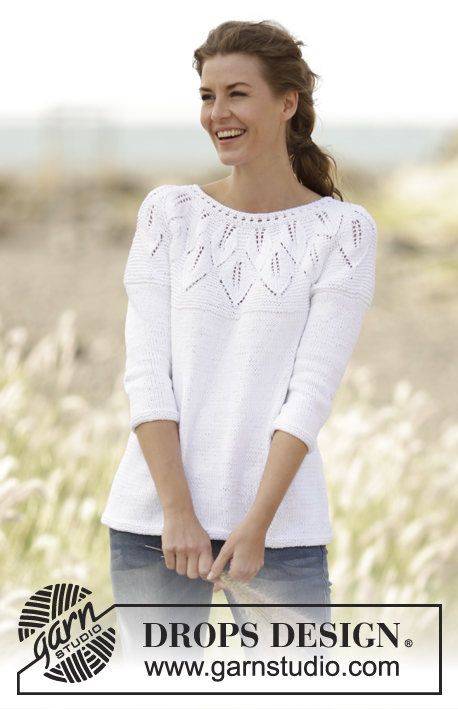
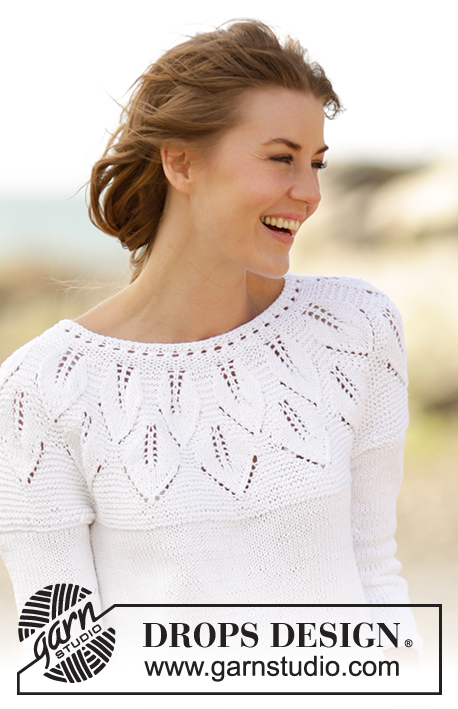
Knitted DROPS jumper with leaf pattern, ridges and round yoke, worked top down in ”Muskat”. Size S-XXXL.
DROPS 169-3 |
||||||||||||||||||||||
|
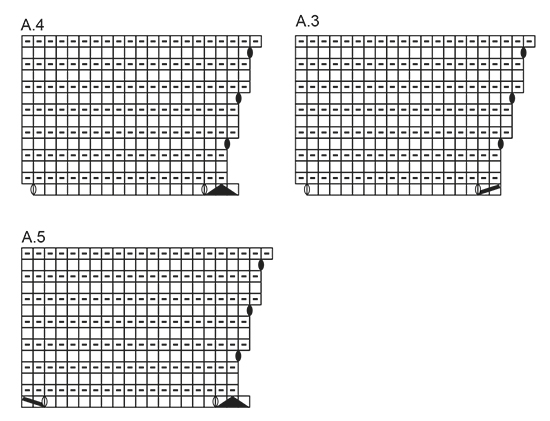
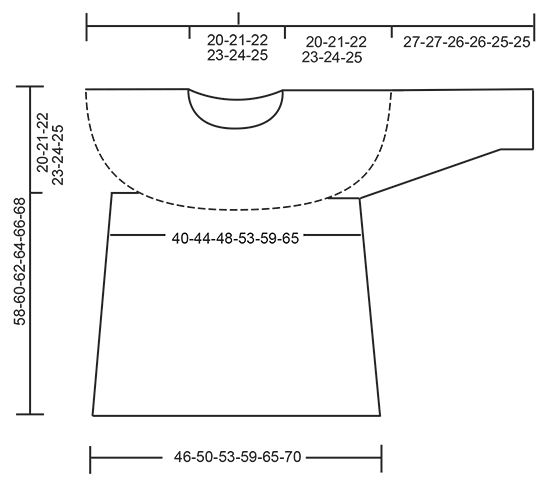
GARTER ST (back and forth): K all rows. 1 ridge = K2 rows. GARTER ST (worked in the round): 1 ridge = 2 rounds. * K 1 round and P 1 round *, repeat from *-*. PATTERN: See diagrams A.1 to A.5. The diagrams show all rows in pattern seen from RS. BUTTONHOLES: Dec for buttonhole on band at the end of row seen from RS. Work until 4 sts remain. Make 1 YO, K the next 2 sts tog, work the last 2 sts on row. Dec for buttonholes when piece measures (from cast-on edge and along the band): SIZE S: 2, 8, 14 and 19 cm SIZE M: 2, 8, 14 and 20 cm SIZE L: 2, 8, 14 and 21 cm SIZE XL: 2, 8, 15 and 22 cm SIZE XXL: 2, 9, 16 and 23 cm SIZE XXXL: 2, 9, 16 and 24 cm ---------------------------------------------------------- JUMPER: The piece is worked top down. Yoke is worked back and forth on circular needle with button band on the back, then work the body in the round. YOKE: Cast on 89-95-101-113-125-131 sts on circular needle size 3.5 mm / US 4 with Muskat. Bind off for BUTTON HOLES mid back - see explanation above. Work 5 sts in GARTER ST - see explanation above (= band), A.1 until 5 sts remain, 5 sts in garter st (= band). When A.1 has been worked 1 time vertically, continue as follows: 5 sts in garter st, A.2 (= 6 sts), repeat A.2 13-14-15-17-19-20 times in total, finish with first st in A.2 (so that pattern is the same in each side), finish with 5 sts in garter st. REMEMBER THE KNITTING GAUGE When A.2 has been worked 1 time vertically, there are 245-263-281-317-353-371 sts on needle. Then work as follows: 5 sts in garter st, A.3 (= 17 sts), repeat A.4 11-12-13-15-17-18 times, A.5 (= 20 sts) and 5 sts in garter st. When A.3-A.5 have been worked 1 time vertically, there are 284-305-326-368-410-431 sts on needle. Continue in garter st until piece measures 20-21-22-23-24-25 cm / 8"-8¼"-8¾"-9"-9½"-9¾", on last row from WS adjust no of sts to 283-307-331-365-397-429. Continue to work as follows (from RS): bind off the first 5 sts, work the first 39-43-47-53-59-65 sts (= half back piece), slip the next 61-65-69-74-78-82 sts on a stitch holder (= sleeve), cast on 6 new sts under sleeve, work the next 78-86-94-106-118-130 sts (= front piece), slip the next 61-65-69-74-78-82 sts on a stitch holder (= sleeve), cast on 6 new sts under sleeve, work the remaining 39-43-47-53-59-65 sts (= half back piece). BODY: There are now 168-184-200-224-248-272 sts for body. Insert a marker in each side of body where new sts were cast on under sleeve (= 3 new sts on each side of marker). NOW MEASURE THE PIECE FROM HERE. Switch to circular needle size 4 mm / US 6. Continue with stockinette st, now work in the round. When piece measures 4 cm / 1½", inc 1 st on each side of each marker (= 4 sts inc). Repeat inc every 5-5-5-6-6-6 cm / 2"-2"-2"-2 ⅜"-2⅜"-2⅜" 5 more times = 192-208-224-248-272-296 sts. Continue in stockinette st until piece measures 34-35-36-37-38-39 cm / 13⅜"-13¾"-14¼"-14½"-15"-15¼", switch to circular needle size 3.5 mm / US 4 and work 3 ridges in GARTER ST - see explanation above. Bind off. The whole piece measures approx. 58-60-62-64-66-68 cm / 22¾"-23⅝"-24⅜"-25¼"-26"-26¾". SLEEVE: Slip sts from stitch holder back on double pointed needles size 3.5 mm / US 4 (= 61-65-69-74-78-82 sts). Pick up 1 st in each of the 6 sts cast on under sleeve, insert a marker in the middle of these sts = 67-71-75-80-84-88 sts. Work 2 ridges in GARTER ST – see explanation above, switch to double pointed needles size 4 mm / US 6, then work in stockinette st. When piece measures 3 cm / 1", dec 1 st on each side marker, repeat dec every 2-2-1½-1½-1-1 cm / ¾"-¾"-½"-½"-⅜"-⅜" 9-10-11-13-14-15 more times = 47-49-51-52-54-56 sts. Continue in stockinette st until sleeve measures 27-27-26-26-25-25 cm / 10½"-10½"-10¼"-10¼"-9¾"-9¾" (shorter measurements in the larger sizes because of longer yoke), switch to double pointed needle size 3.5 mm / US 4 and work 3 ridges. Bind off. Work the other sleeve the same way. ASSEMBLY: Place band without buttonholes under band with buttonholes and fasten the bottom band. Sew on buttons. |
||||||||||||||||||||||
Diagram explanations |
||||||||||||||||||||||
|
||||||||||||||||||||||
 |
||||||||||||||||||||||
 |
||||||||||||||||||||||
 |
||||||||||||||||||||||
Have you finished this pattern?Tag your pictures with #dropspattern #summerleavessweater or submit them to the #dropsfan gallery. Do you need help with this pattern?You'll find 26 tutorial videos, a Comments/Questions area and more by visiting the pattern on garnstudio.com. © 1982-2026 DROPS Design A/S. We reserve all rights. This document, including all its sub-sections, has copyrights. Read more about what you can do with our patterns at the bottom of each pattern on our site. |
||||||||||||||||||||||


With over 40 years in knitting and crochet design, DROPS Design offers one of the most extensive collections of free patterns on the internet - translated to 17 languages. As of today we count 325 catalogs and 12298 patterns - 12288 of which are translated into English (US/in).
We work hard to bring you the best knitting and crochet have to offer, inspiration and advice as well as great quality yarns at incredible prices! Would you like to use our patterns for other than personal use? You can read what you are allowed to do in the Copyright text at the bottom of all our patterns. Happy crafting!
Post a comment to pattern DROPS 169-3
We would love to hear what you have to say about this pattern!
If you want to leave a question, please make sure you select the correct category in the form below, to speed up the answering process. Required fields are marked *.