
Popular categories
Looking for a yarn?


Comments / Questions (135)
![]() Małgorzata wrote:
Małgorzata wrote:
Dzień dobry, nie rozumiem jak technicznie mam wykonać to "przerobienie pierwszego oczka ze schematu A2." (jeżeli karczek robi się w tę i z powrotem ) Czy to znaczy że tym przerobieniem pierwszego oczka ze schematu zamykam robótkę w okrąg?Czy znaczy to, żę z tego oczka robi się dwa (bo z wylicznia wynika, że powinnam mieć jedno oczko mniej )
07.01.2020 - 12:28DROPS Design answered:
Witaj Małgosiu! Przerabiasz górną część karczku w tę i z powrotem następująco: 5 o. ściegiem francuskim, schemat A.2 (= 6 o.), powt. w sumie 13-14-15-17-19-20 razy schemat A.2, zakończyć przerabiając 1-sze o. schematu A.2 (w ten sposób motyw będzie symetryczny, przerabiasz 1-sze oczko po prawej stronie schematu), zakończyć przerabiając 5 o. ściegiem francuskim. W rozmiarze S na koniec schematu masz w ten sposób: 5 o.+ (13x18) + 5 o. + 1 o. = 245 o. Powodzenia!
08.01.2020 - 22:21
![]() LNoelle Le Port wrote:
LNoelle Le Port wrote:
Comment faire pour tricoter les manches ? Faut il tricoter en rond ou en aller retour. Je n'arrive pas à mettre les mailles relevées sur une seule aiguille double pointe. Merci pour la réponse
12.07.2019 - 15:05DROPS Design answered:
Bonjour Mme Le Port, cette vidéo montre (pour un raglan, mais la technique sera la même ici) comment on reprend les mailles des manches pour les tricoter en rond. Bon tricot!
12.07.2019 - 15:10
![]() Ewa wrote:
Ewa wrote:
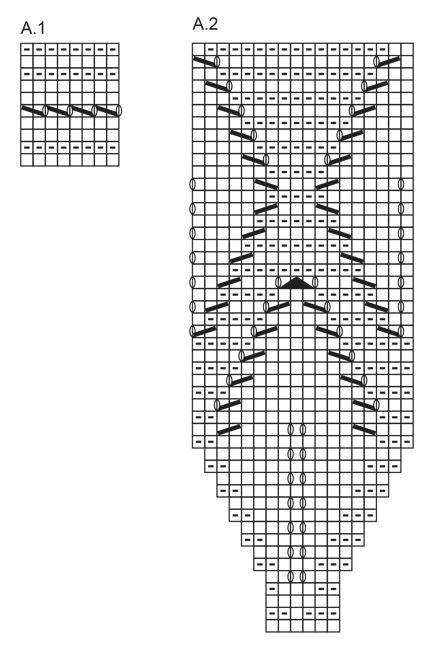
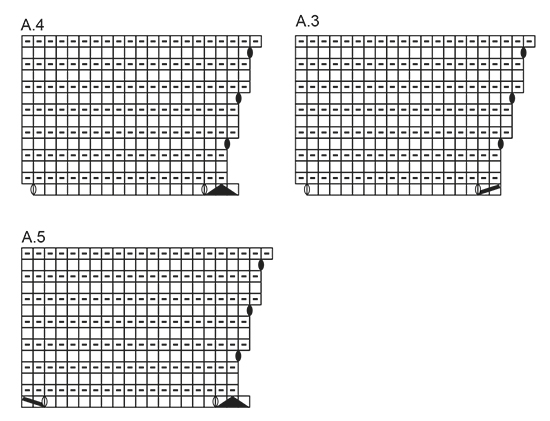
W opisie jest takie sformułowanie: "Gdy schemat A.1 zostanie przerobiony 1 raz na wysokość, dalej przer. następująco: 5 o. ściegiem francuskim, schemat A.2 (= 6 o.)" Co oznacza: A.2 (=6 o.). 6 o. to sześć oczek? Schemat A2 to 18 oczek szerokości?
12.07.2019 - 11:38DROPS Design answered:
Witaj Ewo! Schemat czytamy od dołu, a schemat A.2 na początku ma 6 oczek, dopiero później rozszerzy się do 18. Powodzenia!
12.07.2019 - 16:41
![]() Kina wrote:
Kina wrote:
Hej, börjar man med framkanten bak direkt på första varvet, eller stickar man runt i 2cm och sedan börja med framkanten, förstår inte riktigt.
30.06.2019 - 16:59DROPS Design answered:
Hej. Du börjar direkt med att sticka 5 m rätstickning (= kant till knäppning/knappar) A.1 tills det återstår 5 maskor och dessa 5 maskor stickas i rätstickning (= kant till knäppning/knappar). Du fortsätter på samma sätt med 5 rätstickade m (till kanterna) i början och slutet av varvet. Lycka till!
01.07.2019 - 10:35
![]() Suzete Terezinha Machado wrote:
Suzete Terezinha Machado wrote:
Modelos muito bonitos e bem explicadinho, fáceis de serem feitos.
15.06.2019 - 04:11
![]() Noelle Le Port wrote:
Noelle Le Port wrote:
Bonjour, pourrait-on avoir un gros plan du motif A2 et des premiers rangs de A3 A4 et A5 merci pour votre reponse précédente
27.05.2019 - 12:16DROPS Design answered:
Bonjour Mme Le Port, sur la 2ème et la 3ème photo, on voit le motif de l'empiècement en plus grand. (les feuilles se tricotent en jersey endroit et les mailles entre les feuilles se tricotent au point mousse) - les diagrammes A.3-A.5 se tricotent simplement comme indiqué dans les diagrammes - voir aussi. Bon tricot!
27.05.2019 - 13:25
![]() Le Port wrote:
Le Port wrote:
Bonjour, après A2 faut il faire A3 11 fois, A4 ,1 fois puis A5 1fois sur le même rang ? De plus vous ne dites pas qu'il faut rabattre les 5 mailles bordure de gauche. Merci pour la réponse
25.05.2019 - 09:09DROPS Design answered:
Bonjour Mme Le Port, après A.2 on tricote les 245-263-281-317-353-371 m ainsi: 5 m point mousse, A.3 (= 17 m), on répète 11-12-13-15-17-18 fois A.4 en largeur et on termine par A.5 (= 20 m) et 5 m point mousse. Soit 284-305-326-368-410-431 m quand les diagrammes sont terminés 1 fois en hauteur. On rabat ensuite les 5 premières m du début du rang (patte de boutonnage du demi-dos), et on continuera ensuite en rond. Bon tricot!
27.05.2019 - 09:49
![]() Marita Lang wrote:
Marita Lang wrote:
Tschuldigung! Habe jetzt noch mal nachgelesen. Hinten sind die Knöpfe
30.04.2019 - 00:47
![]() Marita Lang wrote:
Marita Lang wrote:
Unter Fertigstellen steht u.a. Knöpfe annähen: Wo hat denn der Pullover Knöpfe?
30.04.2019 - 00:20DROPS Design answered:
Liebe Frau Lang, die Knöpfe sind hinten im Rücken, es werden 3 Knopflöcher am Ende der Hin-Reihen eingearbeitet (siehe KNOPFLÖCHER) = am linken Rand Rückenteil, die Knöpfe werden dann am rechten Rand vom Rückenteil angenäht. Viel Spaß beim stricken!
30.04.2019 - 10:05
![]() Elke wrote:
Elke wrote:
Goede namiddag, Op de uitleg voor de patronen staat dat de telpatronen het patroon aan de goede kant laten zoen. Dus voor A1 en A2 staan alleen de heengaande naalden vermeld en NIET de teruggaande naalden. Dus voor A1 brei ik 20 naalden?
17.04.2019 - 16:28DROPS Design answered:
Dag Elke,
Zowel de heengaande als de teruggaande naalden zijn in het patroon verwerkt, maar het patroon staat erin getekend vanaf de goede kant gezien. Je begint rechts onderaan de teltekening.
21.04.2019 - 17:26
|
||||||||||||||||||||||
Summer Leaves#summerleavessweater |
||||||||||||||||||||||
 |
 |
|||||||||||||||||||||
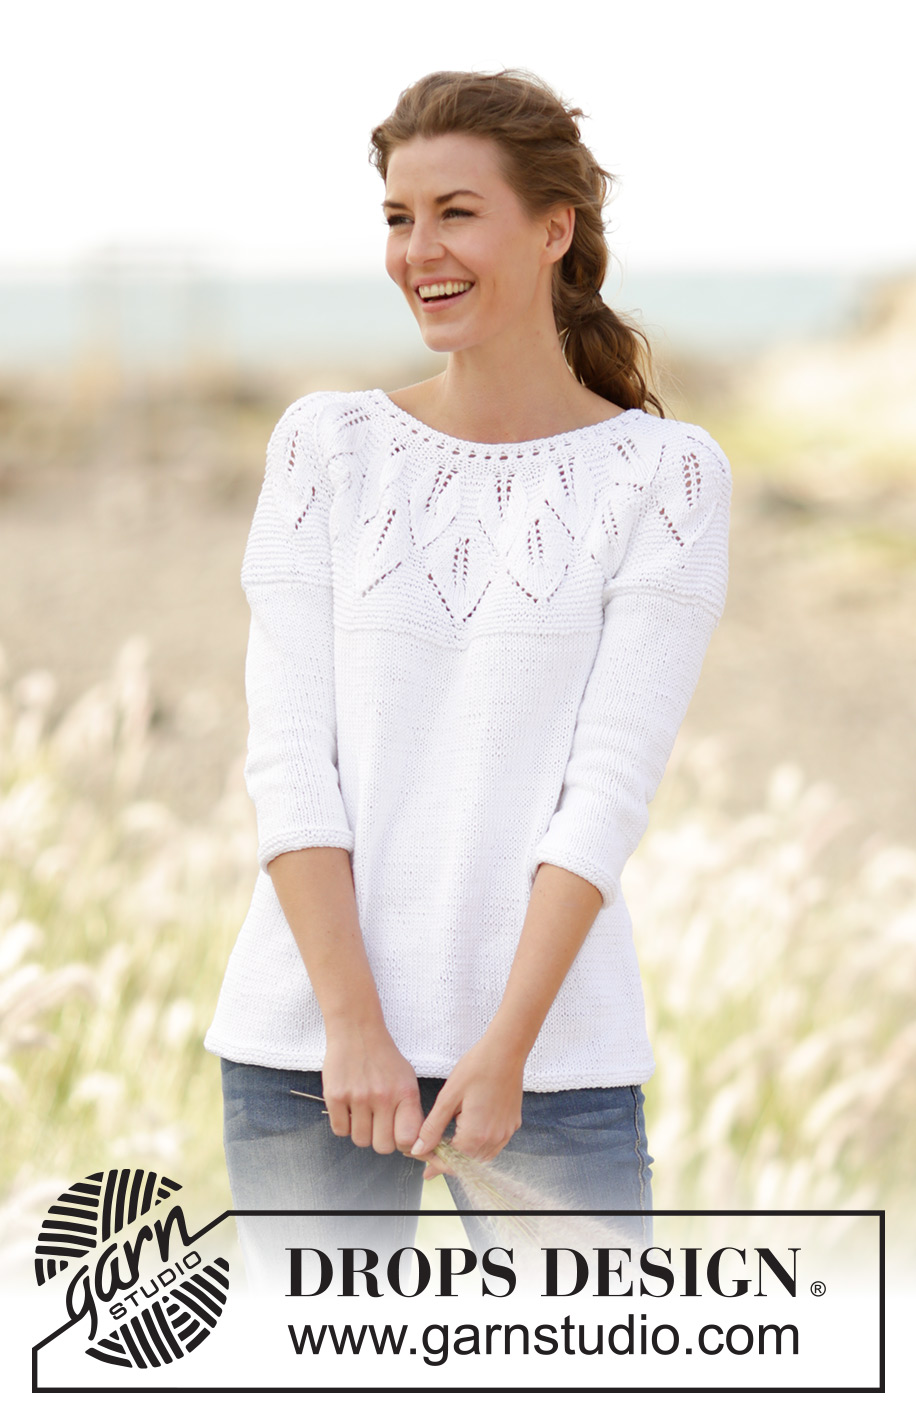
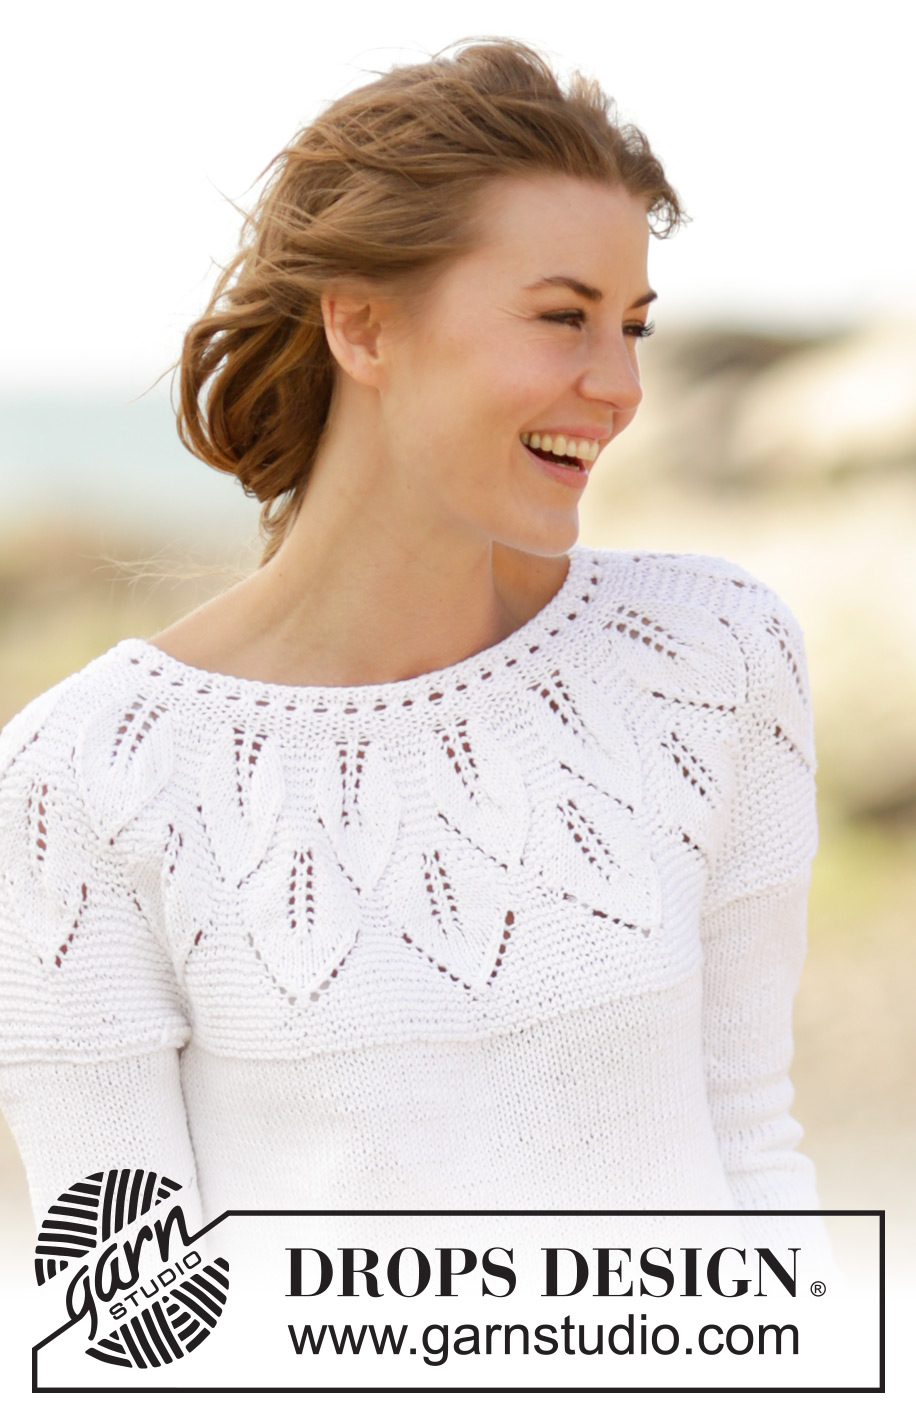
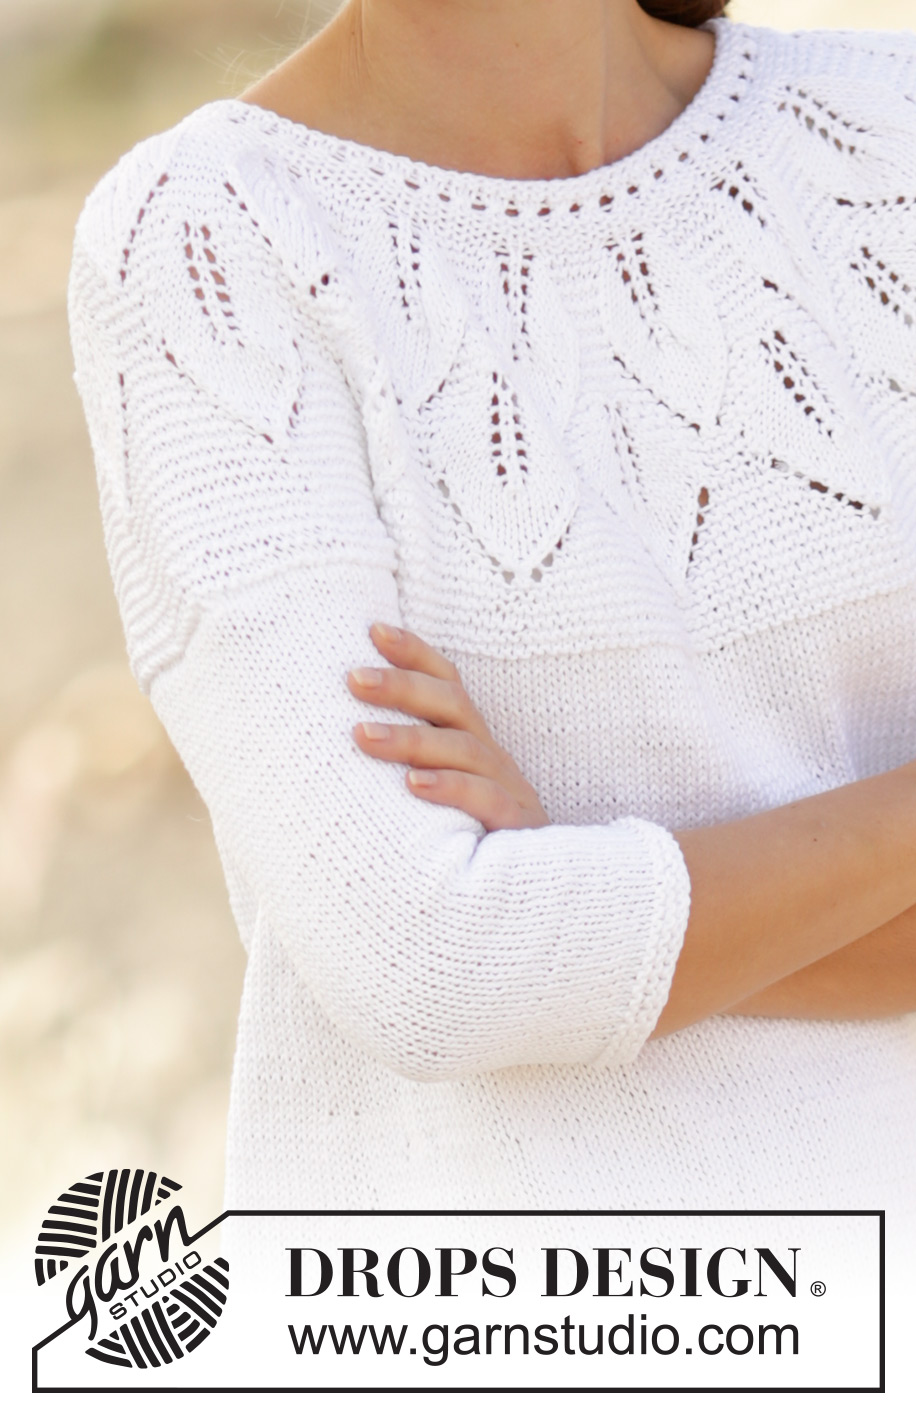
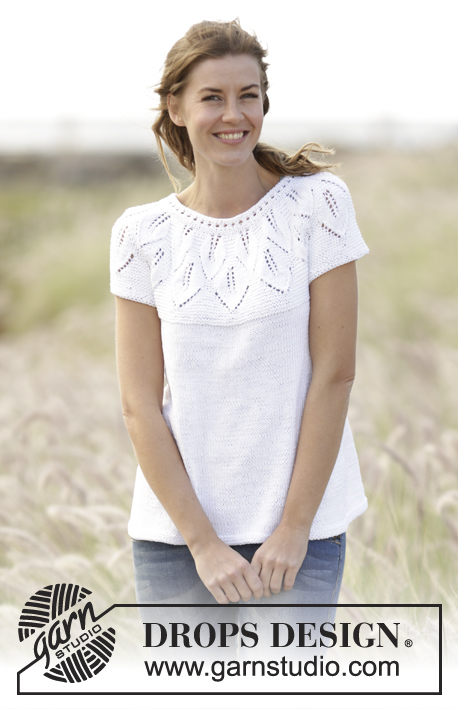
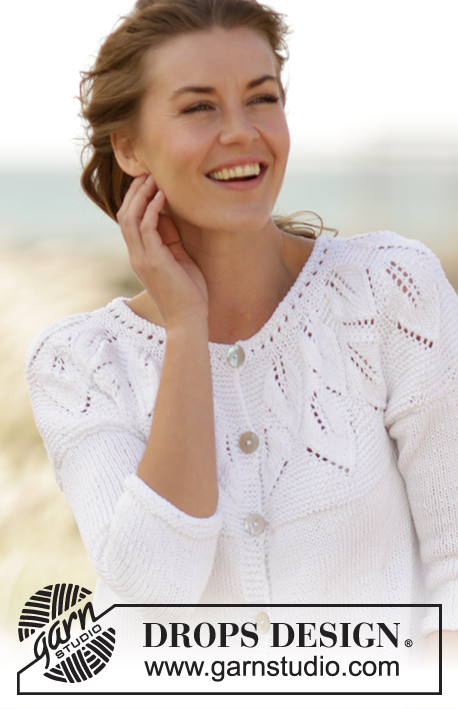
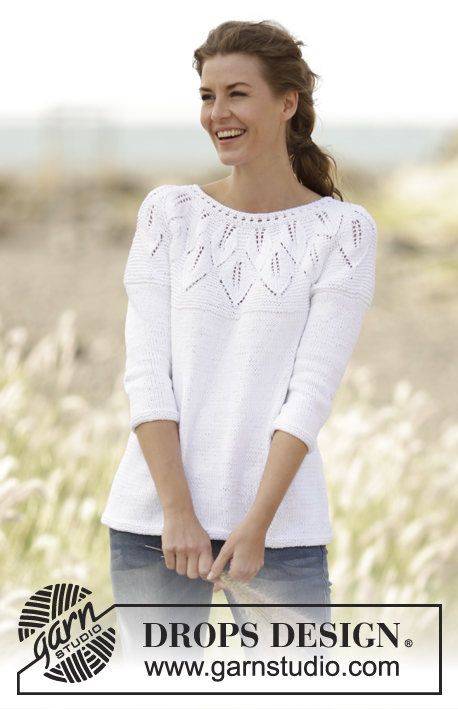
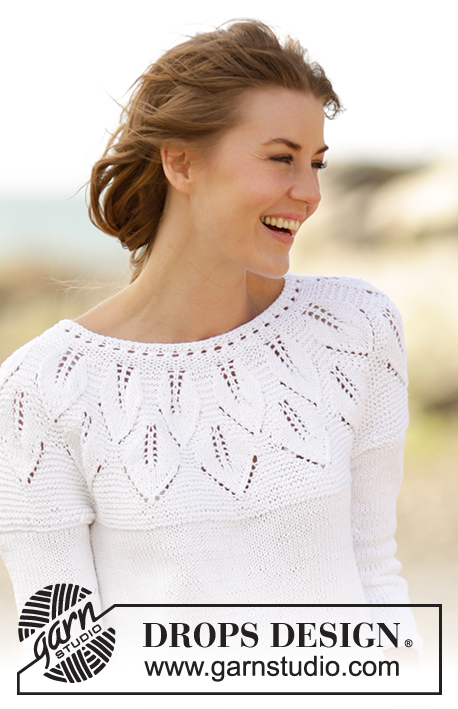
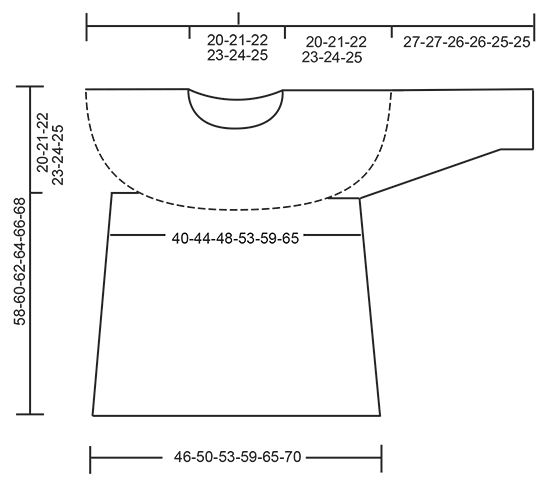
Knitted DROPS jumper with leaf pattern, ridges and round yoke, worked top down in ”Muskat”. Size S-XXXL.
DROPS 169-3 |
||||||||||||||||||||||
|
GARTER ST (back and forth): K all rows. 1 ridge = K2 rows. GARTER ST (worked in the round): 1 ridge = 2 rounds. * K 1 round and P 1 round *, repeat from *-*. PATTERN: See diagrams A.1 to A.5. The diagrams show all rows in pattern seen from RS. BUTTONHOLES: Dec for buttonhole on band at the end of row seen from RS. Work until 4 sts remain. Make 1 YO, K the next 2 sts tog, work the last 2 sts on row. Dec for buttonholes when piece measures (from cast-on edge and along the band): SIZE S: 2, 8, 14 and 19 cm SIZE M: 2, 8, 14 and 20 cm SIZE L: 2, 8, 14 and 21 cm SIZE XL: 2, 8, 15 and 22 cm SIZE XXL: 2, 9, 16 and 23 cm SIZE XXXL: 2, 9, 16 and 24 cm ---------------------------------------------------------- JUMPER: The piece is worked top down. Yoke is worked back and forth on circular needle with button band on the back, then work the body in the round. YOKE: Cast on 89-95-101-113-125-131 sts on circular needle size 3.5 mm / US 4 with Muskat. Bind off for BUTTON HOLES mid back - see explanation above. Work 5 sts in GARTER ST - see explanation above (= band), A.1 until 5 sts remain, 5 sts in garter st (= band). When A.1 has been worked 1 time vertically, continue as follows: 5 sts in garter st, A.2 (= 6 sts), repeat A.2 13-14-15-17-19-20 times in total, finish with first st in A.2 (so that pattern is the same in each side), finish with 5 sts in garter st. REMEMBER THE KNITTING GAUGE When A.2 has been worked 1 time vertically, there are 245-263-281-317-353-371 sts on needle. Then work as follows: 5 sts in garter st, A.3 (= 17 sts), repeat A.4 11-12-13-15-17-18 times, A.5 (= 20 sts) and 5 sts in garter st. When A.3-A.5 have been worked 1 time vertically, there are 284-305-326-368-410-431 sts on needle. Continue in garter st until piece measures 20-21-22-23-24-25 cm / 8"-8¼"-8¾"-9"-9½"-9¾", on last row from WS adjust no of sts to 283-307-331-365-397-429. Continue to work as follows (from RS): bind off the first 5 sts, work the first 39-43-47-53-59-65 sts (= half back piece), slip the next 61-65-69-74-78-82 sts on a stitch holder (= sleeve), cast on 6 new sts under sleeve, work the next 78-86-94-106-118-130 sts (= front piece), slip the next 61-65-69-74-78-82 sts on a stitch holder (= sleeve), cast on 6 new sts under sleeve, work the remaining 39-43-47-53-59-65 sts (= half back piece). BODY: There are now 168-184-200-224-248-272 sts for body. Insert a marker in each side of body where new sts were cast on under sleeve (= 3 new sts on each side of marker). NOW MEASURE THE PIECE FROM HERE. Switch to circular needle size 4 mm / US 6. Continue with stockinette st, now work in the round. When piece measures 4 cm / 1½", inc 1 st on each side of each marker (= 4 sts inc). Repeat inc every 5-5-5-6-6-6 cm / 2"-2"-2"-2 ⅜"-2⅜"-2⅜" 5 more times = 192-208-224-248-272-296 sts. Continue in stockinette st until piece measures 34-35-36-37-38-39 cm / 13⅜"-13¾"-14¼"-14½"-15"-15¼", switch to circular needle size 3.5 mm / US 4 and work 3 ridges in GARTER ST - see explanation above. Bind off. The whole piece measures approx. 58-60-62-64-66-68 cm / 22¾"-23⅝"-24⅜"-25¼"-26"-26¾". SLEEVE: Slip sts from stitch holder back on double pointed needles size 3.5 mm / US 4 (= 61-65-69-74-78-82 sts). Pick up 1 st in each of the 6 sts cast on under sleeve, insert a marker in the middle of these sts = 67-71-75-80-84-88 sts. Work 2 ridges in GARTER ST – see explanation above, switch to double pointed needles size 4 mm / US 6, then work in stockinette st. When piece measures 3 cm / 1", dec 1 st on each side marker, repeat dec every 2-2-1½-1½-1-1 cm / ¾"-¾"-½"-½"-⅜"-⅜" 9-10-11-13-14-15 more times = 47-49-51-52-54-56 sts. Continue in stockinette st until sleeve measures 27-27-26-26-25-25 cm / 10½"-10½"-10¼"-10¼"-9¾"-9¾" (shorter measurements in the larger sizes because of longer yoke), switch to double pointed needle size 3.5 mm / US 4 and work 3 ridges. Bind off. Work the other sleeve the same way. ASSEMBLY: Place band without buttonholes under band with buttonholes and fasten the bottom band. Sew on buttons. |
||||||||||||||||||||||
Diagram explanations |
||||||||||||||||||||||
|
||||||||||||||||||||||
 |
||||||||||||||||||||||
 |
||||||||||||||||||||||
 |
||||||||||||||||||||||
Have you finished this pattern?Tag your pictures with #dropspattern #summerleavessweater or submit them to the #dropsfan gallery. Do you need help with this pattern?You'll find 26 tutorial videos, a Comments/Questions area and more by visiting the pattern on garnstudio.com. © 1982-2026 DROPS Design A/S. We reserve all rights. This document, including all its sub-sections, has copyrights. Read more about what you can do with our patterns at the bottom of each pattern on our site. |
||||||||||||||||||||||


With over 40 years in knitting and crochet design, DROPS Design offers one of the most extensive collections of free patterns on the internet - translated to 17 languages. As of today we count 325 catalogs and 12298 patterns - 12288 of which are translated into English (US/in).
We work hard to bring you the best knitting and crochet have to offer, inspiration and advice as well as great quality yarns at incredible prices! Would you like to use our patterns for other than personal use? You can read what you are allowed to do in the Copyright text at the bottom of all our patterns. Happy crafting!
Post a comment to pattern DROPS 169-3
We would love to hear what you have to say about this pattern!
If you want to leave a question, please make sure you select the correct category in the form below, to speed up the answering process. Required fields are marked *.