
Popular categories
Looking for a yarn?


Comments / Questions (135)
![]() Peggy wrote:
Peggy wrote:
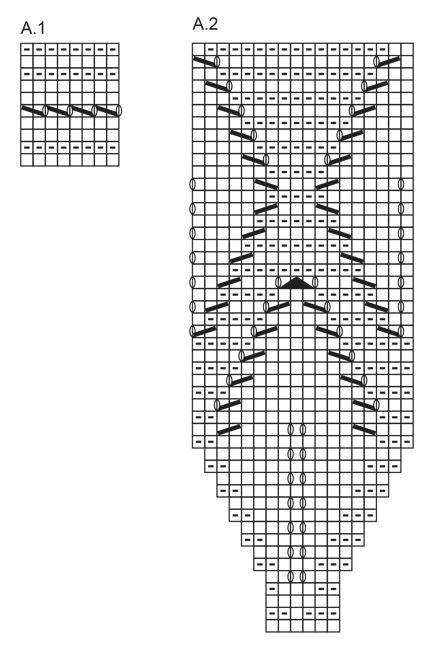
Bonjour, J'ai presque fini de tricoter A2. Quand je lis les explications, je comprends que je vais devoir tricoter A3 puis A4 puis A5. Mais sur la photo, on ne voit pas autant de point mousse après A2... Merci de me renseigner. Peggy
09.02.2017 - 20:58DROPS Design answered:
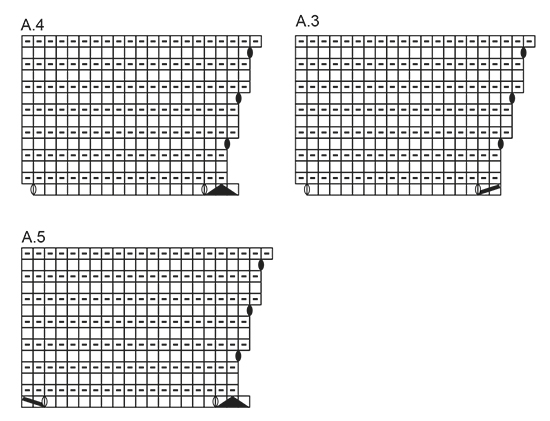
Bonjour Peggy, après A.2, tricotez A.3, A.4 et A.5 en même temps ainsi: A.3 après les m de bordure, répétez A.4 en largeur et termines par A.5 avant les m de bordure = 7 côtes mousse après A.2 et avant la séparation des manches. Bon tricot!
10.02.2017 - 09:20
![]() Lizzie Sørensen wrote:
Lizzie Sørensen wrote:
Synd der ikke er et billede af blusen bagfra. Jeg opdagede først det knapperne da jeg begyndte ar strikke. Jeg kan se at flere har problemer med hvor man starter på diagrammerne. I kunne lave pile opad og mod venstre ved siden af diagrammerne.. eller skrive det ind i teksten over diagrammerne
26.01.2017 - 21:13
![]() Barbara wrote:
Barbara wrote:
I would like to know why do I need to cast off Buttons Holes mid back because this is a jumper?
30.12.2016 - 03:05DROPS Design answered:
Dear Barbara, this is a jumper with a vent on mid back closed with buttons (= 4 buttons in all sizes). Happy knitting!
02.01.2017 - 08:16
![]() Elke wrote:
Elke wrote:
Hallo,… fangen alle Muster A1 bis A5 unten (in der Abbildung) oder oben an? Oder A1 oben und die anderen unten! Oder? Ich finden den Pullover so schön, bin aber kurz vorm Aufgeben!
05.10.2016 - 17:52DROPS Design answered:
Liebe Elke, Lesen Sie alle Diagramm von der rechten Ecken und jede Runde nach links arbeiten (= von der Vorderseite). Lesen Sie mehr hier.
06.10.2016 - 08:57
![]() Pastora wrote:
Pastora wrote:
Buenas tardes, Ya he terminado la parte que corresponde con A1, tengo 101 puntos pero no entiendo la explicación de A2, que quiere decir A2 (=6 puntos) porque veo que el grafico tiene 18 puntos. No entiendo como llegaría a tener 281 puntos? Gracias de antemano Un saludo
29.09.2016 - 21:35DROPS Design answered:
Hola Pastora. En la primera fila de A.2 hay 6 pts. Los aumentos para el canesú están dentro del diagrama A.2, es decir, tenemos 281 pt al finalizar el diagrama A.2 con todos los aumentos.
09.10.2016 - 11:20
![]() Pastora wrote:
Pastora wrote:
Esto no lo entiendo, A-2-(=6pts), que hay que añadir los 6 puntos antes de empezar A-2, repartir 3 y 3 a continuación de los puntos de muzgo y al final antes del otro borde,o 6pts,antes de cada repetición de A-2, no se si me explico
29.09.2016 - 13:50DROPS Design answered:
Hola Pastora. A.2(= 6 pts) significa que una repetición del diagrama A.2 tiene 6 pts, que se repiten varias vcs a lo largo de la fila. Esto no afecta a la cenefa, que se trabaja siempre en pt musgo.
07.10.2016 - 20:25
![]() Pastora wrote:
Pastora wrote:
La pregunta de ayer , ya no me hace falta , lo averigue, el error era mio
29.09.2016 - 13:43
![]() Pastora wrote:
Pastora wrote:
Elaborando el pulover, creo que hay herrores de traducción,cuando ponenTejer 5 pts en PT MUSGO¿ son en realidad vueltas?, y mas abajo A1, hasta que resten 5pts, 5pts en pt musgo(= borde), ¿también son vueltas?, Gracias
28.09.2016 - 18:38DROPS Design answered:
Hola Pastora. Este jersey tiene el cierre en la espalda. En este caso el jersey se trabaja de ida y vta con los 5 pts en pt musgo a cada lado, que forman las cenefas en el centro de la espalda.
04.10.2016 - 00:04
![]() Pastora wrote:
Pastora wrote:
Muchisimas gracias por responder tan pronto,talla calculada,ya os comentare como me queda, otra vez gracias.
23.09.2016 - 18:25
![]() Pastora wrote:
Pastora wrote:
Me encanta, pero quisiera saber como calcular mi talla, muchas gracias espero su respuesta
20.09.2016 - 12:30DROPS Design answered:
Hola Pastora. Para elegir bien la talla coge las medidas que viene en el diagrama debajo del patrón.
22.09.2016 - 22:52
|
||||||||||||||||||||||
Summer Leaves#summerleavessweater |
||||||||||||||||||||||
 |
 |
|||||||||||||||||||||
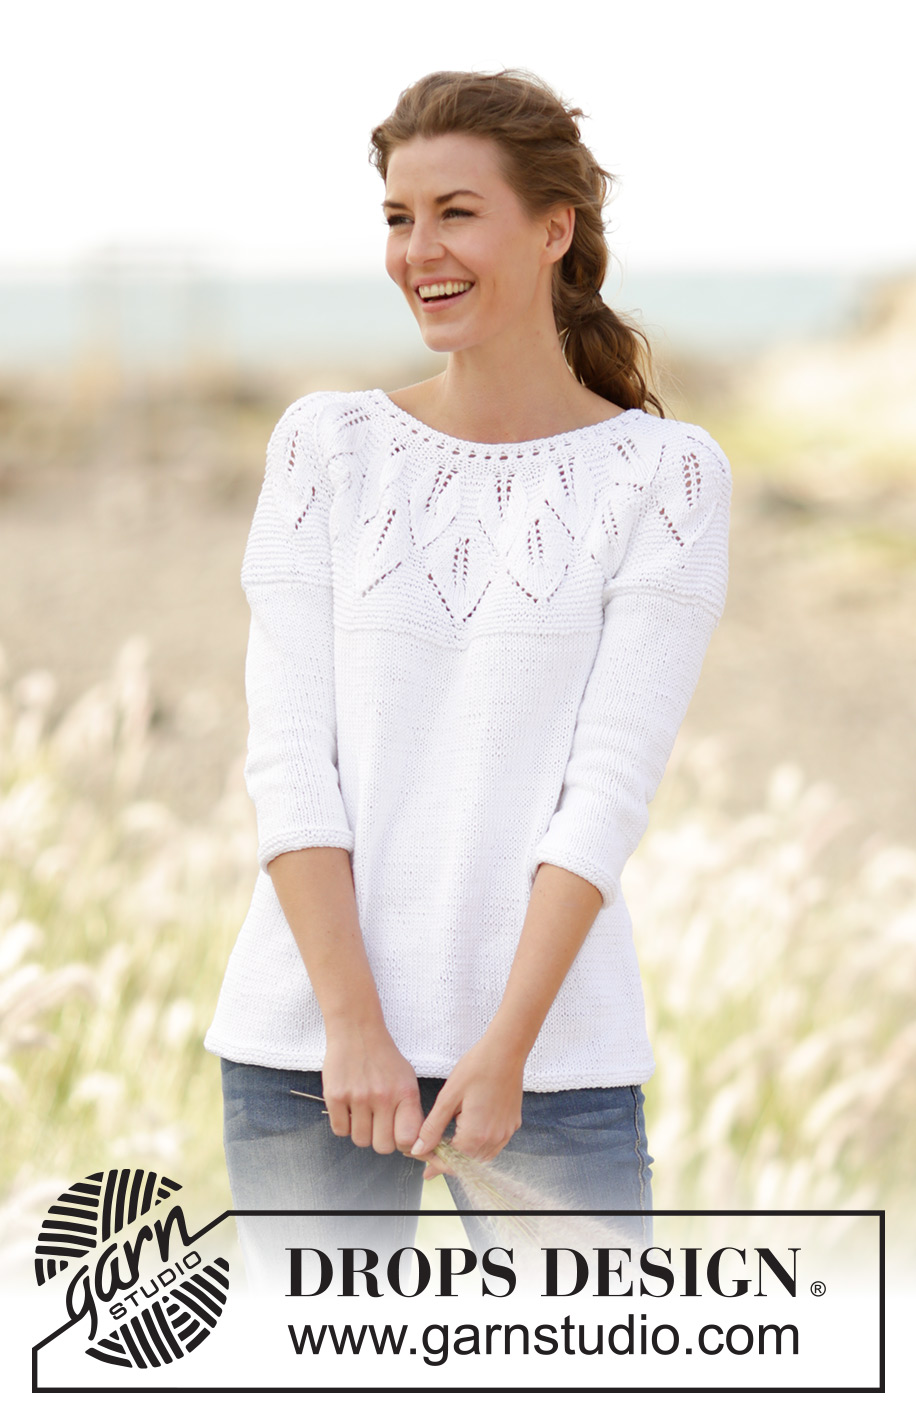
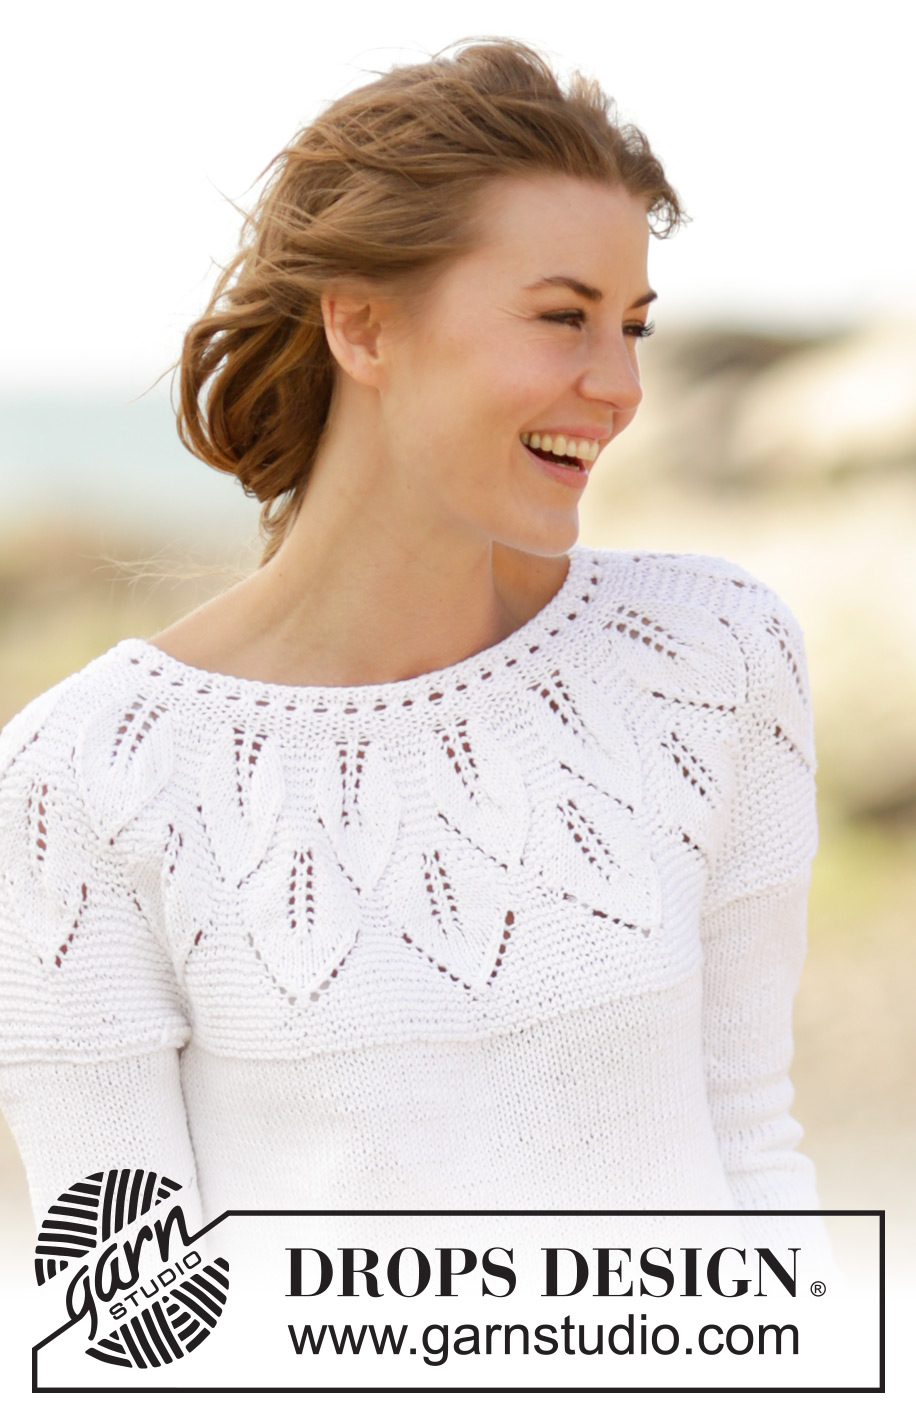
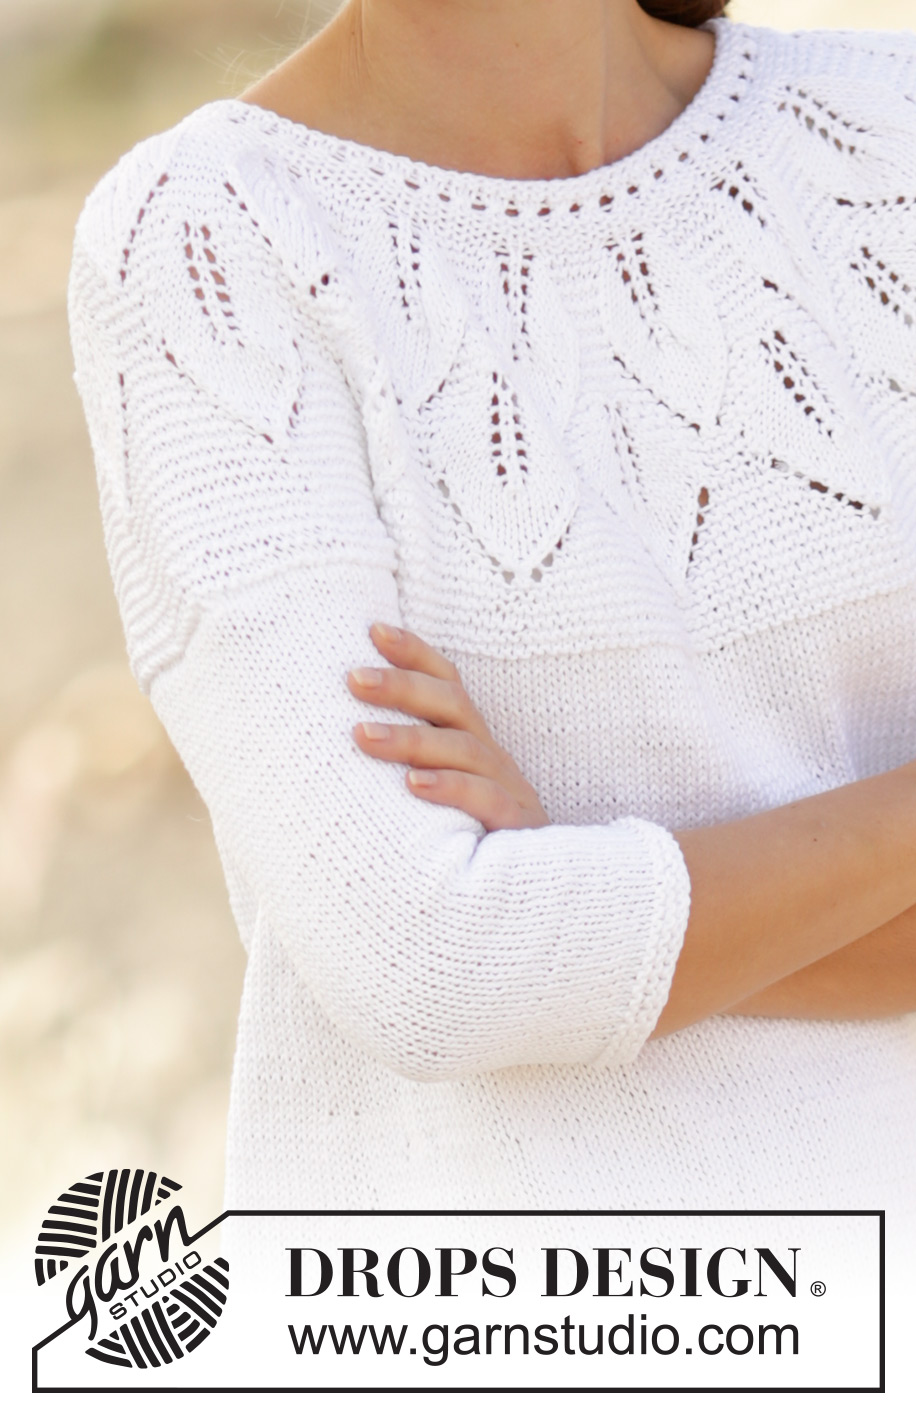
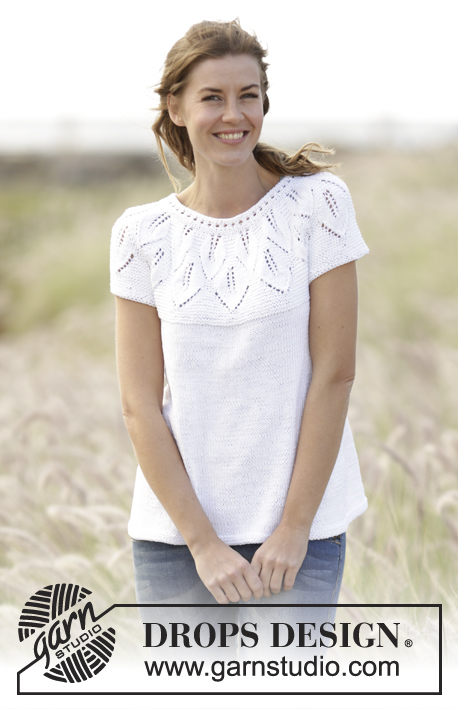
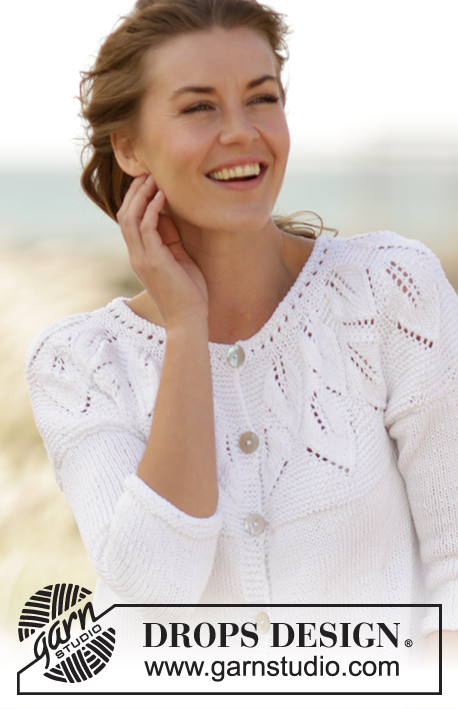
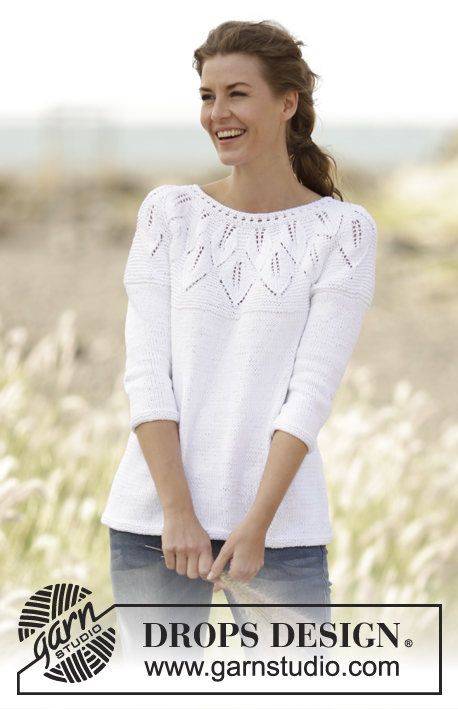
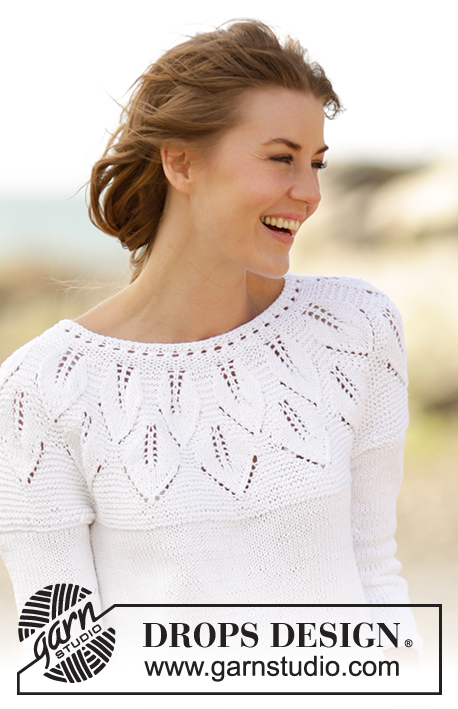
Knitted DROPS jumper with leaf pattern, ridges and round yoke, worked top down in ”Muskat”. Size S-XXXL.
DROPS 169-3 |
||||||||||||||||||||||
|
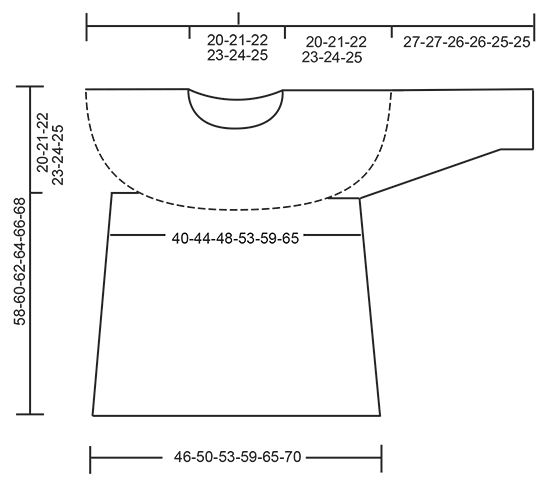
GARTER ST (back and forth): K all rows. 1 ridge = K2 rows. GARTER ST (worked in the round): 1 ridge = 2 rounds. * K 1 round and P 1 round *, repeat from *-*. PATTERN: See diagrams A.1 to A.5. The diagrams show all rows in pattern seen from RS. BUTTONHOLES: Dec for buttonhole on band at the end of row seen from RS. Work until 4 sts remain. Make 1 YO, K the next 2 sts tog, work the last 2 sts on row. Dec for buttonholes when piece measures (from cast-on edge and along the band): SIZE S: 2, 8, 14 and 19 cm SIZE M: 2, 8, 14 and 20 cm SIZE L: 2, 8, 14 and 21 cm SIZE XL: 2, 8, 15 and 22 cm SIZE XXL: 2, 9, 16 and 23 cm SIZE XXXL: 2, 9, 16 and 24 cm ---------------------------------------------------------- JUMPER: The piece is worked top down. Yoke is worked back and forth on circular needle with button band on the back, then work the body in the round. YOKE: Cast on 89-95-101-113-125-131 sts on circular needle size 3.5 mm / US 4 with Muskat. Bind off for BUTTON HOLES mid back - see explanation above. Work 5 sts in GARTER ST - see explanation above (= band), A.1 until 5 sts remain, 5 sts in garter st (= band). When A.1 has been worked 1 time vertically, continue as follows: 5 sts in garter st, A.2 (= 6 sts), repeat A.2 13-14-15-17-19-20 times in total, finish with first st in A.2 (so that pattern is the same in each side), finish with 5 sts in garter st. REMEMBER THE KNITTING GAUGE When A.2 has been worked 1 time vertically, there are 245-263-281-317-353-371 sts on needle. Then work as follows: 5 sts in garter st, A.3 (= 17 sts), repeat A.4 11-12-13-15-17-18 times, A.5 (= 20 sts) and 5 sts in garter st. When A.3-A.5 have been worked 1 time vertically, there are 284-305-326-368-410-431 sts on needle. Continue in garter st until piece measures 20-21-22-23-24-25 cm / 8"-8¼"-8¾"-9"-9½"-9¾", on last row from WS adjust no of sts to 283-307-331-365-397-429. Continue to work as follows (from RS): bind off the first 5 sts, work the first 39-43-47-53-59-65 sts (= half back piece), slip the next 61-65-69-74-78-82 sts on a stitch holder (= sleeve), cast on 6 new sts under sleeve, work the next 78-86-94-106-118-130 sts (= front piece), slip the next 61-65-69-74-78-82 sts on a stitch holder (= sleeve), cast on 6 new sts under sleeve, work the remaining 39-43-47-53-59-65 sts (= half back piece). BODY: There are now 168-184-200-224-248-272 sts for body. Insert a marker in each side of body where new sts were cast on under sleeve (= 3 new sts on each side of marker). NOW MEASURE THE PIECE FROM HERE. Switch to circular needle size 4 mm / US 6. Continue with stockinette st, now work in the round. When piece measures 4 cm / 1½", inc 1 st on each side of each marker (= 4 sts inc). Repeat inc every 5-5-5-6-6-6 cm / 2"-2"-2"-2 ⅜"-2⅜"-2⅜" 5 more times = 192-208-224-248-272-296 sts. Continue in stockinette st until piece measures 34-35-36-37-38-39 cm / 13⅜"-13¾"-14¼"-14½"-15"-15¼", switch to circular needle size 3.5 mm / US 4 and work 3 ridges in GARTER ST - see explanation above. Bind off. The whole piece measures approx. 58-60-62-64-66-68 cm / 22¾"-23⅝"-24⅜"-25¼"-26"-26¾". SLEEVE: Slip sts from stitch holder back on double pointed needles size 3.5 mm / US 4 (= 61-65-69-74-78-82 sts). Pick up 1 st in each of the 6 sts cast on under sleeve, insert a marker in the middle of these sts = 67-71-75-80-84-88 sts. Work 2 ridges in GARTER ST – see explanation above, switch to double pointed needles size 4 mm / US 6, then work in stockinette st. When piece measures 3 cm / 1", dec 1 st on each side marker, repeat dec every 2-2-1½-1½-1-1 cm / ¾"-¾"-½"-½"-⅜"-⅜" 9-10-11-13-14-15 more times = 47-49-51-52-54-56 sts. Continue in stockinette st until sleeve measures 27-27-26-26-25-25 cm / 10½"-10½"-10¼"-10¼"-9¾"-9¾" (shorter measurements in the larger sizes because of longer yoke), switch to double pointed needle size 3.5 mm / US 4 and work 3 ridges. Bind off. Work the other sleeve the same way. ASSEMBLY: Place band without buttonholes under band with buttonholes and fasten the bottom band. Sew on buttons. |
||||||||||||||||||||||
Diagram explanations |
||||||||||||||||||||||
|
||||||||||||||||||||||
 |
||||||||||||||||||||||
 |
||||||||||||||||||||||
 |
||||||||||||||||||||||
Have you finished this pattern?Tag your pictures with #dropspattern #summerleavessweater or submit them to the #dropsfan gallery. Do you need help with this pattern?You'll find 26 tutorial videos, a Comments/Questions area and more by visiting the pattern on garnstudio.com. © 1982-2026 DROPS Design A/S. We reserve all rights. This document, including all its sub-sections, has copyrights. Read more about what you can do with our patterns at the bottom of each pattern on our site. |
||||||||||||||||||||||


With over 40 years in knitting and crochet design, DROPS Design offers one of the most extensive collections of free patterns on the internet - translated to 17 languages. As of today we count 325 catalogs and 12298 patterns - 12288 of which are translated into English (US/in).
We work hard to bring you the best knitting and crochet have to offer, inspiration and advice as well as great quality yarns at incredible prices! Would you like to use our patterns for other than personal use? You can read what you are allowed to do in the Copyright text at the bottom of all our patterns. Happy crafting!
Post a comment to pattern DROPS 169-3
We would love to hear what you have to say about this pattern!
If you want to leave a question, please make sure you select the correct category in the form below, to speed up the answering process. Required fields are marked *.