
Popular categories
Looking for a yarn?


Comments / Questions (86)
![]() Eva wrote:
Eva wrote:
Hello, I am crocheting size M. For the back panel, there Is written "A.5 to A.7 until piece measures 14-15 cm" - but if I look ať the model picture, there Is no way, this part measures 14 cm. I had to crochet 16 rows of "chain spaces" to gain this, but the model has only 4 rows. Is there a mistake in pattern?
06.04.2026 - 20:32DROPS Design answered:
Dear Eva, to get the armhole being 18 cm you have to crochet A.5 to A.7 until piece measures 15 cm from armhole (from marker inserted at the division), then crochet 1 row treble crochets before dividing for neck and finish each shoulder separately. Happy crocheting!
08.04.2026 - 13:31
![]() JODI wrote:
JODI wrote:
I want to shorten this to waist length. Which row should I start? Is there a video available? Thanks
31.05.2025 - 02:45DROPS Design answered:
Dear Jodi, all videos relevant for this pattern are show in the " Videos" section at the top of the pattern. You can check the size chart, for how many cm it measures and how much you want to shorten the piece. You can remove the edge at the bottom. But it's difficult to shorten the rest of the piece, since it's worked in a big pattern that needs many rows and cm to be complete (so you can't work half of it). Happy crochetting!
31.05.2025 - 22:58
![]() Maria wrote:
Maria wrote:
Hi, I'm so confused about the size measurements. I've done the backpiece incl A1-A3 and it's about 185cm long in size M before decreasing. It just feels a lot bigger than it should be?
11.05.2025 - 19:42DROPS Design answered:
Dear Maria, you can see the final measurements of the dress in the size chart below. The dress should have a total length of 80cm for size M. So it can't be 185cm in length. Please check that the crochet gauge is correct. Remember that A.2 is repeated in width (so in the same row where you worked A.1 and A.3, not full repeats of the chart). Happy crochetting!
11.05.2025 - 23:49
![]() JMA Jacobs wrote:
JMA Jacobs wrote:
Hoe vallen de maten? Vergelijk met kleding maten
07.03.2025 - 16:35DROPS Design answered:
Dag JMA,
Ja, deze zijn vergelijkbaar met standaard kledingmaten. Onderaan elk patroon staat een maattekening. Je kunt deze vergelijken met een bestaand kledingstuk dat goed zit om zo de juiste maat te bepalen. Houd er ook rekening mee dat het ene model wat meer aansluitend is dan het andere model.
12.03.2025 - 11:01
![]() Karin wrote:
Karin wrote:
Wird das rechte Vorderteil nicht direkt an den Rumpfteil gehäkelt,weshalb der Faden nicht abgeschnitten werden muss? Was bedeutet im rechten Vorderteil, dass die 2. u. 3. R von A5 u A6 fortlaufend in der Höhe wdh werden muss? Wie oft denn? Ab wann? Zuerst 4 R und dann wdh? Ab wann ist die 3. u 4. R von A4 zu wdh? Danke, bin verwirrt.
03.08.2024 - 15:07DROPS Design answered:
Liebe Karin, der Faden wird am Ende vom Rumfpteil abgeschnitten, dann wird man zuerst das rechte Vorderteil wie erklärt häkeln, um die Armlöcher beidseitig zu bilden. Diese 2 Reihen wiederholen Sie bis die Arbeit 14 bis 19 cm misst (siehe Größe). So zuerst häkeln Sie die 3 Reihen im Diagram und die 2 letzten werden dann wiederholt. Viel Spaß beim Häkeln!
05.08.2024 - 07:29
![]() Michèle Hurez wrote:
Michèle Hurez wrote:
Kan u mij eens uitleggen hoe 1v om st te haken? En eveneens 1 stk om l/l-lus. Dit zijn 2 zaken die ik niet begrijp. Uw hulp zou welkom zijn. Alvast bedankt!
29.06.2024 - 17:41DROPS Design answered:
Dag Michèle,
Bij één van de video's die bij het patroon staat wordt uitgelegd wat het verschil is tussen in en om de steek haken. Hopelijk heb je hier wat aan.
30.06.2024 - 20:38
![]() María Del Pilar wrote:
María Del Pilar wrote:
Me gusta mucho este modelo pero no entiendo bien los diagramos A.1, A.2 y A.3, hileras 3 y 4. Cómo se realiza esa combinación de cad. y p.a. triples? No termino de entender cómo hacerlo. Gracias
13.06.2024 - 13:31DROPS Design answered:
Hola María del Pilar, el siguiente video detalla cómo trabajar estos diagramas: https://www.garnstudio.com/video.php?id=925&lang=es. Puedes seguir el video para resolver tus dudas.
16.06.2024 - 18:21
![]() Begoña Llopis Guardiola wrote:
Begoña Llopis Guardiola wrote:
En la talla L, al final de la sexta hilera del frente derecho, deberian quedar 5 o 6 arcos de cadeneta?si empezamos con 11, restamos tres de la sisa y seis del escote....nos quedan solo dos! No entiendo como se hacen las disminuciones.
12.06.2024 - 23:37DROPS Design answered:
Hola Begoña, para la talla L, las disminuciones para la sisa son 1 arco. Las tallas S/M se han explicado previamente. Por lo tanto, desde "TALLA L, XL, XXL y XXXL:" hasta "TODAS LAS TALLAS:" el primer número de cada secuencia se corresponderá a la talla L. Es decir, disminuyes 1 arco para la sisa y 6 para el cuello. Deberían quedarte 4 arcos para terminar el delantero derecho, cuando alcances la sección TODAS LAS TALLAS.
16.06.2024 - 19:02
![]() Leanne wrote:
Leanne wrote:
How do I work out what size to make?
25.04.2024 - 05:06DROPS Design answered:
Dear Leanne, measure a similar garment you have and like the shape and compare them to the one in the chart, this will be the best way to find out which size to make. Read more here. Happy crocheting!
25.04.2024 - 08:41
![]() Pia wrote:
Pia wrote:
Hej, jag har gjort klart bakstycket, men det ser inte alls ut som på modellbilderna. Det är ju ett helt annat sätt att virka bakstycket som syns på modellbilderna. Kan ni ge mig beskrivningen på hur man gör bakstycket som modellen bär?
17.02.2024 - 19:21DROPS Design answered:
Hej Pia, jo når du har delt arbejdet til 2 forstykker og bagstykke skal du kun hækle de huller som er øverst på bærestykket. Det er samme mønster i A4 A5 A6 A7 A8 den eneste forskel er at A4 og A8 viser hvordan du hækler mod V-halsen :)
23.02.2024 - 11:21
|
|||||||||||||||||||||||||||||||||||||
Summer Bliss Vest#summerblissvestvest |
|||||||||||||||||||||||||||||||||||||
 |
 |
||||||||||||||||||||||||||||||||||||
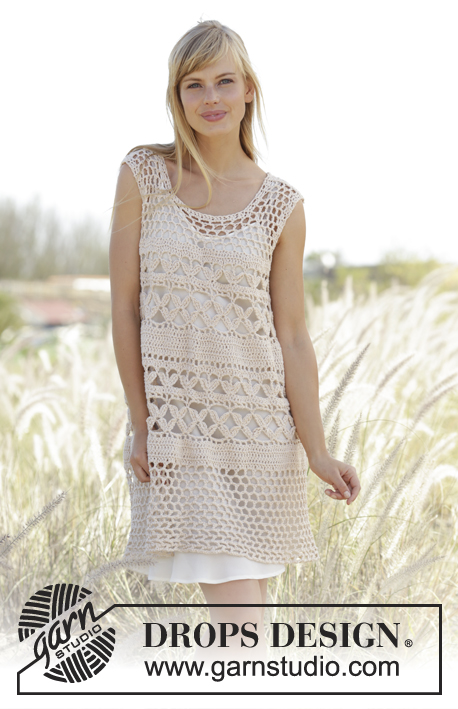
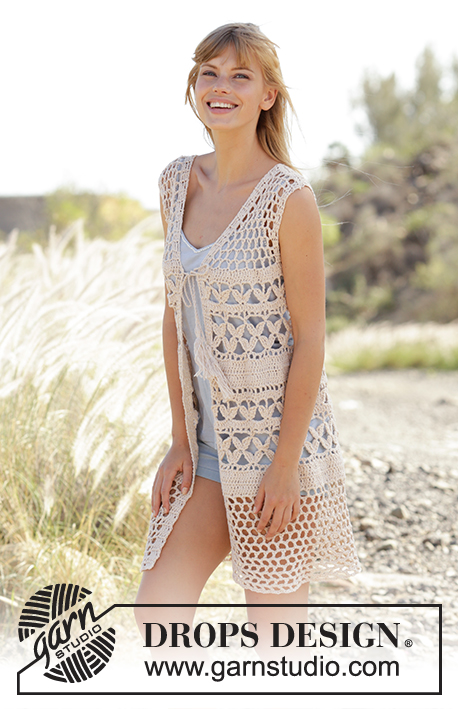
Crochet DROPS vest with A-shape, lace pattern and ties in ”Belle”. Size S-XXXL.
DROPS 167-19 |
|||||||||||||||||||||||||||||||||||||
|
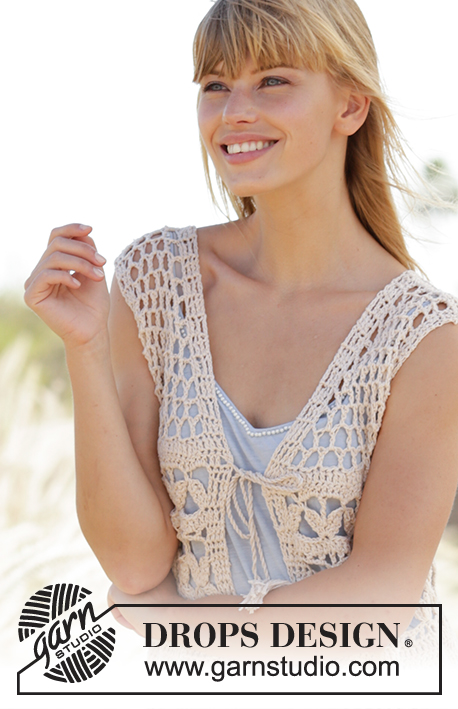
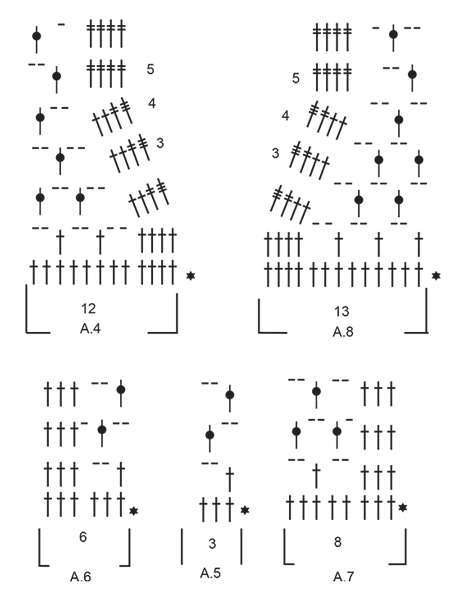
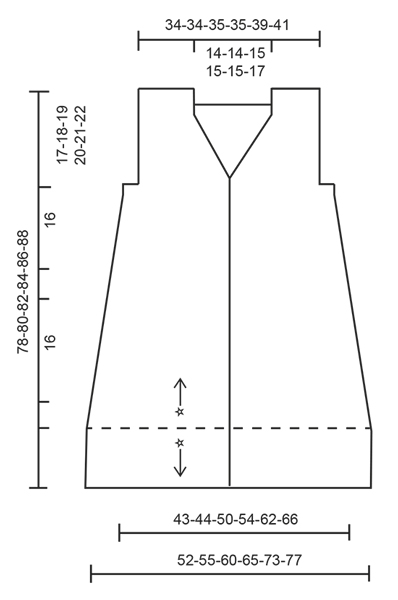
CROCHET INFO: On every dc row replace first dc with 4 ch. Replace first tr on every tr row with 5 ch. Replace first dtr on every dtr row with 6 ch. Beg every sc row with 1 ch. Ch does not replace first sc. PATTERN: See diagrams A.1 to A.8. DECREASE TIP: Dec 1 dc by working the next 2 dc tog as follows: Work 1 dc but wait with last pull through (= 2 loops on hook), then work next dc but on last pull through, pull yarn through all 3 loops on hook. DECREASE TIP CH-SPACES: Dec 1 ch-space at beg of row as follows seen from RS: Work ch 2, skip the first ch-space, work 1 dc around next ch-space. On next row skip the last ch-space seen from WS (= first ch-space seen from RS). Dec 1 ch-space at end of row as follows seen from RS: Work until 1 ch-space remains, ch 2, skip the last ch-space, work 1 st in each of the remaining sts. On next row skip the first ch-space, work ch 2, and 1 dc around next ch-space seen from WS (= last ch-space seen from RS). ---------------------------------------------------------- VEST: Worked back and forth, bottom up. Then divide piece at the armholes and work front and back piece separately. Work an edge at the bottom of with mesh pattern at the end. Work 197-206-225-244-272-290 loose ch (includes 4 ch to turn with) on hook size 4.5 mm/US 7 with Belle. Turn and work as follows: Work 1 dc in 5th ch from hook, then work 1 dc in each of the next 3-5-3-1-1-5 ch, * skip ch 1, work 1 dc in each of the next 6 ch *, repeat from *-* 26-27-30-33-37-39 more times = 166-174-190-206-230-246 dc and 4 ch to turn with - READ CROCHET INFO. REMEMBER THE CROCHET GAUGE! Continue back and forth with 1 dc in every dc until piece measures 5-5-6-6-7-7 cm / 2"-2"-2⅜"-2⅜"-2¾"-2¾". Now work pattern from 2nd row in diagram from RS as follows: Work A.1 (= 8 dc), then work A.2 (= 8 dc) 19-20-22-24-27-29 times in width, A.3 (= 7 dc). On last row in diagram A.1 to A.3 dec 32 dc evenly in all sizes - READ DECREASE TIP = 135-143-159-175-199-215 dc. Continue with 1 dc in every dc until piece measures 25-25-26-26-27-27 cm / 9¾"-9¾"-10¼"-10¼"-10½"-10"½ vertically. Then work pattern from 2nd row in A.1, A.2 and A.3 as before (but now work 15-16-18-20-23-25 repetitions of A.2 in width). Finish before the last 2 rows in diagram A.1 to A.3. Now work 1 row with 1 dc in every dc and adjust no of sts to 136-140-161-173-197-210 dc. Cut the yarn. Insert a marker here. NOW MEASURE THE PIECE FROM HERE. Now divide the piece into 2 front pieces and one back piece. RIGHT FRONT PIECE: Work first row as follows: A.4 over the first 12 dc, then work A.5 over the next 15-15-21-24-30-33 dc (= 5-5-7-8-10-11 repetitions in width), A.6 over the next 6 dc = 9-9-11-12-14-15 ch-spaces on first row. Now work as explained in the different sizes below: SIZE S and M: Continue back and forth until 4th row in A.4 has been worked vertically. NOTE: Repeat 2nd and 3rd row in A.5 and A.6 vertically. 2 ch-spaces have been dec for neck mid front in both sizes. Then repeat 3rd and 4th row in diagram A.4 3-3 more times vertically = 5-5 ch-spaces dec in total for neck mid front and 4-4 ch-spaces (with 2 ch) remain for shoulder. Piece measures approx. 13-13 cm / 5"-5". SIZE L, XL, XXL and XXXL: Continue back and forth with ch-spaces, AT THE SAME TIME on next row dec ch-spaces for neck towards mid front and dec ch-spaces for armhole as follows: DECREASE ARMHOLE: On next row dec 1 ch-space for armhole – READ DECREASE TIP CH-SPACES. Repeat dec 0-1-2-2) more times = 1-2-3-3 ch-spaces dec in total for armhole. DECREASE NECK: When 4th row in A.4 has been worked, 2 ch-spaces have been dec in size L, XL, XXL and XXXL. Then repeat dec for neck (i.e. 3rd and 4th row in A.4) 3-3-3-4 more times = 6-6-6-7 ch-spaces dec in total for neck. ALL SIZES: Continue with ch-spaces as before but now work 5th and 6th row in A.4 towards the neck until piece measures 16-17-18-19-20-21 cm / 6¼"-6¾"-7"-7½"-8"-8¼". Turn and work 16-16-16-16-19-19 dc evenly over shoulder. Fasten off. Piece measures approx. 17-18-19-20-21-22 cm / 6¾"-7"-7½"-8"-8¼"-8¾". BACK PIECE: Beg at armhole on right front piece and skip 4-6-6-6-6-8 dc for armhole. Work A.7 (= 8 dc), A.5 (= 3 dc) 16-16-19-21-25-26 times in width, work A.6 (= 6 dc) = 19-19-22-24-28-29 ch-spaces on first row. Continue as explained in the different sizes below: SIZE S and M: Continue back and forth with pattern as shown on 2nd and 3rd row in A.5 to A.7 until piece measures 14-15 cm / 5½"-6" – adjust so that next row is worked as 3rd row. SIZE L, XL, XXL and XXXL: Continue back and forth with pattern as shown on 2nd and 3rd row in A.5 to A.7, AT THE SAME TIME on next row bind off for armholes in each side inside 3 sts - READ DECREASE TIP CH-SPACES. NOTE: Work 3 tr instead of 3 dc in each side on the rows with dec (this is done to avoid tight edges). Repeat dec 0-1-2-2 more times (= 1-2-3-3 dec in total in each side) = 20-20-22-23 ch-spaces remain. Then continue with ch-spaces as shown on 2nd and 3rd row in diagram A.5 to A.7 until piece measures 16-17-18-19 cm / 6¼"-6¾"-7"-7½" – adjust so that next row is worked as 3rd row. Then continue as explained below in all sizes: Work 1 dc in each of the first 3 dc and 4-4-4-4-5-5 whole ch-spaces (i.e. ch-spaces with 2 ch), work 1 dc in next dc, then work 24-24-26-26-26-28 dc evenly over the next 10-10-11-11-11-12 ch-spaces from previous row, work 1 dc in next dc, and 1 dc around next ch-space, continue with 4-4-4-4-5-5 whole ch-spaces (i.e. ch-spaces with 2 ch) and 1 dc in each of the outermost 3 dc. There are now 26-26-28-28-28-30 dc consecutively in the middle of back piece. Then finish each shoulder separately. Turn, work 1 dc in each of the first 3 dc, then work as before over the 4-4-4-4-5-5 ch-spaces, work 1 dc in each of the first 3 dc of the 26-26-28-28-28-30 dc. Turn and work 16-16-16-16-19-19 dc evenly over shoulder. Fasten off. Work the other shoulder the same way but reversed. Beg at the armhole, and work 1 dc in each of the outermost 3 dc, then work ch-spaces as before over the 4-4-4-4-5-5 ch-spaces, and 1 dc in each of the next 3 dc. Turn and work 16-16-16-16-19-19 dc evenly over shoulder. Fasten off. LEFT FRONT PIECE: Beg at armhole on back piece and skip 4-6-6-6-6-7 dc for armhole. Work A.7 (= 8 dc), A.5 (= 3 dc) 4-4-6-7-9-10 times in width, finish with A.8 (= 13 dc). Continue like this back and forth as on right front piece but reversed. Adjust according to right front piece. ASSEMBLY: Sew the shoulder seams tog. Sew one and one stitch neatly tog and make sure to avoid a tight seam. Fasten off. EDGE AT THE BOTTOM: Now work an edge at the bottom of vest as follows: ROW 1: Fasten yarn with 1 sc and 3 ch in the first ch worked at beg of piece, work 1 dc in each of the next 3 ch (= band), then work * ch 2, skip approx. 1½ cm / ½", work 1 dc in next ch *, repeat from *-* along entire edge until approx. 1½ cm / ½" remain before the last 4 ch on row, work 2 ch and finish with 1 dc in each of the last 4 ch. There are now approx. 66-69-76-83-93-99 ch-spaces and 4 dc for band in each side - remember crochet info. ROW 2: Work 1 dc in each of the first 4 dc, work ch 1, 1 dc around next ch-space, * ch 2, 1 dc around next ch-space * in every ch-space on row, and finish with 1 ch and 1 dc in each of the 4 dc for band. ROW 3: Work 1 dc in each of the first 4 dc, work ch 2, skip 1 ch and 1 dc, * 1 dc around next ch-space, 2 ch *, repeat from *-* until 1 ch-space remains with ch 2, work 1 dc around this ch-space, ch 2, and finish with 1 dc in each of the 4 dc for band. Repeat 2nd and 3rd row until piece measures 78-80-82-84-86-88 cm / 30¾"-31½"-32¼"-33"-33⅞"-34⅝" in total (measured from shoulder) or to desired length. Fasten off. TIES WITH TASSEL: Cut 2 lengths of yarn of 90 cm / 35½". Twine them until the resist. Thread one end through last dc-row worked before piece was divided for front pieces and back piece and place tie double so that it twines again. Tie a knot in the loose end. Repeat in the other side. Then make a tassel in the end of each of the ties: Cut 14 strands of 24 cm / 9½", thread them through one end on one of the ties and distribute the ends so that they are even. Wind a strand several times around the tassel approx. 1 cm / ⅜" from the top, to get a nice top and fasten the strand. |
|||||||||||||||||||||||||||||||||||||
Diagram explanations |
|||||||||||||||||||||||||||||||||||||
|
|||||||||||||||||||||||||||||||||||||
 |
|||||||||||||||||||||||||||||||||||||
 |
|||||||||||||||||||||||||||||||||||||
 |
|||||||||||||||||||||||||||||||||||||
Have you finished this pattern?Tag your pictures with #dropspattern #summerblissvestvest or submit them to the #dropsfan gallery. Do you need help with this pattern?You'll find 11 tutorial videos, a Comments/Questions area and more by visiting the pattern on garnstudio.com. © 1982-2026 DROPS Design A/S. We reserve all rights. This document, including all its sub-sections, has copyrights. Read more about what you can do with our patterns at the bottom of each pattern on our site. |
|||||||||||||||||||||||||||||||||||||


With over 40 years in knitting and crochet design, DROPS Design offers one of the most extensive collections of free patterns on the internet - translated to 17 languages. As of today we count 324 catalogs and 12290 patterns - 12280 of which are translated into English (US/in).
We work hard to bring you the best knitting and crochet have to offer, inspiration and advice as well as great quality yarns at incredible prices! Would you like to use our patterns for other than personal use? You can read what you are allowed to do in the Copyright text at the bottom of all our patterns. Happy crafting!
Post a comment to pattern DROPS 167-19
We would love to hear what you have to say about this pattern!
If you want to leave a question, please make sure you select the correct category in the form below, to speed up the answering process. Required fields are marked *.