
Popular categories
Looking for a yarn?


|
|||||||||||||||||||||||||||||||||||||
Summer Bliss Vest |
|||||||||||||||||||||||||||||||||||||
 |
 |
||||||||||||||||||||||||||||||||||||
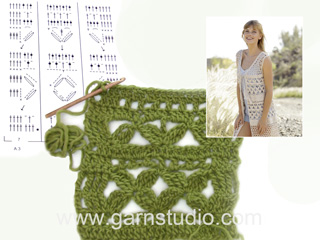
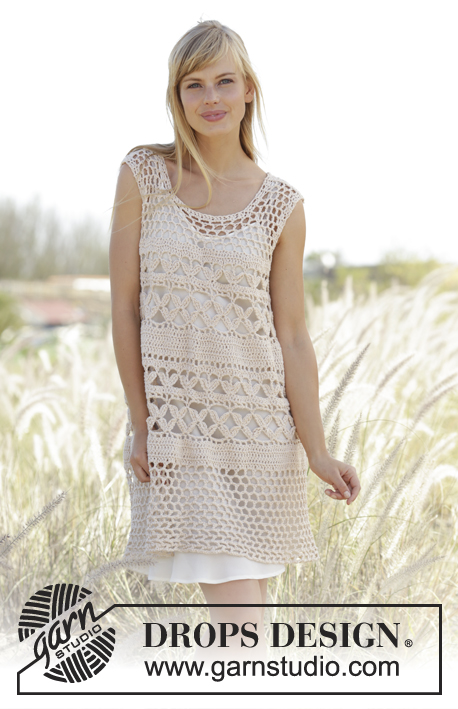
Crochet DROPS vest with A-shape, lace pattern and ties in ”Belle”. Size S-XXXL.
DROPS 167-19 |
|||||||||||||||||||||||||||||||||||||
|
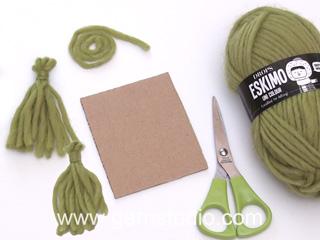
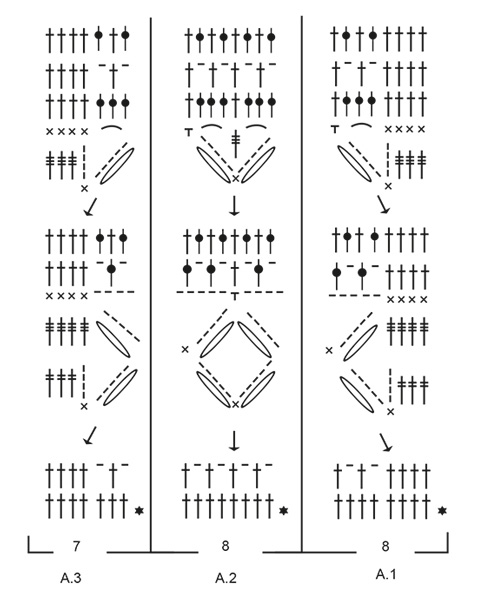
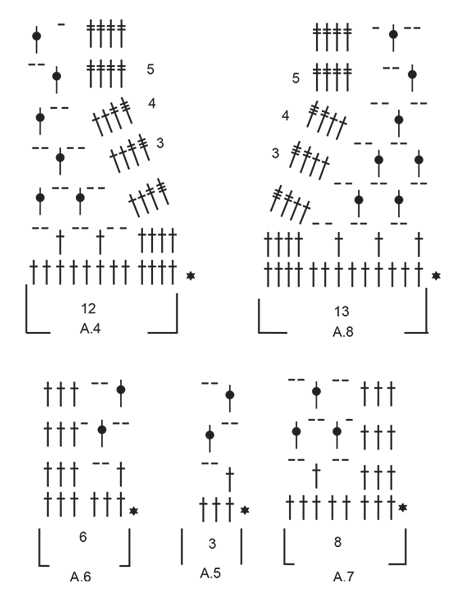
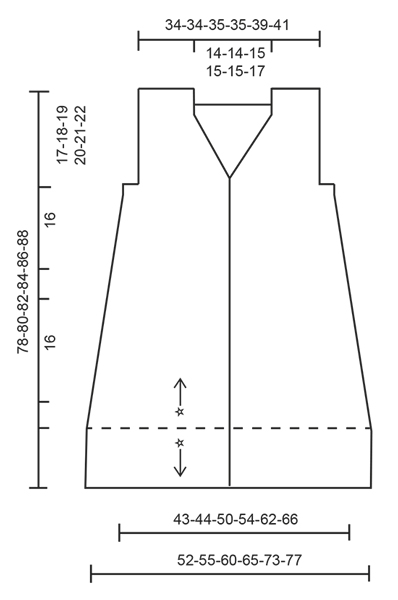
CROCHET INFO: On every dc row replace first dc with 4 ch. Replace first tr on every tr row with 5 ch. Replace first dtr on every dtr row with 6 ch. Beg every sc row with 1 ch. Ch does not replace first sc. PATTERN: See diagrams A.1 to A.8. DECREASE TIP: Dec 1 dc by working the next 2 dc tog as follows: Work 1 dc but wait with last pull through (= 2 loops on hook), then work next dc but on last pull through, pull yarn through all 3 loops on hook. DECREASE TIP CH-SPACES: Dec 1 ch-space at beg of row as follows seen from RS: Work ch 2, skip the first ch-space, work 1 dc around next ch-space. On next row skip the last ch-space seen from WS (= first ch-space seen from RS). Dec 1 ch-space at end of row as follows seen from RS: Work until 1 ch-space remains, ch 2, skip the last ch-space, work 1 st in each of the remaining sts. On next row skip the first ch-space, work ch 2, and 1 dc around next ch-space seen from WS (= last ch-space seen from RS). ---------------------------------------------------------- VEST: Worked back and forth, bottom up. Then divide piece at the armholes and work front and back piece separately. Work an edge at the bottom of with mesh pattern at the end. Work 197-206-225-244-272-290 loose ch (includes 4 ch to turn with) on hook size 4.5 mm/US 7 with Belle. Turn and work as follows: Work 1 dc in 5th ch from hook, then work 1 dc in each of the next 3-5-3-1-1-5 ch, * skip ch 1, work 1 dc in each of the next 6 ch *, repeat from *-* 26-27-30-33-37-39 more times = 166-174-190-206-230-246 dc and 4 ch to turn with - READ CROCHET INFO. REMEMBER THE CROCHET GAUGE! Continue back and forth with 1 dc in every dc until piece measures 5-5-6-6-7-7 cm / 2''-2''-2 3/8''-2 3/8''-2 3/4''-2 3/4''. Now work pattern from 2nd row in diagram from RS as follows: Work A.1 (= 8 dc), then work A.2 (= 8 dc) 19-20-22-24-27-29 times in width, A.3 (= 7 dc). On last row in diagram A.1 to A.3 dec 32 dc evenly in all sizes - READ DECREASE TIP = 135-143-159-175-199-215 dc. Continue with 1 dc in every dc until piece measures 25-25-26-26-27-27 cm / 9 3/4"-9 3/4"-10 1/4"-10 1/4"-10½"-10"½ vertically. Then work pattern from 2nd row in A.1, A.2 and A.3 as before (but now work 15-16-18-20-23-25 repetitions of A.2 in width). Finish before the last 2 rows in diagram A.1 to A.3. Now work 1 row with 1 dc in every dc and adjust no of sts to 136-140-161-173-197-210 dc. Cut the yarn. Insert a marker here. NOW MEASURE THE PIECE FROM HERE. Now divide the piece into 2 front pieces and one back piece. RIGHT FRONT PIECE: Work first row as follows: A.4 over the first 12 dc, then work A.5 over the next 15-15-21-24-30-33 dc (= 5-5-7-8-10-11 repetitions in width), A.6 over the next 6 dc = 9-9-11-12-14-15 ch-spaces on first row. Now work as explained in the different sizes below: SIZE S and M: Continue back and forth until 4th row in A.4 has been worked vertically. NOTE: Repeat 2nd and 3rd row in A.5 and A.6 vertically. 2 ch-spaces have been dec for neck mid front in both sizes. Then repeat 3rd and 4th row in diagram A.4 3-3 more times vertically = 5-5 ch-spaces dec in total for neck mid front and 4-4 ch-spaces (with 2 ch) remain for shoulder. Piece measures approx. 13-13 cm / 5"-5". SIZE L, XL, XXL and XXXL: Continue back and forth with ch-spaces, AT THE SAME TIME on next row dec ch-spaces for neck towards mid front and dec ch-spaces for armhole as follows: DECREASE ARMHOLE: On next row dec 1 ch-space for armhole – READ DECREASE TIP CH-SPACES. Repeat dec 0-1-2-2) more times = 1-2-3-3 ch-spaces dec in total for armhole. DECREASE NECK: When 4th row in A.4 has been worked, 2 ch-spaces have been dec in size L, XL, XXL and XXXL. Then repeat dec for neck (i.e. 3rd and 4th row in A.4) 3-3-3-4 more times = 6-6-6-7 ch-spaces dec in total for neck. ALL SIZES: Continue with ch-spaces as before but now work 5th and 6th row in A.4 towards the neck until piece measures 16-17-18-19-20-21 cm / 6¼''-6¾''-7''-7½''-8''-8¼''. Turn and work 16-16-16-16-19-19 dc evenly over shoulder. Fasten off. Piece measures approx. 17-18-19-20-21-22 cm / 6¾''-7''-7½''-8''-8¼''-8¾''. BACK PIECE: Beg at armhole on right front piece and skip 4-6-6-6-6-8 dc for armhole. Work A.7 (= 8 dc), A.5 (= 3 dc) 16-16-19-21-25-26 times in width, work A.6 (= 6 dc) = 19-19-22-24-28-29 ch-spaces on first row. Continue as explained in the different sizes below: SIZE S and M: Continue back and forth with pattern as shown on 2nd and 3rd row in A.5 to A.7 until piece measures 14-15 cm / 5½"-6" – adjust so that next row is worked as 3rd row. SIZE L, XL, XXL and XXXL: Continue back and forth with pattern as shown on 2nd and 3rd row in A.5 to A.7, AT THE SAME TIME on next row bind off for armholes in each side inside 3 sts - READ DECREASE TIP CH-SPACES. NOTE: Work 3 tr instead of 3 dc in each side on the rows with dec (this is done to avoid tight edges). Repeat dec 0-1-2-2 more times (= 1-2-3-3 dec in total in each side) = 20-20-22-23 ch-spaces remain. Then continue with ch-spaces as shown on 2nd and 3rd row in diagram A.5 to A.7 until piece measures 16-17-18-19 cm / 6 1/4"-6 3/4"-7"-7½" – adjust so that next row is worked as 3rd row. Then continue as explained below in all sizes: Work 1 dc in each of the first 3 dc and 4-4-4-4-5-5 whole ch-spaces (i.e. ch-spaces with 2 ch), work 1 dc in next dc, then work 24-24-26-26-26-28 dc evenly over the next 10-10-11-11-11-12 ch-spaces from previous row, work 1 dc in next dc, and 1 dc around next ch-space, continue with 4-4-4-4-5-5 whole ch-spaces (i.e. ch-spaces with 2 ch) and 1 dc in each of the outermost 3 dc. There are now 26-26-28-28-28-30 dc consecutively in the middle of back piece. Then finish each shoulder separately. Turn, work 1 dc in each of the first 3 dc, then work as before over the 4-4-4-4-5-5 ch-spaces, work 1 dc in each of the first 3 dc of the 26-26-28-28-28-30 dc. Turn and work 16-16-16-16-19-19 dc evenly over shoulder. Fasten off. Work the other shoulder the same way but reversed. Beg at the armhole, and work 1 dc in each of the outermost 3 dc, then work ch-spaces as before over the 4-4-4-4-5-5 ch-spaces, and 1 dc in each of the next 3 dc. Turn and work 16-16-16-16-19-19 dc evenly over shoulder. Fasten off. LEFT FRONT PIECE: Beg at armhole on back piece and skip 4-6-6-6-6-7 dc for armhole. Work A.7 (= 8 dc), A.5 (= 3 dc) 4-4-6-7-9-10 times in width, finish with A.8 (= 13 dc). Continue like this back and forth as on right front piece but reversed. Adjust according to right front piece. ASSEMBLY: Sew the shoulder seams tog. Sew one and one stitch neatly tog and make sure to avoid a tight seam. Fasten off. EDGE AT THE BOTTOM: Now work an edge at the bottom of vest as follows: ROW 1: Fasten yarn with 1 sc and 3 ch in the first ch worked at beg of piece, work 1 dc in each of the next 3 ch (= band), then work * ch 2, skip approx. 1½ cm / ½'', work 1 dc in next ch *, repeat from *-* along entire edge until approx. 1½ cm / ½'' remain before the last 4 ch on row, work 2 ch and finish with 1 dc in each of the last 4 ch. There are now approx. 66-69-76-83-93-99 ch-spaces and 4 dc for band in each side - remember crochet info. ROW 2: Work 1 dc in each of the first 4 dc, work ch 1, 1 dc around next ch-space, * ch 2, 1 dc around next ch-space * in every ch-space on row, and finish with 1 ch and 1 dc in each of the 4 dc for band. ROW 3: Work 1 dc in each of the first 4 dc, work ch 2, skip 1 ch and 1 dc, * 1 dc around next ch-space, 2 ch *, repeat from *-* until 1 ch-space remains with ch 2, work 1 dc around this ch-space, ch 2, and finish with 1 dc in each of the 4 dc for band. Repeat 2nd and 3rd row until piece measures 78-80-82-84-86-88 cm / 30¾''-31½''-32¼''-33''-33 7/8''-34 5/8'' in total (measured from shoulder) or to desired length. Fasten off. TIES WITH TASSEL: Cut 2 lengths of yarn of 90 cm / 35½''. Twine them until the resist. Thread one end through last dc-row worked before piece was divided for front pieces and back piece and place tie double so that it twines again. Tie a knot in the loose end. Repeat in the other side. Then make a tassel in the end of each of the ties: Cut 14 strands of 24 cm / 9½'', thread them through one end on one of the ties and distribute the ends so that they are even. Wind a strand several times around the tassel approx. 1 cm / 3/8'' from the top, to get a nice top and fasten the strand. |
|||||||||||||||||||||||||||||||||||||
Diagram explanations |
|||||||||||||||||||||||||||||||||||||
|
|||||||||||||||||||||||||||||||||||||
|
|||||||||||||||||||||||||||||||||||||
|
|||||||||||||||||||||||||||||||||||||
|
|||||||||||||||||||||||||||||||||||||
|
Have you made this or any other of our designs? Tag your pictures in social media with #dropsdesign so we can see them! Do you need help with this pattern?You'll find tutorial videos, a Comments/Questions area and more by visiting the pattern on garnstudio.com. © 1982-2024 DROPS Design A/S. We reserve all rights. This document, including all its sub-sections, has copyrights. Read more about what you can do with our patterns at the bottom of each pattern on our site. |
|||||||||||||||||||||||||||||||||||||


With over 40 years in knitting and crochet design, DROPS Design offers one of the most extensive collections of free patterns on the internet - translated to 17 languages. As of today we count 304 catalogs and 11422 patterns - 11417 of which are translated into English (US/in).
We work hard to bring you the best knitting and crochet have to offer, inspiration and advice as well as great quality yarns at incredible prices! Would you like to use our patterns for other than personal use? You can read what you are allowed to do in the Copyright text at the bottom of all our patterns. Happy crafting!
Comments / Questions (83)
I am having issue with the vest area; last row of diagram a.1 to a.3 dec 32 dc evenly in all sizes: am I decreasing at the beginning, middle or end of row? Or am I reading this incorrectly?
28.05.2018 - 22:46DROPS Design answered:
Dear Miss Holliman, to "decrease/increase evenly in a row" means that you place the dereases/increases along the row evenly spaced. To do this, take the number of stitches you have in the row (for example 60) and divide it by the bumber of stitches you have to decrease (for this example let's say 10) = 6 So in this example you have to decrease every sixth stitch, Use the numbers you have on your own piece. Happy Crafting!
29.05.2018 - 07:20Hej. Jag virkar en i storlek L allså 225 maskor. Nu är jag på detta På sista v i diag A.1 till A.3 minskas det 32 st jämnt fördelat i alla stl - LÄS MINSKNTIPS = 135-143-159-175-199-215 st. Ska jag minska 32 st? Och ska det bli 159?? 225-159= då blir minskningen 66. Hur ska jag göra?
29.04.2018 - 16:25DROPS Design answered:
Hej, i stl L har du 190 maskor och då du minskar 32 maskor så blir det 159 maskor kvar.
30.04.2018 - 17:21Wat een prachtig en leuk patroon! Heerlijk met die duidelijke video's erbij, wat een uitvinding! Ik beleef hier zoveel plezier aan! Eerst ga ik wat uitproberen met restgaren en daarna ga ik met de prachtige Drops aan de slag. Hartelijk dank en vriendelijke groet, Aafke
26.03.2018 - 12:37I have looked through the complete pattern and I see references to Diagrams A.1 - A.8, but cannot locate the diagrams. Could you please help me with this?
23.03.2018 - 05:01Ik ben het gedeelte achterpand terecht gekomen en kom daar niet helemaal uit. Er staat haak 1 stk in elke van de eerste 3 stk en 4 hele l-lussen (dus l-lussen met 2l). Moet je met de 4 hele l-lussen 4 lossen haken en dan het eerste stk in het 5e stk doen van de vorige toer? Of moet je in elke l-lus een stk haken?
22.10.2017 - 11:45DROPS Design answered:
Hoi Martine, Er wordt bedoeld dat je steeds stokjes met 2 lossen er tussen haakt. De stokjes haak je dan in de lussen van de vorige toer (zie teltekening A.5 t/m A.7).
04.11.2017 - 14:06Ik snap er niks van, ik haak maat L. Hoeveel toeren moet ik het rechtervoorpand minderen? En moet dit al deze toeren aan beide kanten? Moet ik de tekening volgen?? Het gaat vooral om de stukjes tekst vd armsgaten en hals.
05.08.2017 - 16:42DROPS Design answered:
Je begint eerst voor alle maten de eerste toer A.4, A.5 en A.6 te breien. Dus dit is volgens de teltekening. Daarna ga je verder met de beschrijving in jouw maat voor de hals en het armsgat. Bij de beschrijving voor de hals staat aangegeven welke teltekeningen je moet hebbben en hoeveel herhalingen van welke toeren je evt. moet doen in de hoogte, dit kun je gewoon precies zo volgen. Daarnaast minder je l-lussen bij het armsgat, hoe je dit doet staat bovenaan in het patroon beschreven (tip voor het minderen l-lussen)
06.08.2017 - 22:41What does it mean in the front right piece when it says to work vertically?
24.07.2017 - 01:11DROPS Design answered:
Dear Jessie, when a DROPS patterns says vertically, it generally means "lengthwise", in the direction of knitting/crocheting... one row, or pattern repeat above another. I hope this helps. Happy crafting!
24.07.2017 - 09:34Hej, jag har börjat virka på höger framstycket i stlk L men förstår inte hur många varv jag ska göra och hur långt det ska bli. Kan ni hjälpa mig?
18.07.2017 - 08:24DROPS Design answered:
Du ska virka enligt diagram A.4 som det står i mönstret tills arb mäter 18 cm från märket som sattes innan du började med höger framst. Sedan virkas det 16 stolpar jämnt fördelat längs axeln och arb bör då mäta ca 19 cm från märket.
18.07.2017 - 13:37Maria wrote:
Please translate to Czech language.
17.07.2017 - 11:53DROPS Design answered:
Hi Maria. I have sent your request to our Czech translator. Then I hope it will be translated soon. Happy Crocheting!
09.08.2017 - 08:56Please help! I am stuck working on the right front piece. 1. Once I complete row 4 of A.4, what is Next? Do I continue with repetitions of A.5 and finish with A.6 as before and if so, which rows in A.5 and A.6 are on that row? 2. After the 4th row of the right front piece is completed, I repeat the 3rd and 4th row of A.4 3 more times for a size small. Is this I'm the sequence 3 4, 3 4, 3 4 or 3, 3, 3, 4, 4, 4? Any help is appreciated. Thanks!
08.07.2017 - 15:39DROPS Design answered:
Hi Kayce, When you have completed A.4 vertically (after 4 rows), you repeat rows 3 and 4 of A.4 at the same time as you continue repeating rows 2 and 3 of A.5 and A.6. So on row 5 you start with row 3 in A.4 and row 2 in A.5 and A.6. Then row 6 is row 4 in A.2 and row 4 in A.5 and A.6. I hope this helps. Kind regards, Deirdre
09.07.2017 - 13:00