
Popular categories
Looking for a yarn?


Comments / Questions (173)
![]() Marthe Stine wrote:
Marthe Stine wrote:
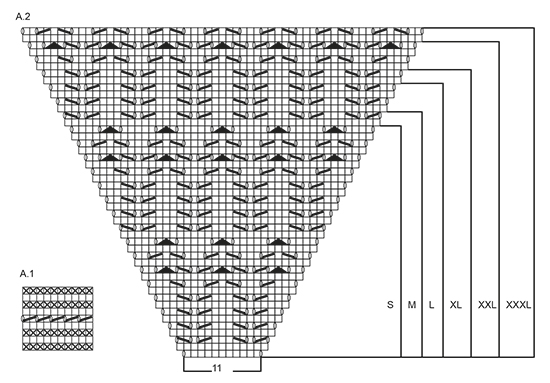
Hei! Jeg forstår ikke hvordan halsen strikkes, for på bildet ser det ut som rillestrikk før det blir 1 omgang hullmønster. Ut fra diagrammet A.1 får jeg hullmønster på annenhver omgang, mulig jeg misforstår diagrammet? Kan dere forklare hver av omgangene rundt halsen? Jeg har lagt opp 87 masker (str.S) og strikket 1 omgang rette masker, hva gjør jeg videre for å få halsen rett?
24.08.2018 - 20:27DROPS Design answered:
Hej Marthe, Det stemmer, du strikker 1.omgang vrang. 2.omgang rett, 3.omgang vrang, 4.omgang rett (du har nu 2 riller). 5.omgang "2rett sammen, 1kast". 6.omgang rett, osv. God fornøjelse!
30.08.2018 - 15:00
![]() Martine Z. wrote:
Martine Z. wrote:
Bonjour Pour les augmentations du raglan, taille XL par exemple, doit on comprendre qu'on augmente tous les deux tours d 'abord 8 fois 12 mailles et ensuite 13 fois 8 mailles ? Merci pour votre réponse
02.08.2018 - 15:41DROPS Design answered:
Bonjour Martine Z., tout à fait, c'est bien ainsi que l'on augmente en taille XL. Bon tricot!
02.08.2018 - 16:01
![]() Susan wrote:
Susan wrote:
Chart A1 is a repeat of an even number of stitches. The cast on for yoke in all sizes is an odd number. What should be done with the extra stitch?
25.06.2018 - 03:22DROPS Design answered:
Hi Susan, To increase evenly, count the total number of stitches to be increased over on the last row in A.1 - 87-91-95-99-103-107 stitches and divide by the number of increases to be mede - 15. This means you make a yarn over after every 6th -6th-6th-7th-7th-7th stitch (approx.) on this row. I hope this helps and happy knitting!
25.06.2018 - 06:12
![]() Jutta Bott wrote:
Jutta Bott wrote:
Hallo hier noch einmal Jutta.Leider war die Beschreibung für A1 sehr unübersichtlich. Aber nach langem probieren geschafft. Für alle anderen. Die ersten 4 Reihen werden kraus rechts gestrickt.
07.06.2018 - 10:05
![]() Jutta Bott wrote:
Jutta Bott wrote:
Vielen Dank für die Antwort. Leider habe ich mich nicht richtig ausgedrückt. Ich meine nicht die 5 Reihe. Mir geht es um die ersten 4 Reihen. Danke
06.06.2018 - 19:07DROPS Design answered:
Liebe Frau Bott, bei A.1 werden die 4 ersten Reihen in A.1 so gestrickt: 1 Runde links, 1 Runde rechts, 1 Runde links, 1 Runde rechts - dann kommt die Löcherrunde (= 2 M re zs, 1 Umschlag), dann stricken Sie 1 Runde re, 1 Runde li, 1 Runde re, und 1 Runde li = 9 Reihe in A.1 insgesamt. Die Maschenanzahl muß immer die gleiche sein, nun bei der letzte Runde in A.1 (= die Runde li) werden Sie regelmäßig verteilt 15 Maschen zunehmen. Viel Spaß beim stricken!
07.06.2018 - 08:38
![]() Jutta Bott wrote:
Jutta Bott wrote:
Ich habe eine Frage zum Modell r-699. Wenn ich Mustersatz A1 stricke 1 Masche Umschlag usw. habe ich die doppelte Anzahl an Maschen. Wie stricke ich die Rückreihe ohne die Doppelte Anzahl an Maschen habe. Wo liegt mein Fehler. Ich komme nicht klar. Danke
06.06.2018 - 11:58DROPS Design answered:
Liebe Frau Bott, bei der 5. Reihe in A.1 stricken Sie (2 M re zs, 1 Umschlag) und von (bis) wiederholen, dh die Maschenanzahl bleibt wie zuvor. Viel Spaß beim stricken!
06.06.2018 - 15:01
![]() Amanda wrote:
Amanda wrote:
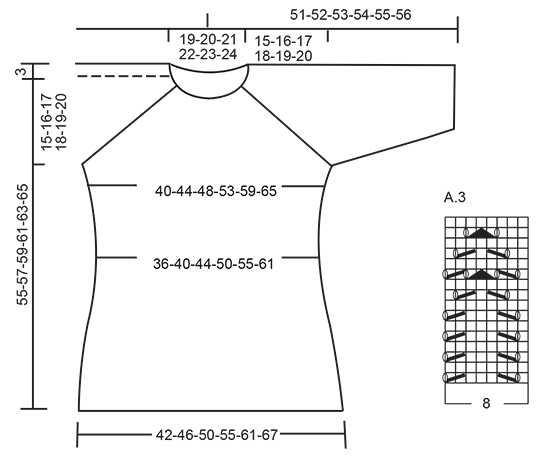
When I'm working the yoke after first Inc round with the raglan incs, the next round we follow the other round. Says we inc sleeves 2 sts but the chart doesn't show YOs (Working row 2 of A2). Do I add in YOs? Arethe raglan increases on the rows we are not doing lace stitches? Do I only work the raglan sleeve increases three times and the remainder of the yoke in the 8-st inc pattern?
05.05.2018 - 01:47DROPS Design answered:
Dear Amanda, the increase in sleeve are drawn in A.2: on 1st row in A.2 you work: 1 YO, K11, 1 YO, on round 2 in A.2 there are 13 sts, and so on, you will increase 2 sts in A.2 every other row in diagram (= 1 YO at the very beg of diagram + 1 YO at the very end of diagram). Happy knitting!
07.05.2018 - 08:42
![]() Barb wrote:
Barb wrote:
Where are the diagram explanations for A.1? I understand row 5, but can't figure out the other rows. Thanks.
20.02.2018 - 02:20DROPS Design answered:
Hi Barb, The diagram for A.1 is at the bottom of the page, to the left of the diagram for A.2. There are 9 rounds, knit, purl, knit, purl. Then a round of knit 2 together make a yarn over alternately to end of round and then knit, purl, knit, purl to finish. Hope this helps and happy knitting!
20.02.2018 - 06:12
![]() Zusanne Ryge wrote:
Zusanne Ryge wrote:
Jeg synes i mangler “slå om” i jeres diagram forklaring. Samtidig burde i have vendt ærmet en halv omgang i opskriften, da man sjældent læser et diagram oppe fra og ned.
09.01.2018 - 22:23Lorraine Herlick wrote:
I have knit many of your lovely patterns over the last three years. May I suggest that there have been many instances when the instructions could have been much clearer. Example, ...1 YO, k1, 1 YO, k2, place marker between these stitches. Instead if it stated k1, place marker, k1, if would also reduce the number of requests for clarification. Thank you.
21.12.2017 - 04:13
|
|||||||||||||||||||
Sea Nymph#seanymphsweater |
|||||||||||||||||||
 |
 |
||||||||||||||||||
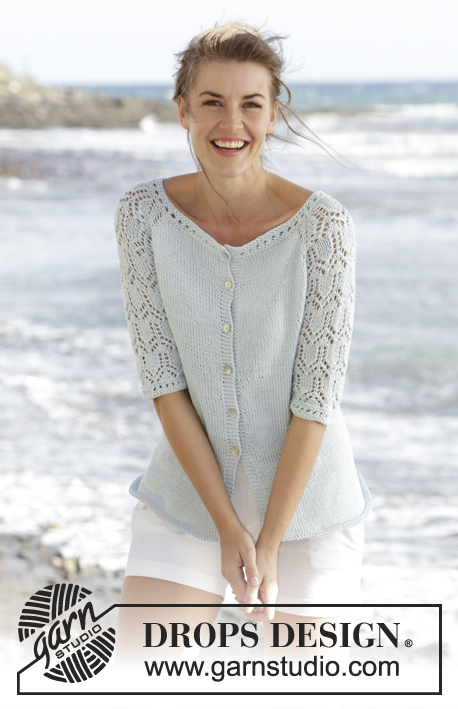
Knitted DROPS jumper with raglan, lace pattern and ¾ sleeves in "Muskat". Worked top down. Size: S - XXXL.
DROPS 168-1 |
|||||||||||||||||||
|
GARTER ST (worked in the round): 1 ridge = 2 rounds. * K 1 round and P 1 round *, repeat from *-*. PATTERN: See diagrams A.1 to A.3. See diagram for size! RAGLAN: Inc every other round as follows: Inc 4 sts on back piece, 4 sts on front piece and 2 sts on each sleeve (= 12 sts inc, inc on sleeve are drawn in pattern) – beg 3 sts before each A.2 and work as follows: 1 YO, K 1, 1 YO, K 2 (marker is in the middle of these sts), A.2, K 2 (marker is in the middle of these sts), 1 YO, K 1, 1 YO. K the YOs closest to markers on next row to make holes, K YOs towards back/front piece twisted to avoid holes. Inc 12 sts this way 0-2-3-7-10-14 times more (= 1-3-4-8-11-15 times in total, first inc is explained in the text). Then inc every other round as follows: Inc 2 sts on back piece, 2 sts on front piece and 2 sts on each sleeve (= 8 sts inc, inc on sleeve are drawn in pattern) – beg 2 sts before each A.2 and work as follows: 1 YO, K 2 (marker is in the middle of these sts), A.2, K 2 (marker is in the middle of these sts), 1 YO. K YOs on next round to make a hole. Inc 8 sts this way 16-15-16-13-12-9 times in total. ---------------------------------------------------------- JUMPER: Worked in the round on circular needle, top down. YOKE: Cast on 87-91-95-99-103-107 sts on circular needle size 4 mm / US 6 with Muskat. K 1 round, them work A.1, on last round in A.1 inc 15 sts evenly = 102-106-110-114-118-122 sts. Then work as follows from mid back: K 17-18-19-20-21-22, 1 YO, K 1, 1 YO, K 2 (insert a marker between these sts), A.2 (= 11 sts), K 2 (insert a marker between these sts), 1 YO, K 1, 1 YO, K 34-36-38-40-42-44, 1 YO, K 1, 1 YO, K 2 (insert a marker between these sts), A.2, K 2 (insert a marker between these sts), 1 YO, K 1, 1 YO, K 17-18-19-20-21-22. Continue this pattern, and inc for RAGLAN as explained above, first inc is now done. REMEMBER THE KNITTING GAUGE When A.2 has been worked vertically - see marking for your size, there are 242-262-286-314-346-374 sts on round, inc are now done. Work next round as follows: Work 38-42-46-52-58-64 sts (= half back piece), slip the next 45-47-51-53-57-59 sts on a stitch holder (= sleeve), cast on 8 sts under sleeve, work the next 76-84-92-104-116-128 sts (= front piece), slip the next 45-47-51-53-57-59 sts on a stitch holder (= sleeve), cast on 8 new sts under sleeve, work the last 38-42-46-52-58-64 sts (= half back piece). BODY: There are now 168-184-200-224-248-272 sts on body. Continue in stockinette st. Insert a marker in each side, in the middle of the 8 new sts that were cast on. NOW MEASURE PIECE FROM HERE. When piece measures 4 cm / 1½", dec 1 st on each side of marker (= 4 sts dec), repeat dec every 4-4-4-5-5-5 cm / 1½"-1½"-1½"-2"-2"-2" 3 more times in total = 152-168-184-208-232-256 sts. When piece measures 22-23-24-25-26-27 cm / 8¾"-9"-9½"-9¾"-10¼"-10⅝", inc 1 st on each side of each marker (= 4 sts inc), repeat inc every 2 cm / ¾" 5 more times = 176-192-208-232-256-280 sts. When piece measures 36-37-38-39-40-41 cm / 14¼"-14½"-15"-14¼"-15¾"-16⅛", work 2 ridges in GARTER ST - see explanation above, over all sts. Bind off K 1/P 1 (to avoid a wavy bind-off edge), piece measures approx. 55-57-59-61-63-65 cm / 21⅝"-22½"-23¼"-24"-24¾"-25½" from cast-on edge. SLEEVE: Worked in the round. Slip sts from sleeve back on double pointed needles size 4 mm / US 6, pick up 1 st in each of the 8 sts under sleeve = 53-55-59-61-65-67 sts. Insert 1 marker mid under sleeve = beg of round. NOW MEASURE PIECE FROM HERE! Then work as follows: 6-7-1-2-4-5 sts in stockinette st, A.3 over the next 40-40-56-56-56-56 sts (beg A.3 where A.2 ends for your size), 7-8-2-3-5-6 sts in stockinette st. When piece measures 4 cm / 1½", dec 1 st on each side of marker. Work the sts that do not fit the pattern in stockinette st, make sure that no of dec and inc in pattern is correct. Repeat dec every 7-7-5-5-3-3 cm / 2¾"-2¾"-2"-2"-1"-1" 2-2-3-3-4-4 more times = 47-49-51-53-55-57 sts. When piece measures 24-23-23-22-22-21 cm / 9½"-9"-9"-8¾"-8¾"-8¼", work A.1 over all sts, then bind off. Work the other sleeve the same way. |
|||||||||||||||||||
Diagram explanations |
|||||||||||||||||||
|
|||||||||||||||||||
 |
|||||||||||||||||||
 |
|||||||||||||||||||
Have you finished this pattern?Tag your pictures with #dropspattern #seanymphsweater or submit them to the #dropsfan gallery. Do you need help with this pattern?You'll find 25 tutorial videos, a Comments/Questions area and more by visiting the pattern on garnstudio.com. © 1982-2026 DROPS Design A/S. We reserve all rights. This document, including all its sub-sections, has copyrights. Read more about what you can do with our patterns at the bottom of each pattern on our site. |
|||||||||||||||||||


With over 40 years in knitting and crochet design, DROPS Design offers one of the most extensive collections of free patterns on the internet - translated to 17 languages. As of today we count 325 catalogs and 12298 patterns - 12288 of which are translated into English (US/in).
We work hard to bring you the best knitting and crochet have to offer, inspiration and advice as well as great quality yarns at incredible prices! Would you like to use our patterns for other than personal use? You can read what you are allowed to do in the Copyright text at the bottom of all our patterns. Happy crafting!
Post a comment to pattern DROPS 168-1
We would love to hear what you have to say about this pattern!
If you want to leave a question, please make sure you select the correct category in the form below, to speed up the answering process. Required fields are marked *.