
Popular categories
Looking for a yarn?


Comments / Questions (173)
![]() Patrizia wrote:
Patrizia wrote:
Non mi sono chiari gli aumenti per il dietro e davanti, partendo dallo sprone di fanno a giro alterni?? Tutti i giri dispari?? 😞
24.05.2019 - 19:15DROPS Design answered:
Buongiorno Patrizia. Aumenta un giro sì, un giro no. Dopo aver completato il diagramma A.1, sul giro successivo inizia ad aumentare. Il primo aumento è spiegato nel testo. Per gli aumenti successivi segue le indicazioni del paragrafo Raglan. Buon lavoro!
25.05.2019 - 06:47
![]() Lorena Johnson wrote:
Lorena Johnson wrote:
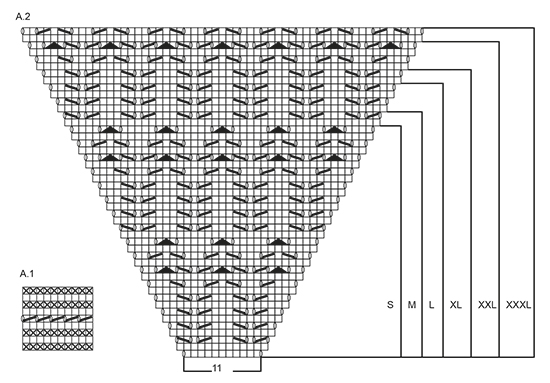
I am knitting Sea Nymph and am having trouble with instructions. In diagram A2, is each row in diagram to be knit as a separate row or only as every other row with plain knit row between each diagrammed row?
06.03.2019 - 01:51DROPS Design answered:
Dear Lorena the diagrams show all the rows. If you are knitting in round, just always read The diagrams right to left, from bottom to top. Happy knitting!
06.03.2019 - 09:18
![]() Lorena Johnson wrote:
Lorena Johnson wrote:
In the instruction diagram A2, is each row pictured an actual row or do I knit the design row in every other row?
06.03.2019 - 01:46DROPS Design answered:
Dear Lorena the diagrams show all the rows. If you are knitting in round, just always read The diagrams right to left, from bottom to top. Happy knitting!
06.03.2019 - 09:18
![]() Eva wrote:
Eva wrote:
Bei den Raglan-Zunahmen steht: am Rücken und Vorderteil werden in jeder 2. R. 4 Maschen zugenommen. Wenn ich mich nicht irre, nimmt man am Vorderteil je 1 Masche und am Rücken 2 Maschen durch die Umschläge zu... Heißt das nun, dass im Vorderteil 3 Maschen und im Rückenteil in jeder 2. Reihe noch zusätzlich 2 Maschen zugenommen werden müssen? Ich bin verwirrt...
28.02.2019 - 17:34DROPS Design answered:
Liebe Eva, es werden zuerst 12 M in jeder 2. Rd zugenommen: 4 M am Rückenteil + 4 M am Vorder teil + 2 M an jedem Ärmel. siehe RAGLANZUNAHMEN. Viel Spaß beim stricken!
01.03.2019 - 09:35
![]() Radia wrote:
Radia wrote:
Merci 😊
07.01.2019 - 12:57
![]() Radia wrote:
Radia wrote:
Bonjour, Je suis très contente de découvrir votre site. Moi qui rêve depuis longtemps de débuter dans l’ar Du tricot. Je serai heureuse, s’il vous plaît si vous pourriez me dire quel tricot serait facile à réaliser pour une débutante... sachant que j’ai déjà tricoter des écharpes basiques, un petit pul avec l’ai De qqn mais sans plus. Merci 😊
06.01.2019 - 08:18DROPS Design answered:
Bonjour Radia, regardez bien les différents modèles et lisez attentivement les explications, si vous avez une question, n'hésitez pas à la poser ici, pour toute assistance individuelle, votre magasin DROPS saura vous conseiller. Vous trouverez ici un large éventail de modèles dits "basiques". Bon tricot!
07.01.2019 - 11:12
![]() Sylvie wrote:
Sylvie wrote:
Bonjour, pour reaugmenter le corps du pull, on mesure à partir de l'emmanchure? 25 cm pour une taille 44. Merci
30.09.2018 - 20:57DROPS Design answered:
Bonjour Sylvie! Exactement, on mesure à partir de l'emmanchure. Bon tricot!
01.10.2018 - 08:43
![]() Sinne Kold wrote:
Sinne Kold wrote:
Jeg kan ikke få de 87 masker i str s til at passe med række 5 i A1? Det giver jo et lige antal - ikke ulige?
30.09.2018 - 18:44DROPS Design answered:
Hei Sinne. På 5 omgang blir du nødt til å strikke den siste masken uten felling siden det er et ugjevnt masketall, som du sier. Så strikk den bare vanlig rett. God fornøyelse.
01.10.2018 - 15:22
![]() Jeanette wrote:
Jeanette wrote:
Dank voor jullie antwoord . Ik begrijp dat het patroon door moet lopen , dat kan ik goed op foto van de trui zien. Maar mijn probleem is dat ik nooit precies kan zien waar 2 steken samen zijn gebreid . Het terug kijken van een telpatroon in een breiwerk vind ik gewoon erg lastig . De laatste naald in A2 bij maat S is de naald met het patroon.Nadat ik de 8 steken onder de mouw heb opgenomen , deze naald recht uitbreien tot de marker . Dan 6 steken in tricosteek , dan A3 ?
05.09.2018 - 12:51DROPS Design answered:
Dag Jeanette, Ik heb nog even goed gekeken en de 6 steken is vanaf de markeerdraad, dus je moet nog 2 steken in tricot erbij breien als je al 4 steken op de naald hebt. Om te controleren of het patroon goed doorloopt, kan je bij voorbeeld ook kijken naar of het zwarte driehoekje in het telpatroon boven elkaar zit (dus waar je 1 steek afhaalt, 2 steken samen breit en de afgehaalde steek overhaalt), maar volgens mij moet het goed komen als je de 6 steken na de markeerdraad aanhoudt.
06.09.2018 - 10:43
![]() Jeanette wrote:
Jeanette wrote:
Ik weet niet hoe ik verder moet met de mouw. Mijn maat is S. Als ik de 8 steken onder de mouw heb opgenomen en de markeerder in het midden van die 8 steken zet , heb ik dus al 4 steken op de eerste naald staan . Moet ik nu nog 2 steken breien voordat ik met A3 begin ? of 6 steken zoals in het patroon staat.
04.09.2018 - 19:57DROPS Design answered:
Dag Jeanette, Waar het om gaat is dat je het patroon door laat lopen, dus de 2 recht samen in A.3 moet boven de 2 recht samen in A.2 komen. (Onder de oksel heb je een stukje tricotsteek zitten, waar je straks steken mindert)
05.09.2018 - 09:10
|
|||||||||||||||||||
Sea Nymph#seanymphsweater |
|||||||||||||||||||
 |
 |
||||||||||||||||||
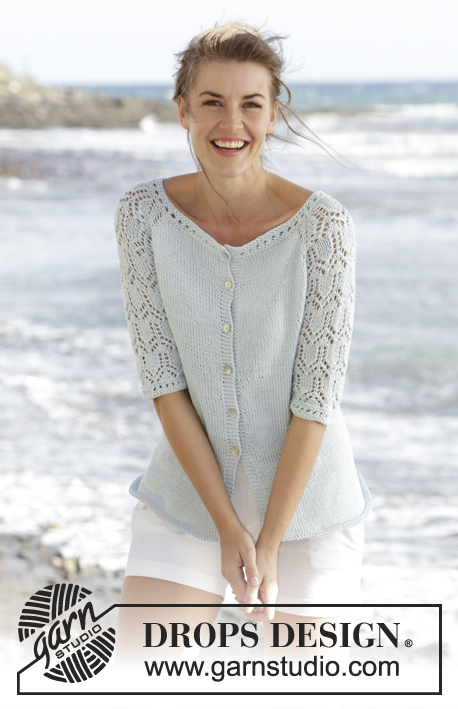
Knitted DROPS jumper with raglan, lace pattern and ¾ sleeves in "Muskat". Worked top down. Size: S - XXXL.
DROPS 168-1 |
|||||||||||||||||||
|
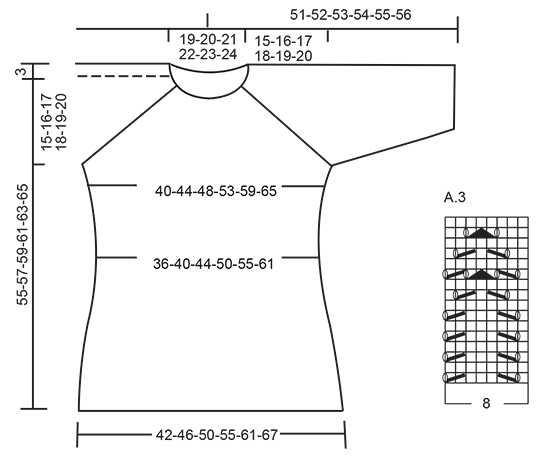
GARTER ST (worked in the round): 1 ridge = 2 rounds. * K 1 round and P 1 round *, repeat from *-*. PATTERN: See diagrams A.1 to A.3. See diagram for size! RAGLAN: Inc every other round as follows: Inc 4 sts on back piece, 4 sts on front piece and 2 sts on each sleeve (= 12 sts inc, inc on sleeve are drawn in pattern) – beg 3 sts before each A.2 and work as follows: 1 YO, K 1, 1 YO, K 2 (marker is in the middle of these sts), A.2, K 2 (marker is in the middle of these sts), 1 YO, K 1, 1 YO. K the YOs closest to markers on next row to make holes, K YOs towards back/front piece twisted to avoid holes. Inc 12 sts this way 0-2-3-7-10-14 times more (= 1-3-4-8-11-15 times in total, first inc is explained in the text). Then inc every other round as follows: Inc 2 sts on back piece, 2 sts on front piece and 2 sts on each sleeve (= 8 sts inc, inc on sleeve are drawn in pattern) – beg 2 sts before each A.2 and work as follows: 1 YO, K 2 (marker is in the middle of these sts), A.2, K 2 (marker is in the middle of these sts), 1 YO. K YOs on next round to make a hole. Inc 8 sts this way 16-15-16-13-12-9 times in total. ---------------------------------------------------------- JUMPER: Worked in the round on circular needle, top down. YOKE: Cast on 87-91-95-99-103-107 sts on circular needle size 4 mm / US 6 with Muskat. K 1 round, them work A.1, on last round in A.1 inc 15 sts evenly = 102-106-110-114-118-122 sts. Then work as follows from mid back: K 17-18-19-20-21-22, 1 YO, K 1, 1 YO, K 2 (insert a marker between these sts), A.2 (= 11 sts), K 2 (insert a marker between these sts), 1 YO, K 1, 1 YO, K 34-36-38-40-42-44, 1 YO, K 1, 1 YO, K 2 (insert a marker between these sts), A.2, K 2 (insert a marker between these sts), 1 YO, K 1, 1 YO, K 17-18-19-20-21-22. Continue this pattern, and inc for RAGLAN as explained above, first inc is now done. REMEMBER THE KNITTING GAUGE When A.2 has been worked vertically - see marking for your size, there are 242-262-286-314-346-374 sts on round, inc are now done. Work next round as follows: Work 38-42-46-52-58-64 sts (= half back piece), slip the next 45-47-51-53-57-59 sts on a stitch holder (= sleeve), cast on 8 sts under sleeve, work the next 76-84-92-104-116-128 sts (= front piece), slip the next 45-47-51-53-57-59 sts on a stitch holder (= sleeve), cast on 8 new sts under sleeve, work the last 38-42-46-52-58-64 sts (= half back piece). BODY: There are now 168-184-200-224-248-272 sts on body. Continue in stockinette st. Insert a marker in each side, in the middle of the 8 new sts that were cast on. NOW MEASURE PIECE FROM HERE. When piece measures 4 cm / 1½", dec 1 st on each side of marker (= 4 sts dec), repeat dec every 4-4-4-5-5-5 cm / 1½"-1½"-1½"-2"-2"-2" 3 more times in total = 152-168-184-208-232-256 sts. When piece measures 22-23-24-25-26-27 cm / 8¾"-9"-9½"-9¾"-10¼"-10⅝", inc 1 st on each side of each marker (= 4 sts inc), repeat inc every 2 cm / ¾" 5 more times = 176-192-208-232-256-280 sts. When piece measures 36-37-38-39-40-41 cm / 14¼"-14½"-15"-14¼"-15¾"-16⅛", work 2 ridges in GARTER ST - see explanation above, over all sts. Bind off K 1/P 1 (to avoid a wavy bind-off edge), piece measures approx. 55-57-59-61-63-65 cm / 21⅝"-22½"-23¼"-24"-24¾"-25½" from cast-on edge. SLEEVE: Worked in the round. Slip sts from sleeve back on double pointed needles size 4 mm / US 6, pick up 1 st in each of the 8 sts under sleeve = 53-55-59-61-65-67 sts. Insert 1 marker mid under sleeve = beg of round. NOW MEASURE PIECE FROM HERE! Then work as follows: 6-7-1-2-4-5 sts in stockinette st, A.3 over the next 40-40-56-56-56-56 sts (beg A.3 where A.2 ends for your size), 7-8-2-3-5-6 sts in stockinette st. When piece measures 4 cm / 1½", dec 1 st on each side of marker. Work the sts that do not fit the pattern in stockinette st, make sure that no of dec and inc in pattern is correct. Repeat dec every 7-7-5-5-3-3 cm / 2¾"-2¾"-2"-2"-1"-1" 2-2-3-3-4-4 more times = 47-49-51-53-55-57 sts. When piece measures 24-23-23-22-22-21 cm / 9½"-9"-9"-8¾"-8¾"-8¼", work A.1 over all sts, then bind off. Work the other sleeve the same way. |
|||||||||||||||||||
Diagram explanations |
|||||||||||||||||||
|
|||||||||||||||||||
 |
|||||||||||||||||||
 |
|||||||||||||||||||
Have you finished this pattern?Tag your pictures with #dropspattern #seanymphsweater or submit them to the #dropsfan gallery. Do you need help with this pattern?You'll find 25 tutorial videos, a Comments/Questions area and more by visiting the pattern on garnstudio.com. © 1982-2026 DROPS Design A/S. We reserve all rights. This document, including all its sub-sections, has copyrights. Read more about what you can do with our patterns at the bottom of each pattern on our site. |
|||||||||||||||||||


With over 40 years in knitting and crochet design, DROPS Design offers one of the most extensive collections of free patterns on the internet - translated to 17 languages. As of today we count 325 catalogs and 12298 patterns - 12288 of which are translated into English (US/in).
We work hard to bring you the best knitting and crochet have to offer, inspiration and advice as well as great quality yarns at incredible prices! Would you like to use our patterns for other than personal use? You can read what you are allowed to do in the Copyright text at the bottom of all our patterns. Happy crafting!
Post a comment to pattern DROPS 168-1
We would love to hear what you have to say about this pattern!
If you want to leave a question, please make sure you select the correct category in the form below, to speed up the answering process. Required fields are marked *.