
Popular categories
Looking for a yarn?


Comments / Questions (173)
![]() Maija Linnakko wrote:
Maija Linnakko wrote:
Neulon Sea Nymph Puseros. Mitä tarkoittaa ohje: aloite kuviomalli aina 3 silmukan päästä?
21.05.2020 - 15:27
![]() Margarita Jeria wrote:
Margarita Jeria wrote:
Tienes las indicaciones en español?
29.02.2020 - 14:45DROPS Design answered:
Hola Margarita. Aquí esta el link en español: https://www.garnstudio.com/pattern.php?id=7357&cid=23. Para cambiar de idioma tienes que pinchar en la ventanilla bajo la foto del patrón.
29.02.2020 - 23:15
![]() Tatjana wrote:
Tatjana wrote:
Вы вяжете регланом сверху без вывязывание ростка?
28.12.2019 - 22:57DROPS Design answered:
Добрый день ,Татьяна. Не все модели вяжутся сверху вниз с вывязыванием ростка, некоторые модели с регланом или круглой кокеткой вяжутся без ростка.
28.12.2019 - 23:31
![]() Jokima wrote:
Jokima wrote:
Merci 🙂
10.07.2019 - 16:07
![]() Jokima wrote:
Jokima wrote:
Bonjour et merci pour ce joli modèle 👏 Pouvez-vous me dire comment faire les diminutions dos - devant et manches car je n’ ai pas trouvé d’explication. Merci 🙏
10.07.2019 - 15:01DROPS Design answered:
Bonjour Jokima et merci. Pour diminuer sur les côtés du pull et sous les manches tricotez jusqu'à ce qu'il reste 3 m avant le marqueur, tricotez 2 mailles ensemble à l'endroit, 2 mailles endroit (le fil marqueur est entre ces 2 mailles) et glissez 1 m à l'end, 1 m end, passez la m glissée par-dessus la m tricotée; répétez ces diminutions au marqueur suivant du côté du pull (1 seule fois sous les manches). Pour les augmentations des côtés du pull, vous pouvez ensuite également augmenter de chaque côté des 2 mailles ainsi: 1 jeté, 2 m end (le marqueur est au milieu), 1 jeté. Bon tricot!
10.07.2019 - 15:51
![]() Vigdis wrote:
Vigdis wrote:
Hvor finner jeg info om målene på genseren, altså hvilken str jeg skal velge mtp S, M, L, XL osv.?
09.07.2019 - 10:39DROPS Design answered:
Hej Vigdis, du finder målene i måleskitsen aller nederst i opskriften. God fornøjelse!
09.07.2019 - 10:47
![]() Sabrina wrote:
Sabrina wrote:
Scusate non capisco la divisione delle maglie per le varie parti:taglia M quante maglie per leamiche? e per il davanti? il dietro? grazie mille a chi risponderà Sabrina
28.05.2019 - 18:48DROPS Design answered:
Buongiorno Sabrina. Deve dividere le m in questo modo: le prime 42 sono parte del dietro; le 47 m successive sono la manica; avvia 8 m ( che saranno 4 per il dietro e 4 per il davanti); le 84 m successive sono il davanti; le 47 m successive la manica; avvia 8 m e le ultime 42 sono per il dietro. Considerando le m aumentate, per il davanti e il dietro avrà 92 m e per le maniche 47 m. Buon lavoro!
28.05.2019 - 19:45
![]() Patrizia wrote:
Patrizia wrote:
Grazie, grazie per la disponibilità e pazienza.
26.05.2019 - 21:23
![]() Patrizia wrote:
Patrizia wrote:
Perché alla fine mi ritrovo più di 400 maglie, e non le 374!?
26.05.2019 - 17:57DROPS Design answered:
Buongiorno Patrizia. Gli aumenti sono: 12 m x 15 volte = 180 m. Poi 8 m x 9 volte = 72. Quando inizia questi aumenti sui ferri ha 122 m. Quindi alla fine degli aumenti ha 122 + 180 + 72 = 374 m. Gli aumenti sulle maniche sono il primo e l’ultimo gettato del diagramma A.2. Buon lavoro!
26.05.2019 - 21:20
![]() Patrizia wrote:
Patrizia wrote:
"Aumentare 12 m in questo modo altre 0-2-3-7-10-14 volte (= 1-3-4-8-11-15 volte in totale, il 1° aumento è spiegato nel testo)." "Aumentare 8 m in questo modo 16-15-16-13-12-9 volte in totale."... Scusatemi ma non ho capito 😞
26.05.2019 - 17:19DROPS Design answered:
Buongiorno Patrizia. Quando deve aumentare 12 m sul giro, lo deve fare in tutto per 15 volte (taglia XXXL). Il primo di questi 15 aumenti è spiegato nel testo, quindi ripete gli aumenti altre 14 volte (in tutto 15 volte). Quando aumenta 8 m sul giro, lo deve fare per 9 volte. Buon lavoro!
26.05.2019 - 20:58
|
|||||||||||||||||||
Sea Nymph#seanymphsweater |
|||||||||||||||||||
 |
 |
||||||||||||||||||
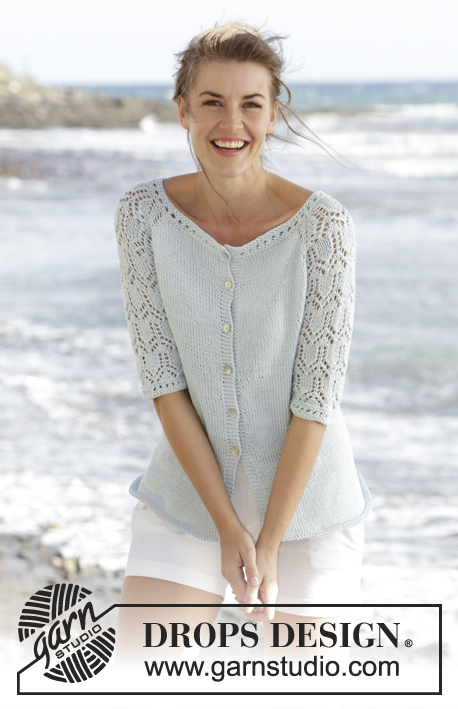
Knitted DROPS jumper with raglan, lace pattern and ¾ sleeves in "Muskat". Worked top down. Size: S - XXXL.
DROPS 168-1 |
|||||||||||||||||||
|
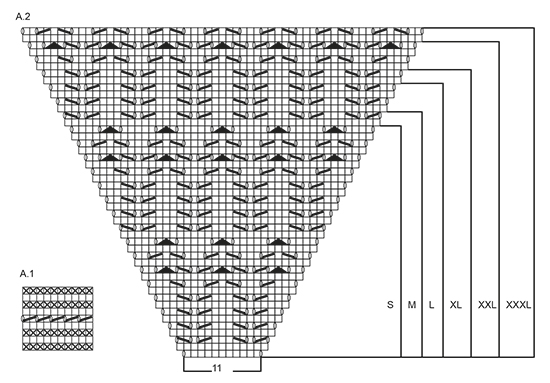
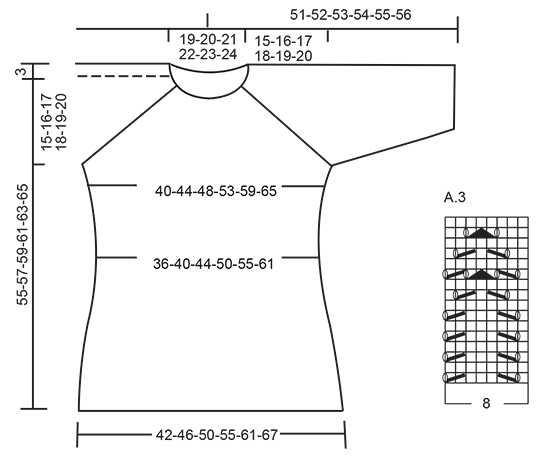
GARTER ST (worked in the round): 1 ridge = 2 rounds. * K 1 round and P 1 round *, repeat from *-*. PATTERN: See diagrams A.1 to A.3. See diagram for size! RAGLAN: Inc every other round as follows: Inc 4 sts on back piece, 4 sts on front piece and 2 sts on each sleeve (= 12 sts inc, inc on sleeve are drawn in pattern) – beg 3 sts before each A.2 and work as follows: 1 YO, K 1, 1 YO, K 2 (marker is in the middle of these sts), A.2, K 2 (marker is in the middle of these sts), 1 YO, K 1, 1 YO. K the YOs closest to markers on next row to make holes, K YOs towards back/front piece twisted to avoid holes. Inc 12 sts this way 0-2-3-7-10-14 times more (= 1-3-4-8-11-15 times in total, first inc is explained in the text). Then inc every other round as follows: Inc 2 sts on back piece, 2 sts on front piece and 2 sts on each sleeve (= 8 sts inc, inc on sleeve are drawn in pattern) – beg 2 sts before each A.2 and work as follows: 1 YO, K 2 (marker is in the middle of these sts), A.2, K 2 (marker is in the middle of these sts), 1 YO. K YOs on next round to make a hole. Inc 8 sts this way 16-15-16-13-12-9 times in total. ---------------------------------------------------------- JUMPER: Worked in the round on circular needle, top down. YOKE: Cast on 87-91-95-99-103-107 sts on circular needle size 4 mm / US 6 with Muskat. K 1 round, them work A.1, on last round in A.1 inc 15 sts evenly = 102-106-110-114-118-122 sts. Then work as follows from mid back: K 17-18-19-20-21-22, 1 YO, K 1, 1 YO, K 2 (insert a marker between these sts), A.2 (= 11 sts), K 2 (insert a marker between these sts), 1 YO, K 1, 1 YO, K 34-36-38-40-42-44, 1 YO, K 1, 1 YO, K 2 (insert a marker between these sts), A.2, K 2 (insert a marker between these sts), 1 YO, K 1, 1 YO, K 17-18-19-20-21-22. Continue this pattern, and inc for RAGLAN as explained above, first inc is now done. REMEMBER THE KNITTING GAUGE When A.2 has been worked vertically - see marking for your size, there are 242-262-286-314-346-374 sts on round, inc are now done. Work next round as follows: Work 38-42-46-52-58-64 sts (= half back piece), slip the next 45-47-51-53-57-59 sts on a stitch holder (= sleeve), cast on 8 sts under sleeve, work the next 76-84-92-104-116-128 sts (= front piece), slip the next 45-47-51-53-57-59 sts on a stitch holder (= sleeve), cast on 8 new sts under sleeve, work the last 38-42-46-52-58-64 sts (= half back piece). BODY: There are now 168-184-200-224-248-272 sts on body. Continue in stockinette st. Insert a marker in each side, in the middle of the 8 new sts that were cast on. NOW MEASURE PIECE FROM HERE. When piece measures 4 cm / 1½", dec 1 st on each side of marker (= 4 sts dec), repeat dec every 4-4-4-5-5-5 cm / 1½"-1½"-1½"-2"-2"-2" 3 more times in total = 152-168-184-208-232-256 sts. When piece measures 22-23-24-25-26-27 cm / 8¾"-9"-9½"-9¾"-10¼"-10⅝", inc 1 st on each side of each marker (= 4 sts inc), repeat inc every 2 cm / ¾" 5 more times = 176-192-208-232-256-280 sts. When piece measures 36-37-38-39-40-41 cm / 14¼"-14½"-15"-14¼"-15¾"-16⅛", work 2 ridges in GARTER ST - see explanation above, over all sts. Bind off K 1/P 1 (to avoid a wavy bind-off edge), piece measures approx. 55-57-59-61-63-65 cm / 21⅝"-22½"-23¼"-24"-24¾"-25½" from cast-on edge. SLEEVE: Worked in the round. Slip sts from sleeve back on double pointed needles size 4 mm / US 6, pick up 1 st in each of the 8 sts under sleeve = 53-55-59-61-65-67 sts. Insert 1 marker mid under sleeve = beg of round. NOW MEASURE PIECE FROM HERE! Then work as follows: 6-7-1-2-4-5 sts in stockinette st, A.3 over the next 40-40-56-56-56-56 sts (beg A.3 where A.2 ends for your size), 7-8-2-3-5-6 sts in stockinette st. When piece measures 4 cm / 1½", dec 1 st on each side of marker. Work the sts that do not fit the pattern in stockinette st, make sure that no of dec and inc in pattern is correct. Repeat dec every 7-7-5-5-3-3 cm / 2¾"-2¾"-2"-2"-1"-1" 2-2-3-3-4-4 more times = 47-49-51-53-55-57 sts. When piece measures 24-23-23-22-22-21 cm / 9½"-9"-9"-8¾"-8¾"-8¼", work A.1 over all sts, then bind off. Work the other sleeve the same way. |
|||||||||||||||||||
Diagram explanations |
|||||||||||||||||||
|
|||||||||||||||||||
 |
|||||||||||||||||||
 |
|||||||||||||||||||
Have you finished this pattern?Tag your pictures with #dropspattern #seanymphsweater or submit them to the #dropsfan gallery. Do you need help with this pattern?You'll find 25 tutorial videos, a Comments/Questions area and more by visiting the pattern on garnstudio.com. © 1982-2026 DROPS Design A/S. We reserve all rights. This document, including all its sub-sections, has copyrights. Read more about what you can do with our patterns at the bottom of each pattern on our site. |
|||||||||||||||||||


With over 40 years in knitting and crochet design, DROPS Design offers one of the most extensive collections of free patterns on the internet - translated to 17 languages. As of today we count 325 catalogs and 12298 patterns - 12288 of which are translated into English (US/in).
We work hard to bring you the best knitting and crochet have to offer, inspiration and advice as well as great quality yarns at incredible prices! Would you like to use our patterns for other than personal use? You can read what you are allowed to do in the Copyright text at the bottom of all our patterns. Happy crafting!
Post a comment to pattern DROPS 168-1
We would love to hear what you have to say about this pattern!
If you want to leave a question, please make sure you select the correct category in the form below, to speed up the answering process. Required fields are marked *.