
Popular categories
Looking for a yarn?


Comments / Questions (173)
![]() Marita Hallquist wrote:
Marita Hallquist wrote:
Nu har jag fastnat ingen, nu vet jag inte var jag ska sätta markörerna vid dom 8 nyupplagda maskorna under ärmen. ska markören sitta på varje sida om dom 8 maskorna?
05.10.2016 - 14:16DROPS Design answered:
Hej Marita. Sätt en markör i varje sida, mitt i de 8 nya m som lades upp = dvs, du saetter den i midten af disse 8 med 4 m paa hver side.
06.10.2016 - 14:34
![]() Marita Hallquist wrote:
Marita Hallquist wrote:
Eftersom jag inte fick något svar så fick jag klura ut det själv.
26.09.2016 - 17:58
![]() Marita Hallquist wrote:
Marita Hallquist wrote:
Hur ökar jag på raglan?, jag kan inte förstå mönstret. Är det ett omslag på varje sida på dom 2 maskorna med markören?
25.09.2016 - 21:52DROPS Design answered:
Hej Marita. Ja, du har to masker med en markör i midten af disse to. Du öker hele tiden paa hver side af de to masker saa de forbliver konstant.
26.09.2016 - 14:39
![]() Lena B. Nielsen wrote:
Lena B. Nielsen wrote:
Hvor skal mærketråden placeres ved raglanudtagningen. Der står "slå om, 1 ret, slå om, 2 m ret - er det så mellem de 2 m ret at mærketråden skal sidde? Og på næste udtagningsomgang forskydes mærketråden så? Jeg har nu trevlet op 2 gange og vil gerne strikke det rigtigt denne gang.
23.08.2016 - 10:15DROPS Design answered:
Hej Lena. Du kan laese under BÆRESTYKKE hvor maerketraadene skal placeres. De skal ikke forskydes undervejs, men du tager ud paa hver side - maerketraaden bliver hvor den er saa du faar en lige raglanlinie
23.08.2016 - 14:21
![]() Maria wrote:
Maria wrote:
Finalmente ho capito!!! meno male che ci siete voi a dare spiegazioni alle zuccone come me..... grazie mille, anche per la vs pazienza
22.08.2016 - 16:33
![]() Maria wrote:
Maria wrote:
Io ho lavorato cosi: 1-3-7 e 9 ferro: 1rovescio, 1 gettato ripetuto per tutto il giro. 2- 4-6 e 8 ferro: 1 diritto, 1 diritto sul gettato del ferro precedente, ripetuto per tutto il giro. 5 ferro: 2 maglie insieme a diritto.
22.08.2016 - 13:21DROPS Design answered:
Buongiorno Maria, i diagrammi si leggono dal basso verso l'alto, da destra verso sinistra. Il diagramma A.1 si lavora come segue: 1°, 3°, 7° e 9° giro a rov, 2°, 4°, 6° e 8° giro a dir, 5° giro: (2 m insieme a dir, 1 gettato) per 5 volte. Questa è una ripetizione del diagramma. Ci riscriva se qualcosa non è chiaro. Buon lavoro!
22.08.2016 - 15:13
![]() Maria wrote:
Maria wrote:
Buongiorno, scusate ma io ho ancora difficolta con lo schema A1. Lavorando i gettati a diritto, alla fine dello schema A1, io non mi ritrovo con 114 maglie ma con molte di più, oltre 200. Cosa sto sbagliando? grazie mille
22.08.2016 - 09:15DROPS Design answered:
Buongiorno Maria,durante la lavorazione de diagramma A.1 il numero delle m non cambia, per ogni ripetizione si lavorano 5 gettati e 5 diminuzioni (2 m insieme a dir). Controlli di aver fatto tutte le diminuzioni. Buon lavoro!
22.08.2016 - 09:46
![]() Maria wrote:
Maria wrote:
Buongiorno, non riesco a capire lo schema A1. Io sono taglia XL, quindi ho messo su 99 maglie ed ho fatto il 1° ferro a dir ed ora devo iniziare lo schema A1. non capisco se nello schema, i giri 1°, 3°,7° e 9° sono 1 maglia a rovescio, 1 gettato, 1 rovescio, 1 gettato, e cosi di seguito. e se fosse cosi, nel 2° e 4° e 8° ferro , devo lavorare a diritto anche i gettati? grazie
11.08.2016 - 18:02DROPS Design answered:
Buonasera Maria, è corretto, i diagrammi riportano tutti i giri, per cui nei giri successivi ai gettati li lavorerà a diritto. Buon lavoro!
11.08.2016 - 18:32
![]() Maren Marit wrote:
Maren Marit wrote:
Vanskelig å forstå hvordan ernene skal strikkes. Strikker str M. str. 7 m gl.str, så 40 m mønster, så 8 m gl.str. Hvordan strikkes ermet videre. Skal det strikkes et felt under ermet med glattstr eller skal det strikkes mønster. Skjønner ikke dette, uklar forklaring i mønsteret.
27.07.2016 - 11:22DROPS Design answered:
Hej Maren, Ja det stemmer, de masker som ikke går op i mønsteret skal strikkes i glatstrik. God fornøjelse!
29.03.2017 - 15:04
![]() Diana Hart wrote:
Diana Hart wrote:
I don't understand where to place the markers in the yoke. After completing A1 it says knit 17 , 1yo k1 1yo k2 insert a marker between these stitches. Does that mean after the k2 and before A2, or between the yo overs and knits. if the later there will be 5 stitches so would it be after 2 or 3 stitches. I am very confused. Also for the subsequent markers, where do they go? I have never used your patterns before, but they look so lovely I really would like to try.
22.07.2016 - 15:00DROPS Design answered:
Dear Mrs Hart, when it says: K2, insert a marker between these sts, you have to work these 2 sts as follows: K1, insert a marker, K1 (= K2 with a marker in between). These 2 sts are the raglan lines, markers have to stay on place. Happy knitting!
22.07.2016 - 16:00
|
|||||||||||||||||||
Sea Nymph#seanymphsweater |
|||||||||||||||||||
 |
 |
||||||||||||||||||
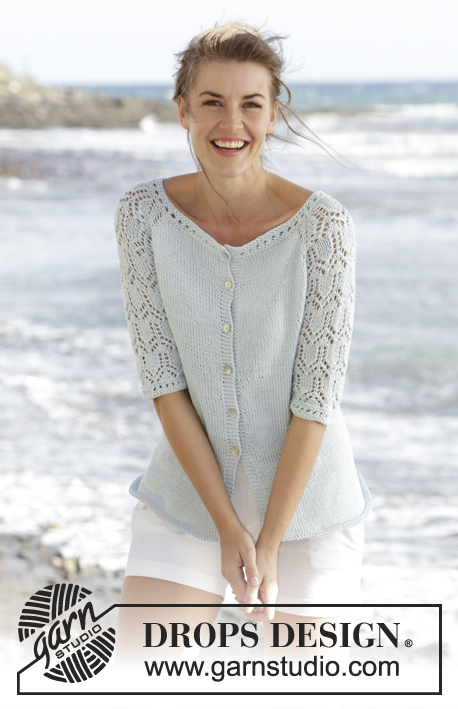
Knitted DROPS jumper with raglan, lace pattern and ¾ sleeves in "Muskat". Worked top down. Size: S - XXXL.
DROPS 168-1 |
|||||||||||||||||||
|
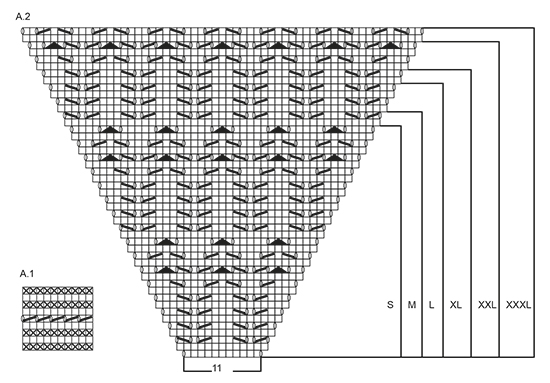
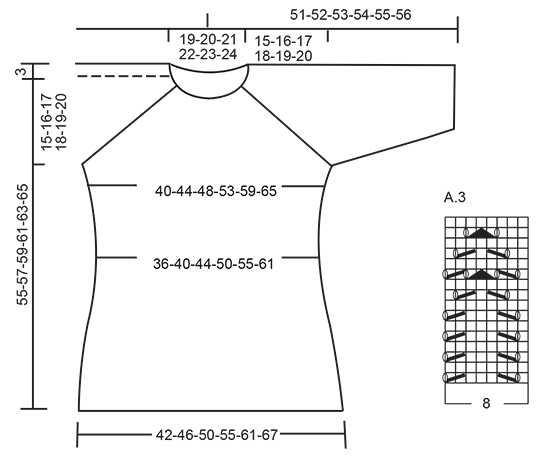
GARTER ST (worked in the round): 1 ridge = 2 rounds. * K 1 round and P 1 round *, repeat from *-*. PATTERN: See diagrams A.1 to A.3. See diagram for size! RAGLAN: Inc every other round as follows: Inc 4 sts on back piece, 4 sts on front piece and 2 sts on each sleeve (= 12 sts inc, inc on sleeve are drawn in pattern) – beg 3 sts before each A.2 and work as follows: 1 YO, K 1, 1 YO, K 2 (marker is in the middle of these sts), A.2, K 2 (marker is in the middle of these sts), 1 YO, K 1, 1 YO. K the YOs closest to markers on next row to make holes, K YOs towards back/front piece twisted to avoid holes. Inc 12 sts this way 0-2-3-7-10-14 times more (= 1-3-4-8-11-15 times in total, first inc is explained in the text). Then inc every other round as follows: Inc 2 sts on back piece, 2 sts on front piece and 2 sts on each sleeve (= 8 sts inc, inc on sleeve are drawn in pattern) – beg 2 sts before each A.2 and work as follows: 1 YO, K 2 (marker is in the middle of these sts), A.2, K 2 (marker is in the middle of these sts), 1 YO. K YOs on next round to make a hole. Inc 8 sts this way 16-15-16-13-12-9 times in total. ---------------------------------------------------------- JUMPER: Worked in the round on circular needle, top down. YOKE: Cast on 87-91-95-99-103-107 sts on circular needle size 4 mm / US 6 with Muskat. K 1 round, them work A.1, on last round in A.1 inc 15 sts evenly = 102-106-110-114-118-122 sts. Then work as follows from mid back: K 17-18-19-20-21-22, 1 YO, K 1, 1 YO, K 2 (insert a marker between these sts), A.2 (= 11 sts), K 2 (insert a marker between these sts), 1 YO, K 1, 1 YO, K 34-36-38-40-42-44, 1 YO, K 1, 1 YO, K 2 (insert a marker between these sts), A.2, K 2 (insert a marker between these sts), 1 YO, K 1, 1 YO, K 17-18-19-20-21-22. Continue this pattern, and inc for RAGLAN as explained above, first inc is now done. REMEMBER THE KNITTING GAUGE When A.2 has been worked vertically - see marking for your size, there are 242-262-286-314-346-374 sts on round, inc are now done. Work next round as follows: Work 38-42-46-52-58-64 sts (= half back piece), slip the next 45-47-51-53-57-59 sts on a stitch holder (= sleeve), cast on 8 sts under sleeve, work the next 76-84-92-104-116-128 sts (= front piece), slip the next 45-47-51-53-57-59 sts on a stitch holder (= sleeve), cast on 8 new sts under sleeve, work the last 38-42-46-52-58-64 sts (= half back piece). BODY: There are now 168-184-200-224-248-272 sts on body. Continue in stockinette st. Insert a marker in each side, in the middle of the 8 new sts that were cast on. NOW MEASURE PIECE FROM HERE. When piece measures 4 cm / 1½", dec 1 st on each side of marker (= 4 sts dec), repeat dec every 4-4-4-5-5-5 cm / 1½"-1½"-1½"-2"-2"-2" 3 more times in total = 152-168-184-208-232-256 sts. When piece measures 22-23-24-25-26-27 cm / 8¾"-9"-9½"-9¾"-10¼"-10⅝", inc 1 st on each side of each marker (= 4 sts inc), repeat inc every 2 cm / ¾" 5 more times = 176-192-208-232-256-280 sts. When piece measures 36-37-38-39-40-41 cm / 14¼"-14½"-15"-14¼"-15¾"-16⅛", work 2 ridges in GARTER ST - see explanation above, over all sts. Bind off K 1/P 1 (to avoid a wavy bind-off edge), piece measures approx. 55-57-59-61-63-65 cm / 21⅝"-22½"-23¼"-24"-24¾"-25½" from cast-on edge. SLEEVE: Worked in the round. Slip sts from sleeve back on double pointed needles size 4 mm / US 6, pick up 1 st in each of the 8 sts under sleeve = 53-55-59-61-65-67 sts. Insert 1 marker mid under sleeve = beg of round. NOW MEASURE PIECE FROM HERE! Then work as follows: 6-7-1-2-4-5 sts in stockinette st, A.3 over the next 40-40-56-56-56-56 sts (beg A.3 where A.2 ends for your size), 7-8-2-3-5-6 sts in stockinette st. When piece measures 4 cm / 1½", dec 1 st on each side of marker. Work the sts that do not fit the pattern in stockinette st, make sure that no of dec and inc in pattern is correct. Repeat dec every 7-7-5-5-3-3 cm / 2¾"-2¾"-2"-2"-1"-1" 2-2-3-3-4-4 more times = 47-49-51-53-55-57 sts. When piece measures 24-23-23-22-22-21 cm / 9½"-9"-9"-8¾"-8¾"-8¼", work A.1 over all sts, then bind off. Work the other sleeve the same way. |
|||||||||||||||||||
Diagram explanations |
|||||||||||||||||||
|
|||||||||||||||||||
 |
|||||||||||||||||||
 |
|||||||||||||||||||
Have you finished this pattern?Tag your pictures with #dropspattern #seanymphsweater or submit them to the #dropsfan gallery. Do you need help with this pattern?You'll find 25 tutorial videos, a Comments/Questions area and more by visiting the pattern on garnstudio.com. © 1982-2026 DROPS Design A/S. We reserve all rights. This document, including all its sub-sections, has copyrights. Read more about what you can do with our patterns at the bottom of each pattern on our site. |
|||||||||||||||||||


With over 40 years in knitting and crochet design, DROPS Design offers one of the most extensive collections of free patterns on the internet - translated to 17 languages. As of today we count 325 catalogs and 12298 patterns - 12288 of which are translated into English (US/in).
We work hard to bring you the best knitting and crochet have to offer, inspiration and advice as well as great quality yarns at incredible prices! Would you like to use our patterns for other than personal use? You can read what you are allowed to do in the Copyright text at the bottom of all our patterns. Happy crafting!
Post a comment to pattern DROPS 168-1
We would love to hear what you have to say about this pattern!
If you want to leave a question, please make sure you select the correct category in the form below, to speed up the answering process. Required fields are marked *.