
Popular categories
Looking for a yarn?


Comments / Questions (174)
![]() Kerhoas wrote:
Kerhoas wrote:
Merci pour vos explications!
07.10.2021 - 17:33
![]() Kerhoas wrote:
Kerhoas wrote:
Bonjour, J'ai fait le col au point mousse et les 24 augmentations. J'ai mes 138mailles. J'ai lu tous les commentaires en français, mais je ne comprends toujours pas comment faire les augmentations à suivre. Pourriez-vous m'expliquer svp?
02.10.2021 - 22:23DROPS Design answered:
Bonjour Mme Kerhoas, placez vos marqueurs comme indiqué: 26 m (5+21), 1 m avec marqueur, 20 m, 1 m avec marqueur, 42 m, 1 m avec marqueur, 20 m, 1 m avec marqueur, 26 m (21+5) = 138 m. La maille avec le marqueur est la m au milieu de A.1; Augmentez maintenant avant/après les 11 m du raglan comme indiqué sous RAGLAN, soit 8 m (dos/devants + manches tous les 2 rangs), soit 4 m (dos/devants ou manches seulement en fonction de la taille). Bon tricot!
04.10.2021 - 08:16
![]() Veronica Eriksson wrote:
Veronica Eriksson wrote:
Hej! Är den stor el liten i storleken?
11.09.2021 - 12:36DROPS Design answered:
Hej Veronica. Längst ner på mönstret har du en måttskiss med mått i cm i alla storlekar på plagget. Det bästa är att du mäter en tröja du redan har och som du tycker är bra passform på och gör den storlek som motsvarar de måtten. Mvh DROPS Design
16.09.2021 - 13:46
![]() Renée-Monique Martel wrote:
Renée-Monique Martel wrote:
Then work ridges (1st row = RS) but in every transition between body and sleeves work A.1 (= 11 sts - NOTE: St with marker should fit with st with arrow in diagram), To knit the 11st with the marker, from previous row, do we take 5 sts from the body, place the maker and calculate the 5st in the sleeve to make the A.1? Thank you...
13.04.2021 - 16:34DROPS Design answered:
Dear Mrs Martel, the markers sould have already been placed before, ie work the first 5 sts in A.1 before the stitch with the marker (=end of front piece/sleeve/back piece); work the stich with an arrow in diagram over the stitch with a marker and work the last 5 sts in A.1 over the next 5 stitches (= beg of sleeve/backpiece/front piece). Happy knitting!
14.04.2021 - 07:17
![]() Rachel Hodgson wrote:
Rachel Hodgson wrote:
Eureka. I understand now. Thank you so much for your kind reply X
02.04.2021 - 12:21
![]() Rachel Hodgson wrote:
Rachel Hodgson wrote:
Please could you help. I have followed the instructions and I have a question as I have reached the ‘insert 4 markers’ at yoke. I should have 138 st (xxxl size) but when I place my markers and add up the stitch count the total is 134st (5, 21, 20, 42, 20, 21, 5 = 134). Is there a pattern correction I need? Have I made an error and not understood the pattern? Please help. Thank you very much.
02.04.2021 - 11:04DROPS Design answered:
Dear Rachel, the only thing I can think of is, that you should put the markers into stitches, so you might not counted the 4 marked stitches. I hope this helps. Happy Knitting!
02.04.2021 - 11:23
![]() Marie Lussier wrote:
Marie Lussier wrote:
Merci d’avoir répondu à ma question . Je comprends maintenant comment faire les boutonnières en «purl » ( envers ) MAIS ce que j’ai s aussi besoin de savoir c’est : dois-je faire , dans ce patron (z-713) , les boutonnières en « knit »( endroit) OU en « purl »(envers) , alors que la bande est tricotée en envers en totalité ? Merci !
17.02.2021 - 02:43DROPS Design answered:
Bonjour Mme Lussier, comme les mailles de bordure des devants se tricotent tout le temps en mailles envers, vous allez tricoter les boutonnières en tricotant 2 mailles ensemble à l'envers (et non à l'endroit) - la correction a été faite, merci de l'avoir relevé. Bon tricot!
17.02.2021 - 08:22
![]() Marie Lussier wrote:
Marie Lussier wrote:
Je ne comprends pas la façon de faire les boutonnières avec le « purl ». Pourquoi y a -t-il des mailles tricotées « knit » dans le patron ? Le tutoriel montre les boutonnières avec des mailles « knit » . Y a -t’il un tutoriel pour des boutonnières avec mailles « purl » ? Merci de m’expliquer d’avantage . Merci !
16.02.2021 - 07:38DROPS Design answered:
Bonjour Mme Lussier, pour faire les boutonnières dans les mailles envers, faites 1 jeté (= ramenez le fil derrière l'ouvrage, puis de nouveau devant pour pouvoir tricoter les mailles suivantes à l'envers) et tricotez 2 mailles ensemble à l'envers (cf vidéo. Bon tricot!
16.02.2021 - 09:44
![]() Gabriella wrote:
Gabriella wrote:
Jag har i stort sett stickat klart oket men det felar på några maskor. Jag tänkte justera detta utan att repa upp men behöver veta var jag skall placera dessa ökningar. Min fråga är skall A1 diagrammets maskor hamna på helt på framstycket eller tex halva på framstycket halva på ärmstycket?
14.12.2020 - 15:23DROPS Design answered:
Hej Gabriella. Du stickar A.1 mellan varje övergång mellan fram/bakstycke och ärmar. Det du kan göra är att räkna hur många maskor du ska ha i de olika delarna i din storlek genom att se på antal ökade maskor per del och sedan justera så att det stämmer. Mvh DROPS Design
22.12.2020 - 08:38
![]() Annet wrote:
Annet wrote:
Ik heb een vraag over meerderen voor de raglan. (Nog nooit raglan gemaakt nl) Begrijp ik het meerderen zo goed? : 1e markeerder eerst meerderen zoal bij “lijf” en dan links van diezelfde markeerder zoals bij “mouw”? 2e markeerder eerst “mouw” en dan “lijf” 3e markeerder eerst “lijf” en dan “mouw” 4e markeerder eerst “mouw” en dan “lijf” Bij voorbaat dank voor uw hulp.
25.11.2020 - 17:23DROPS Design answered:
Dag Annet,
Ja, dat klopt inderdaad precies zoals je het zegt! De meerderingen worden aan beide kanten van de markeerdraden gemaakt en als je aan de kant van de mouw bent meerder je zoals aangegeven voor de mouw en als je bij het lijf bent meerder je zoals aangegeven voor het lijf.
26.11.2020 - 09:32
|
|||||||
Sweet Olivia Cardigan#sweetoliviacardigan |
|||||||
|
|
|||||||
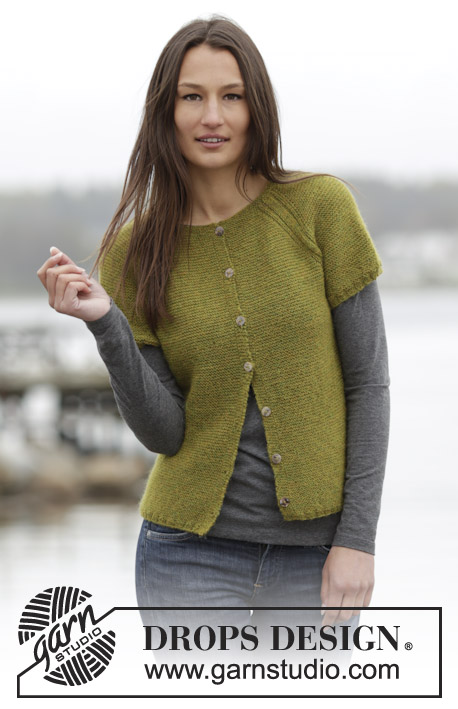
Knitted DROPS jacket in garter st with raglan, worked top down in "Alpaca". Size: S - XXXL.
DROPS 164-42 |
|||||||
|
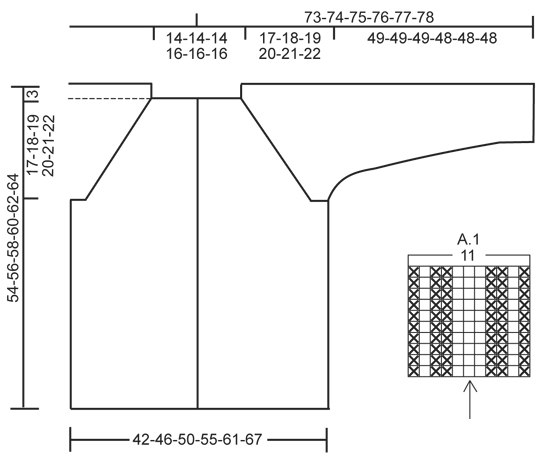
GARTER ST (back and forth): K all rows. 1 ridge = K2 rows. PATTERN: See diagram A.1. The diagram shows all rows in pattern seen from RS. BUTTONHOLES: Dec for buttonholes on right band. 1 buttonhole = work until 3 sts remain on needle (seen from RS), make 1 YO, P 2 tog and P the last 1 st. Dec for buttonholes when piece measures: SIZE S: 2, 9, 16, 24, 32, 40 and 48 cm / ¾",3½",6¼",9½",12½",15¾",19" SIZE M: 2, 10, 18, 26, 34, 42 and 50 cm / ¾",4",7",10¼",13½",16½",19¾" SIZE L: 2, 10, 18, 26, 34, 42 and 50 cm / ¾",4",7",10¼",13½",16½",19¾" SIZE XL: 2, 10, 18, 26, 34, 43 and 52 cm / ¾",4",7",10¼",13½",17",20½" SIZE XXL: 2, 10, 18, 27, 36, 45 and 54 cm / ¾",4",7",10½",14¼",17¾",21¼" SIZE XXXL: 2, 11, 20, 29, 38, 47 and 56 cm / ¾",4½",8",11½",15",18½",22" RAGLAN: Inc 1 st on each side of the 11 raglan sts. Inc by K 2 in st both before and after the 11 raglan sts (= 2 sts inc at every A.1). All inc are done from RS. MEASURING TIP: Because of garter st the garment will be longer when worn. All length measurements must therefore be done while holding up the garment. ---------------------------------------------------------- JACKET: Work back and forth on circular needle from mid front, work top down. YOKE: Cast on 106-106-106-114-114-114 sts (includes 5 band sts each side towards mid front) on circular needle size 2.5 mm / US 1.5 with Alpaca. Work 3 ridges in GARTER ST - see explanation above. Switch to circular needle size 3 mm / US 2.5 and K 1 row from RS while inc 24 sts evenly - NOTE: P the outermost 5 sts in each side towards mid front and do not inc over these sts (= band sts) = 130-130-130-138-138-138 sts on row. Insert 4 markers in the piece as follows (from WS): P 5 (= band sts), K 19-19-19-21-21-21 (= right front piece), insert 1 marker in next st, K 20 (= sleeve), insert 1 marker in next st, K 38-38-38-42-42-42 (= back piece), insert 1 marker in next st, K 20 (= sleeve), insert 1 marker in next st, K 19-19-19-21-21-21 (= left front piece) and finish with P 5 (= band sts). READ ALL OF THE FOLLOWING SECTION BEFORE CONTINUING: Then work ridges (1st row = RS) but in every transition between body and sleeves work A.1 (= 11 sts - NOTE: St with marker should fit with st with arrow in diagram), P the 5 band sts in each side towards mid front on every row until finished measurements. REMEMBER THE KNITTING GAUGE and remember to dec for BUTTONHOLES on right band - see explanation above. AT THE SAME TIME on first row from RS beg inc for RAGLAN – see explanation above. NOTE: Inc differently on body and sleeves: BODY: Inc every other row (i.e. every row from RS) a total of 13-21-26-34-42-53 times and then every 4th row (i.e. every other row from RS) a total of 14-11-10-7-4-0 times. SLEEVE: Inc every other row a total of 17-19-18-20-18-21 times, and on every 4th row a total of 12-12-14-14-16-16 time. After all inc for raglan there are 354-382-402-438-458-498 sts on row and piece measures approx. 20-21-22-23-24-25 cm / 8"-8¼"-8¾"-9"-9½"-9¾" from shoulder. Work next row as follows from WS: Work 52-57-61-68-73-80 sts (= right front piece), slip the next 78-82-84-88-88-94 sts on 1 stitch holder (= sleeve), cast on 6-6-8-8-10-10 new sts (= under sleeve), work 94-104-112-126-136-150 sts (= back piece), slip the next 78-82-84-88-88-94 sts on 1 stitch holder (= sleeve), cast on 6-6-8-8-10-10 sts (= under sleeve), work the remaining 52-57-61-68-73-80 sts (= left front piece). BODY: = 210-230-250-278-302-330 sts. Continue to work in garter st back and forth and P bands - remember buttonholes on right band. When piece measures 33-34-35-36-37-38 cm / 13"-13⅜"-13¾"-14¼"-14½"-15", measured from where sleeve was divided under sleeve (or desired length) – READ MEASURING TIP, P 1 row from WS while inc 2 sts evenly = 212-232-252-280-304-332 sts on needle. Switch to circular needle size 2.5 mm / US 1.5 and work 3 rows rib (= K 2/P 2) with 5 band sts in garter st and 2 K in each side towards mid front (seen from RS). Then LOOSELY bind off sts with K over K and P over P. Entire jacket measures approx. 54-56-58-60-62-64 cm / 21¼"-22"-22¾"-23⅝"-24⅜"-25¼" from shoulder. SLEEVE: Worked in the round on double pointed needles. Slip the 78-82-84-88-88-94 sts from stitch holder in one side of piece back on double pointed needles size 3 mm / US 2.5 and cast in addition on 6-6-8-8-10-10 new sts mid under sleeve = 84-88-92-96-98-104 sts. Insert 1 marker – NOW MEASURE PIECE FROM HERE. Work in stockinette st in the round. AT THE SAME TIME after 3 rounds dec 2 sts mid under sleeve. Repeat dec every 4th round 4-4-4-5-5-5 times in total and then every 4½-3½-3-3-3-2 cm / 1¾"-1¼"-1"-1"-1"-¾" 9-11-12-13-13-16 times in total = 58-58-60-60-62-62 sts. When sleeve measures 48-48-48-47-47-47 cm / 19"-19"-19"-18½"-18½"-18½" (or at desired length), K 1 round while dec 2-2-4-0-2-2 sts evenly = 56-56-56-60-60-60 sts on needle. Work 3 rounds rib (= K 2/P 2). Then LOOSELY bind off sts with K over K and P over P. Work the other sleeve the same way. ASSEMBLY: Sew the openings under the sleeves. Sew the buttons on to the left band. |
|||||||
Diagram explanations |
|||||||
|
|||||||
 |
|||||||
Have you finished this pattern?Tag your pictures with #dropspattern #sweetoliviacardigan or submit them to the #dropsfan gallery. Do you need help with this pattern?You'll find 20 tutorial videos, a Comments/Questions area and more by visiting the pattern on garnstudio.com. © 1982-2026 DROPS Design A/S. We reserve all rights. This document, including all its sub-sections, has copyrights. Read more about what you can do with our patterns at the bottom of each pattern on our site. |
|||||||


With over 40 years in knitting and crochet design, DROPS Design offers one of the most extensive collections of free patterns on the internet - translated to 17 languages. As of today we count 324 catalogs and 12290 patterns - 12280 of which are translated into English (US/in).
We work hard to bring you the best knitting and crochet have to offer, inspiration and advice as well as great quality yarns at incredible prices! Would you like to use our patterns for other than personal use? You can read what you are allowed to do in the Copyright text at the bottom of all our patterns. Happy crafting!
Post a comment to pattern DROPS 164-42
We would love to hear what you have to say about this pattern!
If you want to leave a question, please make sure you select the correct category in the form below, to speed up the answering process. Required fields are marked *.