
Popular categories
Looking for a yarn?


Comments / Questions (67)
Dalia wrote:
Hi, may i get further explanation about the following, in the left front:?"On the following 2 rows knit 2 rows garter st over only the 7 button band sts (short rows). What are the 7 button band? Thx Dalia
29.04.2013 - 08:56DROPS Design answered:
Dear Dalia, the 7 button band sts are the 7 sts towards mid front/edge. You then work 2 rows on this 7 sts only (leave remaining sts unworked) and continue as staged. This will help to have a nice collar. Happy knitting!
29.04.2013 - 10:49
![]() Hanne Frey wrote:
Hanne Frey wrote:
Kan det virkelig passe, at der skal tages så hurtigt ind ved ærmerne - tænker på 2 m i hver side, når de første indtagninger er lavet?
28.01.2013 - 17:14DROPS Design answered:
Hej Hanne. Ja, mönstret stemmer. Du skal tage ind til aermekuppel paa den beskrevne maade.
28.01.2013 - 21:42
![]() A Croonen wrote:
A Croonen wrote:
Ik begrijp iets niet met het breien van het linker voorpand.Ik moet op het laatst over 20 steken ribbelsteek breien ,en dan over de buitenste 16steken,wat moet ik doen met de overige 4 steken.
13.01.2013 - 23:05DROPS Design answered:
Je breit verkorte naalden over de 20 st. Eerst brei je 2 nld over alle st en daarna 2 nld over de eerste 16 st. Bij de laatste 2 nld moet je gewoon de 4 st laten rusten. Bekijk ook onze instructievideo over verkorte naalden.
14.01.2013 - 12:07
![]() G. L. wrote:
G. L. wrote:
Die Anleitung vom Muster ist im Deutschen falsch. Richtig ist die englische Anleitung: *1.R. rechts 2.R. links 3.R. links 4.R. links 5.R. rechts 6.R. rechts* von *-* wiederholen.... Ich hoffe, dass der Rest richtig übersetzt ist, ansonsten hab ich bald ein Problem und werde mich hier wieder melden...
10.04.2012 - 11:45DROPS Design answered:
Die Anleitung stimmt so: (* 2 R. glatt stricken, 1 R. li. *, von *-* wiederholen) ergiebt genau die das gleiche Muster.
11.04.2012 - 09:22
![]() Drops Design France wrote:
Drops Design France wrote:
Bonjour Louise et merci, cet oubli a été réparé.
29.11.2010 - 09:28Louise wrote:
Bonjour, dans la version francophone, il y a eu un oubli, les instructions pour la ceinture est manquante
28.11.2010 - 18:34
![]() Denise wrote:
Denise wrote:
I am having trouble with interpreting the pattern directions. The front piece at the start of the collar,could this be clarified there is too much going on for my poor "pea-brain" to figure out. If someone has a row by row interpretation that would make the pattern much easier to read...at least for me. Thanks, Denise
17.02.2009 - 22:04
|
|
DROPS 69-8 |
|
 |
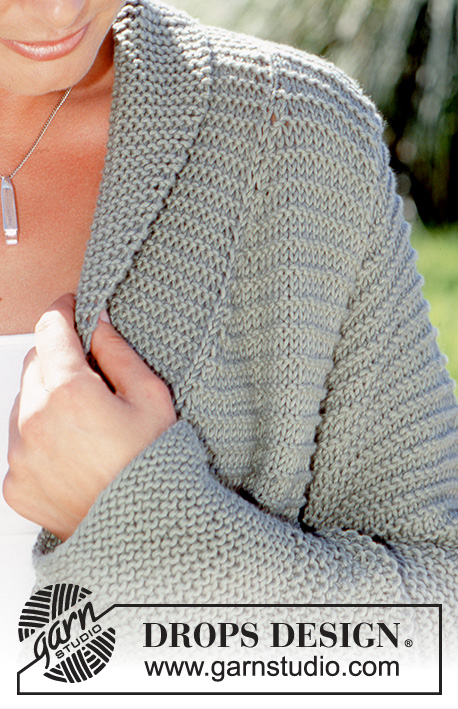 |
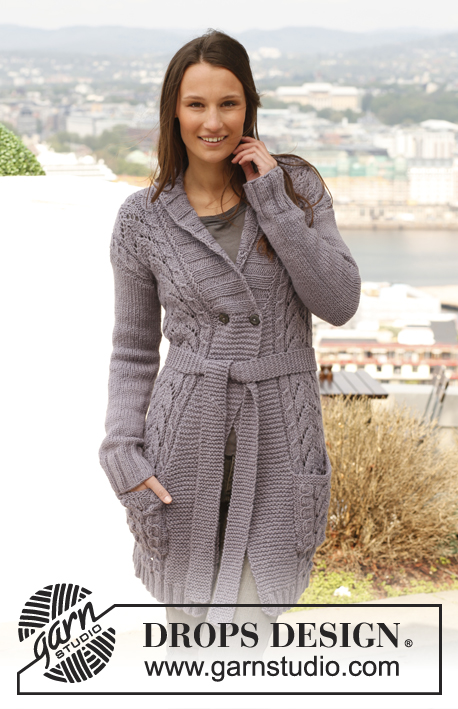
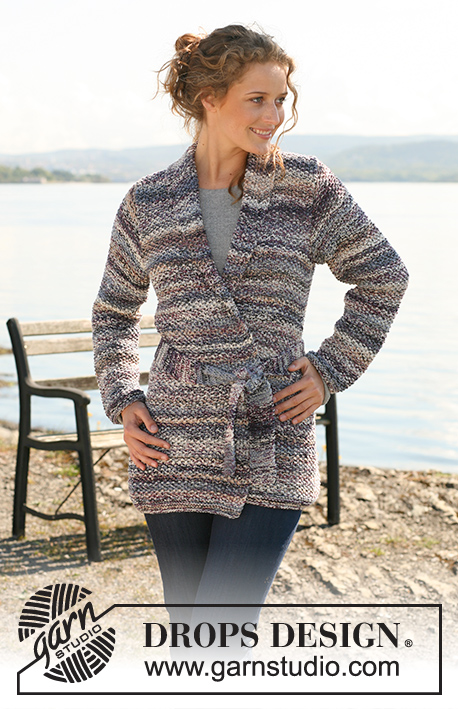
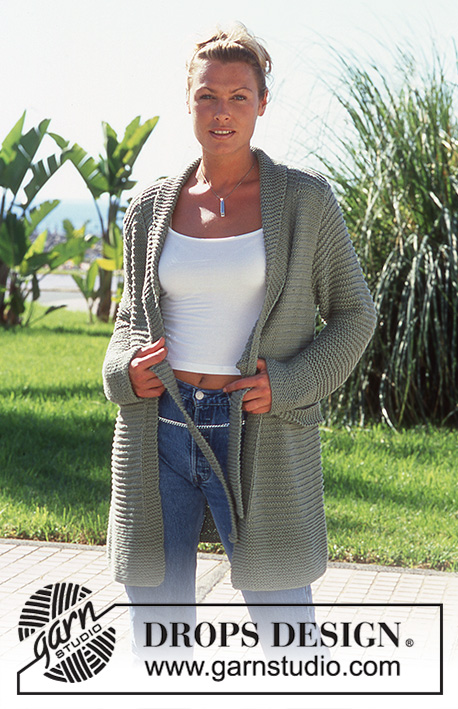
DROPS Cardigan in Paris
DROPS 69-8 |
|
|
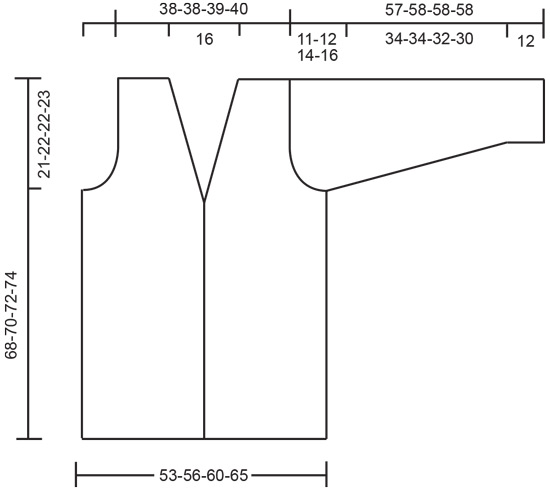
Gauge: 16 sts x 20 rows = 10 x 10 cm [4" x 4"] in stockinette st. Garter st, when knitting flat: Knit all sts, all rows. Pattern: Row 1 (right side row): Knit Row 2: Purl Row 3: Purl Row 4: Purl Row 5: Knit Row 6: Knit Repeat these 6 rows. Knitting tips: Dec for the neck only on right side rows. Right front: dec 1 st as follows: sl 1, K 1, psso. Left front: dec 1 st as follows: K 2 tog. Back: Cast on 86-92-98-106 sts. Knit garter st for 12 cm [4.75"], then continue with pattern- see instructions above. When the piece measures 47-48-50-51 cm [18.5"-18⅞"-19.75"-20"] bind off for armhole at each side every other row: 3 sts 1-2-2-2 times, 2 sts 2-2-3-4 times, 1 st 5-5-5-7 times = 62-62-64-64 sts. When the piece measures 66-68-70-72 cm [26"-26.75"-27⅝"-28.25"] bind off the center 24 sts for the neck. On the next row dec 1 st at each neck edge = 18-18-19-19 sts remain on each shoulder. Bind off the remaining sts when the piece measures 68-70-72-74 cm [26.75"-27⅝"-28.25"-29⅛"]. Left front: Cast on 48-51-54-58 sts. Knit garter st for 12 cm [4.75"] over all sts. Continue with pattern, but knit the 6 edge sts at the center front as follows from edge (seen from the right side): 5 sts garter st, 1 st stockinette st. Read the entire next section before knitting. When the piece measures 46-47-49-50 cm [18⅛"-18.5"-19.25"-19.75"] inc 2 sts inside 1 edge st at the center front for collar - knit the increased sts for collar in garter st, keeping the 1 st in stockinette st between button bands and body. On the following 2 rows knit 2 rows garter st over only the 7 button band sts (short rows). Then inc 1 st inside 1 edge st 6 times every row, then 6 times every other row and then 6 times every 4th row = 20 sts increased for collar. At the same time when the piece measures 47-48-50-51 cm [18.5"-18⅞"-19.75"-20"] bind off for armhole at the side as on back. At the same time when the piece measures 50-51-53-54 cm [19.75"-20"-20⅞"-21.25"] dec for the neck shaping (while increasing for collar) as follows: make decs inside the 1 stockinette st + garter sts for collar. Dec 1 st 18 times every other row - see knitting tips. When the piece measures 68-70-72-74 cm [26.75"-27⅝"-28.25"-29⅛"] bind off shoulder sts + 6 button band sts = 18-18-19-19 sts bound off. There are now 20 garter sts on the needles (collar). Continue in garter st as follows: * 2 rows garter st over all sts, 2 rows garter st over only the outermost 16 sts *, repeat from * - * until the inner edge of collar measures approx. 8 cm [3⅛"] (the outer edge should measure 16 cm [6.25"]). Put sts on a holder. Right front: Cast on and knit the same as the left but reverse all shaping. Sleeve: Cast on 38-38-40-42 sts. Knit garter st for 12 cm [4.75"], then continue with pattern. When the piece measures 13-13-14-14 cm [5⅛"-5⅛"-5.5"-5.5"] inc 1 st at each side 13-14-13-14 times every 2.5-2-2-2 cm [1"-0.75"-0.75"-0.75"] = 64-66-66-70 sts. When sleeve measures approx. 46-46-44-42 cm [18⅛"-18⅛"-17.25"-16.5"] bind off for sleeve cap at each side every other row: 3 sts 1-1-1-0 time, 2 sts 3-3-2-2 times, 1 st 4-5-7-10 times, then bind off 2 sts at each side until the piece measures 56-57-57-57 cm [22"-22.5"-22.5"-22.5"] and then bind off 3 sts each side 1 time. The piece measures approx. 57-58-58-58 cm [22.5"-22⅞"-22⅞"-22⅞"]. Bind off the remaining sts. Belt: Cast on 9 sts and knit garter st to desired length or until the belt measures approx. 120-130-140-150 cm [47.25"-51⅛"-55⅛"-59"]. Bind off. Assembly: Sew shoulder seams. Join the collar at center back with Kitchener stitch. Sew the collar to back neckline with seam on right side of work. Sew in sleeves. Sew sleeve and side seams using edge sts as a seam allowance. |
|
 |
|
Have you finished this pattern?Tag your pictures with #dropspattern or submit them to the #dropsfan gallery. Do you need help with this pattern?You'll find 22 tutorial videos, a Comments/Questions area and more by visiting the pattern on garnstudio.com. © 1982-2026 DROPS Design A/S. We reserve all rights. This document, including all its sub-sections, has copyrights. Read more about what you can do with our patterns at the bottom of each pattern on our site. |
|


With over 40 years in knitting and crochet design, DROPS Design offers one of the most extensive collections of free patterns on the internet - translated to 17 languages. As of today we count 325 catalogs and 12298 patterns - 12288 of which are translated into English (US/in).
We work hard to bring you the best knitting and crochet have to offer, inspiration and advice as well as great quality yarns at incredible prices! Would you like to use our patterns for other than personal use? You can read what you are allowed to do in the Copyright text at the bottom of all our patterns. Happy crafting!
Post a comment to pattern DROPS 69-8
We would love to hear what you have to say about this pattern!
If you want to leave a question, please make sure you select the correct category in the form below, to speed up the answering process. Required fields are marked *.