
Popular categories
Looking for a yarn?


Comments / Questions (67)
![]() Elaine Hinkley wrote:
Elaine Hinkley wrote:
I am having difficulty with the front collar. The instructions are very confusing.can you please simplify them.
11.10.2017 - 03:06DROPS Design answered:
Dear Mrs Hinkley, cast off from RS the sts for shoulder + 6 sts front band = 20 sts remain on needle for collar. Work these sts from RS. Turn and work now short rows starting from WS: *2 rows over the 20 sts, 2 rows over the first 16 sts*, repeat from *-* until collar measures approx. 8 cm (on the shorter side). Happy knitting!
11.10.2017 - 09:09
![]() Cora Kramer wrote:
Cora Kramer wrote:
Na de 12 cm ribbels bij het linkervoorpand moet ik op de goede kant beginnen met de kantsteken voor de sjaalkraag. Maar als ik dit doe komen deze steken aan de linkerzijnaadkant te zitten. Doe ik iets verkeerd, of moeten deze steken gebreid worden op de verkeerde kant?
30.09.2017 - 22:04DROPS Design answered:
Hallo Cora, De 6 kantsteken brei je inderdaad aan de kant van midden voor, dus als je op de goede kant aan het breien bent, brei je deze kantsteken op het einde van de naald.
07.10.2017 - 17:06
![]() Cora Kramer wrote:
Cora Kramer wrote:
Na de 12 cm ribbels bij het linkervoorpand moet ik op de goede kant beginnen met de kantsteken voor de sjaalkraag. Maar als ik dit doe komen deze steken aan de linkerzijnaadkant te zitten. Doe ik iets verkeerd, of moeten deze steken gebreid worden op de verkeerde kant?
30.09.2017 - 22:03Susan Woodward wrote:
How do I work out the quantity of wool that I need please.
06.06.2017 - 17:36DROPS Design answered:
Dear Mrs Woodward, you fill find required amount of yarn for each size under tab "Materials", ie 850 g DROPS Paris in size S divided by 50 g a ball Paris (see shadecard) = 17 balls Paris in size S. Happy knitting!
07.06.2017 - 08:30Marianne Van Heerden wrote:
Can you please tell me how many stitches i should have on the sleeve before I cast off? Many thanks.
06.01.2017 - 12:14DROPS Design answered:
Dear Mrs Van Heerden, number of remaining sts at the end of sleeve will vary with your tension in height (and size), cast off at the beg of every row on each side: 3 sts 1-1-1-0 time, 2 sts 3-3-2-2 times, 1 st 4-5-7-10 times, then cast off 2 sts at the beg of every row on each side 2 sts until sleeve measures 56-57 cm, then cast off 3 sts 1 time on each side. Happy knitting!
06.01.2017 - 12:56
![]() Natasja wrote:
Natasja wrote:
Beste Ik begrijp het linker voorpand niet goed. Mindering voor de hals? 18x1 st. Naast de tricotsteek ? Dus op verkeerde kant beginnen? Moet ik dan 2 st ervoor samen breien? En moet in dan met een andere draad de tricotsteek en ribbelsteken verder breien?
15.12.2016 - 21:27DROPS Design answered:
Hoi Natasja. Je mindert naast de kraagsteken door 2 st samen te breien, je hoeft hiervoor geen nieuwe draad te nemen voor de rest van de nld. Je breit gewoon door met dezelfde draad. Je mindert alleen op de goede kant (zie brei tips aan het begin van het patroon).
22.12.2016 - 14:28Birgit wrote:
Was bedeutet gegen den hals abketten? Muss ich beim halsausschnitt abketten oder an der Aussenseite also der schulter?
24.09.2016 - 12:03DROPS Design answered:
Liebe Birgit, Sie müssen beim Halsausschnitt abnehmen, dh vor den 5 Krausrippen + 1 M glatt + die M. die für den den kragen aufgenommen wurden am linken Vorderteil (= nach diese Maschen am rechten Vorderteil).
26.09.2016 - 11:35
![]() Winnie wrote:
Winnie wrote:
På denne opskrift 69-8 lang jakke, var det muligt at finde en video på den sjals krage det er temmelig uforståelig, og jeg er jo ikke den eneste der har problem med den
25.04.2016 - 19:36
![]() Katarina Lundqvist wrote:
Katarina Lundqvist wrote:
Hej! Vill gärna sticka denna modell i Alpacka Boucle och undrar hur mycket garn som går åt? Vänliga hälsningar Katarina
28.11.2015 - 20:14DROPS Design answered:
Hej. Här kan du se hur du räknar om garnmängden. Lycka till!
30.11.2015 - 09:27
![]() Judith Schrøder-Madsen wrote:
Judith Schrøder-Madsen wrote:
Jeg forstår ikke rigtig opskriften vedr. forstykket, hvor jeg når til stolpen og der står:På de næste 2 p strikkes der kun retstrik over de yderste 7 m stolpe - de resterende m på pinden strikkes ikke ? Vil det sige, at kraven (stolpen strikkes for sig selv og syes på forstykkes ved monteringen)??? Min veninde og jeg har læst opskriften nogle gange men finder ikke rigtig meningen. Mvh Judith
07.10.2014 - 15:27DROPS Design answered:
Hej Judith. Nej, du skal strikke 2 pinde ekstra (forkortede pinde) over de 7 stolpemasker. Derefter strikker du videre over alle masker igen. Du gör det for at göre stolpen lidt laengere saa den ikke traekker op, naar du nu begynder paa indtagningen til halsen.
07.10.2014 - 16:59
|
|
DROPS 69-8 |
|
 |
 |
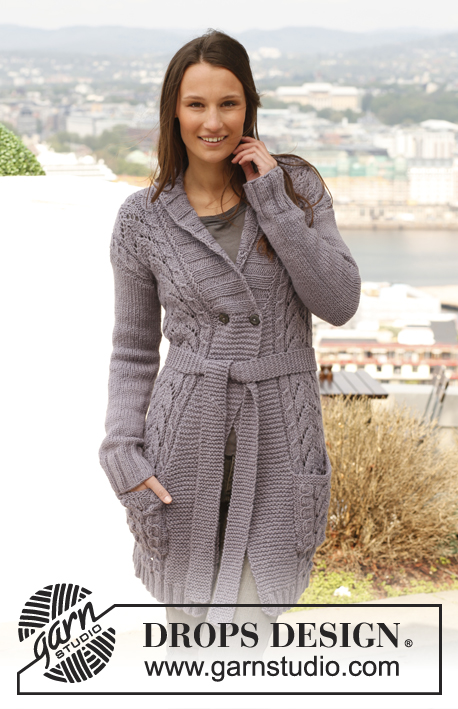
DROPS Cardigan in Paris
DROPS 69-8 |
|
|
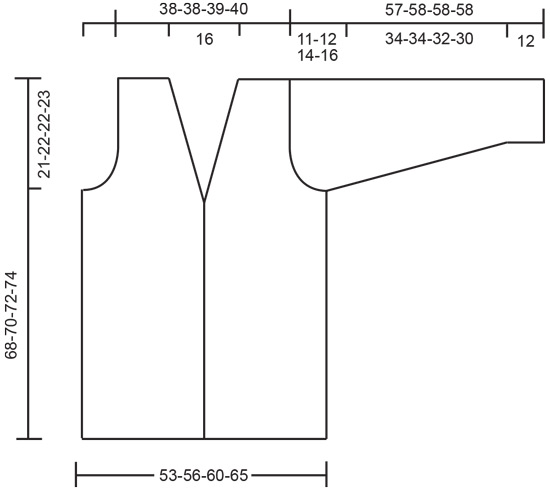
Gauge: 16 sts x 20 rows = 10 x 10 cm [4" x 4"] in stockinette st. Garter st, when knitting flat: Knit all sts, all rows. Pattern: Row 1 (right side row): Knit Row 2: Purl Row 3: Purl Row 4: Purl Row 5: Knit Row 6: Knit Repeat these 6 rows. Knitting tips: Dec for the neck only on right side rows. Right front: dec 1 st as follows: sl 1, K 1, psso. Left front: dec 1 st as follows: K 2 tog. Back: Cast on 86-92-98-106 sts. Knit garter st for 12 cm [4.75"], then continue with pattern- see instructions above. When the piece measures 47-48-50-51 cm [18.5"-18⅞"-19.75"-20"] bind off for armhole at each side every other row: 3 sts 1-2-2-2 times, 2 sts 2-2-3-4 times, 1 st 5-5-5-7 times = 62-62-64-64 sts. When the piece measures 66-68-70-72 cm [26"-26.75"-27⅝"-28.25"] bind off the center 24 sts for the neck. On the next row dec 1 st at each neck edge = 18-18-19-19 sts remain on each shoulder. Bind off the remaining sts when the piece measures 68-70-72-74 cm [26.75"-27⅝"-28.25"-29⅛"]. Left front: Cast on 48-51-54-58 sts. Knit garter st for 12 cm [4.75"] over all sts. Continue with pattern, but knit the 6 edge sts at the center front as follows from edge (seen from the right side): 5 sts garter st, 1 st stockinette st. Read the entire next section before knitting. When the piece measures 46-47-49-50 cm [18⅛"-18.5"-19.25"-19.75"] inc 2 sts inside 1 edge st at the center front for collar - knit the increased sts for collar in garter st, keeping the 1 st in stockinette st between button bands and body. On the following 2 rows knit 2 rows garter st over only the 7 button band sts (short rows). Then inc 1 st inside 1 edge st 6 times every row, then 6 times every other row and then 6 times every 4th row = 20 sts increased for collar. At the same time when the piece measures 47-48-50-51 cm [18.5"-18⅞"-19.75"-20"] bind off for armhole at the side as on back. At the same time when the piece measures 50-51-53-54 cm [19.75"-20"-20⅞"-21.25"] dec for the neck shaping (while increasing for collar) as follows: make decs inside the 1 stockinette st + garter sts for collar. Dec 1 st 18 times every other row - see knitting tips. When the piece measures 68-70-72-74 cm [26.75"-27⅝"-28.25"-29⅛"] bind off shoulder sts + 6 button band sts = 18-18-19-19 sts bound off. There are now 20 garter sts on the needles (collar). Continue in garter st as follows: * 2 rows garter st over all sts, 2 rows garter st over only the outermost 16 sts *, repeat from * - * until the inner edge of collar measures approx. 8 cm [3⅛"] (the outer edge should measure 16 cm [6.25"]). Put sts on a holder. Right front: Cast on and knit the same as the left but reverse all shaping. Sleeve: Cast on 38-38-40-42 sts. Knit garter st for 12 cm [4.75"], then continue with pattern. When the piece measures 13-13-14-14 cm [5⅛"-5⅛"-5.5"-5.5"] inc 1 st at each side 13-14-13-14 times every 2.5-2-2-2 cm [1"-0.75"-0.75"-0.75"] = 64-66-66-70 sts. When sleeve measures approx. 46-46-44-42 cm [18⅛"-18⅛"-17.25"-16.5"] bind off for sleeve cap at each side every other row: 3 sts 1-1-1-0 time, 2 sts 3-3-2-2 times, 1 st 4-5-7-10 times, then bind off 2 sts at each side until the piece measures 56-57-57-57 cm [22"-22.5"-22.5"-22.5"] and then bind off 3 sts each side 1 time. The piece measures approx. 57-58-58-58 cm [22.5"-22⅞"-22⅞"-22⅞"]. Bind off the remaining sts. Belt: Cast on 9 sts and knit garter st to desired length or until the belt measures approx. 120-130-140-150 cm [47.25"-51⅛"-55⅛"-59"]. Bind off. Assembly: Sew shoulder seams. Join the collar at center back with Kitchener stitch. Sew the collar to back neckline with seam on right side of work. Sew in sleeves. Sew sleeve and side seams using edge sts as a seam allowance. |
|
 |
|
Have you finished this pattern?Tag your pictures with #dropspattern or submit them to the #dropsfan gallery. Do you need help with this pattern?You'll find 22 tutorial videos, a Comments/Questions area and more by visiting the pattern on garnstudio.com. © 1982-2026 DROPS Design A/S. We reserve all rights. This document, including all its sub-sections, has copyrights. Read more about what you can do with our patterns at the bottom of each pattern on our site. |
|


With over 40 years in knitting and crochet design, DROPS Design offers one of the most extensive collections of free patterns on the internet - translated to 17 languages. As of today we count 325 catalogs and 12298 patterns - 12288 of which are translated into English (US/in).
We work hard to bring you the best knitting and crochet have to offer, inspiration and advice as well as great quality yarns at incredible prices! Would you like to use our patterns for other than personal use? You can read what you are allowed to do in the Copyright text at the bottom of all our patterns. Happy crafting!
Post a comment to pattern DROPS 69-8
We would love to hear what you have to say about this pattern!
If you want to leave a question, please make sure you select the correct category in the form below, to speed up the answering process. Required fields are marked *.