
Popular categories
Looking for a yarn?


Comments / Questions (77)
![]() Giulia wrote:
Giulia wrote:
Nell'ultima riga del dietro, dove viene detto di non lavorare le maglie per creare lo scollo, le maglie che vanno lavorate sono basse o alte doppie? In parole povere il dietro termina con una riga 1 o 2 del motivo?
17.02.2016 - 02:05DROPS Design answered:
Buongiorno Giulia. Il dietro finisce con una riga 2 del motivo, quindi con una riga a maglie alte doppie. Buon lavoro!
17.02.2016 - 09:07
![]() Jehanne wrote:
Jehanne wrote:
Voor de mensen die niet uit de sjaalkraag komen : ik heb onder een ander patroone van drops een filmpje gevonden waarop je het kunt zien: op youtube vinden door te zoeken op " how to knit an easy shawl collar" . Het is wel gebreid,maakt niet uit, principe van flap maken en die omvouwen is hetzelfde. for people who struggle with the collar shawl, i found a video of drops ,you can find it at youtube "how to knit an easy collar shawl"... success!!★
08.02.2016 - 21:18
![]() Elke Schill wrote:
Elke Schill wrote:
Hallo, Ich habe für das Modell 166-6 das Garn Andes bestellt, 700g. Nun habe ich die Sorge, dass es nicht reicht für Größe L??!! Liebe Grüße Elke
28.01.2016 - 08:49DROPS Design answered:
Sie müssen bei Alternativgarnen immer die Lauflänge zur Berechnung der benötigen Menge heranziehen. Cloud hat 80 m auf 50g, also sind 600 g Cloud = 960 M. Andes hat 96 m auf 100 g, also rechnen Sie 960 m durch 96 m = 10, d.h. 10 Knäuel = 1000 g Andes. Mit 700 g kommen Sie daher nicht hin, wenn Sie die Jacke nicht kürzer häkeln, was hier machbar wäre.
29.01.2016 - 10:46
![]() Rianne wrote:
Rianne wrote:
Antwoord aan Ellen: Ik heb de zijnaden alleen vastgezet ter hoogte van de vastentoeren, een steek aan de bovenkant en een steek aan de onderkant van die toer. Het is niet mooi als je de dubbele stokjes aan elkaar vastmaakt.
05.01.2016 - 16:54
![]() Ellen Van Cooten wrote:
Ellen Van Cooten wrote:
Kan iemand mij vertellen hoe je de zijnaden van patroon 166-6 in elkaar zet?
25.12.2015 - 13:18
![]() Olga wrote:
Olga wrote:
Habe die Jacke nun fertig und sie ist wunderschön und schnell zu häkeln! Auch die Wolle, sehr warm und kuschelig! Mir ist jedoch ein Fehler aufgefallen: beim linken Seitenteil, wenn die ersten M für den Ärmel zugenommen wurden werden diese erst mit festen M, dann Stäbchen, dann halbe Stäbchen und dann im Muster (DStb) übergehäkelt. Es müssen aber doch erst die halben, dann die ganzen St gehäkelt werden damit es größer wird oder liege ich da falsch?
02.12.2015 - 21:15DROPS Design answered:
Ja, Sie haben Recht, da steckt wohl ein Fehler, d.h. wie von Ihnen beschrieben müssen zuerst die fM gehäkelt werden, dann die halben Stb und dann die Stb, so passt es dann ja auch zum rechten Vorderteil. Ich leite das zur Korrektur an die Designerinnen weiter.
09.12.2015 - 21:23
![]() Mieke wrote:
Mieke wrote:
In het patroon staat voor de sjaalkraag haak op de verkeerde kant in de voorste lus van de steek en haak op de verkeerde kant in de achterste lus van de steek, moet ik hier door beide lussen haken?, of moet een van de twee de goed kant zijn? zo ja, welke?
23.11.2015 - 19:19DROPS Design answered:
Hoi Mieke. Je moet niet door beide lussen haken, je haakt door de voorste lus op de verkeerde kant en de achterste lus op de goede kant zoals er staat in het patroon.
02.12.2015 - 11:38
![]() Poinsot wrote:
Poinsot wrote:
Bonjour. Il me semble que ce modèle n'est pas en demi-brides mais en brides d'après la photo. Mais peut-être que je me trompe. Cordialement. Marthe Poinsot
05.09.2015 - 21:08DROPS Design answered:
Bonjour Mme Poinsot, cette veste se réalise en point texturé composé de doubles brides (DB) et de ms (mailles serrées) - voir également le lexique. Bon crochet!
07.09.2015 - 13:29
![]() Elyse Johnson wrote:
Elyse Johnson wrote:
Hi, I am quite new to crochet and I just had a question about what this means. It says "1 tr in each of the next 0-3-6-0-6-0 ch". Is that related to the size you are making? For example, I am making a L so does it mean 1 tr in each of the next 6 ch? Or does it mean something else? Thanks!
20.08.2015 - 20:51DROPS Design answered:
Dear Mrs Johnson, that's right, each number refers to the size, size L is third size, you will then crochet "1 tr in each of the next 6 ch". Happy crocheting!
21.08.2015 - 08:51
![]() Markéta Ž. wrote:
Markéta Ž. wrote:
Nádhera...už se těším na návod... Na první pohled jsem se zamilovala...:)
27.06.2015 - 17:47
|
|
Loch Ness#lochnessjacket |
|
 |
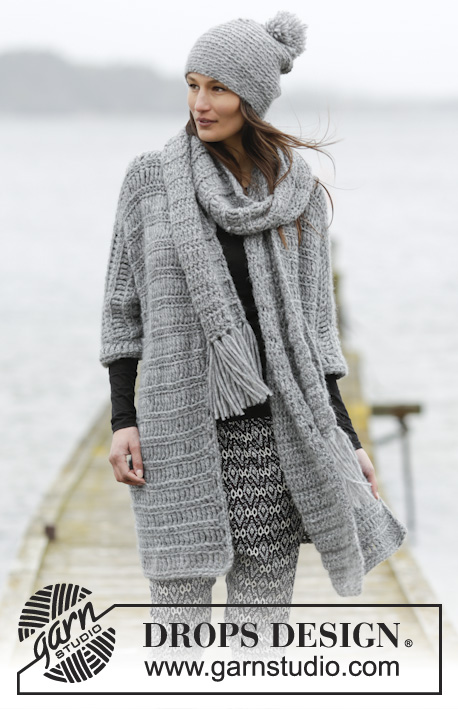 |
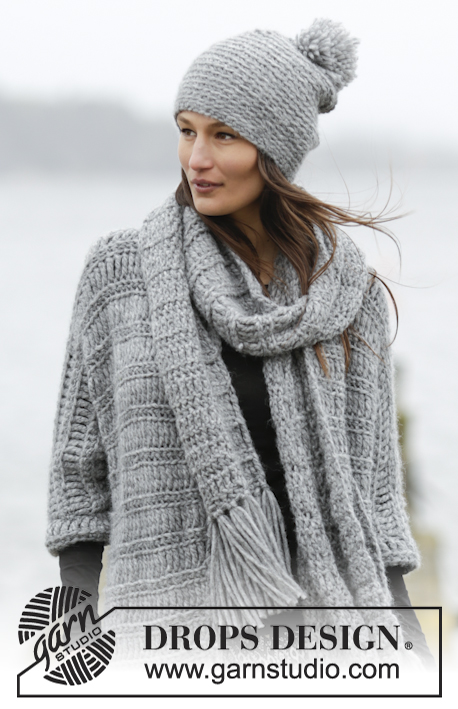
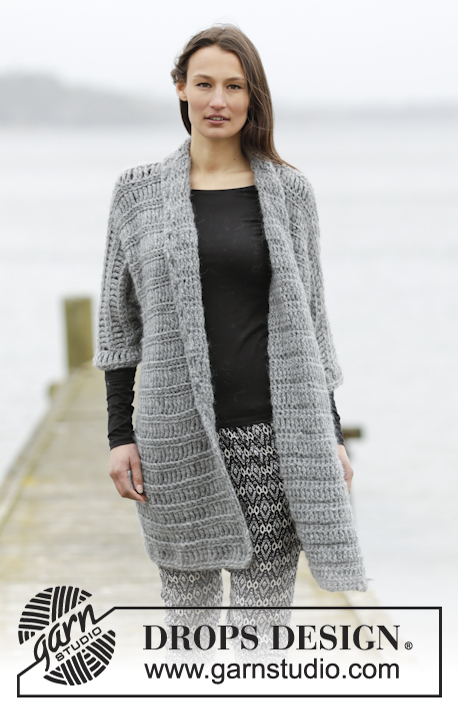
Crochet DROPS jacket with trebles and single crochet in 1 thread Cloud or 2 threads Air. Size: S - XXXL.
DROPS 166-6 |
|
|
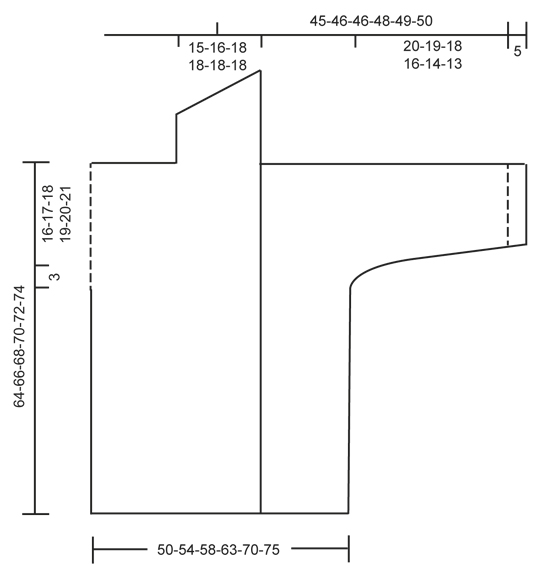
CROCHET INFO: At beg of every round/row with sc work 1 ch. Ch does not replace sc. At beg of every round/row with tr replace first tr with 4 ch. DECREASE TIP: Dec 1 sc by working 2 sc tog as follows: * Insert hook in next st, get yarn *, repeat from *-* one more time, make a YO and pull yarn through all 3 sts on hook = 1 sc dec. PATTERN: ROW 1 (= from WS): Work 1 sc in front loop of every st from previous row. ROW 2 (from RS): Work 1 tr in back loop of every st from previous row. Repeat 1st and 2nd row. ---------------------------------------------------------- JACKET: Worked back and forth in several pieces and sewn tog when finished. BACK PIECE: Work 49-52-55-60-66-71 ch on hook size 9 mm / M/13 with 1 thread Cloud or 2 threads Air . Then work as follows from RS: 1 tr in 5th ch from hook (= 2 tr), 1 tr in each of the next 0-3-6-0-6-0 ch, * skip ch 1, 1 tr in each of the next 10 ch *, repeat from *-* 3-3-3-4-4-5 more times = 42-45-48-52-58-62 tr - READ CROCHET INFO. Now work PATTERN - see explanation above, until finished measurements. REMEMBER THE CROCHET GAUGE! When piece measures 45-46-47-48-49-50 cm / 17¾"-18"-18½"-19"-19¼"-19¾" - adjust so that last row worked is 2nd row in pattern, insert a marker in the outermost st in each side of piece. Work 7-7-6-6-5-5 new ch at the end of row = 49-52-54-58-63-67 sts. Now work as follows: ROW 1 (= WS): Work 1st row in pattern over the 7-7-6-6-5-5 new ch, and continue over back piece, work 7-7-6-6-5-5 new ch at the end of row = 56-59-60-64-68-72 sts. ROW 2: (Remember Crochet info) Work 1 sc in each of the first 3-3-2-2-1-1 ch (4 ch remain before st with marker), work 1 hdc in each of the next ch 2, then 1 dc in each of the next 2 ch. Continue with 2nd row in pattern over back piece until next marker. Work 1 dc in each of the next 2 sc, then 1 hdc in each of the next 2 sc, 1 sc in each of the remaining 3-3-2-2-1-1 sc on row, work 4-4-4-3-3-2 new ch at the end of row = 60-63-64-67-71-74 sts. ROW 3: Work 1st row in pattern over all sts on back piece, work 4-4-4-3-3-2 new ch at the end of row = 64-67-68-70-74-76 sts. ROW 4: Work 1 sc in each of the first 7-7-6-5-4-3 sts (= 4 sts remain before st with marker), work 1 hdc in each of the next 2 sc, then 1 dc in each of the next 2 sc, continue with 2nd row in pattern over back piece until next marker, work 1 dc in each of the next 2 sc, then 1 hdc in each of the next 2 sc, 1 sc in each of the remaining 7-7-6-5-4-3 sc on row, work 5-4-4-4-3-3 new ch at the end of row = 69-71-72-74-77-79 sts. ROW 5: Work 1st row in pattern over all sts on back piece, work 5-4-4-4-3-3 new ch at the end of row = 74-75-76-78-80-82 sts on row. Continue with pattern as before (i.e. work tr from RS and sc from WS). When piece measures 62-64-66-68-70-72 cm / 24⅜"-25¼"-26"-26¾"-27½"-28⅜", adjust so that next row is 2nd row in pattern, work as follows: Work the first 31-31-31-32-33-34 sts. Cut the yarn. Skip the next 12-13-14-14-14-14 sc from previous row (= neck), work the remaining 31-31-31-32-33-34 sts. Cut the yarn. RIGHT FRONT PIECE: Work 41-43-45-47-51-53 ch (includes 4 ch to turn with) on hook size 9 mm / M/13 with Cloud. Then work as follows from RS: Work 1 tr in 5th ch from hook (= 2 tr), 1 tr in each of the next 3-5-7-9-2-4 ch, * skip ch 1, 1 tr in each of the next 10 ch *, repeat from *-* 2-2-2-2-3-3 more times = 35-37-39-41-44-46 tr. Continue with pattern as on back piece until piece measures 45-46-47-48-49-50 cm / 17¾"-18"-18½"-19"-19¼"-19¾", adjust according to back piece and so that last row is 2nd row in pattern. Insert a marker in last st seen from RS, work 7-7-6-6-5-5 new ch at the end of row = 42-44-45-47-49-51 sts. ROW 1 (= WS): Continue with 1st row in pattern over the 7-7-6-6-5-5 new ch, then continue over the remaining sts. ROW 2: Work 2nd row in pattern to st with marker, 1 dc in each of the next ch 2, then 1 hdc in each of the next ch 2, 1 sc in each of the remaining 3-3-2-2-1-1 ch on row, work 4-4-4-3-3-2 new ch at the end of row = 46-48-49-50-52-53 sts. ROW 3: Work 1st row in pattern over all sts. ROW 4: Work 2nd row in pattern over all sts to st with marker, 1 dc in each of the next 2 sc, then 1 hdc in each of the next 2 sc, 1 sc in each of the remaining 7-7-6-5-4-3 sc, work 5-4-4-4-3-3 new ch at the end of row = 51-52-53-54-55-56 sts. ROW 5: Work 1st row in pattern over all sts on row. Continue with pattern over all sts until piece measures 64-66-68-70-72-74 cm / 25¼"-26"-26¾"-27½"-28⅜"-29⅛", adjust so that last row is 2nd row in pattern. Cut the yarn. SHAWL COLLAR: Then work shawl collar in sc over the outermost 20-21-22-22-22-22 sts towards mid front on jacket. NOTE: Work in front loop of sts from WS and back loop of sts from RS. Beg from WS. Work 1 sl st in 20th-21st-22nd-22nd-22nd-22nd tr from mid front, ch 1, 1 sc in same st, 1 sc in each of the remaining sts on row, * turn and work 1 sc in each of the first 10-10-11-11-11-11 sc, turn and work back, turn and work over all the 20-21-22-22-22-22 sc, turn and work back *, repeat from *-* until shawl collar measures 8-8-9-9-9-9 cm / 3"-3"-3½"-3½"-3½"-3½" along the shortest side. Cut the yarn. LEFT FRONT PIECE: Work as right front piece but reversed. I.e. when piece measures 45-46-47-48-49-50 cm / 17¾"-18"-18½"-19"-19¼"-19¾", adjust according to right front piece and so that last row is 2nd row in pattern. ROW 1: Turn piece and work 1st row in pattern over all sts, insert a marker in last st on row (seen from WS), work 7-7-6-6-5-5 new ch. ROW 2: Work 1 sc in each of the first 3-3-2-2-1-1 ch (4 sc remain before st with marker), work 1 dc in each of the next ch 2, 1 hdc in each of the next ch 2, continue with 2nd row in pattern over the remaining sts. Then continue inc for sleeve on every row from WS the same way as on right front piece. Adjust according to right front piece, and work shawl collar reversed, i.e. beg from RS. ASSEMBLY: Sew shoulder seams, sew underarm seams and side seams in one inside 1 tr/sc but leave 20 cm / 8" for vent in each side. Make sure that to avoid a tight seam. Sew the 2 shawl collars tog mid back and sew it to the neck. EDGE AT THE BOTTOM OF JACKET: Beg in first st (seen from RS) on back piece and work as follows: Fasten yarn with 1 sl st, work 1 sc in every dc, cut the yarn. Then work one more row with sc from RS but now work in back loop of st. Repeat on both front pieces. EDGE ALONG BAND: Fasten yarn with 1 sl st in the corner at the bottom of right band and work as follows from RS: Work ch 2, skip until first sc-row and work (1 dc, 1 hdc, ch 1, 1 hdc, 1 dc) around sc-row, ch 1, * skip until next sc-row and work (1 dc, 1 hdc, ch 1, 1 hdc, 1 dc) around next sc-row *, repeat from *-* around the entire band and collar but when working collar, skip approx. 4 cm / 1½" before working a new dc-group. I.e. there are approx. 10 dc-groups over collar. CUFF/SLEEVE EDGE: ROUND 1: Fasten yarn with 1 sl st in sleeve seam and work 4 ch (= 1 tr), work 30 tr around sleeve opening (i.e. approx. 1 tr around every sc-row and 3 tr around every row with tr). Finish round with 1 sl st in 4th ch at beg of round. ROUND 2: Work ch 1, continue with 1 sc in every tr. NOTE: Work in back loop of dc below. Fasten off. Repeat around the other sleeve. ---------------------------------------------------------- Hat and scarf: See DROPS 166-07 or "Related patterns" in pattern on website. ---------------------------------------------------------- |
|
 |
|
Have you finished this pattern?Tag your pictures with #dropspattern #lochnessjacket or submit them to the #dropsfan gallery. Do you need help with this pattern?You'll find 12 tutorial videos, a Comments/Questions area and more by visiting the pattern on garnstudio.com. © 1982-2026 DROPS Design A/S. We reserve all rights. This document, including all its sub-sections, has copyrights. Read more about what you can do with our patterns at the bottom of each pattern on our site. |
|


With over 40 years in knitting and crochet design, DROPS Design offers one of the most extensive collections of free patterns on the internet - translated to 17 languages. As of today we count 325 catalogs and 12298 patterns - 12288 of which are translated into English (US/in).
We work hard to bring you the best knitting and crochet have to offer, inspiration and advice as well as great quality yarns at incredible prices! Would you like to use our patterns for other than personal use? You can read what you are allowed to do in the Copyright text at the bottom of all our patterns. Happy crafting!
Post a comment to pattern DROPS 166-6
We would love to hear what you have to say about this pattern!
If you want to leave a question, please make sure you select the correct category in the form below, to speed up the answering process. Required fields are marked *.