
Popular categories
Looking for a yarn?


|
|
Loch Ness |
|
 |
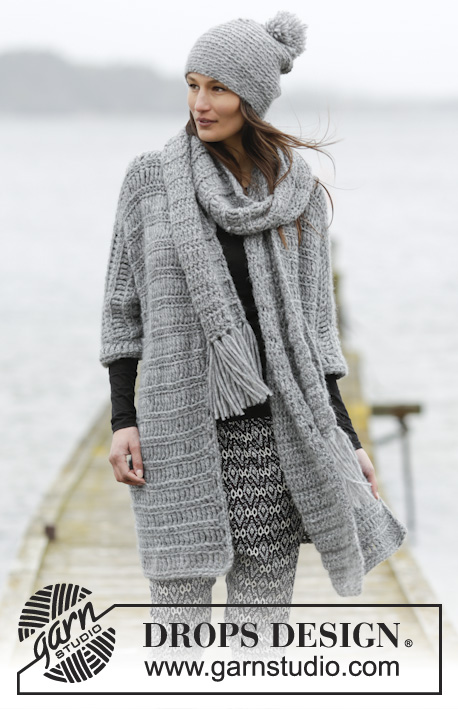 |
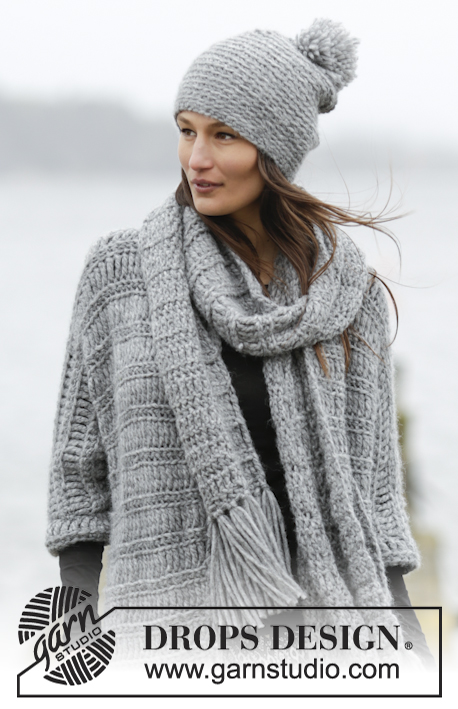
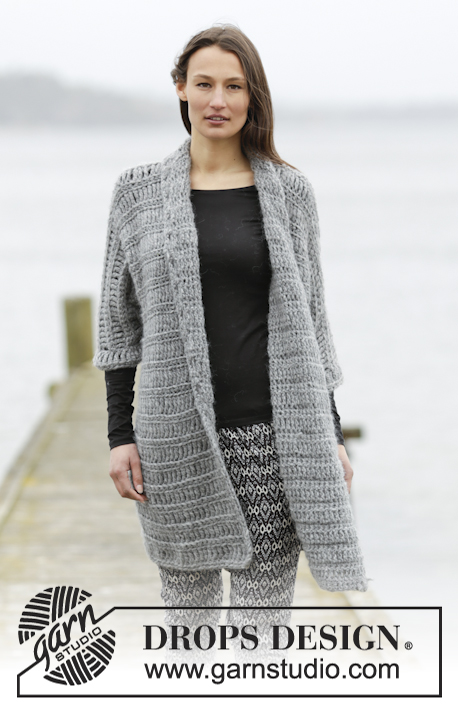
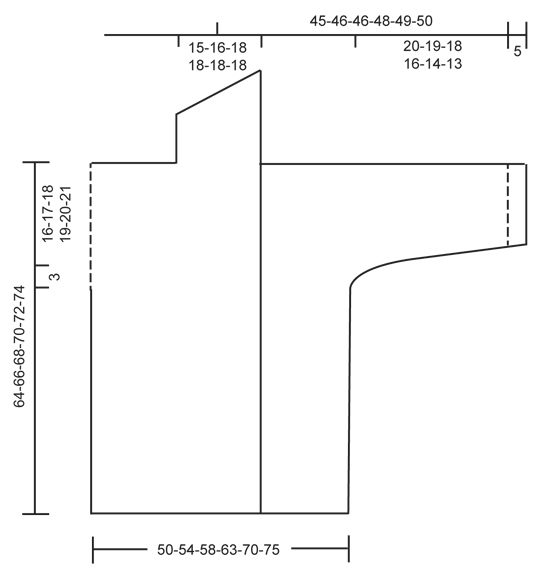
Crochet DROPS jacket with trebles and single crochet in 1 thread Cloud or 2 threads Air. Size: S - XXXL.
DROPS 166-6 |
|
|
CROCHET INFO: At beg of every round/row with sc work 1 ch. Ch does not replace sc. At beg of every round/row with tr replace first tr with 4 ch. DECREASE TIP: Dec 1 sc by working 2 sc tog as follows: * Insert hook in next st, get yarn *, repeat from *-* one more time, make a YO and pull yarn through all 3 sts on hook = 1 sc dec. PATTERN: ROW 1 (= from WS): Work 1 sc in front loop of every st from previous row. ROW 2 (from RS): Work 1 tr in back loop of every st from previous row. Repeat 1st and 2nd row. ---------------------------------------------------------- JACKET: Worked back and forth in several pieces and sewn tog when finished. BACK PIECE: Work 49-52-55-60-66-71 ch on hook size 9 mm / M/13 with 1 thread Cloud or 2 threads Air . Then work as follows from RS: 1 tr in 5th ch from hook (= 2 tr), 1 tr in each of the next 0-3-6-0-6-0 ch, * skip ch 1, 1 tr in each of the next 10 ch *, repeat from *-* 3-3-3-4-4-5 more times = 42-45-48-52-58-62 tr - READ CROCHET INFO. Now work PATTERN - see explanation above, until finished measurements. REMEMBER THE CROCHET GAUGE! When piece measures 45-46-47-48-49-50 cm / 17¾"-18"-18½"-19"-19¼"-19¾" - adjust so that last row worked is 2nd row in pattern, insert a marker in the outermost st in each side of piece. Work 7-7-6-6-5-5 new ch at the end of row = 49-52-54-58-63-67 sts. Now work as follows: ROW 1 (= WS): Work 1st row in pattern over the 7-7-6-6-5-5 new ch, and continue over back piece, work 7-7-6-6-5-5 new ch at the end of row = 56-59-60-64-68-72 sts. ROW 2: (Remember Crochet info) Work 1 sc in each of the first 3-3-2-2-1-1 ch (4 ch remain before st with marker), work 1 hdc in each of the next ch 2, then 1 dc in each of the next 2 ch. Continue with 2nd row in pattern over back piece until next marker. Work 1 dc in each of the next 2 sc, then 1 hdc in each of the next 2 sc, 1 sc in each of the remaining 3-3-2-2-1-1 sc on row, work 4-4-4-3-3-2 new ch at the end of row = 60-63-64-67-71-74 sts. ROW 3: Work 1st row in pattern over all sts on back piece, work 4-4-4-3-3-2 new ch at the end of row = 64-67-68-70-74-76 sts. ROW 4: Work 1 sc in each of the first 7-7-6-5-4-3 sts (= 4 sts remain before st with marker), work 1 hdc in each of the next 2 sc, then 1 dc in each of the next 2 sc, continue with 2nd row in pattern over back piece until next marker, work 1 dc in each of the next 2 sc, then 1 hdc in each of the next 2 sc, 1 sc in each of the remaining 7-7-6-5-4-3 sc on row, work 5-4-4-4-3-3 new ch at the end of row = 69-71-72-74-77-79 sts. ROW 5: Work 1st row in pattern over all sts on back piece, work 5-4-4-4-3-3 new ch at the end of row = 74-75-76-78-80-82 sts on row. Continue with pattern as before (i.e. work tr from RS and sc from WS). When piece measures 62-64-66-68-70-72 cm / 24⅜"-25¼"-26"-26¾"-27½"-28⅜", adjust so that next row is 2nd row in pattern, work as follows: Work the first 31-31-31-32-33-34 sts. Cut the yarn. Skip the next 12-13-14-14-14-14 sc from previous row (= neck), work the remaining 31-31-31-32-33-34 sts. Cut the yarn. RIGHT FRONT PIECE: Work 41-43-45-47-51-53 ch (includes 4 ch to turn with) on hook size 9 mm / M/13 with Cloud. Then work as follows from RS: Work 1 tr in 5th ch from hook (= 2 tr), 1 tr in each of the next 3-5-7-9-2-4 ch, * skip ch 1, 1 tr in each of the next 10 ch *, repeat from *-* 2-2-2-2-3-3 more times = 35-37-39-41-44-46 tr. Continue with pattern as on back piece until piece measures 45-46-47-48-49-50 cm / 17¾"-18"-18½"-19"-19¼"-19¾", adjust according to back piece and so that last row is 2nd row in pattern. Insert a marker in last st seen from RS, work 7-7-6-6-5-5 new ch at the end of row = 42-44-45-47-49-51 sts. ROW 1 (= WS): Continue with 1st row in pattern over the 7-7-6-6-5-5 new ch, then continue over the remaining sts. ROW 2: Work 2nd row in pattern to st with marker, 1 dc in each of the next ch 2, then 1 hdc in each of the next ch 2, 1 sc in each of the remaining 3-3-2-2-1-1 ch on row, work 4-4-4-3-3-2 new ch at the end of row = 46-48-49-50-52-53 sts. ROW 3: Work 1st row in pattern over all sts. ROW 4: Work 2nd row in pattern over all sts to st with marker, 1 dc in each of the next 2 sc, then 1 hdc in each of the next 2 sc, 1 sc in each of the remaining 7-7-6-5-4-3 sc, work 5-5-4-4-4-3-3 new ch at the end of row = 51-52-53-54-55-56 sts. ROW 5: Work 1st row in pattern over all sts on row. Continue with pattern over all sts until piece measures 64-66-68-70-72-74 cm / 25¼"-26"-26¾"-27½"-28⅜"-29⅛", adjust so that last row is 2nd row in pattern. Cut the yarn. SHAWL COLLAR: Then work shawl collar in sc over the outermost 20-21-22-22-22-22 sts towards mid front on jacket. NOTE: Work in front loop of sts from WS and back loop of sts from RS. Beg from WS. Work 1 sl st in 20th-21st-22nd-22nd-22nd-22nd tr from mid front, ch 1, 1 sc in same st, 1 sc in each of the remaining sts on row, * turn and work 1 sc in each of the first 10-10-11-11-11-11 sc, turn and work back, turn and work over all the 20-21-22-22-22-22 sc, turn and work back *, repeat from *-* until shawl collar measures 8-8-9-9-9-9 cm / 3"-3"-3½"-3½"-3½"-3½" along the shortest side. Cut the yarn. LEFT FRONT PIECE: Work as right front piece but reversed. I.e. when piece measures 45-46-47-48-49-50 cm / 17¾"-18"-18½"-19"-19¼"-19¾", adjust according to right front piece and so that last row is 2nd row in pattern. ROW 1: Turn piece and work 1st row in pattern over all sts, insert a marker in last st on row (seen from WS), work 7-7-6-6-5-5 new ch. ROW 2: Work 1 sc in each of the first 3-3-2-2-1-1 ch (4 sc remain before st with marker), work 1 dc in each of the next ch 2, 1 hdc in each of the next ch 2, continue with 2nd row in pattern over the remaining sts. Then continue inc for sleeve on every row from WS the same way as on right front piece. Adjust according to right front piece, and work shawl collar reversed, i.e. beg from RS. ASSEMBLY: Sew shoulder seams, sew underarm seams and side seams in one inside 1 tr/sc but leave 20 cm / 8" for vent in each side. Make sure that to avoid a tight seam. Sew the 2 shawl collars tog mid back and sew it to the neck. EDGE AT THE BOTTOM OF JACKET: Beg in first st (seen from RS) on back piece and work as follows: Fasten yarn with 1 sl st, work 1 sc in every dc, cut the yarn. Then work one more row with sc from RS but now work in back loop of st. Repeat on both front pieces. EDGE ALONG BAND: Fasten yarn with 1 sl st in the corner at the bottom of right band and work as follows from RS: Work ch 2, skip until first sc-row and work (1 dc, 1 hdc, ch 1, 1 hdc, 1 dc) around sc-row, ch 1, * skip until next sc-row and work (1 dc, 1 hdc, ch 1, 1 hdc, 1 dc) around next sc-row *, repeat from *-* around the entire band and collar but when working collar, skip approx. 4 cm / 1½" before working a new dc-group. I.e. there are approx. 10 dc-groups over collar. CUFF/SLEEVE EDGE: ROUND 1: Fasten yarn with 1 sl st in sleeve seam and work 4 ch (= 1 tr), work 30 tr around sleeve opening (i.e. approx. 1 tr around every sc-row and 3 tr around every row with tr). Finish round with 1 sl st in 4th ch at beg of round. ROUND 2: Work ch 1, continue with 1 sc in every tr. NOTE: Work in back loop of dc below. Fasten off. Repeat around the other sleeve. ---------------------------------------------------------- Hat and scarf: See DROPS 166-07 or "Related patterns" in pattern on website. ---------------------------------------------------------- |
|
|
|
|
Have you made this or any other of our designs? Tag your pictures in social media with #dropsdesign so we can see them! Do you need help with this pattern?You'll find tutorial videos, a Comments/Questions area and more by visiting the pattern on garnstudio.com. © 1982-2024 DROPS Design A/S. We reserve all rights. This document, including all its sub-sections, has copyrights. Read more about what you can do with our patterns at the bottom of each pattern on our site. |
|


With over 40 years in knitting and crochet design, DROPS Design offers one of the most extensive collections of free patterns on the internet - translated to 17 languages. As of today we count 304 catalogs and 11422 patterns - 11417 of which are translated into English (US/in).
We work hard to bring you the best knitting and crochet have to offer, inspiration and advice as well as great quality yarns at incredible prices! Would you like to use our patterns for other than personal use? You can read what you are allowed to do in the Copyright text at the bottom of all our patterns. Happy crafting!
Comments / Questions (80)
Hallo, hoeveel bolletjes heb je nodig om dit vest te maken en van hoeveel gram? Ik zie het namelijk nergens staan. Alvast bedankt!
04.10.2017 - 12:07DROPS Design answered:
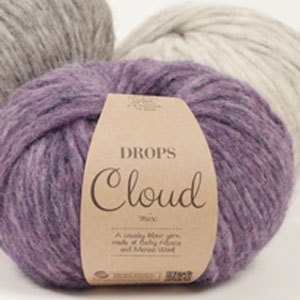
Hallo Bregit, Dit staat helemaal bovenaan het patroon bij 'materiaal': DROPS CLOUD van Garnstudio 500-550-600-650-750-800 gr. kleur nr. 04, grijs
07.10.2017 - 17:13Bij het achterpand staat als je gevorderd bent tot 60 steken voor maat L en begint bij toer 2: "denk om informatie voor het haken", haak 1 v in elke van de volgende ...... Moet ik nu toch eerst 4 lossen haken en daarna met de vasten beginnen?
07.09.2017 - 14:33DROPS Design answered:
Hallo Nicole, Bij informatie voor het haken staat in de tweede regel Vervang aan het begin van elke dstk-toer het eerste dstk door 4 l. Omdat je een toer van dubbele stokjes aan het haken bent, vervang je dus nu het eerste dubbele stokje door 4 lossen.
08.09.2017 - 11:24Hej med jer jeg er ved at hækle nr 166-6 men kan ikke rigtig se, om den er lige lang hele vejen rundt eller om ryggen er kortere og forstykket længere
09.06.2017 - 10:18DROPS Design answered:
Hei Ann-Louise. På denne modellene er forstykket og bakstykket like lange. Se evnt. nederst på siden, der finner du målskissen /mål for lengden på de ulike størrelsene. God Fornøyelse!
09.06.2017 - 11:14Mange tak for jeres svar. det skal nok blive en god trøje alligevel. :-)
04.06.2017 - 15:40Passer målene efter maskeantallet for jeg synes det bliver lidt løst og meget elastisk, bruger godt nok garn fra Easy care big, men fik af vide at det kunne man sagtens bruge. Hækler på pind 8. jeg bruger normalt tøj i str s/m men er målene over øverst på ryggen pg så bliver den bredere jo længere man kommer ned el er detfor og bagstykke der gør den breddere, håber spørgsmålene giver mening
26.05.2017 - 09:25DROPS Design answered:
Hei Ann-Louise. Garnet Easy Care Big er ikke i vårt sortiment og det kjenner jeg ikke til. Det garnet vi har brukt, DROPS Cloud er ikke elastisk og passer fint med målene som er oppgitt i denne oppskriften. Har din butikk anbefalt deg å bruke et annet garn, ville jeg ha kontakten butikken der du har kjøpt garnet og snakket med dem.
29.05.2017 - 08:39Hallo, ich verstehe die Beschreibung für den Schalkragen nicht. In der Skizze verläuft dieser mit Schrägung zu, in der Beschreibung soll man immer 22 M häkeln. Dann heißt es wieder in der Beschreibung etwas von 11 fm häkeln. Dieser Bereich der Beschreibung ist wirklich schwer verständlich und verwirrend
24.03.2017 - 08:16DROPS Design answered:
Liebe Isabella, Sie werden jetzt verkürzten Reihen über die 22 M häkeln: *1 R über die ersten 11 M, wenden und diese 11 M zurückhäkeln, dann 2 R über die 22 M *, diese 4 R wiederholen, so gibt es mehr R über die ersten 11 M und weniger über die letzten M des Kragens. Viel Spaß beim häkeln!
24.03.2017 - 09:05Au secours, j'aimerais vraiment faire ce gilet. Mais je compte déjà rien au xplication pour le dos😕😕
14.01.2017 - 22:03DROPS Design answered:
Bonjour Mme Schweger, vous pouvez poser votre question précise ici, ou bien pour toute assistance personnalisée, merci de bien vouloir contacter le magasin où vous avez acheté votre laine. Bon tricot!
16.01.2017 - 09:36Buonasera, sono sempre io! Volevo sapere cosa significa "1 m.b nel filo anteriore di ogni m della riga precedente" cosa si intende per "filo anteriore"? La colonnina? Grazie :-)
07.12.2016 - 16:39DROPS Design answered:
Buonasera Paola, ogni maglia è composta da due fili, in questo caso deve lavorare solo nel filo davanti. Buon lavoro!
07.12.2016 - 17:50Ik kom niet uit de sjaalkraag. Er staat : haak in de voorste lus v.d st aan de verkeerde kant en de achterste lus v.d st aan de verkeerde kant. Moet niet een v.d twee ' voorste' zijn?
27.11.2016 - 15:22DROPS Design answered:
Hoi Gerry. Ik zie wat je bedoelt. Je haakt in de voorste lus aan de de verkeerde kant en in de achterste lus aan de goede kant. Ik zal het aanpassen. Bedankt.
28.11.2016 - 16:57Buonasera! Se volessi realizzare solo la giacca, quanti grammi occorrerebbero? Grazie :-)
05.11.2016 - 15:49DROPS Design answered:
Buonasera Paola, le quantità di filato indicate si riferiscono solo alla giacca: il cappello e la sciarpa fanno parte del modello 166-7. Buon lavoro!
05.11.2016 - 18:22