
Popular categories
Looking for a yarn?


Comments / Questions (77)
![]() Ingeborg wrote:
Ingeborg wrote:
Vergeet mijn vraag, na acht keer lezen begrijp ik dat dit alleen voor de eerste tour dubbele stokjes geldt.
16.10.2016 - 23:10
![]() Ingeborg wrote:
Ingeborg wrote:
Ik snap het patroon niet, hoe simpel het ook is. Als ik na elk 10e dubbel stokje een steek moet overslaan, zonder dat ik een losse moet haken, dan minder ik toch? Dat lijkt me niet de bedoeling als je net een paar cm onderweg bent.
16.10.2016 - 23:05DROPS Design answered:
Hoi Ingeborg. Dit is alleen in de eerste toer. Je slaat 1 l over tussen de 10 dstk om een meer elastisch rand te krijgen en hebt na deze toer: 42-45-48-52-58-62 dbl-stk op de toer.
17.10.2016 - 16:38
![]() Flandin-Garcia wrote:
Flandin-Garcia wrote:
Bonjour, je ne comprends pas les explications pour faire le col châle. Je ne sais pas où commencer. Je ne comprends pas les explications fournies. Pouvez vous m'aider ? En vous remerciant.
01.10.2016 - 13:07DROPS Design answered:
Bonjour Mme Flandin Garcia, le col châle se crochète sur les 20-22 m côté encolure (pas côté épaule), pour celui du devant droit, commencez sur l'envers et crochetez 1 rang de ms sur ces mailles, et continuez en rangs raccourcis ainsi: *10-11 ms (sur l'end), tournez, 10-11 ms (sur l'env) tournez, 2 rangs de ms sur les 20-21-22 m* répétez ces 4 rangs jusqu'à la hauteur indiquée. Bon crochet!
03.10.2016 - 09:08
![]() Monique Liebrechts wrote:
Monique Liebrechts wrote:
Als ik het patroon volg voor het achterpand dan komen daar zeg maar "gaten" waar ik een losse en dus een dstk over sla. Dit zie ik op de foto echter niet bij de voorpanden terug komen. Hoort het dan wel zo? Tevens klopt dan niet 0-3-6-0-6-0 l.... Hoe kan je een dstk maken in elke van de vlgd 0 lossen? (Ik Maak de xl) het moet voor xl in elk geval 6 zijn om aan de 52 steken te komen. Dus als ik het goed begrijp zitten er "gaten" op de rug maar niet aan de voorkant.
21.08.2016 - 01:53DROPS Design answered:
Hoi Monique. Dat zal zich rechttrekken als je verder bent en na 1x wassen van het vest. Bij de 0 maak je dus geen dstk voordat je verder gaat met de verdere beschrijving.
25.08.2016 - 15:43
![]() Christine Descoteaux wrote:
Christine Descoteaux wrote:
What is the yarn weight of the Drop Clouds I do not see it much here and will need to get an alternative here in the US. Also what are the bust sizes of the S-M-L-XXl-XXXL I am not sure what size to make Medium or Large. thanks you. Christine
31.03.2016 - 16:49DROPS Design answered:
Dear Mrs Descoteaux, read more about our yarn here - and about the size here - You will find the list of all DROPS retailers in/shipping to USA. Happy knitting!
31.03.2016 - 17:51
![]() Bernadet wrote:
Bernadet wrote:
Super bedankt voor je tip Jehanne! Het is voor het eerst dat ik een vest haak: en ik snapte al helemaal niets van die sjaalkraag! Nu wel!
25.03.2016 - 18:35
![]() Lenette Nielsen wrote:
Lenette Nielsen wrote:
Er det rigtigt at hæklefastheden er i stangmasker, når mønstret er i dobbelstangmasker? Håber på hurtigt svar så jeg kan komme igang med den lækre trøje :-)
16.03.2016 - 12:18DROPS Design answered:
Hej Lenette, Ja det stemmer og mønsteret består af fm og dbl-st. God fornøjelse!
16.03.2016 - 15:32
![]() N.. Majors wrote:
N.. Majors wrote:
Adding sts at end I understand, but in doing this for pattern166-6 what part of the jacket is this? It looks like a stair.???
26.02.2016 - 07:41DROPS Design answered:
Dear Mrs Majors, the sts cast on at the end of rows are for sleeve, working with several kind of sts (sc, hd, dc) will help these to get a smooth inc that will be then hidden with the seam under arm. Happy crocheting!
26.02.2016 - 10:59
![]() Bernadet wrote:
Bernadet wrote:
Hallo, 8 stk x 4,5 toeren = 10 x 10 cm.: wat is dit volledig uitgeschreven? Ik vraag me af: moet ik halve stokjes maken voor een halve toer??
20.02.2016 - 23:14DROPS Design answered:
Hoi Bernadet. Nee, 8 stokjes en 4,5 toer is 10 x 10 cm, dus je haakt 5 toeren en meet de 10 cm halverwege tussen toer 4 en 5.
22.02.2016 - 14:10
![]() Giulia wrote:
Giulia wrote:
Siccome non si capisce tanto bene la spiegazione, su quali maglie devo iniziare a lavorare il collo a scialle? Non capisco su quale maglia devo agganciarmi
17.02.2016 - 12:51DROPS Design answered:
Buongiorno Giulia, deve iniziare a lavorare il collo nella 20°-21°-22°-22°-22°-22 m dal centro davanti come indicato nelle spiegazioni. Provi a leggere la risposta al commento di Alice dell'11.12.2015, magari la può aiutare ulteriormente. Buon lavoro!
17.02.2016 - 14:57
|
|
Loch Ness#lochnessjacket |
|
 |
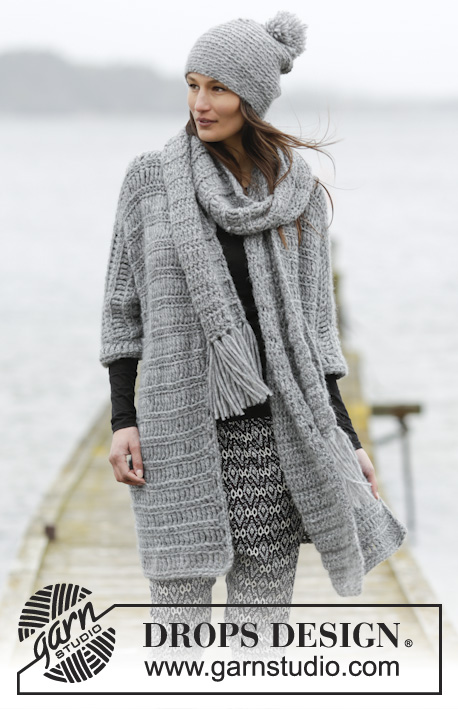 |
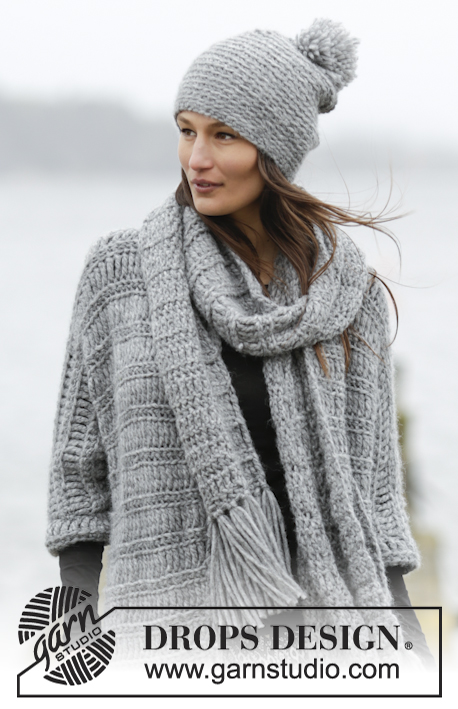
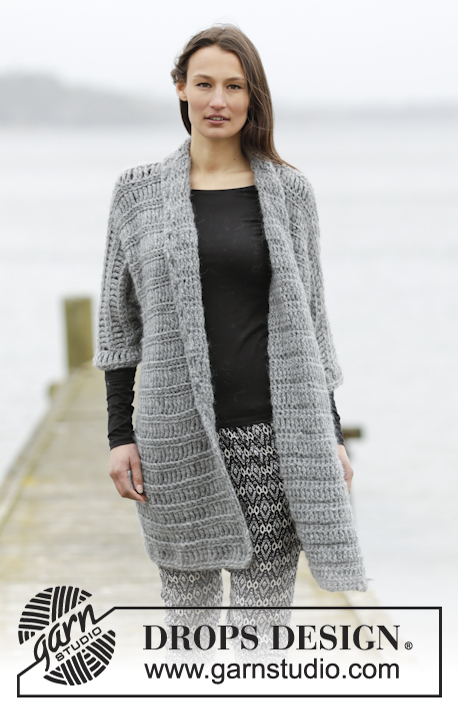
Crochet DROPS jacket with trebles and single crochet in 1 thread Cloud or 2 threads Air. Size: S - XXXL.
DROPS 166-6 |
|
|
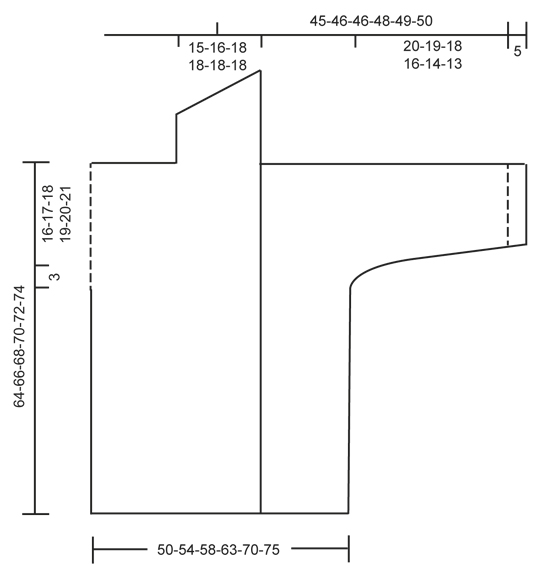
CROCHET INFO: At beg of every round/row with sc work 1 ch. Ch does not replace sc. At beg of every round/row with tr replace first tr with 4 ch. DECREASE TIP: Dec 1 sc by working 2 sc tog as follows: * Insert hook in next st, get yarn *, repeat from *-* one more time, make a YO and pull yarn through all 3 sts on hook = 1 sc dec. PATTERN: ROW 1 (= from WS): Work 1 sc in front loop of every st from previous row. ROW 2 (from RS): Work 1 tr in back loop of every st from previous row. Repeat 1st and 2nd row. ---------------------------------------------------------- JACKET: Worked back and forth in several pieces and sewn tog when finished. BACK PIECE: Work 49-52-55-60-66-71 ch on hook size 9 mm / M/13 with 1 thread Cloud or 2 threads Air . Then work as follows from RS: 1 tr in 5th ch from hook (= 2 tr), 1 tr in each of the next 0-3-6-0-6-0 ch, * skip ch 1, 1 tr in each of the next 10 ch *, repeat from *-* 3-3-3-4-4-5 more times = 42-45-48-52-58-62 tr - READ CROCHET INFO. Now work PATTERN - see explanation above, until finished measurements. REMEMBER THE CROCHET GAUGE! When piece measures 45-46-47-48-49-50 cm / 17¾"-18"-18½"-19"-19¼"-19¾" - adjust so that last row worked is 2nd row in pattern, insert a marker in the outermost st in each side of piece. Work 7-7-6-6-5-5 new ch at the end of row = 49-52-54-58-63-67 sts. Now work as follows: ROW 1 (= WS): Work 1st row in pattern over the 7-7-6-6-5-5 new ch, and continue over back piece, work 7-7-6-6-5-5 new ch at the end of row = 56-59-60-64-68-72 sts. ROW 2: (Remember Crochet info) Work 1 sc in each of the first 3-3-2-2-1-1 ch (4 ch remain before st with marker), work 1 hdc in each of the next ch 2, then 1 dc in each of the next 2 ch. Continue with 2nd row in pattern over back piece until next marker. Work 1 dc in each of the next 2 sc, then 1 hdc in each of the next 2 sc, 1 sc in each of the remaining 3-3-2-2-1-1 sc on row, work 4-4-4-3-3-2 new ch at the end of row = 60-63-64-67-71-74 sts. ROW 3: Work 1st row in pattern over all sts on back piece, work 4-4-4-3-3-2 new ch at the end of row = 64-67-68-70-74-76 sts. ROW 4: Work 1 sc in each of the first 7-7-6-5-4-3 sts (= 4 sts remain before st with marker), work 1 hdc in each of the next 2 sc, then 1 dc in each of the next 2 sc, continue with 2nd row in pattern over back piece until next marker, work 1 dc in each of the next 2 sc, then 1 hdc in each of the next 2 sc, 1 sc in each of the remaining 7-7-6-5-4-3 sc on row, work 5-4-4-4-3-3 new ch at the end of row = 69-71-72-74-77-79 sts. ROW 5: Work 1st row in pattern over all sts on back piece, work 5-4-4-4-3-3 new ch at the end of row = 74-75-76-78-80-82 sts on row. Continue with pattern as before (i.e. work tr from RS and sc from WS). When piece measures 62-64-66-68-70-72 cm / 24⅜"-25¼"-26"-26¾"-27½"-28⅜", adjust so that next row is 2nd row in pattern, work as follows: Work the first 31-31-31-32-33-34 sts. Cut the yarn. Skip the next 12-13-14-14-14-14 sc from previous row (= neck), work the remaining 31-31-31-32-33-34 sts. Cut the yarn. RIGHT FRONT PIECE: Work 41-43-45-47-51-53 ch (includes 4 ch to turn with) on hook size 9 mm / M/13 with Cloud. Then work as follows from RS: Work 1 tr in 5th ch from hook (= 2 tr), 1 tr in each of the next 3-5-7-9-2-4 ch, * skip ch 1, 1 tr in each of the next 10 ch *, repeat from *-* 2-2-2-2-3-3 more times = 35-37-39-41-44-46 tr. Continue with pattern as on back piece until piece measures 45-46-47-48-49-50 cm / 17¾"-18"-18½"-19"-19¼"-19¾", adjust according to back piece and so that last row is 2nd row in pattern. Insert a marker in last st seen from RS, work 7-7-6-6-5-5 new ch at the end of row = 42-44-45-47-49-51 sts. ROW 1 (= WS): Continue with 1st row in pattern over the 7-7-6-6-5-5 new ch, then continue over the remaining sts. ROW 2: Work 2nd row in pattern to st with marker, 1 dc in each of the next ch 2, then 1 hdc in each of the next ch 2, 1 sc in each of the remaining 3-3-2-2-1-1 ch on row, work 4-4-4-3-3-2 new ch at the end of row = 46-48-49-50-52-53 sts. ROW 3: Work 1st row in pattern over all sts. ROW 4: Work 2nd row in pattern over all sts to st with marker, 1 dc in each of the next 2 sc, then 1 hdc in each of the next 2 sc, 1 sc in each of the remaining 7-7-6-5-4-3 sc, work 5-4-4-4-3-3 new ch at the end of row = 51-52-53-54-55-56 sts. ROW 5: Work 1st row in pattern over all sts on row. Continue with pattern over all sts until piece measures 64-66-68-70-72-74 cm / 25¼"-26"-26¾"-27½"-28⅜"-29⅛", adjust so that last row is 2nd row in pattern. Cut the yarn. SHAWL COLLAR: Then work shawl collar in sc over the outermost 20-21-22-22-22-22 sts towards mid front on jacket. NOTE: Work in front loop of sts from WS and back loop of sts from RS. Beg from WS. Work 1 sl st in 20th-21st-22nd-22nd-22nd-22nd tr from mid front, ch 1, 1 sc in same st, 1 sc in each of the remaining sts on row, * turn and work 1 sc in each of the first 10-10-11-11-11-11 sc, turn and work back, turn and work over all the 20-21-22-22-22-22 sc, turn and work back *, repeat from *-* until shawl collar measures 8-8-9-9-9-9 cm / 3"-3"-3½"-3½"-3½"-3½" along the shortest side. Cut the yarn. LEFT FRONT PIECE: Work as right front piece but reversed. I.e. when piece measures 45-46-47-48-49-50 cm / 17¾"-18"-18½"-19"-19¼"-19¾", adjust according to right front piece and so that last row is 2nd row in pattern. ROW 1: Turn piece and work 1st row in pattern over all sts, insert a marker in last st on row (seen from WS), work 7-7-6-6-5-5 new ch. ROW 2: Work 1 sc in each of the first 3-3-2-2-1-1 ch (4 sc remain before st with marker), work 1 dc in each of the next ch 2, 1 hdc in each of the next ch 2, continue with 2nd row in pattern over the remaining sts. Then continue inc for sleeve on every row from WS the same way as on right front piece. Adjust according to right front piece, and work shawl collar reversed, i.e. beg from RS. ASSEMBLY: Sew shoulder seams, sew underarm seams and side seams in one inside 1 tr/sc but leave 20 cm / 8" for vent in each side. Make sure that to avoid a tight seam. Sew the 2 shawl collars tog mid back and sew it to the neck. EDGE AT THE BOTTOM OF JACKET: Beg in first st (seen from RS) on back piece and work as follows: Fasten yarn with 1 sl st, work 1 sc in every dc, cut the yarn. Then work one more row with sc from RS but now work in back loop of st. Repeat on both front pieces. EDGE ALONG BAND: Fasten yarn with 1 sl st in the corner at the bottom of right band and work as follows from RS: Work ch 2, skip until first sc-row and work (1 dc, 1 hdc, ch 1, 1 hdc, 1 dc) around sc-row, ch 1, * skip until next sc-row and work (1 dc, 1 hdc, ch 1, 1 hdc, 1 dc) around next sc-row *, repeat from *-* around the entire band and collar but when working collar, skip approx. 4 cm / 1½" before working a new dc-group. I.e. there are approx. 10 dc-groups over collar. CUFF/SLEEVE EDGE: ROUND 1: Fasten yarn with 1 sl st in sleeve seam and work 4 ch (= 1 tr), work 30 tr around sleeve opening (i.e. approx. 1 tr around every sc-row and 3 tr around every row with tr). Finish round with 1 sl st in 4th ch at beg of round. ROUND 2: Work ch 1, continue with 1 sc in every tr. NOTE: Work in back loop of dc below. Fasten off. Repeat around the other sleeve. ---------------------------------------------------------- Hat and scarf: See DROPS 166-07 or "Related patterns" in pattern on website. ---------------------------------------------------------- |
|
 |
|
Have you finished this pattern?Tag your pictures with #dropspattern #lochnessjacket or submit them to the #dropsfan gallery. Do you need help with this pattern?You'll find 12 tutorial videos, a Comments/Questions area and more by visiting the pattern on garnstudio.com. © 1982-2026 DROPS Design A/S. We reserve all rights. This document, including all its sub-sections, has copyrights. Read more about what you can do with our patterns at the bottom of each pattern on our site. |
|


With over 40 years in knitting and crochet design, DROPS Design offers one of the most extensive collections of free patterns on the internet - translated to 17 languages. As of today we count 325 catalogs and 12298 patterns - 12288 of which are translated into English (US/in).
We work hard to bring you the best knitting and crochet have to offer, inspiration and advice as well as great quality yarns at incredible prices! Would you like to use our patterns for other than personal use? You can read what you are allowed to do in the Copyright text at the bottom of all our patterns. Happy crafting!
Post a comment to pattern DROPS 166-6
We would love to hear what you have to say about this pattern!
If you want to leave a question, please make sure you select the correct category in the form below, to speed up the answering process. Required fields are marked *.