
Popular categories
Looking for a yarn?


Comments / Questions (51)
![]() Patrizia wrote:
Patrizia wrote:
CIAO NON RIESCO A VEDERE IL PARTICOLARE DALLA DOMANDA ANCHE SE MAGARI POTREI CAPIRE DALLE ISTRUZIONI E TROVARE LA SOLUZIONE AL MIO DUBBIO.........LE MANICHE SONO SENZA CUCITURA CIOE' PARTONO DALLO SPRONE ROTONDO?CHIEDO SCUSA E SPERO DI ESSERMI SPIEGATA STO CERCANDO UN MODELLO CHE ABBIA LA MANICA ATTACCATA MI POTETE AIUTARE ?GRAZIE IN ANTICIPO BUONA GIORNATA E BUON LAVORO
08.10.2019 - 11:31DROPS Design answered:
Buongiorno Patrizia. Sì, le maniche vengono lavorate dallo sprone verso il basso. Il cardigan è lavorato dall'alto verso il basso (quindi si parte dal collo). Buon lavoro!
08.10.2019 - 12:55
![]() Csák Györgyi wrote:
Csák Györgyi wrote:
Pattern says Work 1 edge around the neck in ch-row on hook size 4 mm / G/6 with Cotton Light, beg mid front from RS as follows: Work up 119-119-125-125-131-131 dc in ch-row. Does it mean the neck should start at the middle of the front? Not all the way around?
20.08.2019 - 15:35DROPS Design answered:
Dear Mrs Györgyi, you start edge on neck from RS on top of right front piece, ie mid front on piece and along the whole neckline to the corner of left front piece. Happy crocheting!
20.08.2019 - 15:53
![]() France Blanchette wrote:
France Blanchette wrote:
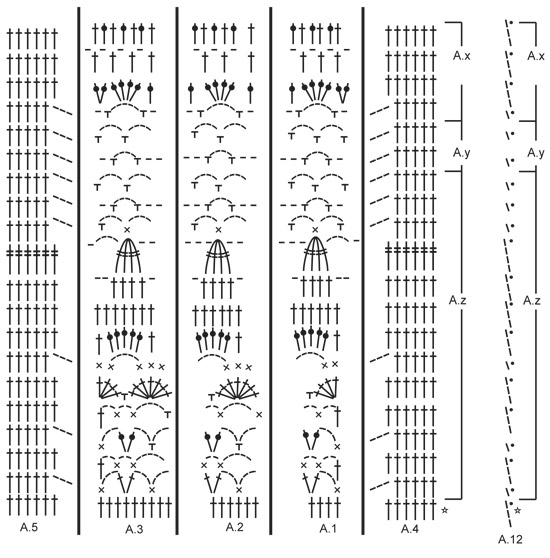
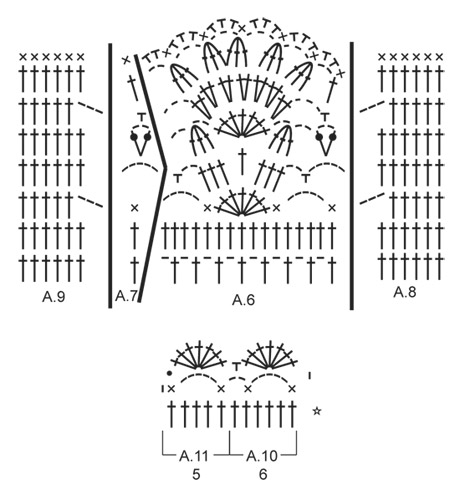
Bonjour, Étant donné que A.1 a 4 brides de départ et que cette partie doit rester à 4. Dans le diagramme de A.z dans le septième rang, il y a 6 brides. On doit compter 6 brides au lieu de 4? Pour les augmentations, est-ce qu’ils se font dans la section A.2 étant donné que c’est supposé être la seule à être augmentée? Merci pour votre attention!
13.08.2019 - 19:55DROPS Design answered:
Bonjour Mme Blanchette, suivez bien les diagrammes tels qu'ils sont indiqués ( au 7ème rang de A.z on a 6 brides dans A.1 et 7 dans A.3, le nombre de mailles du rang sera donc juste). Les augmentations se font à intervalles réguliers entre A.4 et A.5 (= entre les bordures des devants) soit au-dessus de A.1, A.2 et A.3. Au rang suivant, vous crochetez A.1 comme avant, puis vous répétez A.2 (vous aurez 1 motif de plus en largeur) et terminerez par A.3, comme avant. Bon crochet!
14.08.2019 - 07:58
![]() France Blanchette wrote:
France Blanchette wrote:
Bonjour, Ça fait 6 fois que je refais la partie entre 175 brides et l’augmentation de 12 brides= 187 brides et j’arrive toujours à 188 brides. J’ai bien compté et j’arrive jamais à 187 brides. Est-ce qu’il y a un erreur sur le patron?
11.08.2019 - 15:23DROPS Design answered:
Bonjour Mme Blanchette, vérifiez bien que vous avez toujours le bon nombre de mailles dans chacun des diagrammes soit 6 m pour A.4, 4 m pour A.1, 6 m pour chaque A.2, 9 m pour A.3 et 6 m pour A.5, soit 175 m pour qu'après les 12 augmentations vous ayez bien 187 m. Pour mieux vous repérer dans vos diagrammes, vous pouvez mettre un marqueur entre chacun d'eux, ainsi le nombre de motifs sera plus facile à visualiser. Bon crochet!
12.08.2019 - 08:25
![]() Rhonda Bertolani wrote:
Rhonda Bertolani wrote:
I am a beginner and have never made a garmet/clothing. I would really like to start making cardigans and sweaters. Is this pattern appropriate for a beginner?
08.05.2019 - 00:26DROPS Design answered:
Dear Rhonda, I think this patterns is a bit difficult for beginners. However, you will find some basic patterns HERE. Good luck!
08.05.2019 - 07:49
![]() Ina wrote:
Ina wrote:
Hoe moet je het bij de tweede en volgende toeren van de pas doen met de losse tussen de 4 stokjes van de eerste toer moet je daar ook een stokje op haken?
03.05.2019 - 20:45DROPS Design answered:
Dag Ina,
Nee, hier haak je niks in. De reden dat je op de eerste toer af en toe een losse overslaat is om te voorkomen dat de toer met lossen te strak gaat zitten. Hier is al rekening mee gehouden met het aantal op te zetten lossen.
05.05.2019 - 16:36
![]() Anne wrote:
Anne wrote:
Bonjour, étant novice en crochet, j'aurai aimé avoir un Tuto vidéo complet de la veste, si toutefois c'est possible. Merci
12.04.2019 - 16:23
![]() Caffiaux wrote:
Caffiaux wrote:
Bonjour, serait il possible d'avoir le Tuto complet pour le modèle "lacey days jacket"
11.04.2019 - 14:10DROPS Design answered:
Bonjour Mme Caffiaux, les explications de ce modèle sont complètes, pour vous aider, retrouvez ici comment lire un diagramme au crochet, pour toute question, utilisez cet espace, et pour toute assistance individuelle, contactez le magasin où vous avez acheté votre laine - même par mail ou téléphone. Bon croche!t
11.04.2019 - 14:56
![]() Laura wrote:
Laura wrote:
Intenté hacer esta versión en modelo jersey pero me ondean mucho la parte de arriba. Decidí hacer este modelo y me pasa exactamente lo mismo, he procurado mantener todo el rato la misma tensión, pero no se por que me pasa...
07.09.2017 - 01:25
![]() Heike wrote:
Heike wrote:
Hallo, nachdem mir beim letzten Mal so gut und schnell geholfen wurde, muss ich jetzt nochmal fragen. Ich verstehe die Striche bei A12 (Ärmel) nicht. Im ersten Block 3 Striche? Könnt ihr mir helfen? LG Heike
11.04.2017 - 19:09DROPS Design answered:
Liebe Heike, A.12 zeigt wie jede Runde beginnt und endet, dh bei der 1. Reihe in A.z fangen Sie mit 1 Lm, bei den 2. Runde beginnen Sie mit 3 Lm usw, immer mit 1 kM in dem 1./3. Lm vom Anfang enden. Viel spaß beim häkeln!
12.04.2017 - 12:39
|
|||||||||||||||||||||||||||||||||||||
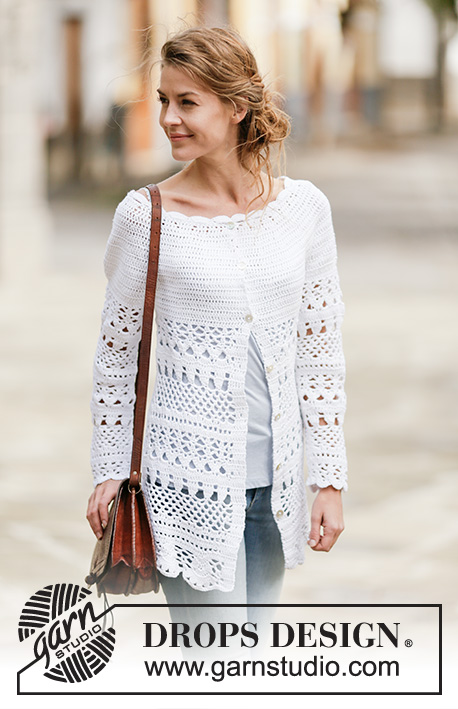
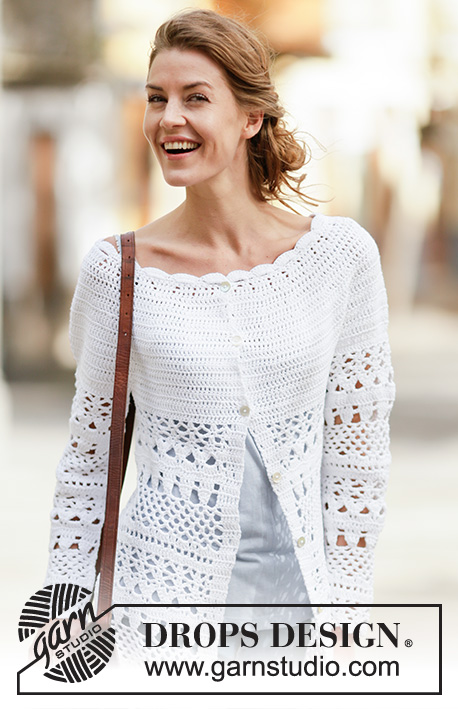
Lacey Days Jacket#laceydaysjacket |
|||||||||||||||||||||||||||||||||||||
 |
 |
||||||||||||||||||||||||||||||||||||
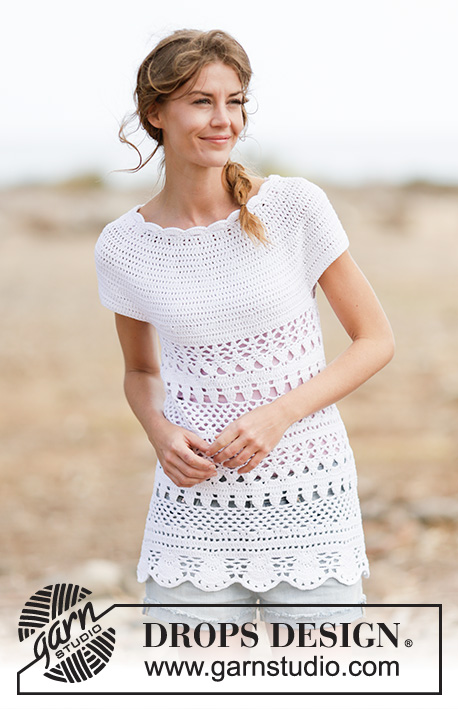
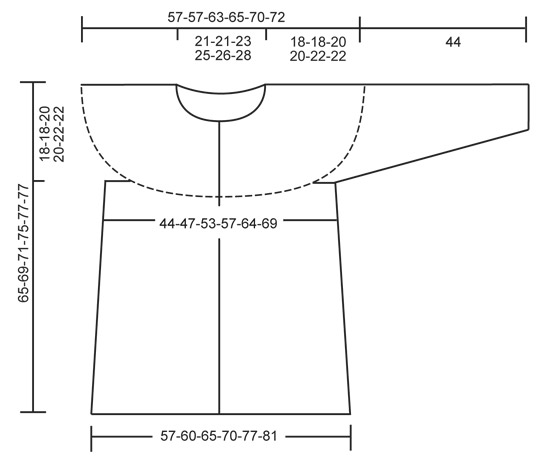
Crochet DROPS jacket with lace pattern and round yoke, worked top down in ”Cotton Light”. Size: S - XXXL.
DROPS 162-28 |
|||||||||||||||||||||||||||||||||||||
|
CROCHET INFO: Applies when piece is worked back and forth. On every dc row replace first dc with 3 ch. Replace first tr on every row with tr with ch 4, finish row with 1 sl st in 4th ch. Replace first sc on every row with sc with ch 1, finish row with 1 sl st in first ch. INCREASE TIP: Inc 1 dc by working 2 dc in 1 dc. Do not inc over band. DECREASE TIP: Work 1 dc but wait with last pull through (= 2 sts on hook), then work next dc but on last pull through, pull yarn through all sts on hook = 1 dc dec. PATTERN: See diagrams A.1-A.12. A.12 shows how pattern beg when working in the round on sleeve. ---------------------------------------------------------- YOKE: Worked top down, back and forth. Work 171-171-181-186-191-201 ch on hook size 4 mm / G/6 with Cotton Light. Work next row as follows: 1 dc in 4th ch (= 2 dc), 1 dc in each of the next ch 2, * skip ch 1, 1 dc in each of the next 4 ch *, repeat from *-* = 136-136-144-148-152-160 dc. READ CROCHET INFO! Insert 12 markers in the piece as follows: Work 21-21-23-24-25-27 dc AT THE SAME TIME inc 1-5-3-3-4-2 dc evenly – READ INCREASE TIP, insert first marker, * work 4 dc, insert next marker *, repeat from *-* 1 more time, work 16 dc, insert next marker, * work 4 dc, insert next marker *, repeat from *-* 1 more time, work 30-30-34-36-38-42 dc AT THE SAME TIME inc 2-10-6-6-8-4 dc evenly, insert next marker, * work 4 dc, insert next marker *, repeat from *-* 1 more time, work 16 dc, insert next marker, * work 4 dc, insert next marker *, repeat from *-* 1 more time, work 21-21-23-24-25-27 dc AT THE SAME TIME inc 1-5-3-3-4-2 dc evenly = 140-156-156-160-168-168 dc. REMEMBER THE CROCHET GAUGE! On next row from RS, inc as follows: Inc 1 dc on each side of every marker (= 24 dc inc), repeat inc on every row from RS 3-3-4-6-7-9 times in total, then inc before every marker (= 12 dc inc), repeat inc on every row from RS 4-4-4-2-2-0 times in total = 260-276-300-328-360-384 dc. Piece measures approx. 17-17-19-19-21-21 cm / 6¾"-6¾"-7½"-7½"-8¼"-8¼". On next row work as follows: 41-44-48-53-59-63 dc (front piece), 8 ch (armhole), skip 54-56-60-64-68-72 dc from previous row (to be used for sleeve later), 70-76-84-94-106-114 dc AT THE SAME TIME inc 1-1-3-1-1-3 dc evenly (back piece), 8 ch (armhole), skip 54-56-60-64-68-72 dc from previous row (to be used for sleeve later) and 41-44-48-53-59-63 dc (front piece) = 169-181-199-217-241-259 dc/ch. Continue to work as follows: A.4 (= 6 dc band), A.1, A.2 24-26-29-32-36-39 times in total in width, A.3, finish with A.5 (= 6 dc band). Work the first 7 row of A.z. On 8th row in A.z (= dc-row) inc 6 dc evenly – READ INCREASE TIP = 175-187-205-223-247-265 dc. Continue to work A.z as before but now work A.2 25-27-30-33-37-40 times in width. When A.z has been worked 1 time vertically, work A.y over A.z 1-2-2-3-3-3 times in total vertically. Then work A.x over A.y. On 2nd row in A.x inc 12 dc evenly = 187-199-217-235-259-277 dc. Continue to work A.x as before but now work A.2 27-29-32-35-39-42 times in width. On last row in A.x inc 6 dc evenly = 193-205-223-241-265-283 dc. Then work A.z over A.x (now work A.2 28-30-33-36-40-43 times in width). On 8th row in A.z inc 12 dc evenly = 205-217-235-253-277-295 dc. Continue to work A.z as before but now work A.2 30-32-35-38-42-45 times in width. When A.z has been worked 1 time vertically, work A.y over A.z 1-2-2-3-3-3 times in total vertically. Then work A.x over A.y. On 2nd row in A.x inc 6 dc evenly = 211-223-241-259-283-301 dc. Continue to work A.x as before but now work A.2 31-33-36-39-43-46 times in width. On last row in A.x inc 10-14-12-10-18-16 dc evenly = 221-237-253-269-301-317 dc. Then work as follows: A.8 (= 6 dc band), A.6 (= 16 dc) 13-14-15-16-18-19 times in total, A.7 (= 1 dc), finish with A.9 (= 6 dc band). Fasten off when A.6 has been worked 1 time vertically. Piece measures approx. 65-69-71-75-77-77 cm / 25½"-27"-28"-29½"-30½"-30½". SLEEVE: Work in the round, top down - see diagram A.12 on how round beg and ends with 1 sl st in ch. Beg by working mid under sleeve as follows: Work 1 sc in 5th ch of the 8 ch worked in armhole on body. Work 3 ch (= 1 dc). Then work with 1 dc in each of the next 3 ch. Then work with 1 dc in every dc over sleeve AT THE SAME TIME dec 1-3-1-5-3-1 dc evenly – READ DECREASE TIP, before working 1 dc in each of the remaining 4 ch under sleeve = 61-61-67-67-73-79 dc. Continue to work as follows: A.1, A.2 8-8-9-9-10-11 times in width, finish with A.3. On 8th round in A.z (= dc-round) dec 6 dc evenly = 55-55-61-61-67-73 dc. Continue to work A.z as before but now work A.2 7-7-8-8-9-10 times in width. When A.z has been worked 1 time vertically, work A.y over A.z. When A.y has been worked 1 time vertically, work A.x over A.y. On last round in A.x dec 6 dc evenly = 49-49-55-55-61-67 dc. Then work A.z over A.x. A.2 is now worked 6-6-7-7-8-9 times in width. On 8th round dec 6 dc evenly = 43-43-49-49-55-61 dc. When A.z has been worked 1 time vertically, work A.y over A.z. Then work A.x over A.y. On last round in A.x dec 0-0-0-0-6-6 dc evenly = 43-43-49-49-49-55 dc. Then work the first 5 rounds of A.z. A.2 is now worked 5-5-6-6-6-7 times in width. Fasten off. Sleeve measures approx. 44 cm / 17¼" in all sizes. Work the other sleeve the same way. NECK EDGE: Work 1 edge around the neck in ch-row on hook size 4 mm / G/6 with Cotton Light, beg mid front from RS as follows: Work up 119-119-125-125-131-131 dc in ch-row. Then work A.11 1 time in total, then A.10 19-19-20-20-21-21 times in total in width. Fasten off. ASSEMBLY: Fasten the buttons on left front piece, the top button approx. 1 cm / ⅜" from neck edge, fasten the remaining button approx. 8 cm / 3⅛" apart. Button between 2 dc on right front piece. |
|||||||||||||||||||||||||||||||||||||
Diagram explanations |
|||||||||||||||||||||||||||||||||||||
|
|||||||||||||||||||||||||||||||||||||
 |
|||||||||||||||||||||||||||||||||||||
 |
|||||||||||||||||||||||||||||||||||||
 |
|||||||||||||||||||||||||||||||||||||
Have you finished this pattern?Tag your pictures with #dropspattern #laceydaysjacket or submit them to the #dropsfan gallery. Do you need help with this pattern?You'll find 15 tutorial videos, a Comments/Questions area and more by visiting the pattern on garnstudio.com. © 1982-2026 DROPS Design A/S. We reserve all rights. This document, including all its sub-sections, has copyrights. Read more about what you can do with our patterns at the bottom of each pattern on our site. |
|||||||||||||||||||||||||||||||||||||


With over 40 years in knitting and crochet design, DROPS Design offers one of the most extensive collections of free patterns on the internet - translated to 17 languages. As of today we count 324 catalogs and 12290 patterns - 12280 of which are translated into English (US/in).
We work hard to bring you the best knitting and crochet have to offer, inspiration and advice as well as great quality yarns at incredible prices! Would you like to use our patterns for other than personal use? You can read what you are allowed to do in the Copyright text at the bottom of all our patterns. Happy crafting!
Post a comment to pattern DROPS 162-28
We would love to hear what you have to say about this pattern!
If you want to leave a question, please make sure you select the correct category in the form below, to speed up the answering process. Required fields are marked *.