
Looking for a yarn?


Comments / Questions (80)
![]() Linda wrote:
Linda wrote:
Welk alternatief van garen kan ik hiervoor nog gebruiken kan niet tegen de 50%wol dat erin zit zou het graag maken met andere garen die lekker koel aanvoelt in de zomer
07.02.2023 - 15:01DROPS Design answered:
Dag Linda,
Alle garens die in garengroep B vallen zou je hiervoor kunnen gebruiken, bijvoorbeeld DROPS Belle, DROPS Cotton Light of DROPS Muskat. Via de garenvervanger welke onderaan de materialenlijst bij ieder patroon te vinden is, kun je berekenen hoeveel gram je nodig hebt als je het patroon in een alternatief garen breit.
08.02.2023 - 11:23
![]() Lori wrote:
Lori wrote:
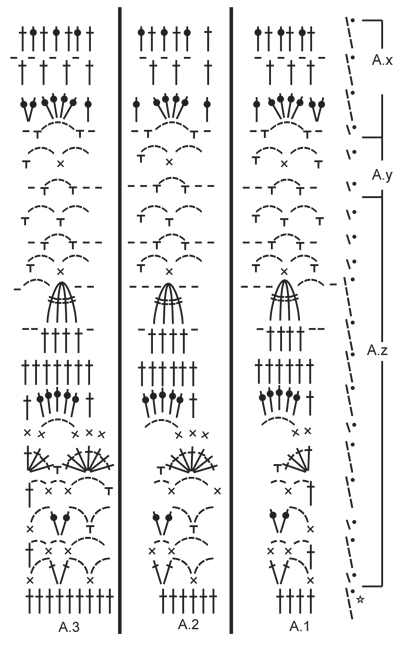
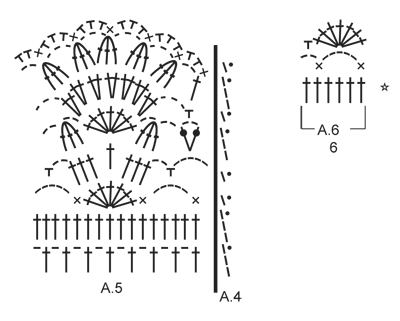
I've worked A1, A2, and A3. I don't understand how to do Ax, Ay, or Az. None show crochet stitches as a beginning point, so I don't know how to proceed. Also, is this done is same manner as other diagrams? For example, am I working across then vertically??
16.07.2022 - 00:56DROPS Design answered:
Dear Lori, A.x, A.y and A.z are subsections of diagrams A.1, A.2 and A.3. First you have worked the first row of A.1, A.2 and A.3. In the next row, you continue working the 2nd row of A.1, A.2 and A.3, which is the first row of A.z and continue working the rows of these 3 charts until reaching the last row of A.z. This means you will have 1 vertical repeat of A.x finished. If you continue working the next row of the 3 charts, you will start working A.y. Happy crocheting!
20.07.2022 - 17:48
![]() Amanda wrote:
Amanda wrote:
For the xxxl size the pattern says to work 21dc at the same time and then a little later on it says 42dc at the same time. What does ‘at the same time’ mean? Is it 42dc in the same stitch?
05.07.2022 - 12:20DROPS Design answered:
Dear Amanda, work this round as follows: 21 dc (US-terminology) increasing 2 dc evenly (= 23 dc), first marker, * work 4 dc, insert next marker *, repeat from *-* 1 more time, work 16 dc, insert next marker, * work 4 dc, insert next marker *, repeat from *-* 1 more time, work 42 dc increasing 4 dc evenly (=46 dc), insert next marker, * work 4 dc, insert next marker *, repeat from *-* 1 more time, work 16 dc, insert next marker, * work 4 dc, insert next marker *, repeat from *-* 1 more time, work 21 dc increasing 2 dc evenly (=23 dc) = 156 dc on the round. Happy crocheting!
05.07.2022 - 15:39
![]() Psitacus wrote:
Psitacus wrote:
Pourriez vous m'expliquer de la ligne 3, jusqu'au point fantaisie, s'il vous plaît ? Je ne m'en sors pas. 17brides augmenter 3 B à intervalles réguliers etc ? Merci d'avance
24.10.2020 - 21:00DROPS Design answered:
Bonjour Mme Psitacus, quand il est indiqué de crocheter 17 brides en augmentant 3 brides à intervalles réguliers, vous devez crocheter 1 bride dans chacune des 17 mailles suivantes, en même temps, vous crochetez 3 fois 2 brides dans la même maille à intervalles réguliers (voir cette leçon) = vous avez ainsi 20 brides au-dessus des 17 mailles du tour précédent. Bon crochet!
26.10.2020 - 13:10
![]() Sandra wrote:
Sandra wrote:
Herigennem. Jeg forstår simpelthen ikke opskriften. Jeg har øget med en stangmaske på hver side af hvert mærke, dvs. med 24 på en omgang, som der står i opskriften. Som jeg læser det, skal det gøres 7 gange?
14.07.2020 - 13:36DROPS Design answered:
Hej Sandra, ja det stemmer, du tager ud på hver side af mærkerne hver gang du hækler fra retsiden. God fornøjelse!
30.07.2020 - 14:11
![]() Sandra wrote:
Sandra wrote:
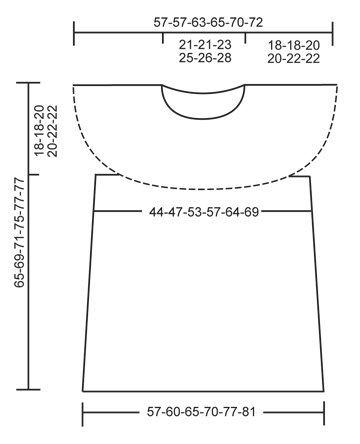
Hej. Jeg er i gang med at hækle bærestykket i størrelse XXL. Jeg er nu nået dertil, hvor det burde være 21 cm, men det fylder reelt kun 10 cm. Jeg har løbende talt maskerne, og der er de 348 masker, der skal være. Det burde passe med, at 18 st på 9 rækker fylder 10 x 10 cm. På nuværende tidspunkt har jeg 11 rækker. Er der mon noget jeg har overset?
13.07.2020 - 20:42DROPS Design answered:
Hei Sandra. Har du kanskje økt både fra retten og fra vrangen? Toppen hekles frem og tilbake, men hver rad hekles sammen på slutten av hver rad, (slik at man kanskje føler at den hekles rundt). Når du øker bare fra retten og har 348 staver har du heklet 19 rader = ca 21 cm. God Fornøyelse!
14.07.2020 - 07:37
![]() Cheryl wrote:
Cheryl wrote:
What is the approximate yardage of yarn needed to make the XXXL size?
24.06.2020 - 17:48DROPS Design answered:
Dear Cheryl, the yarn amount is provided in grams in each pattern -read more in our FAQ here. In size XXXL you will require 750 g DROPS Cotton Merino/50 g a ball = 15 balls. Happy crocheting!
25.06.2020 - 08:49
![]() Isabelle wrote:
Isabelle wrote:
Bonjour, je vois écrit que je retourne mon travail à chaque rang. je fais des augmentations uniquement sur les rangs endroits? je ne fais donc sur le rang envers que des brides sur chaque bride du rang endroit? est ce cela? merci
05.05.2020 - 18:04DROPS Design answered:
Bonjour Isabelle, les toutes premières augmentations se font au 1er rang sur l'envers (quand on augmente à intervalles réguliers en mettant les marqueurs), puis on augmente tous les rangs sur l'endroit = tous les 2 rangs en commençant par le rang suivant (= 3ème depuis le début). Sur l'envers, vous crochetez effectivement 1 bride dans chaque bride. Bon crochet!
06.05.2020 - 10:03
![]() Christina wrote:
Christina wrote:
Due to my little experience, what do you mean by "Continue to work as follows: A.1, A.2 24-26-29-32-36-39 times in total in width, finish with A.3. ". In width? Shouldn' t I continue on the row? And why are the patterns separated with a line ?? What am I missing?
11.01.2020 - 21:40DROPS Design answered:
Dear Christina, this means you just have to continue pattern as before (= A.1 at the beg of round, then repeat A.2 and finish with A.3) but you will now crochet 24-26-29-32-36-39 repeats of A.2 on the round. Diagrams are separated by a line just to divide them making more visible which is A.1, A.2 and A.3. Happy knitting!
13.01.2020 - 09:25
![]() Ciska wrote:
Ciska wrote:
Kunt u mij vertellen hoe ik A.z moet haken want dat snap ik niet. en moet je A.1 en A.2 tegelijk haken of eerst A.1 en dan A.2
20.11.2019 - 16:54DROPS Design answered:
Dag Ciska,
A.2 haak je in de breedte aansluitend op A.2. In het patroon staat er op een gegeven moment dat je A.1 moet haken en dan een aantal keren A.2 in de breedte en tot slot A.3. A.z geeft de hoogte aan van het patroon. Als er in het patroon aangegeven wordt dat je A.z moet haken, dan haak je dus de toeren die daarbinnen staan aangegeven in het telpatroon.
Voor meer uitleg kun je ook de veel gestelde vragen bekijken over hoe je telpatronen voor haken leest.
23.11.2019 - 16:28
|
||||||||||||||||||||||||||||||||||
Lacey Days#laceydaystop |
||||||||||||||||||||||||||||||||||
 |
 |
|||||||||||||||||||||||||||||||||
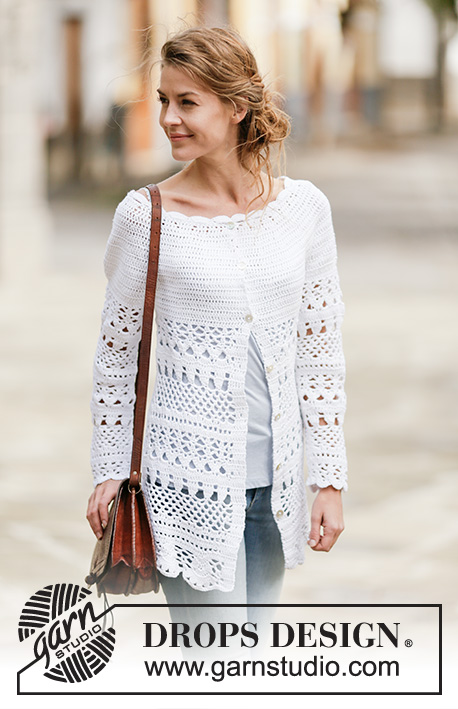
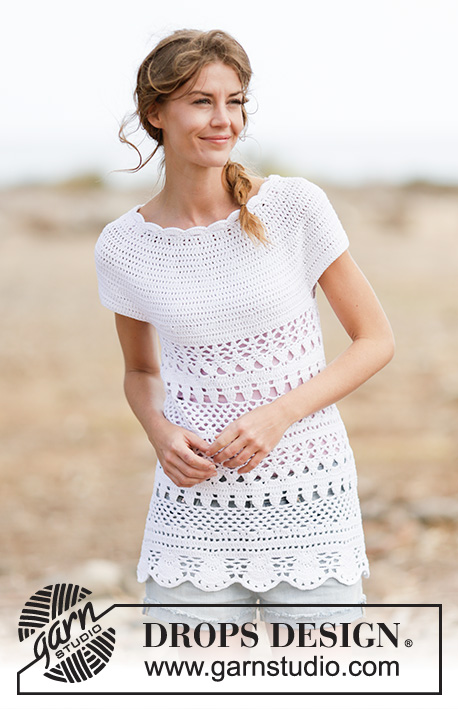
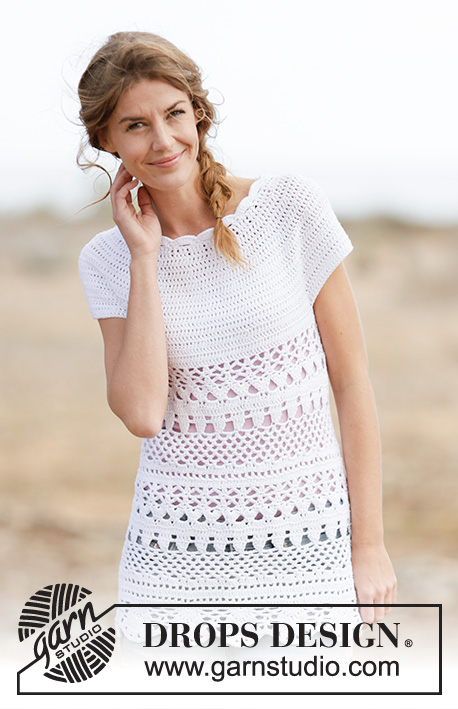
Crochet DROPS top with lace pattern and round yoke, worked top down in ”Cotton Merino”. Size: S - XXXL.
DROPS 162-6 |
||||||||||||||||||||||||||||||||||
|
CROCHET INFO: Applies when piece is worked back and forth. Replace first dc on every row with dc with ch 3, finish row with 1 sl st in 3rd ch. INCREASE TIP: Inc 1 dc by working 2 dc in 1 dc. PATTERN: See diagrams A.1 to A.6. A.4 show how the pattern beg and ends when working in the round. ---------------------------------------------------------- YOKE: Worked top down from mid back. Work 153-153-163-168-173-183 ch on hook size 4 mm / G/6 with Cotton Merino and form a ring with 1 sl st in first ch. Work next round as follows: 3 ch (= 1 dc), 1 dc in first ch from ch-ring, 1 dc in each of the next ch 2, * skip ch 1, 1 dc in each of the next 4 ch *, repeat from *-* = 124-124-132-136-140-148 dc. Then work piece back and forth. Work every row tog at the end of row with 1 sl st in 3rd ch from beg of row. Turn piece. READ CROCHET INFO! Insert 12 markers in the piece as follows: Work 15-15-17-18-19-21 dc AT THE SAME TIME inc 1-5-3-3-4-2 dc evenly – READ INCREASE TIP, insert first marker, * work 4 dc, insert next marker *, repeat from *-* 1 more time, work 16 dc, insert next marker, * work 4 dc, insert next marker *, repeat from *-* 1 more time, work 30-30-34-36-38-42 dc AT THE SAME TIME inc 2-10-6-6-8-4 dc evenly, insert next marker, * work 4 dc, insert next marker *, repeat from *-* 1 more time, work 16 dc, insert next marker, * work 4 dc, insert next marker *, repeat from *-* 1 more time, work 15-15-17-18-19-21 dc AT THE SAME TIME inc 1-5-3-3-4-2 dc evenly = 128-144-144-148-156-156 dc. REMEMBER THE CROCHET GAUGE! Turn piece. On next row from RS, inc as follows: Inc 1 dc on each side of every marker (= 24 dc inc), repeat inc on every row from RS 3-3-4-6-7-9 times in total, then inc before every marker (= 12 dc inc), repeat inc on every row from RS 4-4-4-2-2-0 times in total = 248-264-288-316-348-372 dc. Piece measures approx. 17-17-19-19-21-21 cm / 6 3/4"-6 3/4"-7½"-7½"-8 1/4"-8 1/4". On next round work as follows: 35-38-42-47-53-57 dc (half back piece), 8 ch (under sleeve), skip 54-56-60-64-68-72 dc from previous row (= sleeve), 70-76-84-94-106-114 dc AT THE SAME TIME inc 1-1-3-1-1-3 dc evenly (front piece), 8 ch (under sleeve), skip 54-56-60-64-68-72 dc from previous row (= sleeve) and 35-38-42-47-53-57 dc (half back piece) = 157-169-187-205-229-247 dc/ch. Now work piece in the round without turning. Continue to work as follows: A.1, A.2 24-26-29-32-36-39 times in total in width, finish with A.3. Work the first 7 rounds of A.z. On 8th round in A.z (= dc-round) inc 6 dc evenly – READ INCREASE TIP = 163-175-193-211-235-253 dc. Continue to work A.z as before but now work A.2 25-27-30-33-37-40 times in width. When A.z has been worked 1 time vertically, work A.y over A.z 1-2-2-3-3-3 times in total vertically. Then work A.x over A.y. On 2nd round in A.x inc 12 dc evenly = 175-187-205-223-247-265 dc. Continue to work A.x as before but now work A.2 27-29-32-35-39-42 times in width. On last round in A.x inc 6 dc evenly = 181-193-211-229-253-271 dc. Then work A.z over A.x (now work A.2 28-30-33-36-40-43 times in width). On 8th round in A.z inc 12 dc evenly = 193-205-223-241-265-283 dc. Continue to work A.z as before but now work A.2 30-32-35-38-42-45 times in width. When A.z has been worked 1 time vertically, work A.y over A.z 1-2-2-3-3-3 times in total vertically. Then work A.x over A.y. On 2nd round in A.x inc 6 dc evenly = 199-211-229-247-271-289 dc. Continue to work A.x as before but now work A.2 31-33-36-39-43-46 times in width. On last round in A.x inc 9-13-11-9-17-15 dc evenly = 208-224-240-256-288-304 dc. Then work as follows: A.5 13-14-15-16-18-19 times in total (A.4 shows how round beg and ends). Fasten off when A.5 has been worked 1 time vertically. Piece measures approx. 65-69-71-75-77-77 cm / 25½"-27"-28"-29½"-30½"-30½". NECK EDGE: Worked in the round. Work 1 edge around the neck in ch-round on hook size 4 mm / G/6 with Cotton Merino, beg mid back from RS as follows: Work up 114-114-120-120-126-126 dc in ch-round. Then work A.6 19-19-20-20-21-21 times in width. Fasten off. |
||||||||||||||||||||||||||||||||||
Diagram explanations |
||||||||||||||||||||||||||||||||||
|
||||||||||||||||||||||||||||||||||
|
||||||||||||||||||||||||||||||||||
|
||||||||||||||||||||||||||||||||||
|
||||||||||||||||||||||||||||||||||
Have you finished this pattern?Tag your pictures with #dropspattern #laceydaystop or submit them to the #dropsfan gallery. Do you need help with this pattern?You'll find 11 tutorial videos, a Comments/Questions area and more by visiting the pattern on garnstudio.com. © 1982-2025 DROPS Design A/S. We reserve all rights. This document, including all its sub-sections, has copyrights. Read more about what you can do with our patterns at the bottom of each pattern on our site. |
||||||||||||||||||||||||||||||||||


With over 40 years in knitting and crochet design, DROPS Design offers one of the most extensive collections of free patterns on the internet - translated to 17 languages. As of today we count 314 catalogs and 11822 patterns - 11812 of which are translated into English (US/in).
We work hard to bring you the best knitting and crochet have to offer, inspiration and advice as well as great quality yarns at incredible prices! Would you like to use our patterns for other than personal use? You can read what you are allowed to do in the Copyright text at the bottom of all our patterns. Happy crafting!
Post a comment to pattern DROPS 162-6
We would love to hear what you have to say about this pattern!
If you want to leave a question, please make sure you select the correct category in the form below, to speed up the answering process. Required fields are marked *.