
Popular categories
Looking for a yarn?


Comments / Questions (21)
![]() Rous wrote:
Rous wrote:
Bonjour (n°r-670) À 6 cm de hauteur totale, diminuer 1 m de chaque côté des marqueurs, répéter ces diminutions 3 fois au total tous les -7-cm = -194- m. ok pour ça, mais coté marqueurs dos sur les 100 mailles ou sur les 50 maille du devant Mercie pour votre aide je commence jute a tricoter avec DROP
25.09.2016 - 15:12DROPS Design answered:
Bonjour Mme Rous, les marqueurs repèrent les côtés, vous allez diminuer 2 m à chaque marqueur (= 1 m avant le marqueur + 1 m après le marqueur), soit 4 dimminutions (1 pour chaque devant et 2 pour le dos) à chaque rang de diminutions. Ainsi, vous aviez 210 m (taille M), vous diminuez 4 x (au total, correction faite) 4 m = 16 dim, il reste 198 m. Bon tricot!
26.09.2016 - 10:42
![]() Nicole wrote:
Nicole wrote:
Bonjour je commence le: Modèle n° r-670 comment je tricote en rond mon point mousse mon tricot est en aller retour(quand je visionne votre gilet il me semble qu'il est en jersey est ce que le point mousse est juste les bordures) pouvez vous m'expliquerje ne comprend pas je vous remercie davance
25.09.2016 - 08:23DROPS Design answered:
Bonjour Nicole, quand vous tricotez au point mousse sur aiguille circulaire, en allers et retours (début du gilet), tricotez comme sur aig. droites, c'est-à-dire 1 côte mousse = 2 rangs end. Pour le bas des manches (point mousse en rond, voir réponse précédente). Bon tricot!
26.09.2016 - 10:31
![]() Susanne wrote:
Susanne wrote:
Hallo, Kann es sein, dass die strickVorschrift und das Muster für dielteler Ärmel fehlerhaft ist ? Wenn man auf einem Nadelspiel strickt, gibt es keine Rückreise. Die aber istrotzdem im Muster A1 beschrieben (in den Erläuterungentsprechenden zu den Maschen). Wie ist es Richtig?
13.06.2016 - 17:58DROPS Design answered:
Liebe Susanne, ab der Passe muss in Hin- und Rück-R gestrickt werden, daher ist das Muster von Anfang an so beschrieben. In den Runden stricken alle Maschen so, wie sie in der Hin-R, also Vorderseite gestrickt werden.
14.06.2016 - 21:23
![]() Isabelle wrote:
Isabelle wrote:
Je dois utiliser les aiguilles 3.5 pour un échantillon de la bonne taille, à ce moment là est-ce que je dois prendre des aiguilles no. 3 pour le point mousse ?
13.07.2015 - 00:46DROPS Design answered:
Bonjour Isabelle, si vous avez besoin d'aiguilles 3.5 pour le jersey et le point fantaisie, il est probable que des aiguilles 3 suffiront pour le point mousse. Bon tricot!
27.07.2015 - 10:33
![]() Brandy wrote:
Brandy wrote:
Joli
08.02.2015 - 13:57
![]() Menez wrote:
Menez wrote:
Trės romantique et frais
08.01.2015 - 12:25
![]() MOLINA wrote:
MOLINA wrote:
On a envie de se mettre tout de suite au travail, très beau
04.01.2015 - 20:09
![]() José Serné wrote:
José Serné wrote:
Heerlijk 's zomers en heel vrouwelijk. Die moet zeker online!
14.12.2014 - 21:22
![]() Haingo RAZAFINDRAMAMBA wrote:
Haingo RAZAFINDRAMAMBA wrote:
Magnifique
14.12.2014 - 10:32
![]() Sylcia wrote:
Sylcia wrote:
Denna också
12.12.2014 - 13:25
|
|||||||||||||||||||
Angela Cardigan#angelacardigan |
|||||||||||||||||||
 |
 |
||||||||||||||||||
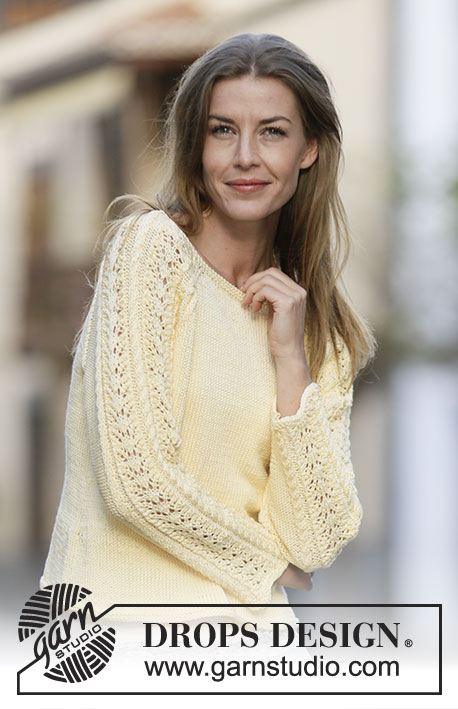
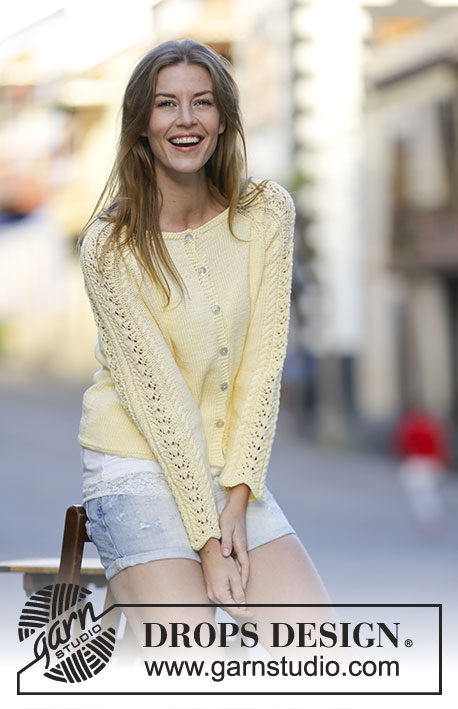
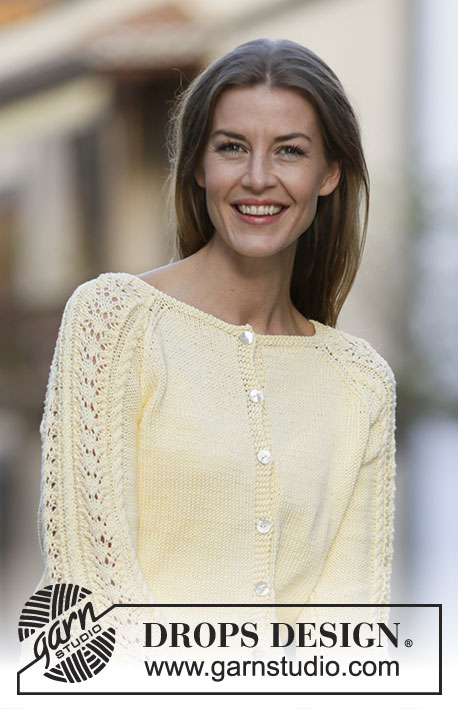
Knitted DROPS jacket with lace pattern and raglan in ”Muskat”. Size: S - XXXL.
DROPS 159-28 |
|||||||||||||||||||
|
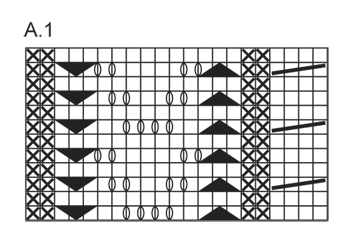
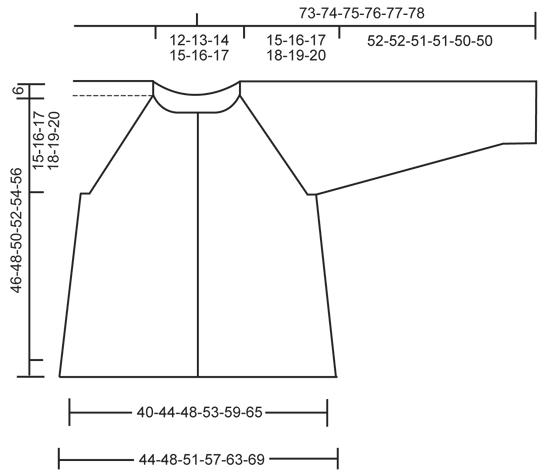
GARTER ST (back and forth): K all rows. 1 ridge = K2 rows. GARTER ST (worked in the round): * K 1 round and P 1 round *, repeat from *-*. 1 ridge = 2 rounds. PATTERN: See diagram A.1. The diagrams show all rows in pattern seen from RS. RAGLAN: Dec 2 sts in every transition between body and sleeves. Dec as follows from RS: Beg 3 sts before marker and work as follows: K 2 tog, K 2 (marker is between these 2 sts), slip 1 st as if to K, K 1, psso. Dec as follows from WS: Beg 3 sts before marker and work as follows: P 2 twisted tog, P 2 (marker is between these 2 sts), P 2 tog. BUTTONHOLES: Dec for buttonholes on right band from RS. 1 buttonhole = K tog 3rd and 4th st from mid front, then make 1 YO. Dec for buttonholes when piece measures: SIZE S: 8, 15, 22, 29, 36 and 44 cm / 3", 6", 8¾", 11½" 14¼", 17¼" SIZE M: 8, 15, 22, 30, 38 and 46 cm / 3", 6", 8¾", 11¾",15", 18". SIZE L: 8, 16, 24, 32, 40 and 48 cm / 3", 6¼", 9½", 12½", 15¾", 19". SIZE XL: 8, 16, 24, 32, 41 and 50 cm / 3", 6¼", 9½", 12½", 16", 19¾". SIZE XXL: 8, 16, 25, 34, 43 and 52 cm / 3", 6¼", 9¾", 13½", 17", 20½". SIZE XXXL: 9.18, 27, 36, 45 and 54 cm / 3½", 7", 10½", 14¼", 17¾", 21¼" --------------------------------------------------------- JACKET: Worked back and forth on circular needle. Cast on 194-210-226-250-274-298 sts (includes 5 band sts in each side) on circular needle size 3.5 mm / US 4 with Muskat. Work 2 ridges in GARTER ST - see explanation above. Switch to circular needle size 4 mm / US 6. Insert 2 markers in the piece; 51-55-59-65-71-77 sts in from each side (back piece = 92-100-108-120-132-144 sts). Continue in stockinette st with 5 st in garter st in each side (= band). When piece measures 6 cm / 2⅜", dec 1 st on each side of markers, repeat dec every 7-7-8-8-9-9 cm / 2¾"-2¾"-3⅛"-3⅛"-3½"-3½" 3 more times = 178-194-210-234-258-282 sts. When piece measures 8 cm / 3⅛", dec for BUTTONHOLE on right band - see explanation above. When piece measures 31-32-33-34-35-36 cm / 12¼"-12½"-13"-13⅜"-13¾"-14¼", bind off for armholes in each side as follows: Work until 4 sts remain before first marker in the side, bind off the next 8 sts, work until 4 sts remain before marker in the other side, bind off the next 8 sts and work the rest of row. There are now 76-84-92-104-116-128 sts on back piece and 43-47-51-57-63-69 sts on each front piece. Put piece aside and knit the sleeves. SLEEVE: Worked in the round on double pointed needles. Cast on 56-58-60-62-64-66 sts on double pointed needles size 3.5 mm / US 4 with Muskat. Work 2 ridges in garter st - see explanation above. Switch to double pointed needles size 4 mm / US 6. Insert 1 marker at the beg of round. Then work as follows: P 5-6-7-8-9-10, A.1 (= 21 sts) 2 times, work the first 4 sts in A.1, P 5-6-7-8-9-10. Continue this pattern upwards AT THE SAME TIME when piece measures 8 cm / 3⅛", inc 1 st on each side of marker. Inc every 3-2½-2½-2-2-2 cm / 1⅛"-⅞"-⅞"-¾"-¾"-¾" 15-16-17-18-19-20 times in total = 86-90-94-98-102-106 sts. P the inc sts. When piece measures 52-52-51-51-50-50 cm / 20½"-20½"-20"-20"-19¾"-19¾" NOTE! Shorter measurements in the larger sizes because of longer sleeve cap and wider shoulders) bind off the 4 sts on each side of marker = 78-82-86-90-94-98 sts. Put piece aside and make another sleeve. YOKE: Slip sleeves on to same circular needle as body where armholes were bound off = 318-342-366-398-430-462 sts. Insert 1 marker in all transitions between sleeves and body (= 4 markers). Continue in stockinette st over sts on body and pattern and P as before on sleeve, AT THE SAME TIME on next row from RS beg dec for RAGLAN – see explanation above (= 8 sts dec). Repeat dec every other row 20-21-22-22-23-24 more times and then every row 3-4-5-7-8-9 times, on last dec for raglan also dec 8 sts evenly over A.1 on each sleeve. After all dec for raglan 118-126-134-150-166-182 sts remain on needle. Switch to circular needle size 3.5 mm / US 4. Work 2 ridges while AT THE SAME TIME on first row dec 8-14-18-28-40-52 sts evenly = 110-112-116-122-126-130 sts. Bind off. ASSEMBLY: Sew the opening under the sleeves. Sew the buttons on to the left band. |
|||||||||||||||||||
Diagram explanations |
|||||||||||||||||||
|
|||||||||||||||||||
 |
|||||||||||||||||||
 |
|||||||||||||||||||
Have you finished this pattern?Tag your pictures with #dropspattern #angelacardigan or submit them to the #dropsfan gallery. Do you need help with this pattern?You'll find 31 tutorial videos, a Comments/Questions area and more by visiting the pattern on garnstudio.com. © 1982-2026 DROPS Design A/S. We reserve all rights. This document, including all its sub-sections, has copyrights. Read more about what you can do with our patterns at the bottom of each pattern on our site. |
|||||||||||||||||||


With over 40 years in knitting and crochet design, DROPS Design offers one of the most extensive collections of free patterns on the internet - translated to 17 languages. As of today we count 324 catalogs and 12290 patterns - 12280 of which are translated into English (US/in).
We work hard to bring you the best knitting and crochet have to offer, inspiration and advice as well as great quality yarns at incredible prices! Would you like to use our patterns for other than personal use? You can read what you are allowed to do in the Copyright text at the bottom of all our patterns. Happy crafting!
Post a comment to pattern DROPS 159-28
We would love to hear what you have to say about this pattern!
If you want to leave a question, please make sure you select the correct category in the form below, to speed up the answering process. Required fields are marked *.