
Popular categories
Looking for a yarn?


Comments / Questions (21)
![]() Van Der Sijpt Chris wrote:
Van Der Sijpt Chris wrote:
Kan ik dit patroon ook van onder naar boven breien ,kan U mij daar richtlijnen voor sturen aub
12.02.2026 - 12:41DROPS Design answered:
Dag Chris,
Als je het patroon andersom breit, zou je moeten meerderen waar je moet minderen en andersom. Het aantal steken dat je afkant moet je opzetten, etc. Alleen je zit ook met het de teltekening. Het is voor ons helaas niet mogelijk om patronen aan te passen naar persoonlijke wensen.
12.02.2026 - 19:21
![]() Patty Walk wrote:
Patty Walk wrote:
I am still working on the sleeve to the Angela Cardigan. I am doing the increases every 7/8 inches and am working my way up to 90 stitches. As the purled stitches increase, more of the under side of the sleeve is becoming purled. It looks as though about half of the sleeve is being purled. I'm concerned that too much of the total sleeve will be purled by the time I get to 90 stitches. Is it going to look alright?
28.04.2023 - 18:41DROPS Design answered:
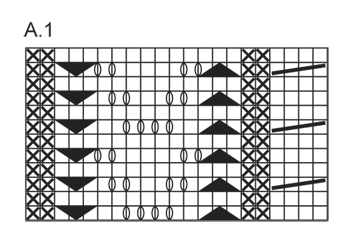
Dear Patty, it's correct; out of the 90 stitches in the sleeve only 42+4 = 46 are worked according to A.1; the rest are purled, according to the reverse stocking stitch, which makes the lace pattern more visible and pretty. Happy knitting!
30.04.2023 - 19:46
![]() Patty Walk wrote:
Patty Walk wrote:
I am working on the sleeves of this beautiful sweater and have a question. I am doing the sleeve in the round. It appears that the round begins with 6 purl stitches and ends with 6 purl stitches. This puts 12 purl stitches together on an otherwise busy pattern from the diagram. Am I doing this correctly?
19.04.2023 - 10:58DROPS Design answered:
Dear Mrs Walk, yes that's correct, the sleeves are worked in reversed stocking stitch (purling all rounds) with A.1 mid on upper sleeve. The new stitches increased on mid under sleeve should also be purled. Happy knitting!
19.04.2023 - 13:04
![]() Patty Walk wrote:
Patty Walk wrote:
How do you knit 3 twisted together? The video that is suggested to watch says "this video does not exist". Please help!
18.04.2023 - 09:28DROPS Design answered:
Dear Mrs Walk, weird, it should work, please check this video here - time code approx. 0:40 for the K3 twisted together. Happy knitting!
18.04.2023 - 10:14
![]() Annette Van Helvoirt wrote:
Annette Van Helvoirt wrote:
Graag zou ik willen weten of dit truitje/vestje te breien is op gewone naalden met knop. Ivm een beperking aan mijn linker arm lukt het me niet meer om met rondbreinaalden/,breinaalden zonder knop te breien. Zo, ja, hoe kan ik dat dan doen als ik de voor en achterpanden apart breien de mouwen later dicht naai? Ik brei met 1 naald in een breiblok. En maak dan maat m.
01.11.2021 - 15:34DROPS Design answered:
Dag Annette,
De reden dat er op de rondbreinaald gebreid wordt is omdat je anders op een gegeven moment heel veel steken op de naald hebt staan en dat wordt nogal proppen. Als je de mouwen en het lijf samen op de naald hebt staan heb je namelijk 318-342-366-398-430-462 steken. Dat past gewoon niet op rechte naalden.
02.11.2021 - 17:28
![]() Natasia wrote:
Natasia wrote:
Hvordan skal indtagning til raglan foregå? (Jeg strikker S, så 318m til 118m) Skal der tages ind hver 2.p 21 gange i alt, derefter hver p 3 gange, og så 8m jævnt over begge ærmer (4m hver)? Eller er det hver 2.p 20 gange i alt, efterfulgt af hver p 3 gange og så 8m jævnt fordelt ind på hvert ærme (2×8)?
29.08.2020 - 16:34DROPS Design answered:
Hej Natasia, Det stemmer du tager ind på hver 2.p 21 gange, på hver p 3 gange + 8 masker jævnt fordelt = ialt 200 indtagninger. God fornøjelse!
02.09.2020 - 14:26
![]() Riitta Hyvärinen wrote:
Riitta Hyvärinen wrote:
Ajattelin neuloa ko. takin baby merino -langasta. Olen kokoa 38.Miten huomioin koon ja langan määrän? yst. terv. RiittaH
09.07.2018 - 10:12DROPS Design answered:
Hei, Baby Merino -lanka on Muskat-lankaa ohuempi lanka, joten neuletiheys ei ole sama. Suosittelemme, että käytät tähän malliin lankaryhmään B kuuluvaa lankaa, jotta saisit siistin lopputuloksen. Kun korvaat tietyn langan toisella langalla on tärkeää, että lasket lankojen metrimäärän, jotta saat kerralla ostettua oikean määrän lankaa.
09.07.2018 - 17:45
![]() Carolina wrote:
Carolina wrote:
Hej! Tack för ett fint mönster! Jag är nu på oket när man sätter i ärmarna på samma sticka som fram-och bakstycke, men förstår inte hur jag ska kunna fortsätta med mönstret över ärmarna då ena varvet blir avigt eftersom koftan stickas fram och tillbaka på stickan. Ska jag sticka mönstret från det aviga varvet och hur löser jag det? Tacksam för svar!
06.09.2017 - 00:13DROPS Design answered:
Hej Carolina, nej du måste se till at sätta ihop arbetet så du stickar mönservarvet på rätsidan och diagrammet stickas då X=rm från avigsidan och tom ruta = am från avigsidan. Lycka till!
07.09.2017 - 09:05
![]() Nicole wrote:
Nicole wrote:
Bojour Pour le raglan Vous dites de diminuer trois. Maille avant donc ont commence les diminution à la 6em maille sinon ça me fait un trous entre les marqueur meci de vos aides
23.01.2017 - 15:42DROPS Design answered:
Bonjour Nicole, on commence à diminuer 3 m avant le marqueur comme expliqué ci-dessous et dans la vidéo, on va avoir: 1 diminution, 1 m, le marqueur, 1 m, 1 diminution. et ce, à chaque raglan. Bon tricot!
23.01.2017 - 15:45
![]() NICOLE wrote:
NICOLE wrote:
Bonjour je voulais savoir si le dos des manche était au point mousse (jersey envers ) étant donnée que les 6 maille de chaque coté le la manche était en maille envers ainsi que toutes les augmentations je vous remercie de votre explications
04.10.2016 - 22:51DROPS Design answered:
Bonjour Nicole, on tricote bien en jersey envers (pas au point mousse) de chaque côté de A.1, soit à l'envers tous les tours - les augmentations au milieu sous la manche se font aussi en jersey envers (pas au point mousse). Bon tricot!
05.10.2016 - 08:44
|
|||||||||||||||||||
Angela Cardigan#angelacardigan |
|||||||||||||||||||
 |
 |
||||||||||||||||||
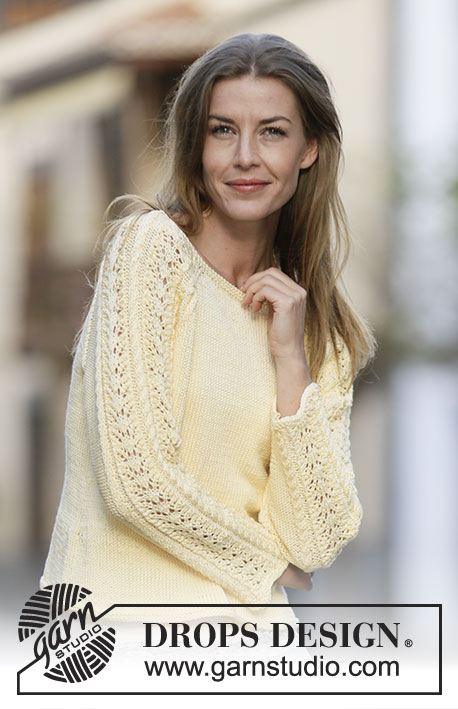
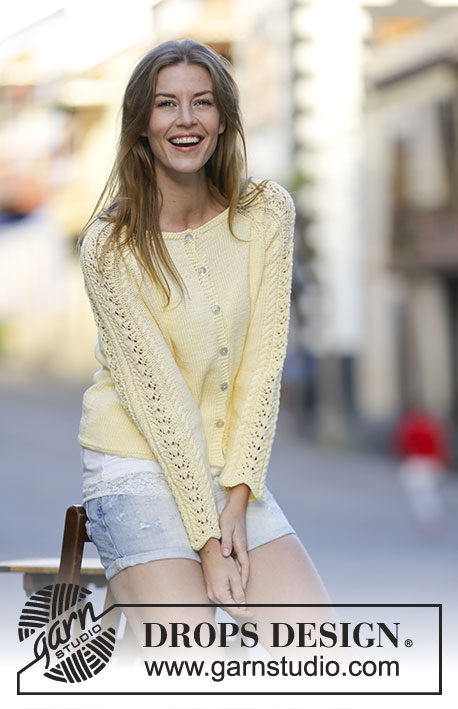
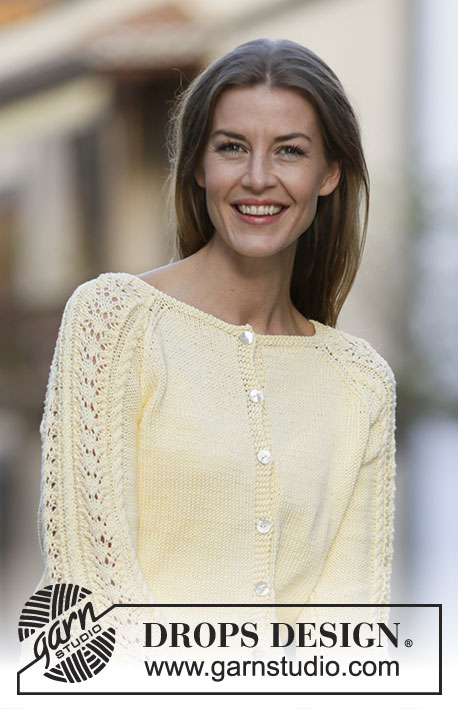
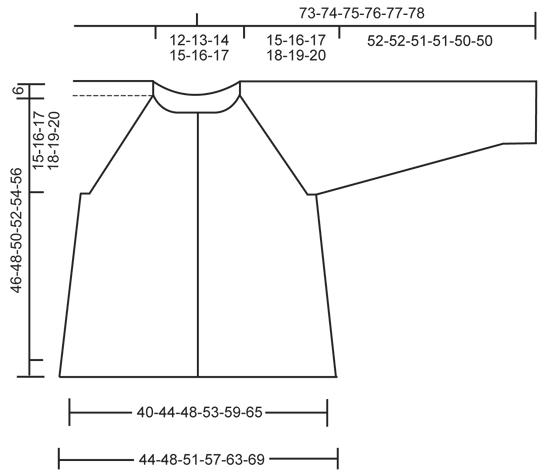
Knitted DROPS jacket with lace pattern and raglan in ”Muskat”. Size: S - XXXL.
DROPS 159-28 |
|||||||||||||||||||
|
GARTER ST (back and forth): K all rows. 1 ridge = K2 rows. GARTER ST (worked in the round): * K 1 round and P 1 round *, repeat from *-*. 1 ridge = 2 rounds. PATTERN: See diagram A.1. The diagrams show all rows in pattern seen from RS. RAGLAN: Dec 2 sts in every transition between body and sleeves. Dec as follows from RS: Beg 3 sts before marker and work as follows: K 2 tog, K 2 (marker is between these 2 sts), slip 1 st as if to K, K 1, psso. Dec as follows from WS: Beg 3 sts before marker and work as follows: P 2 twisted tog, P 2 (marker is between these 2 sts), P 2 tog. BUTTONHOLES: Dec for buttonholes on right band from RS. 1 buttonhole = K tog 3rd and 4th st from mid front, then make 1 YO. Dec for buttonholes when piece measures: SIZE S: 8, 15, 22, 29, 36 and 44 cm / 3", 6", 8¾", 11½" 14¼", 17¼" SIZE M: 8, 15, 22, 30, 38 and 46 cm / 3", 6", 8¾", 11¾",15", 18". SIZE L: 8, 16, 24, 32, 40 and 48 cm / 3", 6¼", 9½", 12½", 15¾", 19". SIZE XL: 8, 16, 24, 32, 41 and 50 cm / 3", 6¼", 9½", 12½", 16", 19¾". SIZE XXL: 8, 16, 25, 34, 43 and 52 cm / 3", 6¼", 9¾", 13½", 17", 20½". SIZE XXXL: 9.18, 27, 36, 45 and 54 cm / 3½", 7", 10½", 14¼", 17¾", 21¼" --------------------------------------------------------- JACKET: Worked back and forth on circular needle. Cast on 194-210-226-250-274-298 sts (includes 5 band sts in each side) on circular needle size 3.5 mm / US 4 with Muskat. Work 2 ridges in GARTER ST - see explanation above. Switch to circular needle size 4 mm / US 6. Insert 2 markers in the piece; 51-55-59-65-71-77 sts in from each side (back piece = 92-100-108-120-132-144 sts). Continue in stockinette st with 5 st in garter st in each side (= band). When piece measures 6 cm / 2⅜", dec 1 st on each side of markers, repeat dec every 7-7-8-8-9-9 cm / 2¾"-2¾"-3⅛"-3⅛"-3½"-3½" 3 more times = 178-194-210-234-258-282 sts. When piece measures 8 cm / 3⅛", dec for BUTTONHOLE on right band - see explanation above. When piece measures 31-32-33-34-35-36 cm / 12¼"-12½"-13"-13⅜"-13¾"-14¼", bind off for armholes in each side as follows: Work until 4 sts remain before first marker in the side, bind off the next 8 sts, work until 4 sts remain before marker in the other side, bind off the next 8 sts and work the rest of row. There are now 76-84-92-104-116-128 sts on back piece and 43-47-51-57-63-69 sts on each front piece. Put piece aside and knit the sleeves. SLEEVE: Worked in the round on double pointed needles. Cast on 56-58-60-62-64-66 sts on double pointed needles size 3.5 mm / US 4 with Muskat. Work 2 ridges in garter st - see explanation above. Switch to double pointed needles size 4 mm / US 6. Insert 1 marker at the beg of round. Then work as follows: P 5-6-7-8-9-10, A.1 (= 21 sts) 2 times, work the first 4 sts in A.1, P 5-6-7-8-9-10. Continue this pattern upwards AT THE SAME TIME when piece measures 8 cm / 3⅛", inc 1 st on each side of marker. Inc every 3-2½-2½-2-2-2 cm / 1⅛"-⅞"-⅞"-¾"-¾"-¾" 15-16-17-18-19-20 times in total = 86-90-94-98-102-106 sts. P the inc sts. When piece measures 52-52-51-51-50-50 cm / 20½"-20½"-20"-20"-19¾"-19¾" NOTE! Shorter measurements in the larger sizes because of longer sleeve cap and wider shoulders) bind off the 4 sts on each side of marker = 78-82-86-90-94-98 sts. Put piece aside and make another sleeve. YOKE: Slip sleeves on to same circular needle as body where armholes were bound off = 318-342-366-398-430-462 sts. Insert 1 marker in all transitions between sleeves and body (= 4 markers). Continue in stockinette st over sts on body and pattern and P as before on sleeve, AT THE SAME TIME on next row from RS beg dec for RAGLAN – see explanation above (= 8 sts dec). Repeat dec every other row 20-21-22-22-23-24 more times and then every row 3-4-5-7-8-9 times, on last dec for raglan also dec 8 sts evenly over A.1 on each sleeve. After all dec for raglan 118-126-134-150-166-182 sts remain on needle. Switch to circular needle size 3.5 mm / US 4. Work 2 ridges while AT THE SAME TIME on first row dec 8-14-18-28-40-52 sts evenly = 110-112-116-122-126-130 sts. Bind off. ASSEMBLY: Sew the opening under the sleeves. Sew the buttons on to the left band. |
|||||||||||||||||||
Diagram explanations |
|||||||||||||||||||
|
|||||||||||||||||||
 |
|||||||||||||||||||
 |
|||||||||||||||||||
Have you finished this pattern?Tag your pictures with #dropspattern #angelacardigan or submit them to the #dropsfan gallery. Do you need help with this pattern?You'll find 31 tutorial videos, a Comments/Questions area and more by visiting the pattern on garnstudio.com. © 1982-2026 DROPS Design A/S. We reserve all rights. This document, including all its sub-sections, has copyrights. Read more about what you can do with our patterns at the bottom of each pattern on our site. |
|||||||||||||||||||


With over 40 years in knitting and crochet design, DROPS Design offers one of the most extensive collections of free patterns on the internet - translated to 17 languages. As of today we count 324 catalogs and 12290 patterns - 12280 of which are translated into English (US/in).
We work hard to bring you the best knitting and crochet have to offer, inspiration and advice as well as great quality yarns at incredible prices! Would you like to use our patterns for other than personal use? You can read what you are allowed to do in the Copyright text at the bottom of all our patterns. Happy crafting!
Post a comment to pattern DROPS 159-28
We would love to hear what you have to say about this pattern!
If you want to leave a question, please make sure you select the correct category in the form below, to speed up the answering process. Required fields are marked *.