
Popular categories
Looking for a yarn?


Comments / Questions (33)
![]() Yvonne wrote:
Yvonne wrote:
Wordt de trappelzak ook aan de onderkant dicht genaaid
08.11.2024 - 11:55DROPS Design answered:
Dag Yvonne,
Ja, de trappelzak wordt ook aan de onderkant dicht genaaid.
10.11.2024 - 13:37
![]() Beate wrote:
Beate wrote:
Når det står legg opp til masker i slutten av hver pinne (str 86/92). Skal det da være igjevnt? (4 m en gang, 5 m to ganger, og 12 m en gang? Da vil jeg få 9m den ene siden og 17 den andre siden, for å så dele 31-26-31 m bak i nakken.
30.07.2024 - 09:15DROPS Design answered:
Hei Beate, Du skal gjenta hver instruks på hver side, slik at det er jevnt. Så først 4 masker på slutten av de første 2 pinnene, deretter 5 masker på slutten av de neste 4 pinnene og 12 masker på slutten av neste 2 pinnene. God fornøyelse!
31.07.2024 - 09:09
![]() Khismeya wrote:
Khismeya wrote:
Pattern looks nice will be trying it in a while will comment again thank you
15.05.2024 - 09:08
![]() Weronika wrote:
Weronika wrote:
Witam :) Znów prośba o pomoc :) Lewy przód: „Dalej przer. 2 rz., W TYM SAMYM CZASIE zacząć przer. dżersejem z oczkami obszycia przodu ściegiem francuskim..” czyli po przerobieniu wszystkich o. ściegiem francuskim nast. 2 rz. robię jak wcześniej, czyli 6 o. ściegiem fran. a 13 pozostałych o. dżersejem? Z tym że w 1szym rz. dodaje równomiernie 2 o.? Np. 1 dodatkowe o. co 9 o.?
07.09.2021 - 21:00DROPS Design answered:
Witaj Weroniko, Po przerobieniu wszystkich o. ściegiem francuskim, 2 następne rzędy przerabiasz jak wcześniej czyli dżersejem, z 6 oczkami ściegiem francuskim od środka przodu. Ponad oczkami dżersejem dodajesz 2 oczka dokładnie tak jak piszesz. Wszystko doskonale zrozumiałaś :) Pozdrawiamy!
08.09.2021 - 14:46
![]() Weronika wrote:
Weronika wrote:
A na co są te dziurki które powstaną po przerobieniu narzutów? Na sznurek od pomponów?
31.08.2021 - 14:49DROPS Design answered:
Witaj Weroniko, przerabiasz oczko przekręcone w miejscu narzutu, właśnie po to aby uniknąć dziur w tym miejscu. Tak czy inaczej mała dziurka pozostanie. Jeśli w tym miejscu pasuje ci dołączyć sznurek do pompona to super. Pozdrawiamy i miłej pracy!
01.09.2021 - 10:22
![]() Weronika wrote:
Weronika wrote:
Czyli mam dodać 1 o. przed 6 o. robionymi ściegiem francuskim i znów 1 o. zaraz po ściegu francuskim a dalej przerabiać dżersejem? A na lewej str to narzucone oczko przerobić na mniejsza czy większa dziurkę? I po co są w tym miejscu dziurki? Na sznurek od pomponów? Przepraszam ale kompletnie nie rozumiem tego objaśnienia i nie wiem jak się za to zabrać :(
30.08.2021 - 18:35DROPS Design answered:
Witaj Weroniko, Tym razem ja namieszałam, przepraszam: a więc: LEWY PRZÓD: masz dodać tylko 1 o. w odl. 6 o. ściegiem francuskim od brzegu od strony dekoltu w nast. rzędzie na prawej stronie robótki. Przer. 1 rz. na lewej stronie robótki i powt. dodawanie o. w nast. rzędzie na prawej stronie robótki (znów dodajesz tylko 1 o. od strony dekoltu za 6 oczkami ściegiem francuskim). Przer. 1 rz. na lewej stronie robótki i na końcu rzędu nabrać 7-7-8 (8-8) o. od środka przodu (zobacz schematyczny rysunek, to będzie ta patka z przodu). Narzut przerabiasz przekręcony (patrz DODAWANIE OCZEK). Pozdrawiamy!
31.08.2021 - 14:21
![]() Weronika wrote:
Weronika wrote:
„1 o. w odl. 6 o. ściegiem francuskim..” - najpierw mam zrobić 6 o. ściegiem francuskim jak we wcześniejszych rzędach, a potem dodawać 1 o. co 6 o. dżersejem i tak przez 3 nast. rzędy na prawej str?
30.08.2021 - 13:22DROPS Design answered:
Witaj Weroniko, masz dodać 1 o. w odl. 6 o. ściegiem francuskim od brzegu od strony dekoltu (dodane 2 oczka, czyli po 1 z każdej strony dekoltu) w nast. rzędzie na prawej stronie robótki, - PATRZ DODAWANIE OCZEK. Przer. 1 rz. na lewej stronie robótki i powt. dodawanie o. w nast. rzędzie na prawej stronie robótki (2-gi raz dodajesz 2 oczka). Przer. 1 rz. na lewej stronie robótki i na końcu rzędu nabrać 7-7-8 (8-8) o. od środka przodu.. Pozdrawiamy!
30.08.2021 - 16:44
![]() Weronika wrote:
Weronika wrote:
Znów mam prośbę o udzielenie pomocy. Mianowicie napisane jest by „ nabrać oczka na rękawy z każdej strony, na końcu każdego rzędu następująco: 1 razy 4 o., 1-1-1 (2-2) razy 5 o. i 1 raz 9-10-12 (12-16) o. = 68-74-82 (94-106) o.” Nie bardzo rozumiem o co tu chodzi. Najpierw mam nabrać w jednym rzędzie po 4 o, w następnym 5 o, a w trzecim 9 o z każdej strony? Ten rękaw nie będzie wtedy mieć takiej „schodkowej” krawędzi zamiast gładkiej?
26.08.2021 - 22:50DROPS Design answered:
Witaj Weroniko, jako że to dodawanie oczek na rękawy jest wykonywane rząd po rzędzie to schodki nie będą widoczne. Aby zminimalizować jeszcze bardziej to ryzyko, zawsze ostatnie dodane oczko przerabiaj bardziej ścisło (zaciągaj mocniej nitkę po wykonaniu tego oczka). Miłej pracy i pozdrawiamy!
27.08.2021 - 08:47
![]() Weronika wrote:
Weronika wrote:
Witam :) zamieniłam włóczkę ze wzoru na C+C (dokładnie big merino) i zastanawiam się jakich drutów powinnam użyć? Nadal 8mm jak podane jest we wzorze czy mniejszych, np 5mm jak podane jest na włóczące big merino? Będę wdzięczna za podpowiedź :) Pozdrawiam
23.08.2021 - 22:17DROPS Design answered:
Witaj Weroniko, rozumiem, że zamierzasz przerabiać 2 nitkami włóczki DROPS Big Merino zamiast 1 nitką włóczki DROPS Snow. Najpierw musisz wykonać próbkę na drutach nr 8 (jak we wzorze). Jak będzie ok, to przerabiasz na tych drutach. Jak nie to próbuj na rozmiar mniejszych/większych w zależności od tego co uzyskasz. Pozdrawiamy!
24.08.2021 - 09:05
![]() Claudine wrote:
Claudine wrote:
Bonjour, Je pense qu'il y a un problème dans les explications du dos.. Il est indiqué qu'à 45 cm le nombre de maille est de 36 mailles pour la taille 6/9 mois. A 54 cm on augmente 1 fois 4 m, 1 fois 5 met 1 fois 10 mailles (soit 19 augmentations) ce qui fait donc 55 mailles au total or vous indiquez 74 m ce qui correspond à la suite des explications. Merci de bien vouloir me préciser où est l'erreur. Bonne soirée
18.02.2021 - 18:32DROPS Design answered:
Bonjour Claudine, vous devez monter le même nombre de mailles de chaque côté pour les manches, autrement dit, montez 4 mailles à la fin des 2 rangs suivants, 5 mailles à la fin des 2 rangs suivants, et 10 mailles à la fin des 2 rangs suivants = 36 +8+10+20= 74 m. Et vous avez le même nombre de mailles pour chaque manche (= 4+5+10). Bon tricot!
19.02.2021 - 07:31
|
|
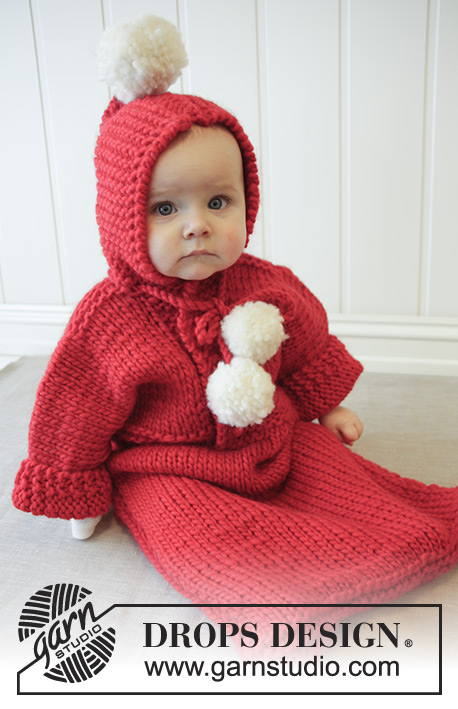
The First Noel#thefirstnoelbuntingbag |
|
 |
 |
Knitted bunting bag for baby and children in DROPS Snow. Piece is worked with hood and pompoms. Size 1 month - 4 years. Theme: Christmas
DROPS Extra 0-1052 |
|
|
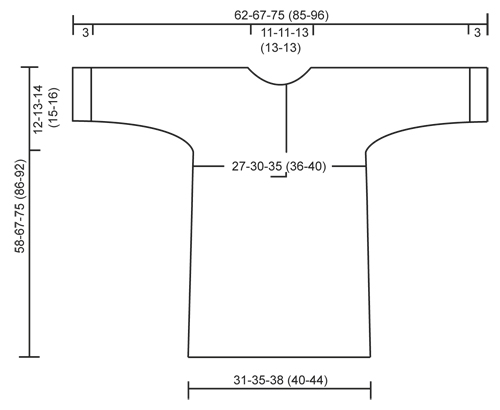
GARTER ST (back and forth): K all rows. 1 ridge = K2 rows. INCREASE TIP: Inc by making 1 YO. On next round work YO twisted, i.e. work in the back loop of st, to avoid holes. HOLE FOR SEAT BELT IN CAR SEAT: You can make a hole at the front and back for the belt in the car seat. Make the first hole on back piece when piece measures approx. 16-20-23 (28-33) cm / 6¼"-8"-9" (11"-13") (or desired measurements) by binding off the middle 4 sts on needle. On next row cast on 4 new sts over the bind off sts and continue as before. Repeat on front piece when piece measures from shoulder 42-47-52 (58-59) cm / 16½"-18½"-20½" (22¾"-23¼"). BUTTONHOLES: Dec for buttonholes on right band. 1 buttonhole = bind off third st from mid front and cast on 1 new st over the bound off st on next row. Dec for buttonholes when band measures: SIZE 1/3 months: 1, 6, 10, 14 and 19 cm / ½",2½",4", 5½" and 7½" SIZE 6/9 months: 1, 5, 10, 15 and 20 cm / ½",2",4",6" and 8" SIZE 12/18 months: 1, 6, 11, 16 and 21 cm / ½",2½",4½",6¼" and 8¼" SIZE 2 years: 1, 7, 12, 17 and 22 cm / ½",2¾",4¾",6¾" and 8¾" SIZE 3/4 years: 1, 6, 10, 14, 18 and 23 cm / ½",2½",4", 5½",7" and 9". ---------------------------------------------------------- BUNTING BAG: Work bag in one - beg at bottom of back piece, cast on sts for sleeve, dec for neck and finish at the bottom of front piece. Worked back and forth on a circular needle to make room for all the sts. If you want you can make a HOLE FOR SEAT BELT IN CAR SEAT - see explanation above. BACK PIECE: Cast on 36-40-44 (46-50) sts (includes 1 edge st in each side) on circular needle size 8 mm / US 11 with Christmas red. Work 3 ridges in garter st - SEE EXPLANATION ABOVE. Continue in stockinette st until piece measures 37-45-52 (62-67) cm / 14½"-17¾"-20½" (24½"-26½") – AT THE SAME TIME on last row dec 4 sts evenly = 32-36-40 (42-46) sts. REMEMBER THE GAUGE! Work 3 ridges over all sts, continue in stockinette st. When piece measures 46-54-61 (71-76) cm / 18"-21¼"-24" (28"-30"), cast on new sts in each side for sleeves. Cast on sts at the end of every row: 4 sts 1 time, 5 sts 1-1-1 (2-2) times and 9-10-12 (12-16) sts 1 time = 68-74-82 (94-106) sts. Work the new sts in stockinette st. NOTE! After last inc work the outermost 3 sts in each side (= at the bottom of sleeve) in garter st. When piece measures 54-63-71 (82-88) cm / 21¼"-24¾"-28" (32¼"-34½"), continue as follows: 3 sts in garter st, 19-22-25 (31-37) sts in stockinette st, 24-24-26 (26-26) sts in garter st (= back of neck), 19-22-25 (31-37) sts in stockinette st, 3 sts in garter st. When 3 ridges have been worked over sts in the back of neck, bind off the middle 12-12-14 (14-14) sts for neck and finish each side separately. Slip sts in the right side on 1 stitch holder. LEFT FRONT PIECE: = 28-31-34 (40-46) sts. Continue in stockinette st with 6 sts in garter st towards the neck and 3 sts in garter st at the bottom of sleeve. When piece measures 58-67-75 (86-92) cm / 22¾"-26½"-29½" (34"-36¼"), insert 1 marker = mid on top of shoulder - NOW MEASURE PIECE FROM HERE! Work as before. When piece measures 1-1-2 (2-2) cm / ½"-½"-¾" (¾"-¾"), inc 1 st towards the neck on next row from RS inside 6 sts in garter st - see INCREASE TIP. Work 1 row from WS and repeat inc on next row from RS. Work 1 row from WS, at the end of this row cast on 7-7-8 (8-8) new sts towards mid front = 37-40-44 (50-56) sts. Work 1 ridge in garter st over the 7-7-8 (8-8) new sts, work the other sts as before. Then work in stockinette st with 6 sts in garter st towards mid front (= band) and 3 sts in garter st at the bottom of sleeve. When piece measures 8-9-10 (11-12) cm / 3"-3½"-4" (4½"-4¾"), bind off sleeve sts, bind off in the side at beg of row as follows: 9-10-12 (12-16) sts 1 time, 5 sts 1-1-1 (2-2) times and 4 sts 1 time = 19-21-23 (24-26) sts. Continue in stockinette st with 6 band sts until piece measures approx. 18-19-20 (21-22) cm / 7"-7½"-8" (8¼"-8¾") (fold the piece double at the marker on shoulder and make sure to work same no of row in stockinette st on back and front piece) – adjust so that next row is worked from RS. Work 3 ridges in garter st over all sts. Work 2 rows while continuing stockinette st and band sts in garter st – AT THE SAME TIME on 1st row inc 2 sts evenly (do not inc over band) = 21-23-25 (26-28) sts. Slip sts on a stitch holder. RIGHT FRONT PIECE: Slip the stitches on the stitch holder back on needle (= 28-31-34 (40-46) sts) and work as left front piece but reversed. Then slip sts from left front piece on to same needle = 42-46-50 (52-56) sts. On next row (= RS) dec band sts tog as follows: Work in stockinette st over the first 15-17-19 (20-22) sts, slip 6 band sts from right front piece on a cable needle in front of piece, * K 1 st from cable needle tog with 1 st from left band *, repeat from *-* 6 times = 6 sts dec, then work in stockinette st the rest of row = 36-40-44 (46-50) sts. Continue in stockinette st over all sts. When piece measures approx. 55-64-72 (83-89) cm / 21½"-25¼"-28½" (32¾"-35") (fold piece at the marker on the shoulder and make sure that front and back pieces are the same length except the 3 bottom ridges on back piece). Work 3 ridges in garter st over all sts. LOOSELY bind off. ASSEMBLY: Fold piece double at the shoulder and sew under arm and side seams inside 1 edge st. Sew cast-on edge to bind-off edge at the bottom of back - sew edge to edge to avoid a chunky seam.Sew buttons on left front piece. HOOD: Pick up 37-39-41 (45-47) sts with Christmas red on circular needle size 8 mm / US 11 around the neck (beg mid front and pick up in outer loops of edge sts from RS). Work in garter st back and forth on needle until hood measures 18-20-22 (24-26) cm / 7"-8"-8¾" (9½"-10¼"). LOOSELY bind off. Sew hood tog edge to edge at the top. POMPOMS AND TIE: Make 2 small pompoms in off white with a diameter of approx. 6 cm / 2½" and 1 large pompom with a diameter of 8 cm / 3". Pompoms should not be too compact. Cut 1 strand of approx. 1 m, fold it double and twine the strand. Fasten tie to 1 small pompom, sew the other end to band by first threading it through band. Make another the same way but fasten in the opposite band. Fasten the large pompom at the top of hood. Fold the sleeves if necessary. |
|
 |
|
Have you finished this pattern?Tag your pictures with #dropspattern #thefirstnoelbuntingbag or submit them to the #dropsfan gallery. Do you need help with this pattern?You'll find 28 tutorial videos, a Comments/Questions area and more by visiting the pattern on garnstudio.com. © 1982-2026 DROPS Design A/S. We reserve all rights. This document, including all its sub-sections, has copyrights. Read more about what you can do with our patterns at the bottom of each pattern on our site. |
|


With over 40 years in knitting and crochet design, DROPS Design offers one of the most extensive collections of free patterns on the internet - translated to 17 languages. As of today we count 324 catalogs and 12291 patterns - 12281 of which are translated into English (US/in).
We work hard to bring you the best knitting and crochet have to offer, inspiration and advice as well as great quality yarns at incredible prices! Would you like to use our patterns for other than personal use? You can read what you are allowed to do in the Copyright text at the bottom of all our patterns. Happy crafting!
Post a comment to pattern DROPS Extra 0-1052
We would love to hear what you have to say about this pattern!
If you want to leave a question, please make sure you select the correct category in the form below, to speed up the answering process. Required fields are marked *.